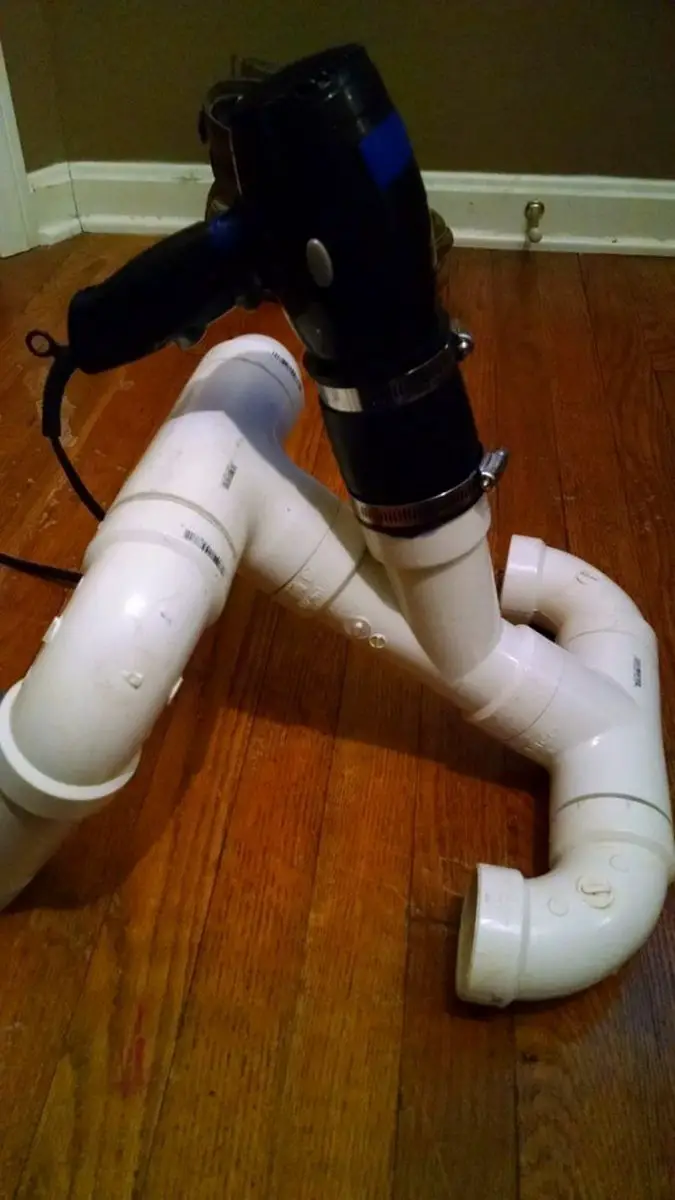
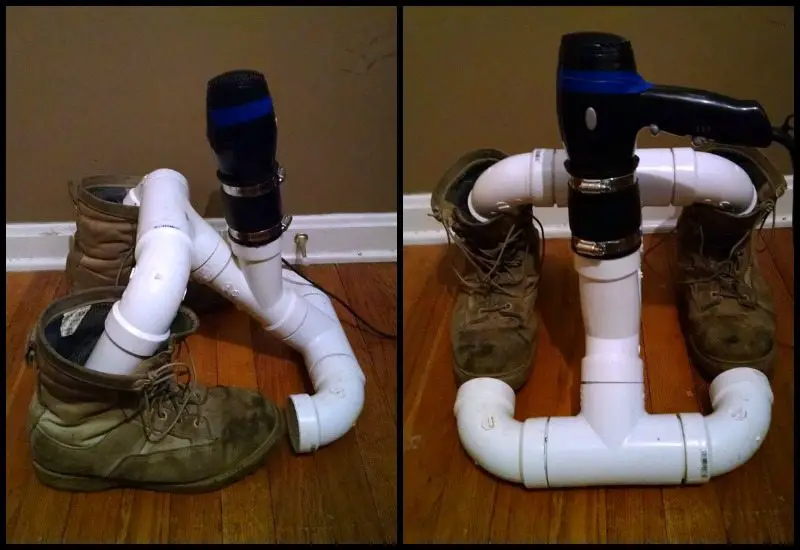
Add the fernco and a hairdryer, then tighten the clamps.

Having a non-glued connection on the rest of the parts allows the boot dryer to be adjusted to different sizes of boots, shoes, gloves, hats, etc. It also allows it to be torn down and stored.
The hairdryer attached to the Y is directional, so whatever you think will take longer to dry you want to point the hairdryer towards.
There are four settings on the hairdryer: high, low, cool high, and cool low. In order to use the cool air functions, you have to tape the cool button in the on position and select the high or low setting.
I made this boot dryer two years ago. I have used all the settings and the PVC has held up beautifully.
The only complaint I can give you is that it isn’t quiet but it dries fairly quickly!
Could you use one of these in your home?
Thanks to
Contents
Safety Tips for Using Your Boot Dryer
When you’re using a homemade boot dryer, it’s crucial to keep safety at the forefront to prevent any mishaps. Here are some straightforward tips to help ensure your boot dryer operates safely, especially when it incorporates a hairdryer for heat.
Keep a Close Watch
It’s a bad idea to leave your boot dryer running unattended. Hairdryers can easily overheat if left on for too long. Make it a point to check on it periodically to ensure it’s not getting excessively hot.
Check Your Wiring
Before every use, take a moment to check that the hairdryer’s cable and all electrical connections are intact and not frayed. Using a hairdryer with damaged wires can be a recipe for electrical hazards or even a fire.
Ventilate the Area
Always use your boot dryer in a place with good airflow. This helps prevent overheating and reduces any potential fumes from the PVC or glue used in your dryer’s construction.
Keep the Area Clear
Make sure there’s nothing flammable near your boot dryer when it’s on. The heat from the hairdryer can quickly ignite these materials. Keep things like papers, cleaning solvents, or other flammable items well away from the drying area.
Inspect Regularly
Frequently check your boot dryer for any signs of damage or wear, especially at the joints and where the hairdryer connects to the PVC. If something looks off, fix it right away to avoid any problems.
Stick to the Guidelines
Always follow the safety guidelines provided by the hairdryer manufacturer. If your hairdryer has safety features like automatic shutoffs, ensure they are functioning correctly.
Following these simple guidelines can help keep your boot dryer a safe and valuable tool for drying your footwear. Safety first is your mantra to make the most out of this handy DIY project!
Exploring Different Ways to Build a Boot Dryer
If you’re looking to make a boot dryer, you don’t have to stick to the usual PVC and hairdryer setup. There are plenty of other materials and methods you can use that might better fit what you have on hand or what you’re trying to accomplish.
Let’s go through some creative alternatives that can spice up your project.
Try Metal Instead of PVC
Metal pipes, like aluminum or even lightweight steel, are great alternatives to PVC. They’re tough and can handle a bit more heat without bending out of shape. If you’re handy with tools, you can cut metal pipes to size and join them with screws, which makes for a really sturdy dryer.
Look Around Your House
You might be surprised by what you can repurpose to make a part of your boot dryer. For example, old vacuum cleaner hoses are flexible and perfect for directing air right where it needs to go. You could also use parts from broken fans or other appliances to help circulate air.
Consider Using Wood
If you’re more comfortable working with wood, you can build a simple frame from planks or dowels. Design it so you can hang boots upside down, and maybe attach a small fan at the bottom to push warm air up through the boots.
Go for Greener Heating Options
Instead of a hairdryer, think about using other types of heaters that might be safer and use less energy. Ceramic heaters are one option—they give off a steady, controlled heat that’s less likely to damage delicate materials.
Build a Solar-Powered Dryer
If you live somewhere sunny, a solar-powered dryer could be a cool project. Use pipes painted black to absorb solar heat. This setup uses no electricity, so it’s super eco-friendly.
Make It Adjustable
It could be really handy to make your dryer adjustable, especially if you have different types and sizes of boots. Design it with parts that can be moved around or adjusted easily. This way, you can switch things up depending on whether you’re drying small children’s shoes or hefty adult boots.
Each of these ideas lets you tailor your boot dryer project to fit your needs and what you like to work with. Plus, it’s just fun to try out new materials and see what you can come up with.
Design Variations for Different Footwear
A one-size-fits-all approach doesn’t always work when it comes to drying footwear. Different types of shoes and boots may require specific features in a boot dryer to ensure they dry effectively without damage. Here are some design variations that can help you customize your DIY boot dryer to handle everything from delicate shoes to bulky winter boots.
Adjustable Width and Height
To accommodate everything from narrow children’s shoes to wide men’s boots, consider building a boot dryer with adjustable width. This can be achieved by using sliding components or telescopic pipes that allow you to easily change the size of the dryer. Adding adjustable height features will also let you dry taller boots without them bending or folding over.
Gentle Heat for Delicate Shoes
For more delicate shoes, like leather dress shoes or suede boots, it’s important to avoid high heat that can warp or crack the material. Design a version of your boot dryer that uses a lower heat setting or incorporates a fan to circulate room-temperature air, which can gently remove moisture without risking damage to sensitive materials.
High Capacity Designs
If you have a family or need to dry multiple pairs of shoes at once, consider a high-capacity dryer design. This could involve multiple branches or ports from a central air source, allowing you to dry several pairs of shoes simultaneously. Ensure that each branch delivers an even flow of air to maintain efficient drying for all items.
Quick-Dry Features for Active Lifestyles
For those who need their footwear ready to go in a hurry, a quick-dry feature can be crucial. Incorporate high-speed fans or boosted heat settings that can be toggled on when time is short. Just make sure these features are used with appropriate footwear to avoid damage.
Specialized Attachments for Accessories
Not just for shoes and boots, your dryer can also be designed to handle accessories like gloves, hats, and even bags. Create attachments or adapters that can direct the flow of air into smaller, more confined spaces, ensuring that all your gear can be dried effectively.
By considering these design variations, your DIY boot dryer can be customized to meet the specific needs of different types of footwear and accessories. This not only makes your device more versatile but also ensures that you can extend the life and maintain the condition of your favorite shoes and boots.
Conclusion
Creating a customized boot dryer offers a practical solution for keeping your footwear in top condition, free from moisture and odors. With a range of designs adaptable for different types and sizes of shoes, this DIY project adds both functionality and a personal touch to your home utilities. Consider these guidelines and ideas to build a boot dryer that meets your specific needs, ensuring your gear is dry and ready for any adventure.
We have more projects to organize your footwear. Check out our horseshoe boot rack guide next!


