By guest blogger, Steve Mason
I woke up one Saturday with no plans for the day. Whilst drinking my morning coffee and going through Facebook, I saw a picture of a man making his daughter a fairy house DIY craft from a log with a chainsaw. I thought that would be perfect for my daughter’s 8th birthday present.
Contents
Crafting the Fairy House Lamp
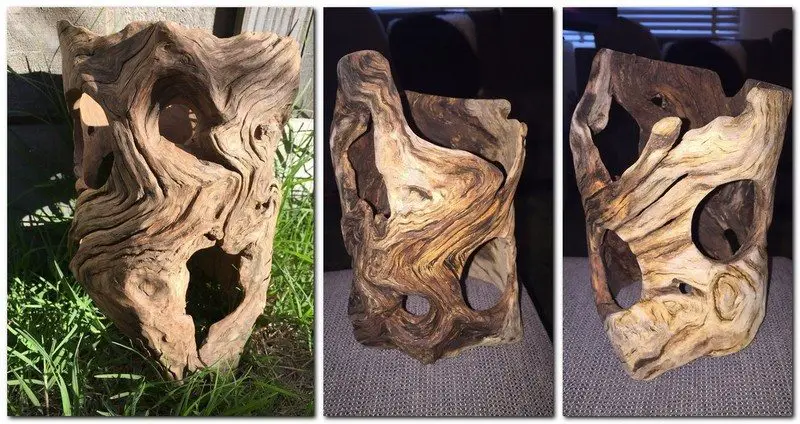
I jumped on gumtree.com and found hollow logs for sale not far from home. I went out almost immediately, picked three beautiful logs, and then spent the next two days cleaning one of them up with the Dremel.
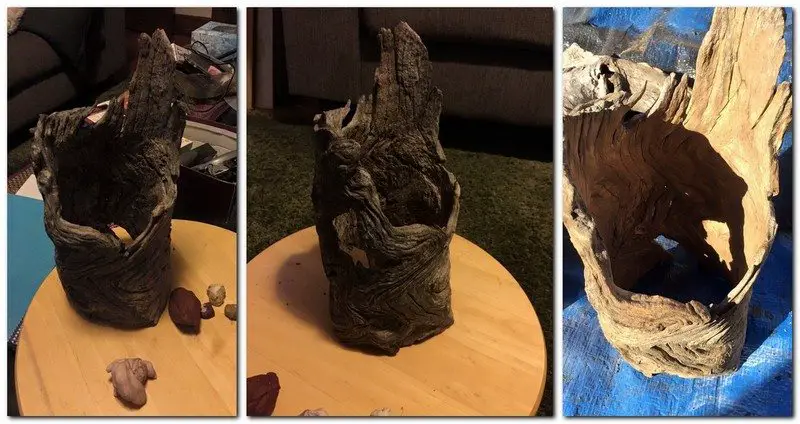
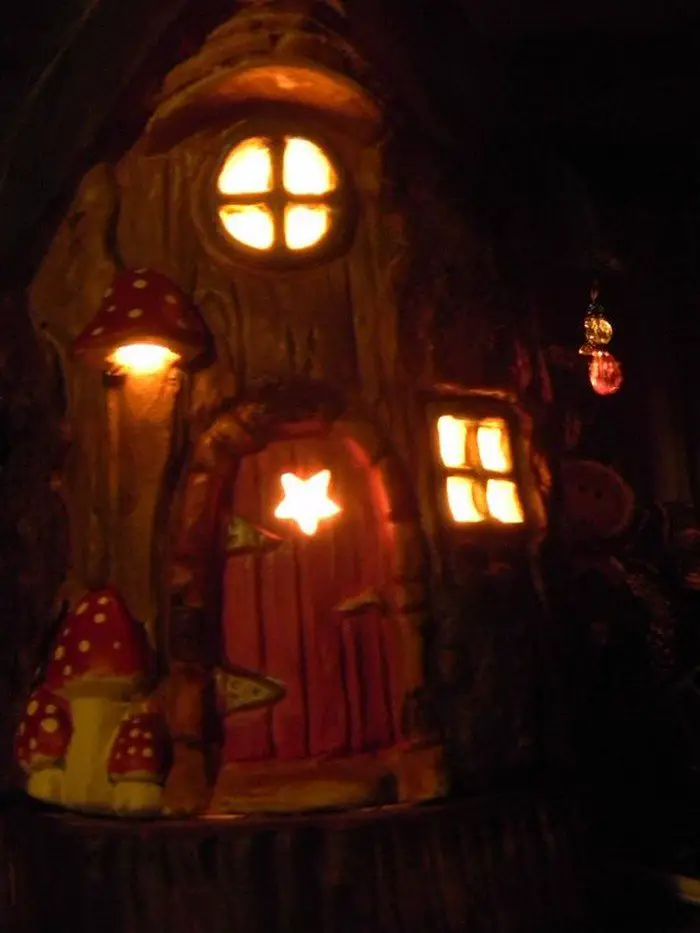
I had an idea that I wanted a window and a door, so I used a drill with a hole cutter bit to randomly cut shapes. I also used a few different sized drill bits to randomly make holes, knowing that light would only really escape from these gaps.
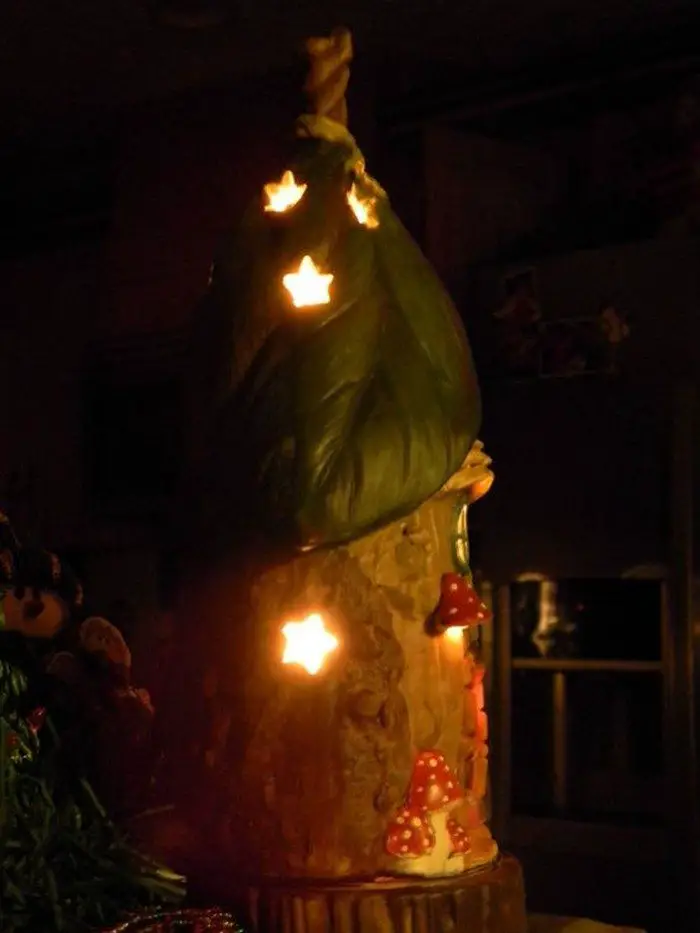
It was now time to test with some light inside to begin dreaming of what may be and get some inspiration…
Click on any image to start the lightbox display. Use your Esc key to close the lightbox.![]()


I mounted it on polystyrene shapes from the spotlight which I glued together and cut out space for the underneath mechanics of the lamp baton. I cut a piece of plywood to secure the lamp holder in place and glued it to the polystyrene. I then carefully sculpted out a recess for the timber to comfortably sit inside of it and not wobble or move.
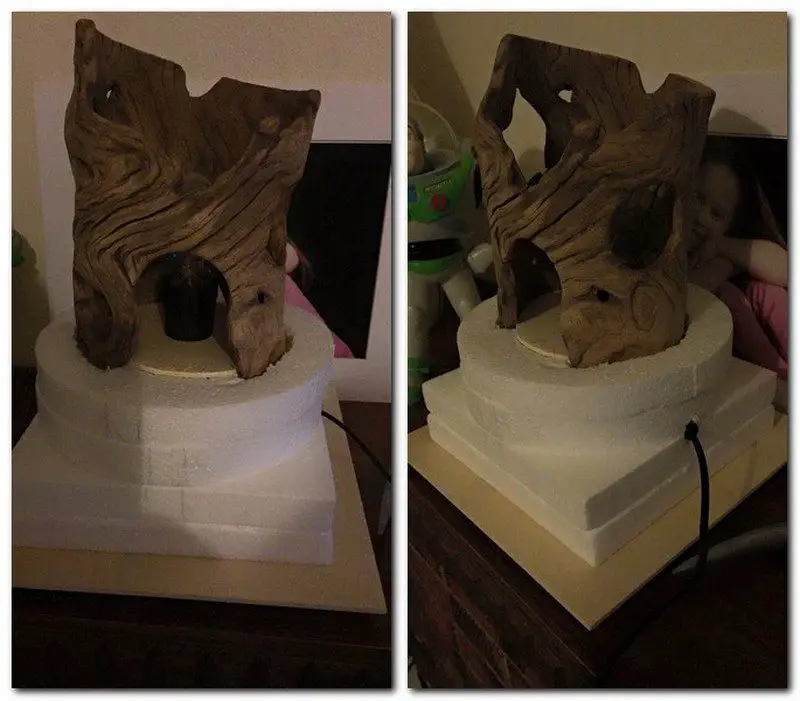
I drilled a hole through the polystyrene at the side for the chord to poke out.
It was time to switch it on to get inspiration!

Now that the ‘skeleton’ of my overall sculpture was formed, it was time to focus on the landscape…
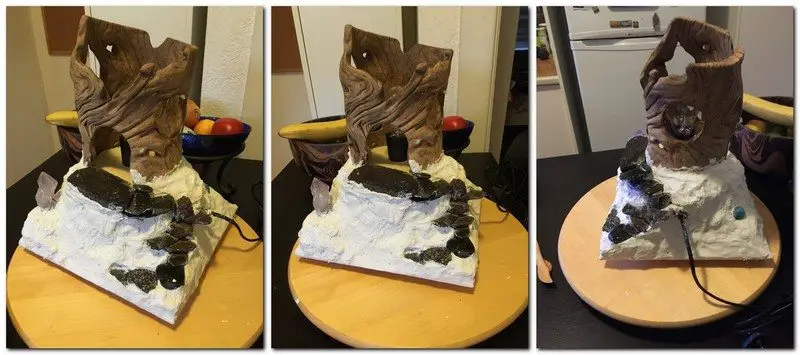
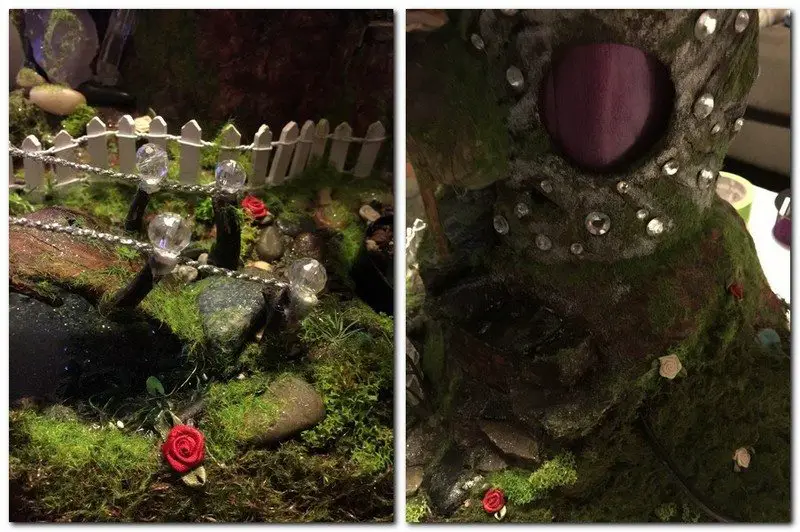
I knew I wanted stairs up a hill to the front door, so I set about carving the polystyrene into a rough shape and then plastering it over the top. Placing the information on the stone was incredibly difficult but I eventually got them in place and lightly plastered them to stay. My daughter is fascinated by some of the crystals and stones I’ve collected over the years so I thought I’d incorporate them into this special sculpture for her.
Next was to make the full-size landscape base.
I wanted the stairs to lead down a path to a pond so I made sure I left a ‘well’ shaped hole. I also had the idea to put in a real bonsai tree so I left a circle-shaped hole for a pot to go into.
After plastering the shape, I used airdry clay to clean the rough plastering up and give me a more defined shape to work with.
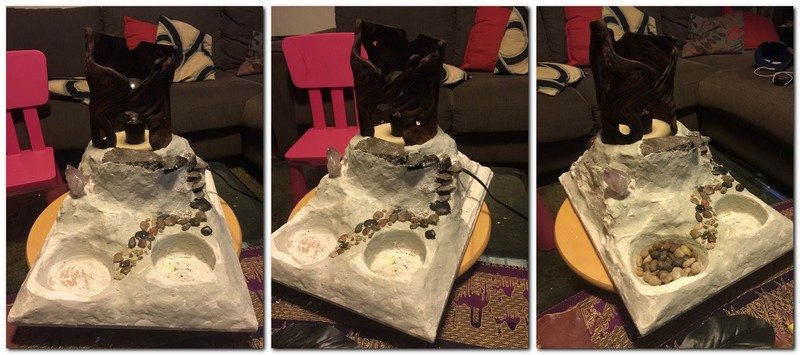
I plastered in the stones for the path.
Once the airdry clay was dry, it was time to start decorating. I started by painting dirt and rock-colored browns and blacks….
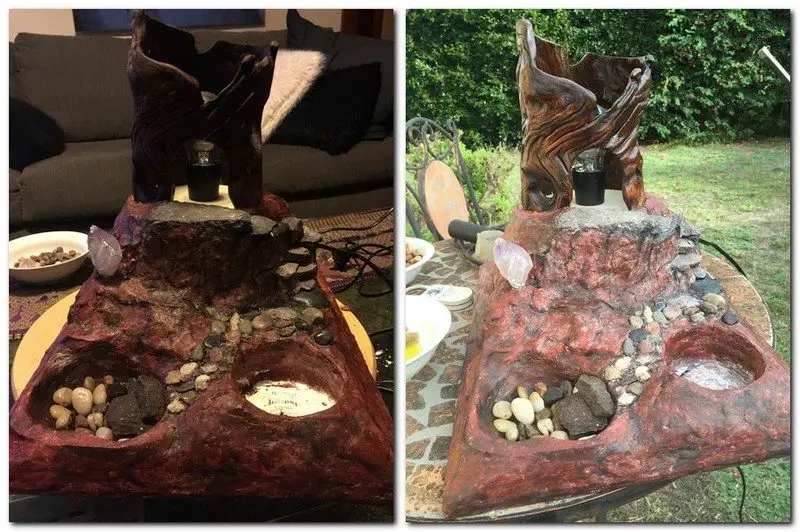
With the oiled wood, this was starting to look good. I went and bought supplies from a train hobby shop. I got moss, small lilies, and clear resin to start the pond…
I used less catalyst so it would go off slowly. This allowed me to stir in a blue tint and the ever-important fairy dust (ground up aluminum). When it started going hard I balanced the lilies on top. I used little sticks as ‘logs’ and painted them with the resin so they looked wet.
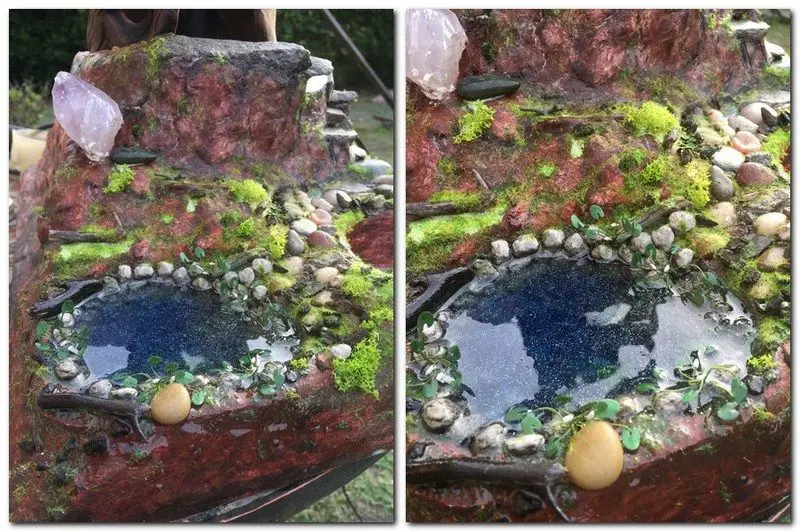
Once it had set, I was able to use the moss matting I had bought online. I cut it to shape and glued on to plaster.
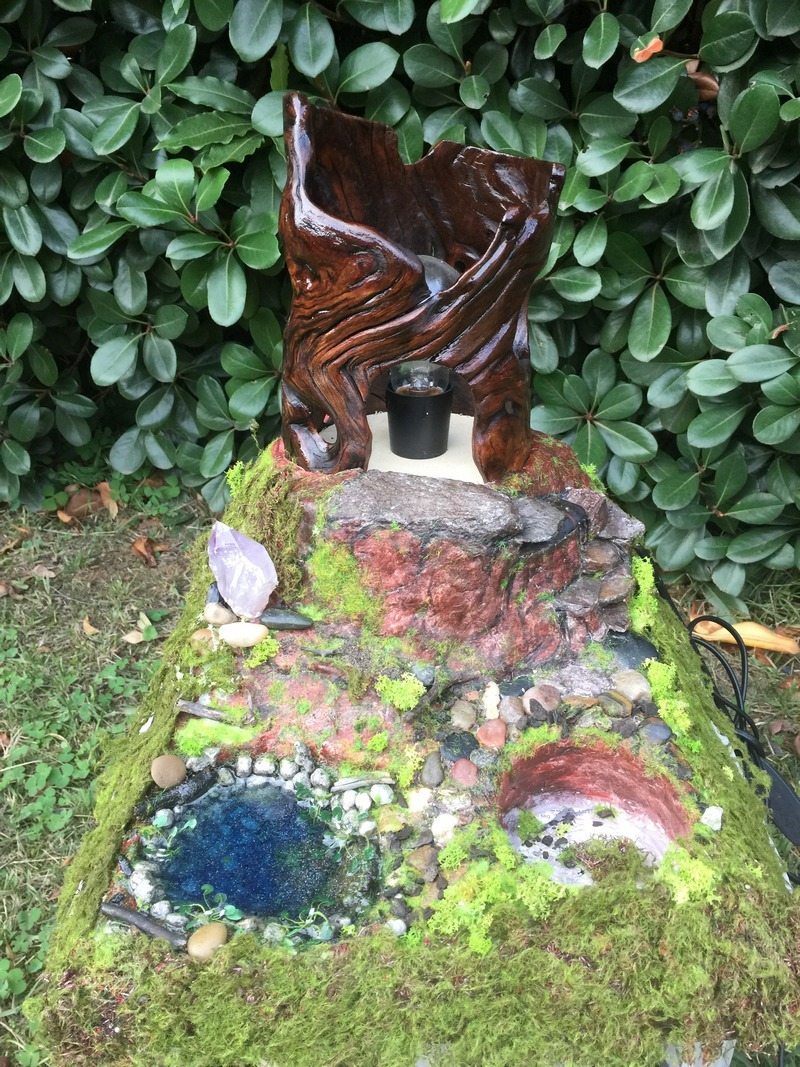
I also glued in bigger pieces of moss I had bought from Spotlight for variation.
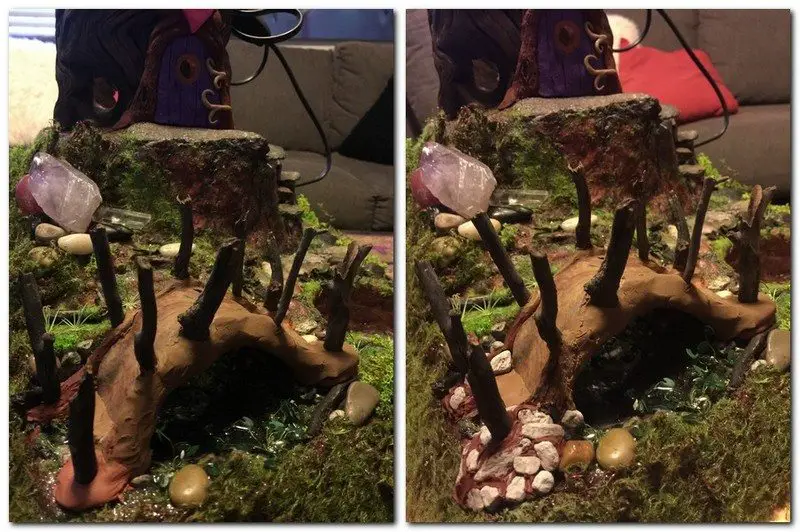
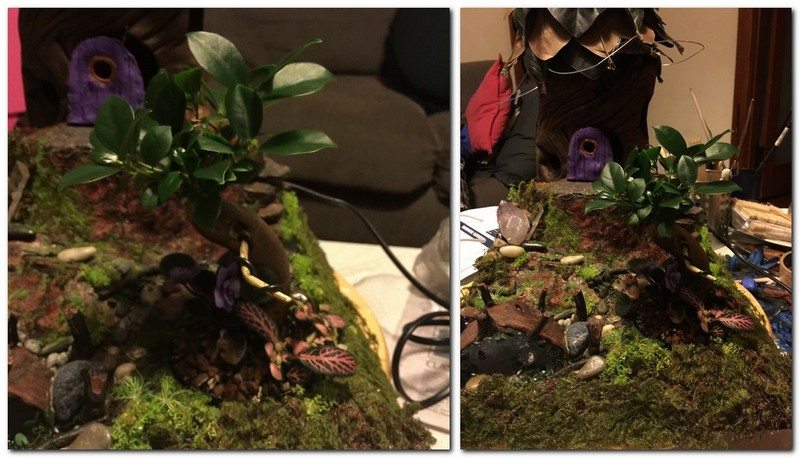
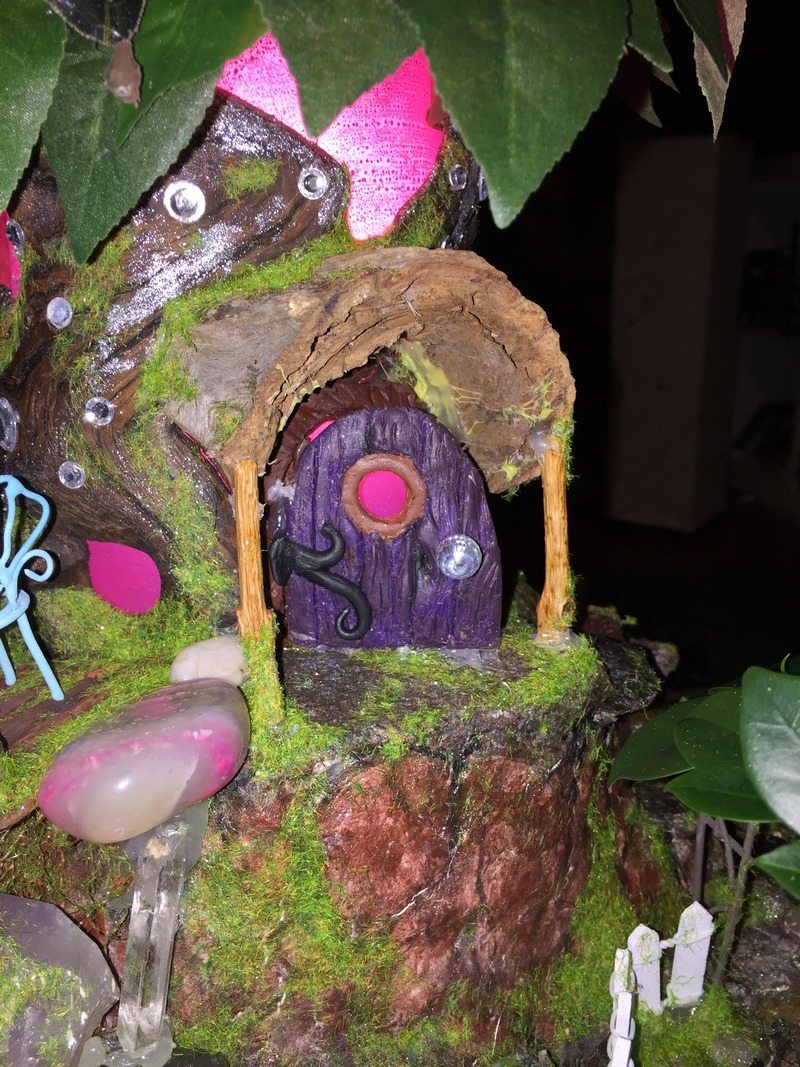
Next, I knew I wanted a bridge over the pond so I had saved a nice round piece of timber that I had chopped off the bottom of the log to make it flat. I polished it up and glued it in place and then super glued sticks along each side. I started to glue stones around it for steps.
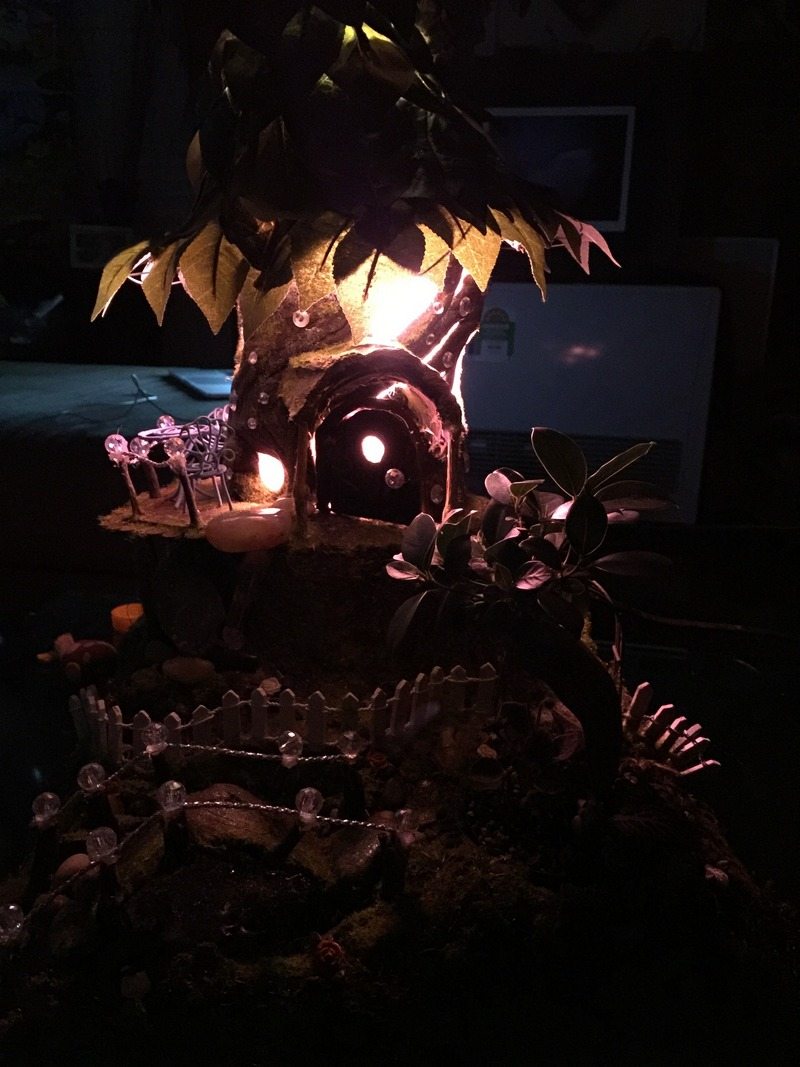
The next step was to start sorting out the roof of the house/lampshade.
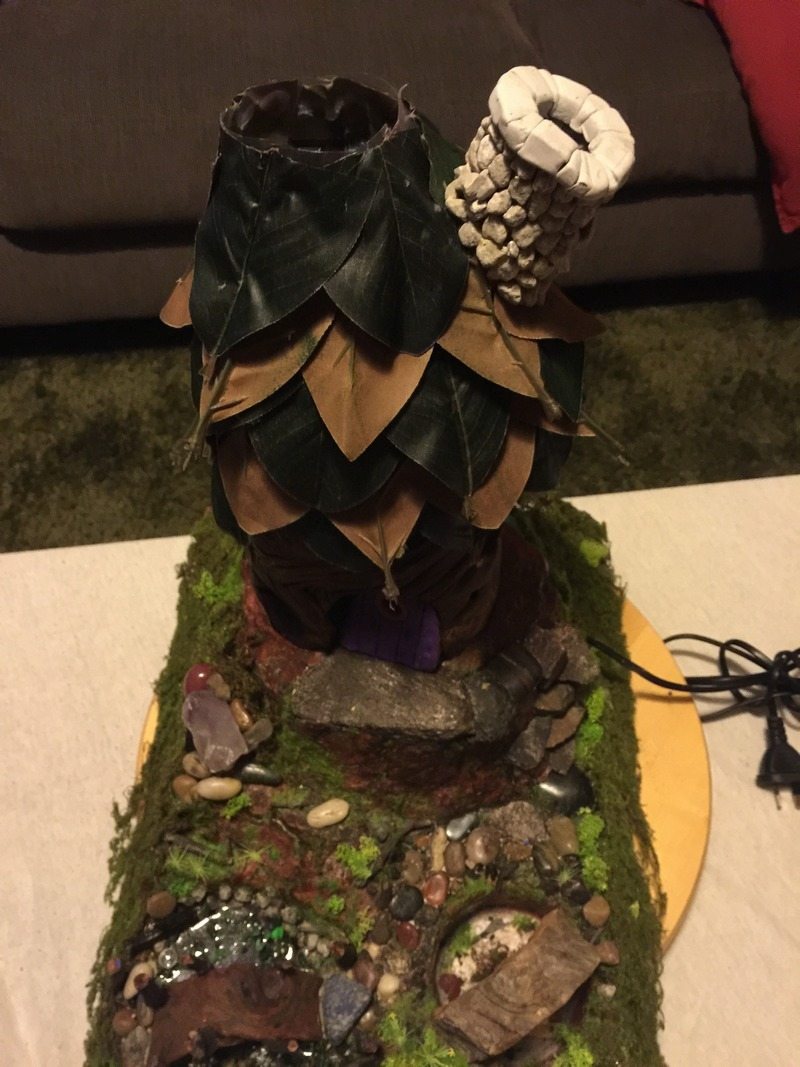
I got some clear plastic and cut it to shape, rolling it around. I then got a toilet roll and glued stones to it for a chimney. I secured to the plastic. I bought fake branches with leaves from Spotlight and cut the leaves off and cut them in half. I hot glued them on to the plastic and around the chimney. I also got some Sculpey and crafted the top of the chimney from that and glued it in place.
Next, my daughter had previously mentioned fairy houses had circled on top of their roof. Not knowing what she meant, I set about making a circular shape for her using wire. I bought a ring from Spotlight and attached 8 (I think) long bits of wire. I shaped them and then spent time making cross-sections and sticking them together for stability. I hot glued it to the existing form, ready to paper maché.
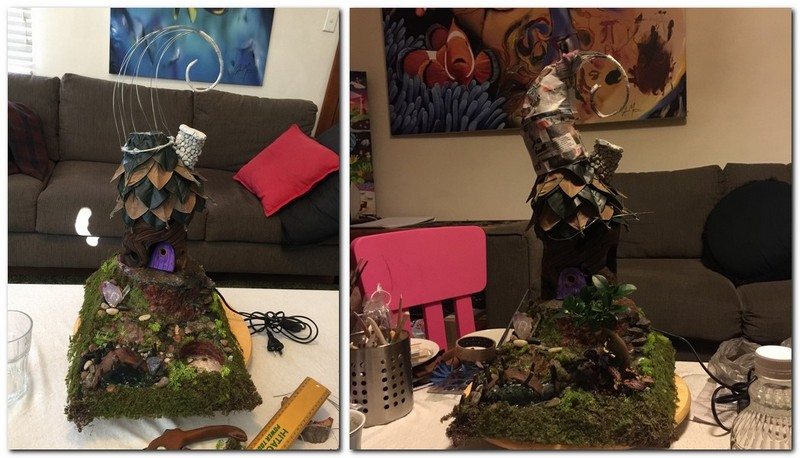
Now that this shape was ready for leaves, I knew I wanted more on the bottom to stick out and act as pergolas, etc so I added wire shapes here.
At this point, I knew I needed the bonsai to be custom made, so I went and saw a friend who is an expert. He took an existing plastic pot and set it in the existing hole I had left. We then roughly drew the landscape shape around the pot and cut it down to size so it would fit in the hole and not be seen. He then planted and shaped the foliage for me.
I decided I wanted a balcony out the side so got a bag of Icypole sticks. I made a cardboard template of the rough shape but spent a lot of time getting the inside shape right. I knew it was going to sit next to the house and I wanted it to sit flush. I took my template and sticks on top, glued them together with craft glue, and used sharp scissors to cut it all into shape.
I glued it to the plaster edge I had left myself and then hot glued sticks from the bottom to the ground for structural support. I then hand-painted the creamy white sticks to look like darker timber.
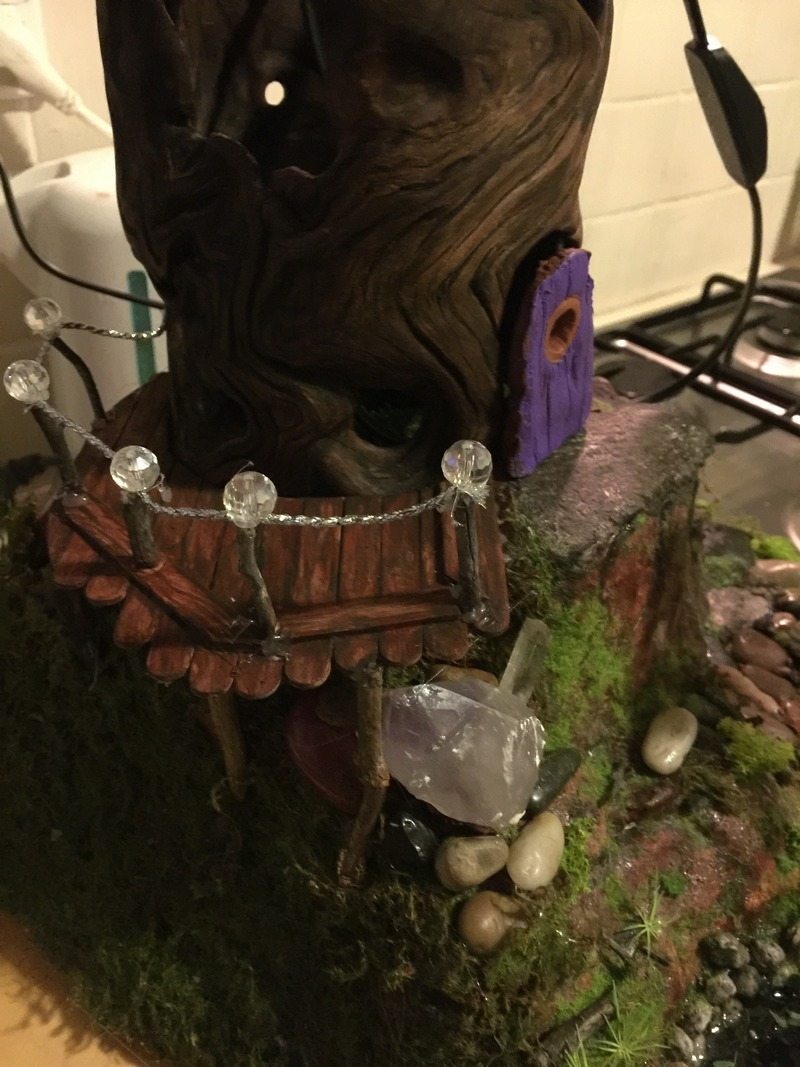
I then added sticks, string, and beads I had bought from Spotlight.

I added the same string and beads to the bridge…
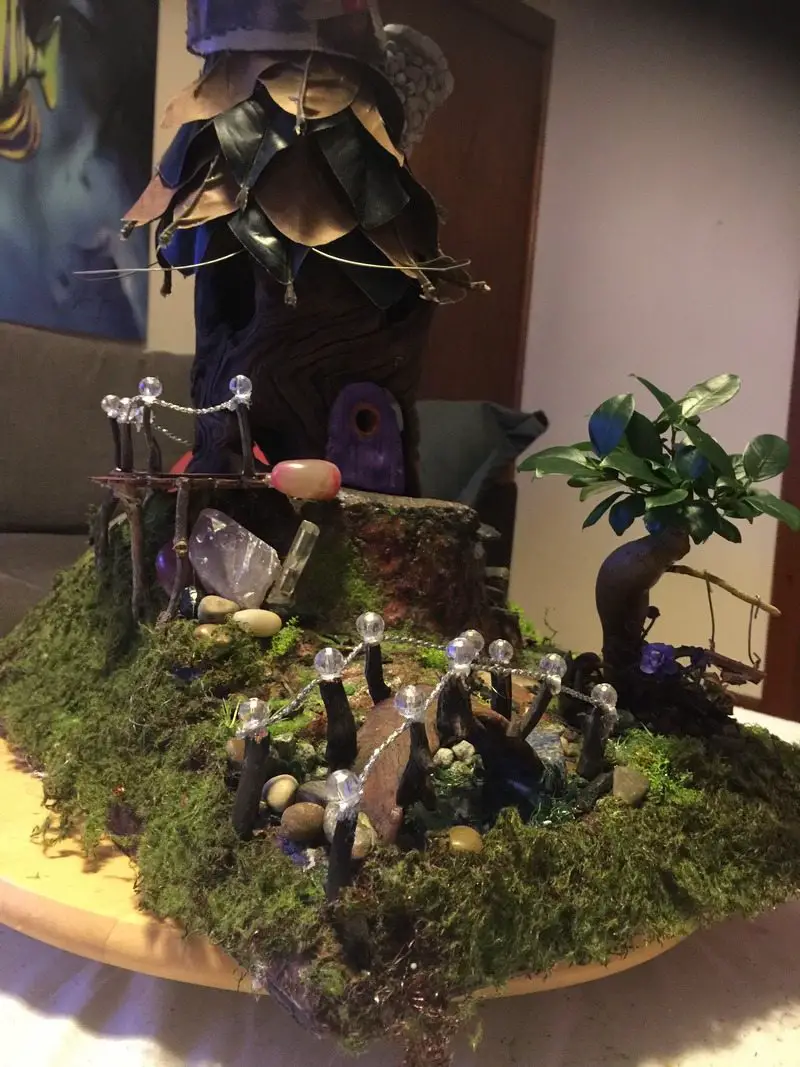
And added heaps of moss everywhere with craft/wood glue and fake moss.
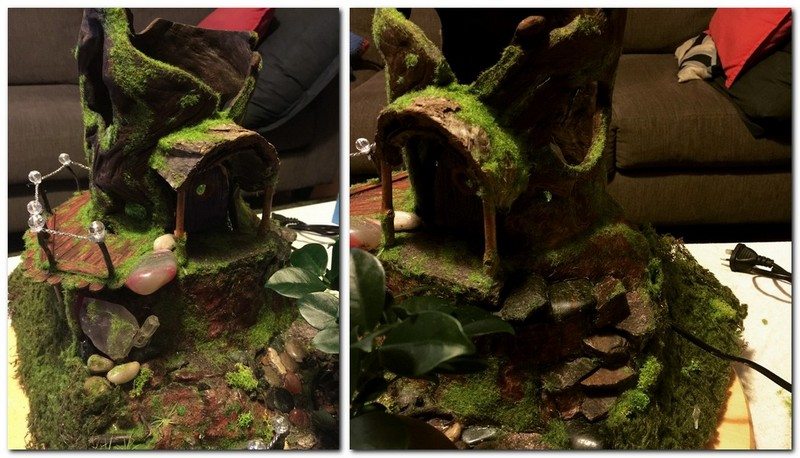
Time to furnish and decorate… I found mini chairs, table, and fence online from a specialty store in Perth…
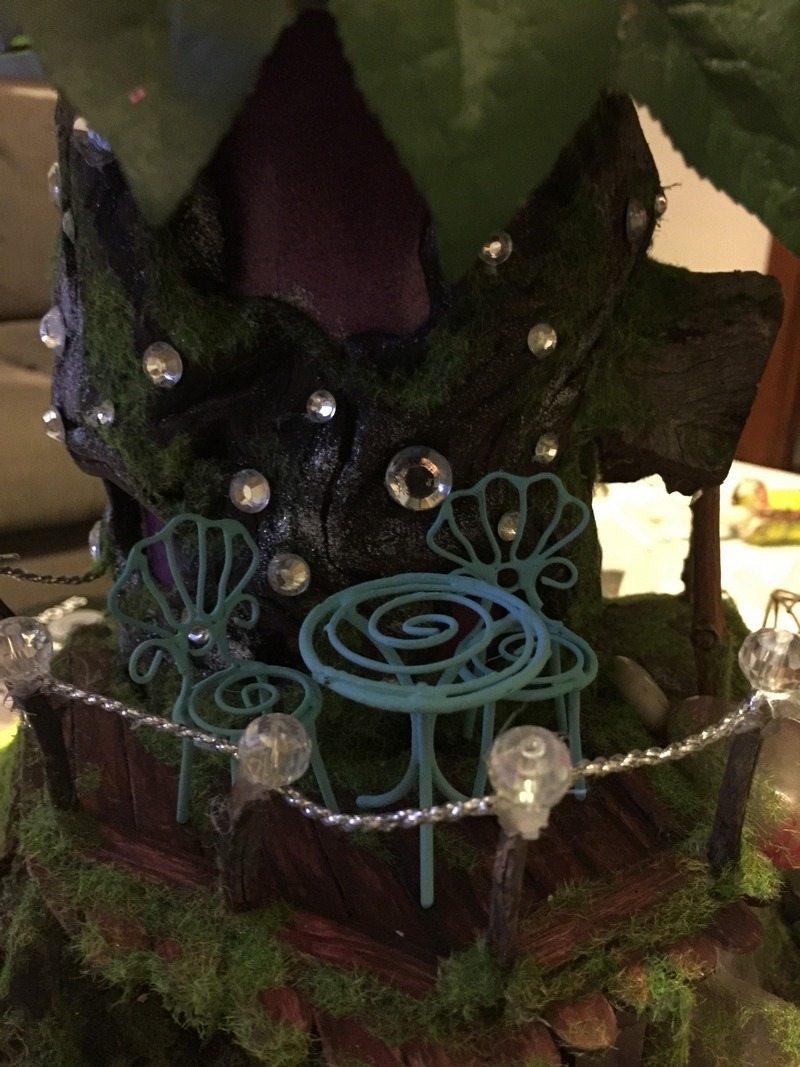
I bent the fence to follow the contours of my landscape and hot glued it in.
I got plastic filing folders from Officeworks. I bought three of them in purple (my daughter’s favorite color) and cut them to shape so they would roll up inside the wood and add color to the light.
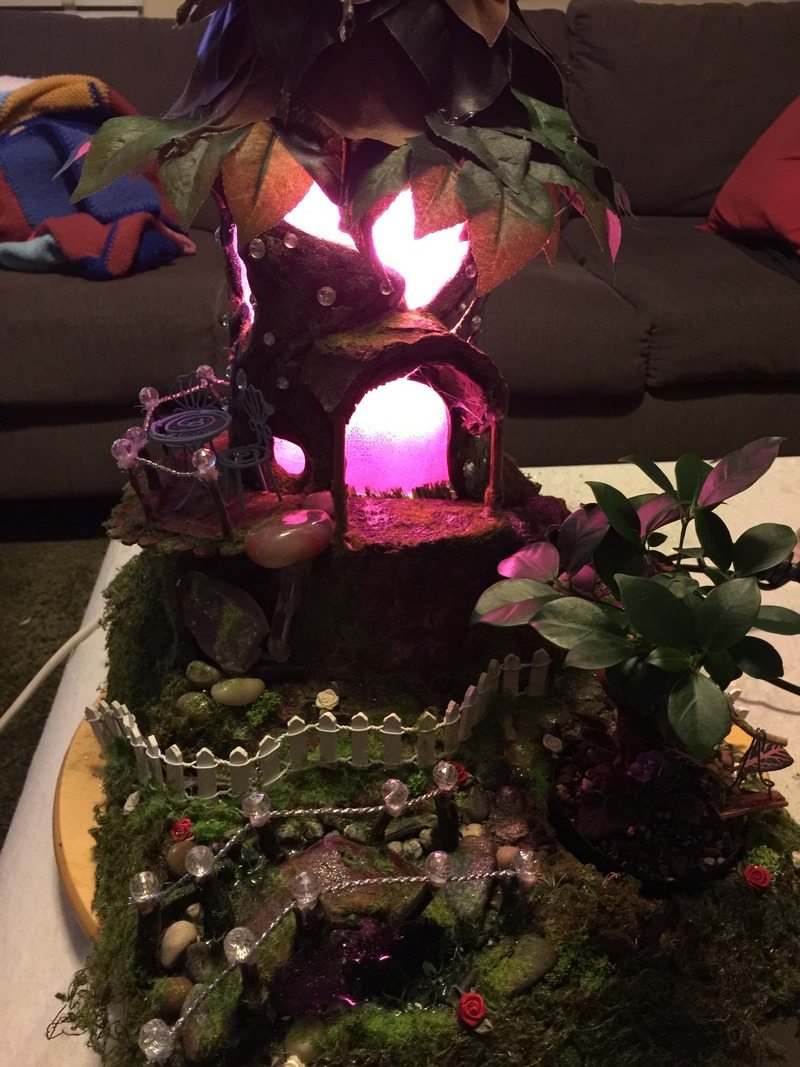
I bought little flowers and stick-on gemstones from the spotlight to finish embellishing it.
I also got around offcut, glued it on for the verandah, and glued it in two posts.
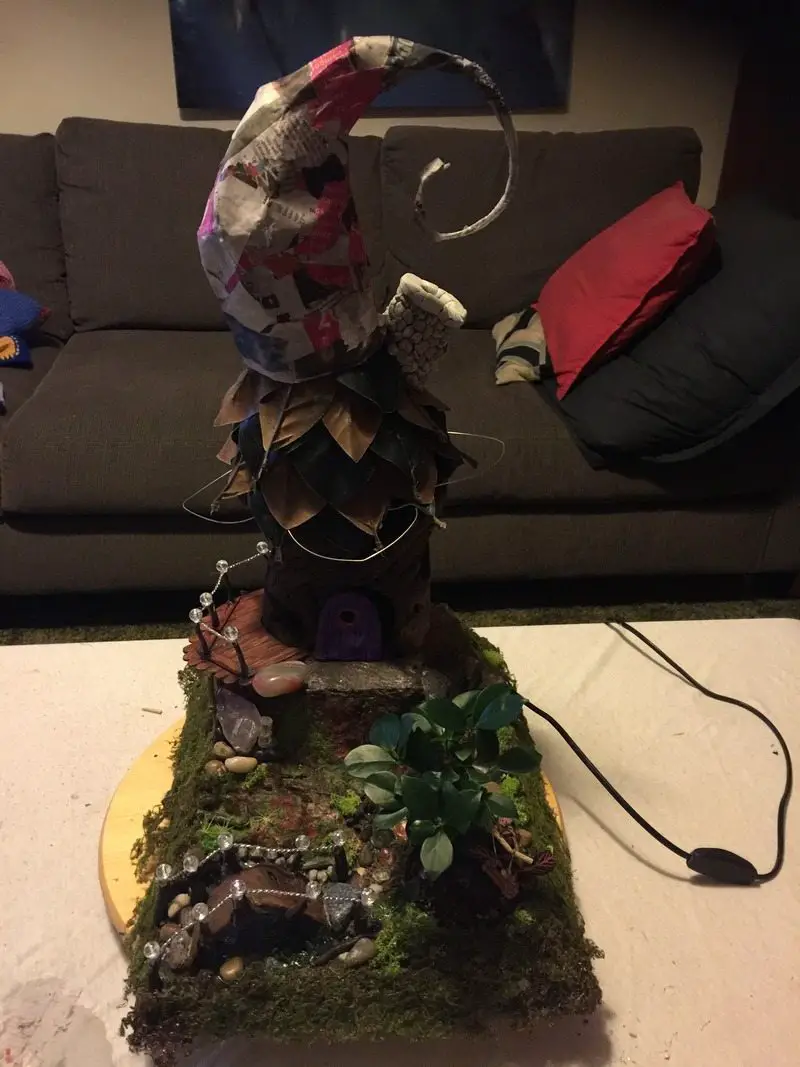
I then sculpted the front door out of Sculpey and glued it in, leaving it slightly open to let light out and make it look inviting… I glued a bead on for the door handle.
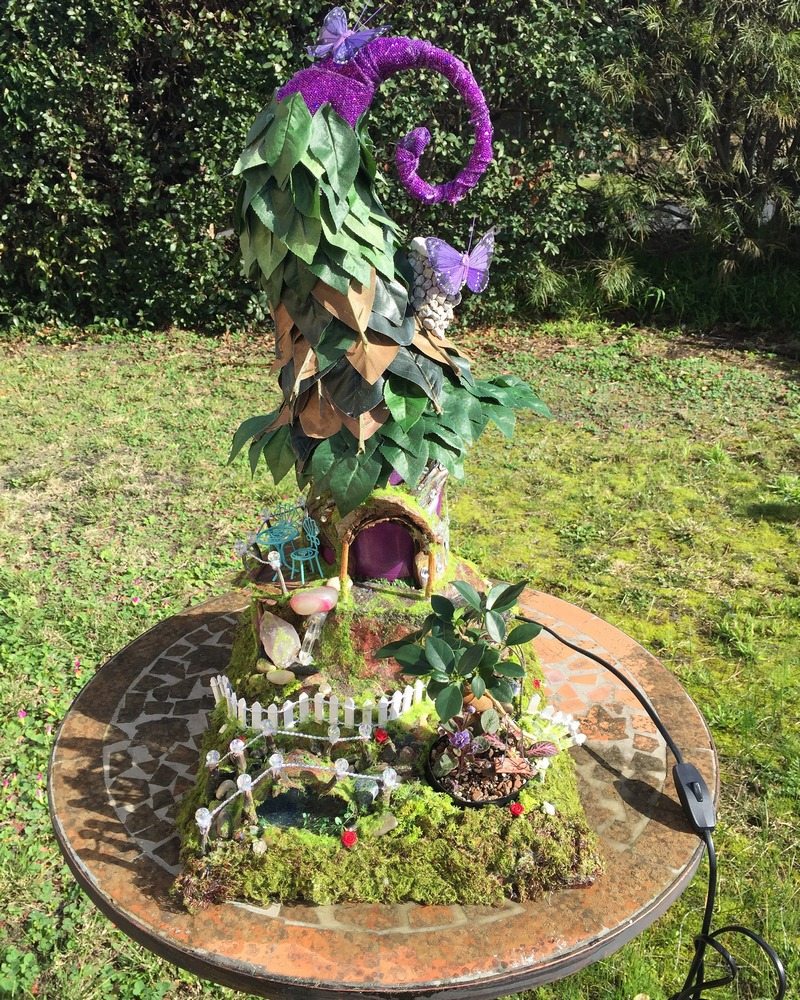
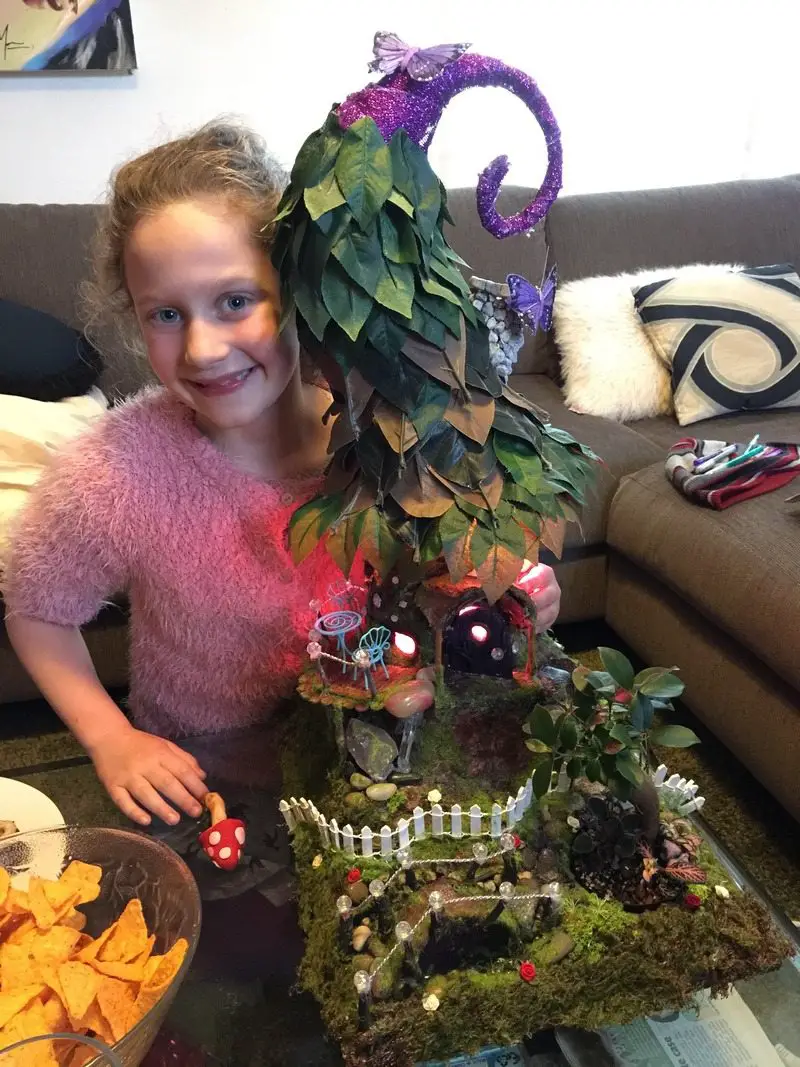
One happy little camper! Happy Birthday Jade
DIY Fairy Doors for Trees and Walls
Have you ever noticed how adding a small detail can transform a space? Fairy doors are one of those charming additions that bring a sense of wonder to your garden or home. These tiny doors, often tucked against the base of a tree or along a garden wall, spark the imagination.
Whether you’re creating a magical backyard for your kids or adding a whimsical touch to your space, fairy doors are a fun addition to any fairy house lamp. They’re simple to make and can easily become the highlight of your miniature fairy world. Here’s how to craft your own fairy doors for trees and walls.
Gathering Your Materials
Start by gathering basic supplies. You can use scrap wood, popsicle sticks, or thick cardboard for the door itself. If you want a more natural look, thin slices of bark or driftwood work beautifully. You’ll also need small pebbles, beads, or buttons for decoration. A hot glue gun, craft glue, and a set of acrylic paints in earthy or bright colors will help bring your design to life. To attach the finished door, use nails, screws, or outdoor adhesive strips depending on your location. These materials are likely already part of your fairy house lamp sash, so you won’t need to buy much more.
Designing the Fairy Doo
Before you start building, decide on the shape and style of your door. Traditional fairy doors often have an arched shape, but you can get creative with round, square, or even whimsical, uneven outlines. Sketch a simple design first to guide your work. If your fairy house lamp has a theme—like a woodland fairy cottage or a bright garden retreat—match your door design to suit. Think about the personality of the fairy who might live behind it. A nature-loving fairy might prefer rustic bark and stones, while a garden fairy may favor colorful flowers and painted vines.
Constructing the Door
Cut your base material to match the shape you planned. If you’re using popsicle sticks, line them up, glue them side by side, and trim them to size once they’re dry. Bark can be layered on a piece of cardboard or wood for added texture. Add crossbeams with twigs or narrow wood strips to create a door frame. Secure everything with wood glue or a hot glue gun.
Now add the little touches that make it special. Glue small pebbles as stepping stones or attach a bead as a doorknob. If you enjoy sculpting, try air-dry clay to make miniature windows, flower pots, or climbing vines to decorate around the door. These small elements tie the look together and make your fairy house lamp stand out.
Painting and Decorating
Once assembled, it’s time to paint. Start with a base coat of your chosen color. Earth tones work well for a natural look, but don’t be afraid to go bold with bright purples, reds, or greens if you want it to pop. After the base coat dries, add shading and highlights to give it depth. Use a fine brush to paint wood grain lines or vines growing up the side of the door.
You can also glue moss around the edges for a wild, enchanted effect. Miniature flowers, either crafted from paper or bought from a craft store, can be attached around the frame. Tiny fairy lights are a fun option if your door is going outside and near a power source or battery pack.
Installing Your Fairy Door
Once your door is finished, it’s ready to be placed in its new home. If you’re attaching it to a tree, make sure the surface is clean and dry. Use small nails or outdoor adhesive strips that won’t harm the tree’s bark. If you’re placing the door against a stone wall or fence, a strong outdoor glue or screw hooks may be the better option.
Try to position the door where it’s easy to spot but still feels like a hidden discovery. Tuck it among flowers or near the base of a tree. You can even add a little path with pebbles leading to the entrance or place a miniature welcome mat in front.
The Magic of Fairy Doors
Fairy doors add personality and magic to any outdoor or indoor space. They’re a simple DIY project that requires only a few materials and a little imagination. Once in place, they tend to spark curiosity, especially among children and visitors. After all, who wouldn’t smile at the idea that a tiny, unseen friend might be living just beyond that little door?
DIY Fairy House Accessories: Furniture, Tiny Dishes, and Decor
Once you finish your fairy house DIY project, it’s time to fill it with the little details that bring it to life. Tiny furniture, miniature dishes, and decorations make a fairy home feel warm and inviting. These small additions create charm and personality, whether your fairy house is part of an outdoor garden or a tabletop display. The best part is, you can make everything yourself with a few simple materials and a little creativity.
Making Fairy Furniture
Every fairy house DIY project needs a cozy place for its fairy residents to relax. Start by making miniature furniture out of natural or repurposed materials. Twigs, popsicle sticks, clothespins, and bark are all great choices. A basic chair can be made by gluing together four twigs for legs and adding flat sticks for the seat and backrest.
To make it more comfortable, glue on a small square of fabric as a cushion. If you want to add a whimsical touch, try wrapping the chair with thin wire vines or gluing on tiny beads as accents.
For a simple table, use a round wood slice or even a bottle cap as the tabletop. Attach it to a thick twig or a wooden spool for the base. This creates a sturdy table where you can later place dishes or decorations. Beds are easy to build using popsicle sticks for the frame.
Add a small piece of fabric stuffed with cotton for the mattress, and top it with a tiny pillow and blanket. These small details make your fairy house DIY project feel warm and lived in.
Crafting Tiny Dishes and Kitchenware
Fairies need dishes for their meals, and making them is another fun part of your fairy house DIY project. Polymer clay is one of the easiest materials to work with. Shape tiny plates by flattening small balls of clay and pinching the edges. For bowls, roll clay into small balls and use your finger to hollow out the middle. After baking, you can paint them in bright colors or leave them simple for a rustic look.
Metal bottle caps also work well as serving plates or platters. You can paint them or glue beads around the edges for decoration. Thimbles make perfect cups, pots, or flower planters. Add a small piece of wire to the thimble to create a handle, turning it into a little kettle or bucket. Toothpicks are great for utensils. Cut and shape them into tiny spoons and forks, then sand them smooth.
Decorating with Fairy-Sized Accessories
Now that you have furniture and dishes, complete your fairy house lamp with unique decorations. Start with rugs cut from scraps of fabric or felt. Add beads or small stitches to create a border. Make tiny picture frames from thin twigs or toothpicks. You can fill them with pressed flowers or miniature drawings.
Shelves can be made from bark, small stones, or bits of wood. Place tiny books, jars, or treasures on them. To create books, fold scraps of paper and glue them inside a small cardboard cover. For plants, glue moss into bottle caps or tiny clay pots. Add beads or small flowers to create colorful potted plants.
Lighting brings extra magic to your fairy house lamp. String small beads on thin wire to make fairy lights. Use battery-operated tea lights to softly illuminate your fairy home. You can also make tiny candles by cutting birthday candles short and placing them on a button or clay base.
Finishing Touches
Once everything is made, arrange your furniture, dishes, and decorations inside your fairy house. Set the table, place chairs around it, and lay down a rug under the bed. Place dishes on the shelves and candles in the windows. The details bring the whole scene to life.
Adding these DIY accessories gives your fairy house DIY project a personal and magical touch. Whether you’re crafting for a child’s play area, decorating your garden, or simply creating a whimsical space for yourself, these little elements make it special. Your fairy house will look like a cozy home, ready for its tiny magical residents to move in.
Conclusion
Crafting a fairy house lamp is a rewarding project that adds charm and magic to any space. With simple tools and a bit of creativity, you can create a unique piece that lights up both the room and the imagination. Whether for a child’s bedroom or a cozy corner, this handmade lamp brings warmth and wonder to your home.
When you want to create your own fairy house for your garden, check out our guide next!


