Has the summer heat got you daydreaming of spending all day in a pool? Opting for a beach resort to indulge in such activities is undoubtedly an option, but it often comes with a significant price tag. And the feasibility of making frequent visits becomes challenging when you, like most people, are occupied with a regular work schedule.
Well, we found a great solution – why not build your own inexpensive pool? Now if backyard space and maintenance are a concern, here’s a very simple DIY above ground plunge pool that you can enjoy for years!
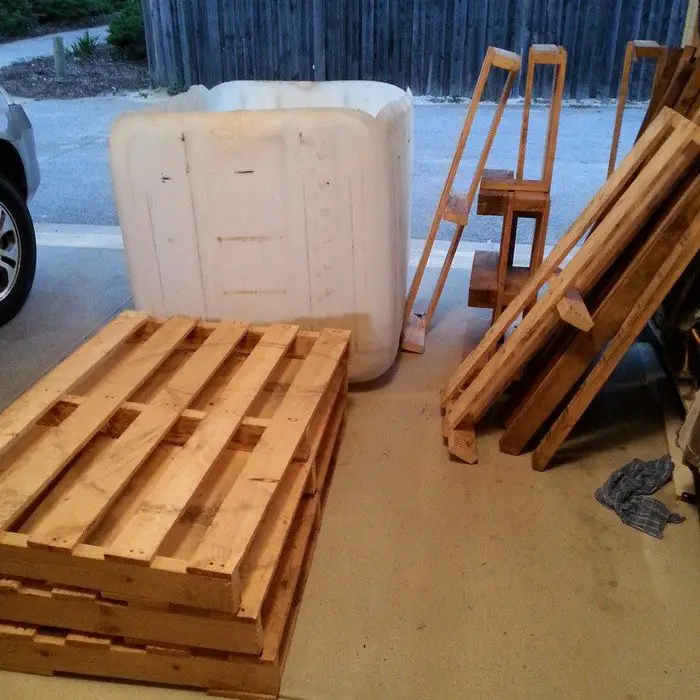
This DIY pool is simply made of a bulk container and some recycled pallets. You can find secondhand parts to keep the total cost at around $100. But if you need or want to purchase new materials, this DIY project would cost around $500 which is a very low amount considering this above ground plunge pool will last a long time!
You don’t need a very large yard to build an above ground plunge pool. It’s easy to maintain and the best part is that you can cool yourself down during the summer anytime you want!
Click on any image to start lightbox display. Use your Esc key to close the lightbox. 8-)

Contents
Building an Above Ground Plunge Pool
Embark on an immersive adventure through this comprehensive guide, where you’ll be guided towards fashioning a personal sanctuary of tranquillity and entertainment within the confines of your backyard.
Whether your objective is to conquer scorching summer temperatures, elevate your outdoor living area, or bask in the rejuvenating advantages of a revitalizing above ground plunge pool, this guide is your ultimate companion.
Get ready to arm yourself with insightful ideas, practical advice, and simple instructions, as you delve into the realm of affordable above ground plunge pool construction. Unleash your creativity and embark on a journey to transform your outdoor area into a captivating haven, courtesy of your very own above ground plunge pool.
Now, gather the necessary materials and tools to get started!
Materials
- 1000L IBC (Intermediate Bulk Containers)
- Pallets
- Wood Trim Material (optional for decor)
- 2″ Wood Screws
- 12G Stainless Hex Drive Screws
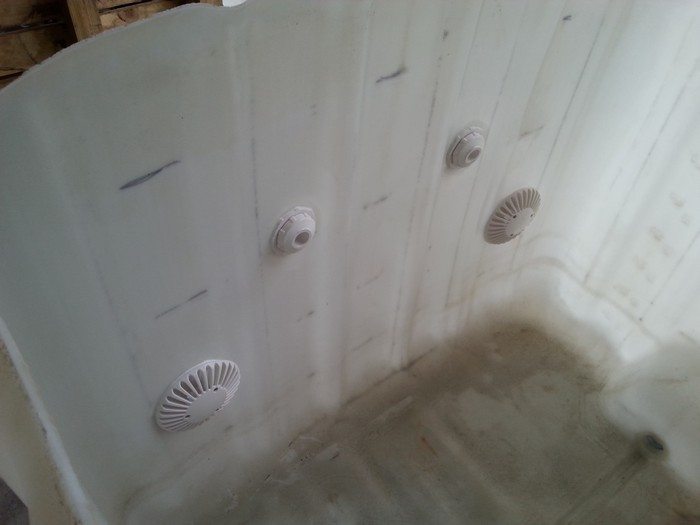
- Pool/Spa Suction
- Provision Jets
- PVC Pipes with appropriate fittings
- PVC Cement
- Pool Pump
Tools
- Reciprocating Saw
- Circular Saw
- Cordless Drill (with Holesaw that fits provision jets)
- Heat Gun
Steps

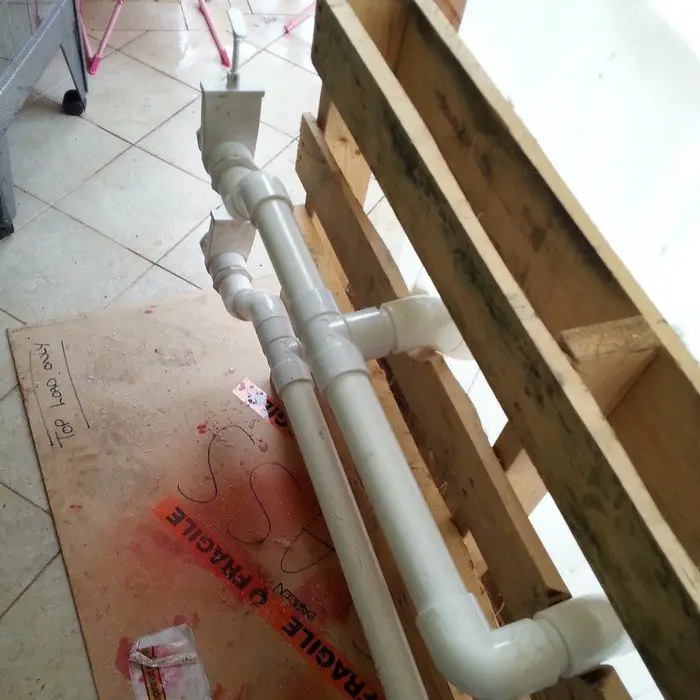
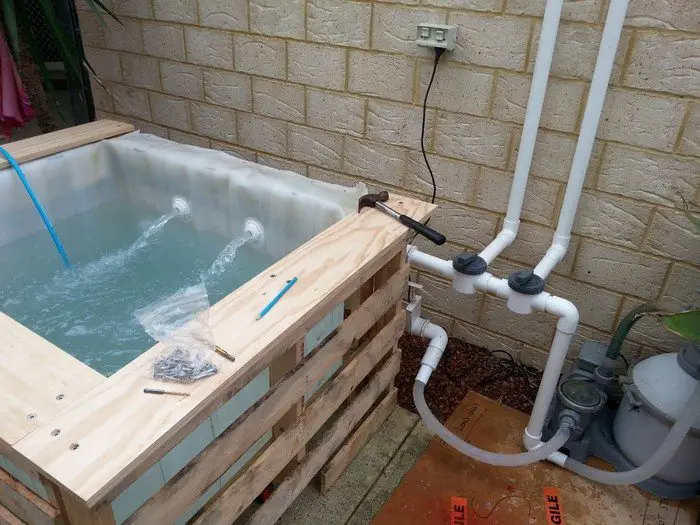
1. Fitting jets and initial pipework: Ensure things are aligned with the gaps in your pallets, cut the holes, and then install your jets.

Make sure you tighten them up nicely. Follow the fitting instructions specific to your chosen kit.
Once the jets are in you can begin plumbing up your PVC pipework, make sure to use the appropriate PVC cement.
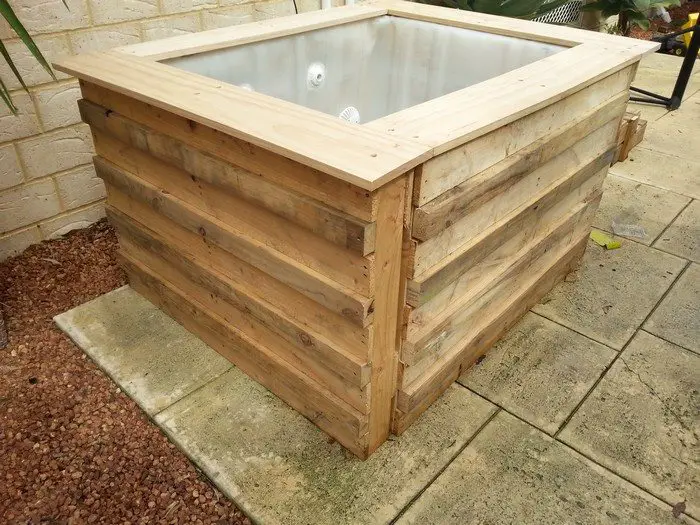
2. Constructing the frame and fixing the edges of the liner: Your IBC will be rectangular in shape so arrange your pallets as shown in the pics. The pallets should be almost exactly the same length as the long side of the IBC. This means the pallets on the short sides will sit with just the right amount of overlap for you to be able to fasten them together without having to shorten or cut them another way.
Use your drill driver, then screw the pallets together. The back side of one pallet overlaps perfectly with the end of another.
The gaps should be sufficient enough for the nosecone of your drill to get through.
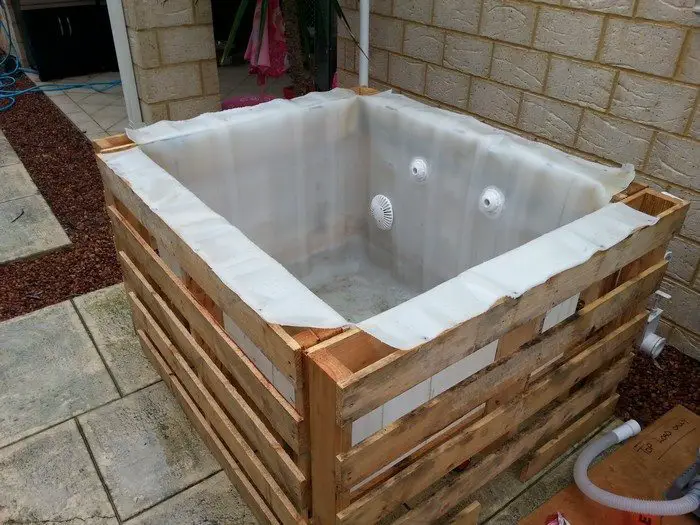
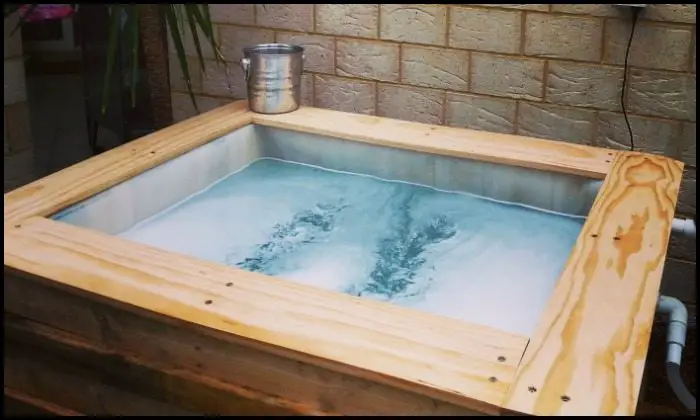
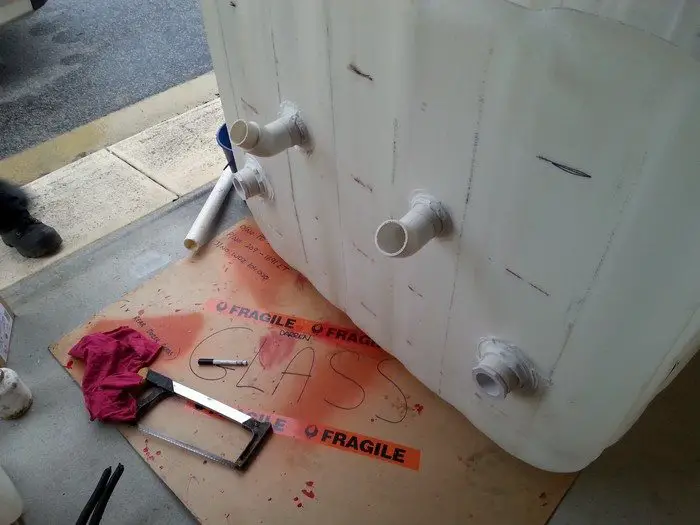
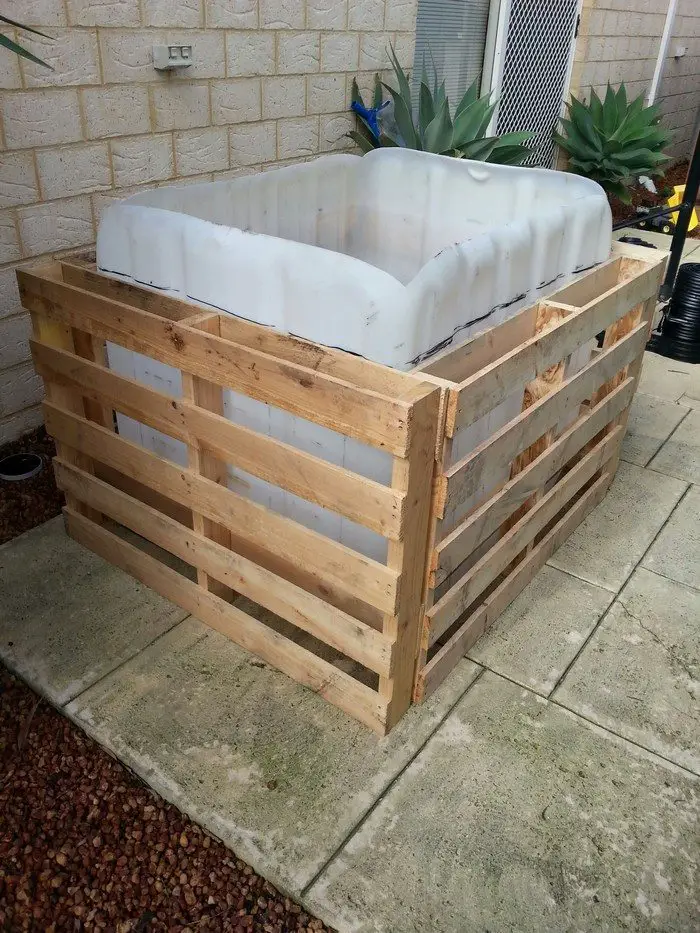
Once this is done, you can cut the top off your IBC (if you hadn’t already) and cut vertically each of the corners down to the level of the top of the frame.
Using the heat gun, heat up the plastic. Allow it to be folded over and screwed down onto the frame.
If you look at the finished product, you will see why this gives a much more professional look.

3. Connecting your pump: Small pool pumps are, for the most part, fairly portable. So just find some flat, even ground for it where it is reasonably well protected. Ideally, place it close to an all-weather outdoor power outlet. Mine came in its own cradle, so all I had to do was put it where I wanted it.
Go for those flexible hose connections. They’re super handy if you need to move or switch out the pump.
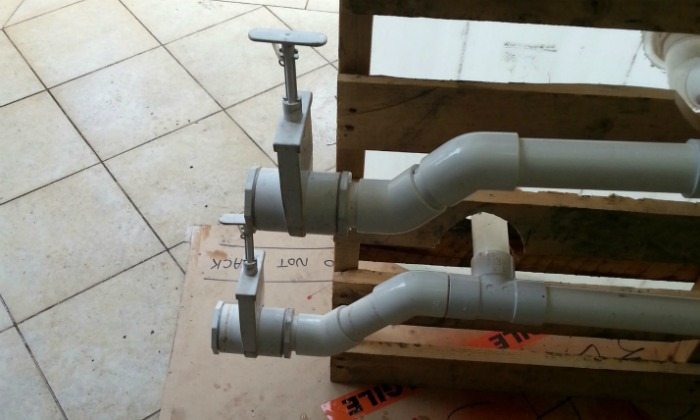
I have fitted isolation valves, in case the pump needs to be replaced at any point. Those can be shut off and no water need not be lost from the tub.
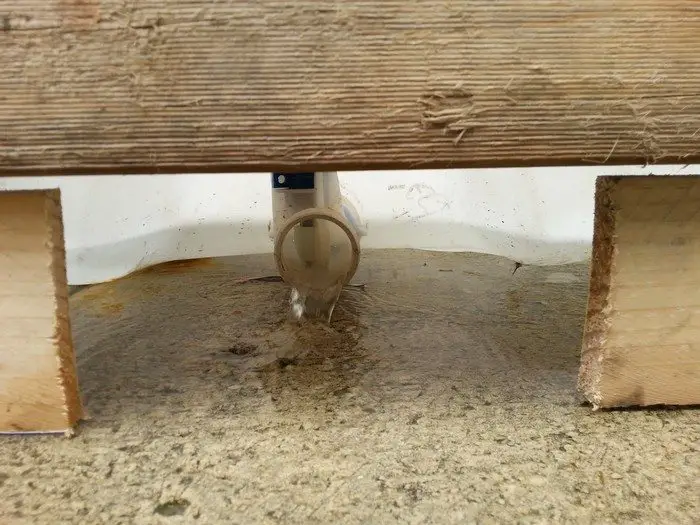
If you do in fact wish to change the water, the IBC has a dispensing valve at its lowest point, which is just perfect. I recommend leaving a cut-out in your pallet/frame for easy access to this :)
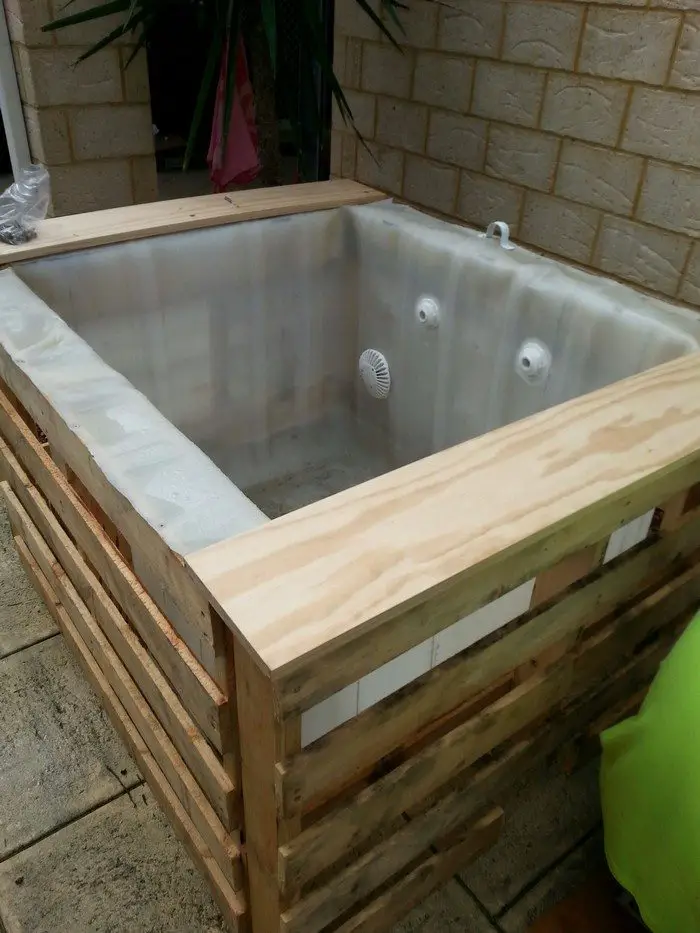
4. Capping it off: This bit is really as simple as cutting your wood to size and screwing it down so that you have an even amount of overhang all the way around the outside. Avoid too much inner overhang if you don’t want to encroach on the already small area.
Pallets aren’t generally engineered to exact standards. Hence, you may find yourself packing certain parts up with thin slivers of wood to get the capping nice and level.
I fixed mine down with 12G stainless hex drive screws. Not only because they look limp, but also because it’s the one area where the screws are likely to get splashed with water. And rust is U.G.L.Y.
5. Finish cladding exterior: Cut your lengths of “gap-filling wood” to size. And using more of your 50 million timber screws, fasten them into place.
The wood I used was “whatever I could get my hands on”, so it turned out to be thicker than the slats of the pallet. I quite liked the effect as I think it added some dimension.
6. Fill and enjoy: Once you have the water level above your suction jets, it is safe to switch the pump on.
You will need to decide what water treatment strategy you are going to take. Personally, I am using chlorine tablets in a floater because by far, it’s the easiest, with really no fuss.
The challenge I set myself here was to keep costs down without compromising the quality of the above ground plunge pool. I am in the fortunate position of being able to get my hands on a lot of these materials for free. The pump was my only cash outlay at $100 for a good second-hand unit.
If you had to fork out every single part of your above ground plunge pool, then this is probably a $500 project (assuming you already have tools).
Thanks to therealorson for this great above ground plunge pool project!
Choosing the Right Location for Your Plunge Pool
For your above-ground plunge pool to last a long time and to provide you with pleasure, choosing the ideal location is essential. The proper placement guarantees that your pool is both safe and easily accessible while also enhancing the visual appeal of your outside area.
We go over some important things to think about in this article when deciding where to put your pool.
Sunlight and Shade
Swimming comfort in your above ground plunge pool can be greatly impacted by how exposed it is to the sun. Having some shady spots close by is also a good idea, even though a sunny position is great for people who prefer warm water. Swimmers can cool off in the shade after enjoying the sun thanks to this equilibrium. Think about the how the sun will travel during the day and how neighboring structures, such as fences or plants, will affect the pool area’s shadowing.
Ground Conditions
The ground on which you place your above ground plunge pool needs to be solid and level. Uneven surfaces can cause structural stress and potential damage to the pool. Before installation, clear the area of any debris or rocks and consider compacting the soil to ensure it’s as level as possible. Avoid areas prone to flooding or excessive moisture, as water accumulation can lead to issues with stability and maintenance.
Proximity to Power Sources
It is imperative that your above ground plunge pool be close to power supplies because it will probably need a pump, filter, or other electrical accessories. Make sure there is a ground-fault circuit interrupter (GFCI) outlet close by to avoid electrical risks. This outlet should be both safe and easily accessible. Always make sure that electrical installations adhere to regional safety codes, and think about getting advice from a qualified electrician.
Privacy and Aesthetics
Privacy is a significant consideration for your above ground plunge pool, as your comfort and relaxation are paramount. Choose a location that is not directly visible to neighbors or passersby. Utilizing landscaping features like bushes, fences, or privacy screens can enhance seclusion while also adding to the overall beauty of your pool area. Moreover, think about how the pool will integrate aesthetically with the rest of your yard. The right spot should complement your existing outdoor design and contribute to a cohesive look.
You may choose the best spot for your above ground plunge pool and make sure it enhances the value and enjoyment of your house for many years to come by considering these aspects.
Unlocking Backyard Bliss!
In just 6 simple steps, you can construct your very own affordable above ground plunge pool. This guide provides a concise and practical roadmap to help you achieve this goal. From gathering the necessary materials to completing the final touches, each step is carefully outlined for ease and clarity.
Say goodbye to expensive pool installations and hello to a budget-friendly oasis in your backyard! With this guide, building an inexpensive above ground plunge pool has never been easier.
So, dive in and enjoy the refreshing waters of your own creation!


