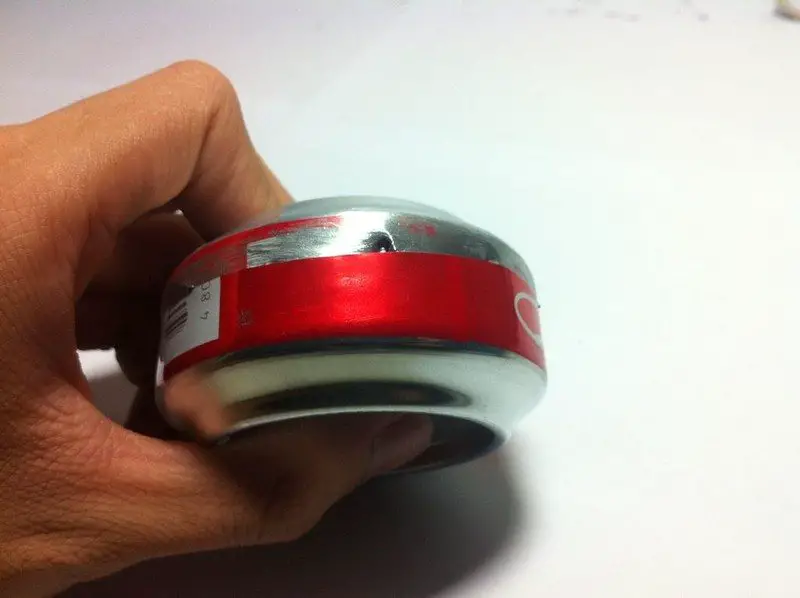
This is now the tricky part, sticking both cans together is the most painstaking task you will encounter in making the stove. I advice you to bend the shorter can’s edges so it would be easier to insert the short can to the long can.
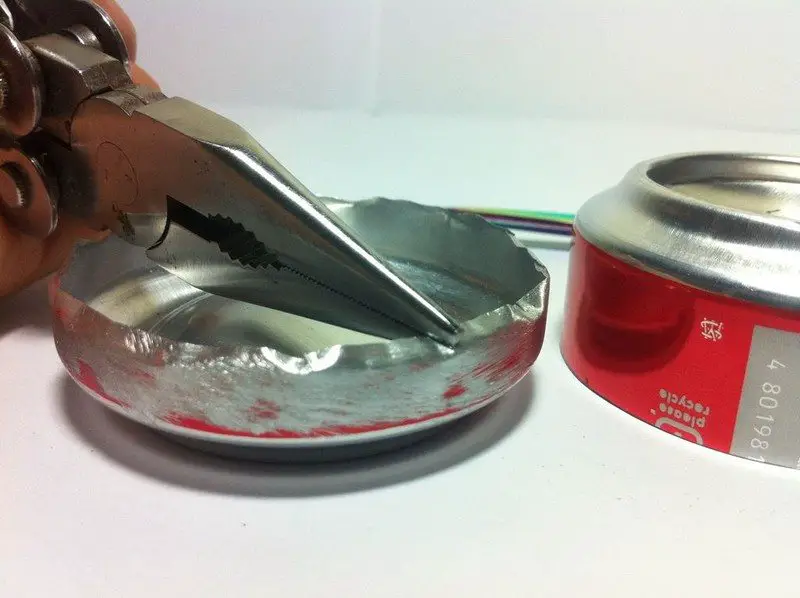
Insert the short can into the long can. Use your Dremel tool for grinding the sharp edges left by the can.
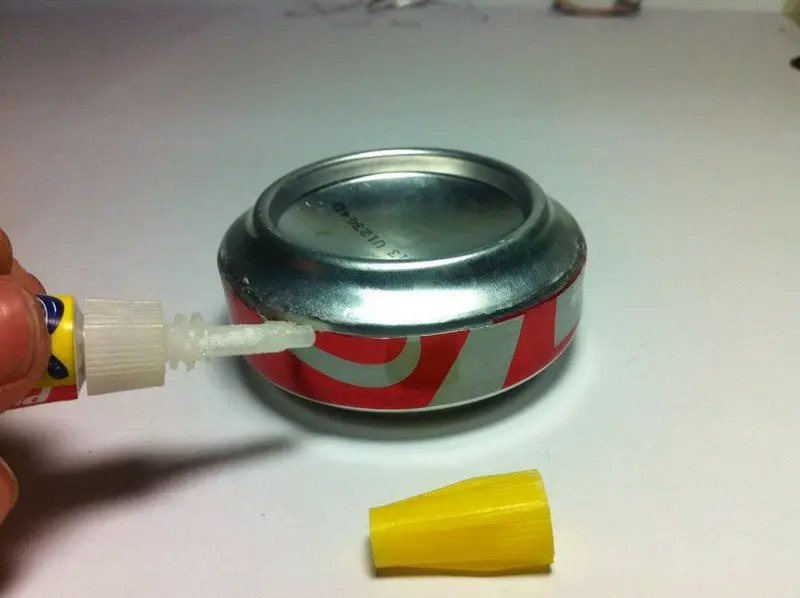
Try to apply super glue into the small gaps left . Be sure to seal it or else flames might exit an unsuspected areas. Keeping the stove airtight as possible is a “must”. Let the glue sip in the gaps. Notice that the super glued area should be the bottom part, Shorter can facing downwards and the longer can should face upwards. Flip the can after gluing it. Don’t forget to let it dry for about an hour.
Drill you holes using a Dremel tool or just simply use a sharp object to puncture the can. Pleas do not make you holes too big nor too small. Don’t forget to use a tape measure to guide your holes. Do not make your’e holes too big nor to small. Use a drill bit that is used for PCB making.

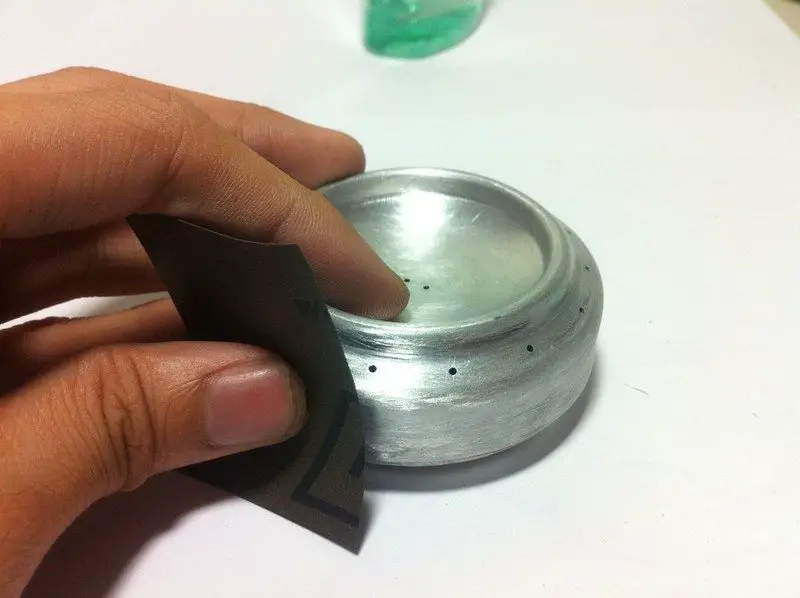
Sand every last ink of the printed label, ink from the label usually burns then turns into a black substance. You wouldn’t want to mess you stove’s appearance.
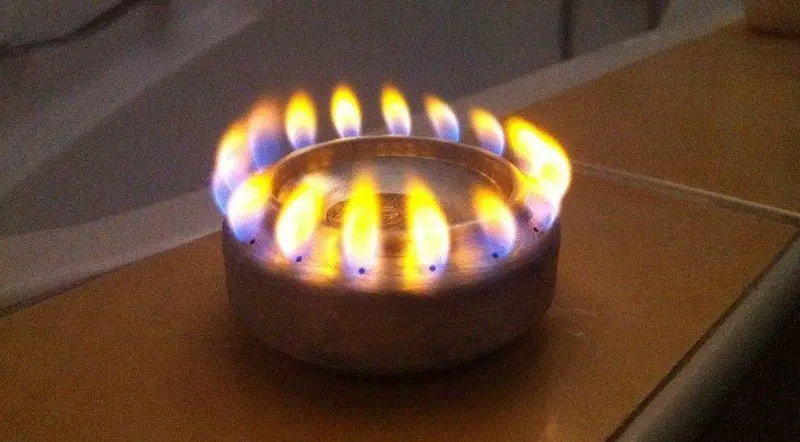
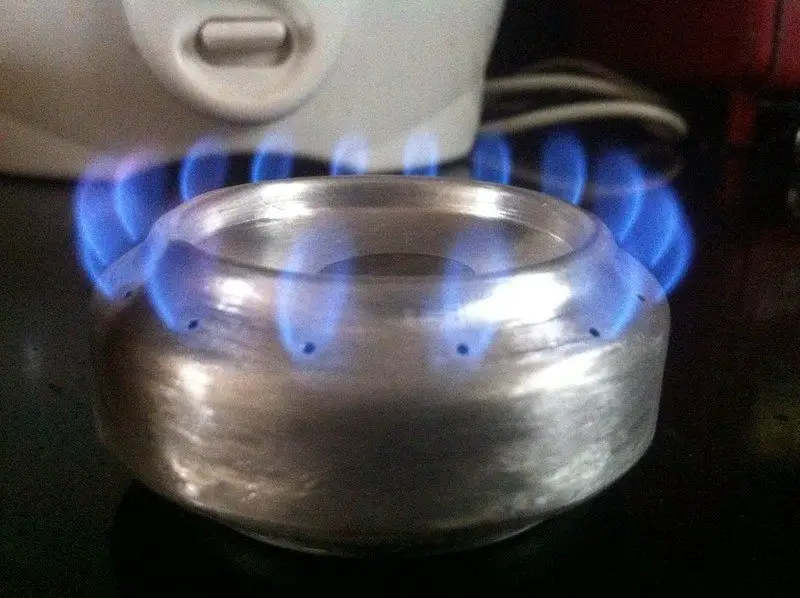
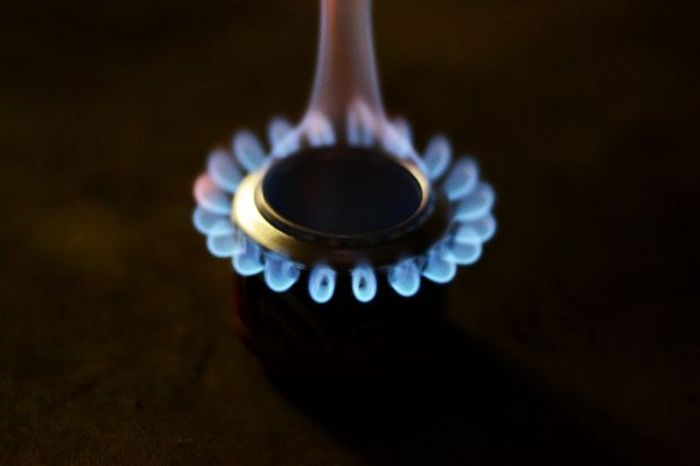
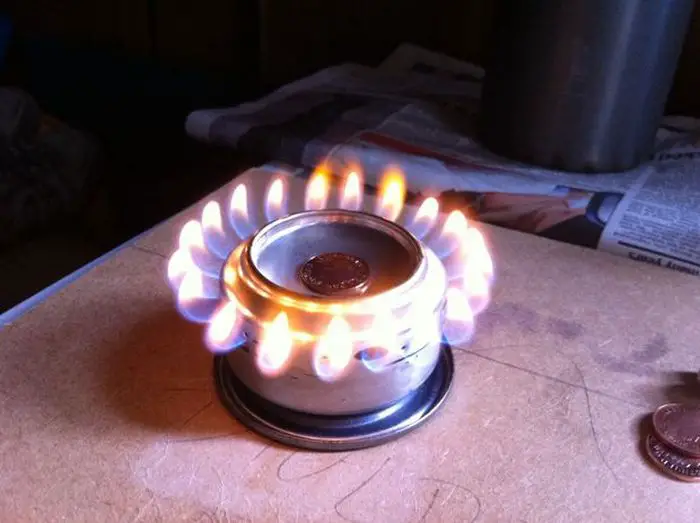
These are the steps for using the stove:
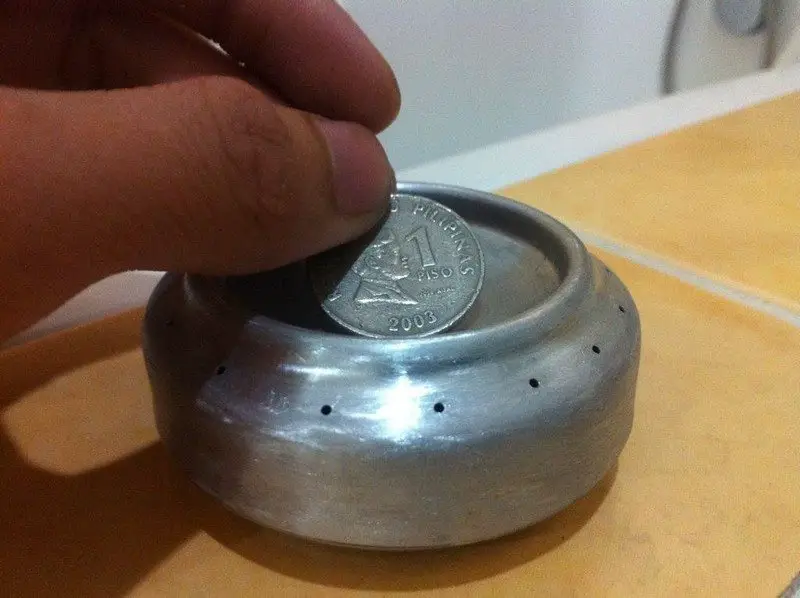
Pour alcohol into the stoves fuel inlet.

Cover the inlet with a coin or magnet.
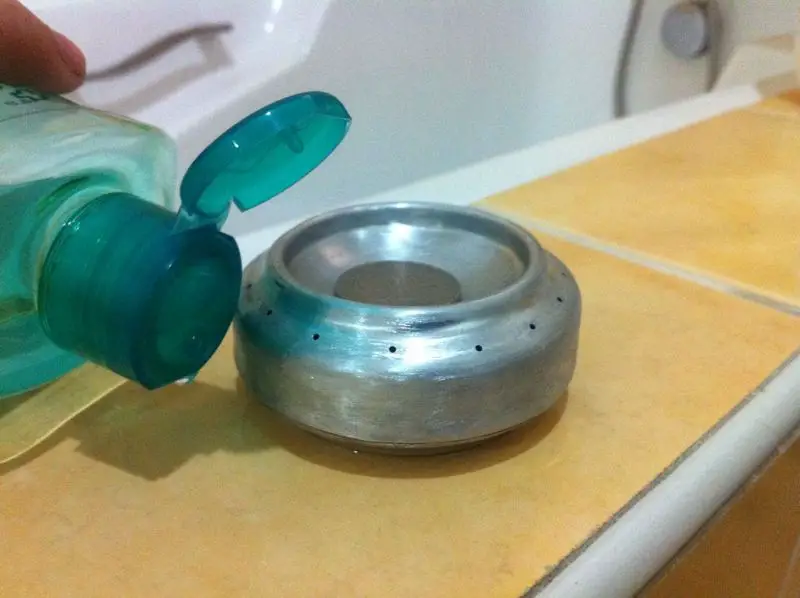
Pour alcohol “around” the stove.
Set the alcohol around the stove on fire.
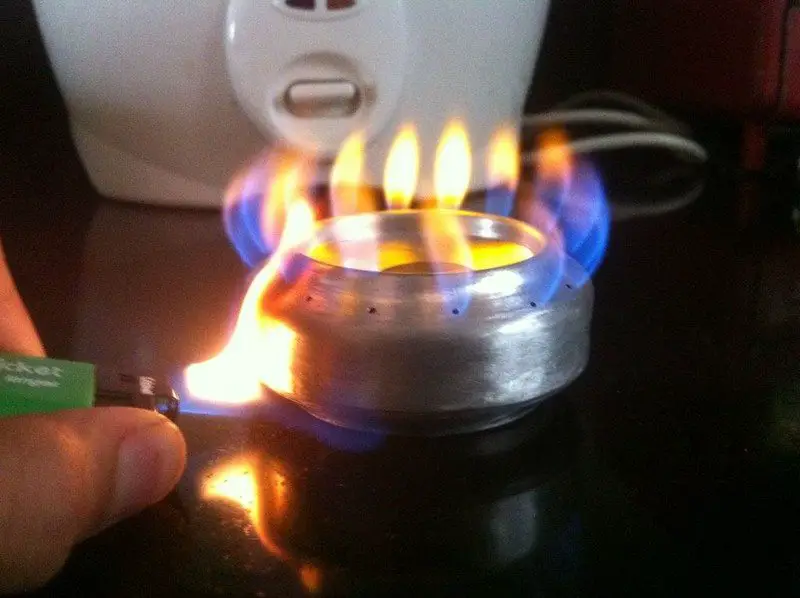
Wait until the jets works, you will hear a boiling sound.
Your’e done! Have fun modifying it :))))
If you want a small stove for camping or cooking or even as an emergency stove when you’re without power or gas, this could be the solution. You might want to think twice about throwing that soda can you just finished.
Thanks to ASCAS for this great project.
Contents
Testing a Pop Can Alcohol Stove: How Long Does It Burn?
A pop can alcohol stove is an efficient, lightweight, and inexpensive tool for outdoor cooking. To understand its performance, we tested how long it burns using different fuel types: ethanol, methanol, and isopropyl alcohol. Using one ounce of fuel in a controlled, wind-free environment, ethanol provided the longest burn time, averaging 8–10 minutes with a bright blue, clean-burning flame.
Methanol followed with 7–9 minutes, while isopropyl alcohol burned for 6–8 minutes but left heavier soot. These results show that ethanol is the most efficient choice for longer cooking sessions, especially when cleanliness and burn stability are essential.
Maximizing burn time requires careful preparation. Using a windscreen can block airflow and improve efficiency while maintaining a consistent fuel measurement, ensuring optimal performance.
Ethanol is the best and most reliable option, but methanol works well in a pinch. Pairing your stove with a pot stand and keeping a safe cooking distance can also enhance performance. A pop can alcohol stove remains an excellent choice for campers and survivalists needing a lightweight, reliable outdoor cooking solution.
Best Fuels for an Alcohol Stove: Pros and Cons
Alcohol stoves are popular among backpackers, campers, and survivalists for their lightweight design and simplicity. Choosing the right fuel is essential to maximize efficiency and performance. Each type of alcohol fuel has its pros and cons, so let’s explore the best options to help you decide which one is right for your stove.
Ethanol
Pros:
- Burns the cleanest with minimal soot.
- Produces a bright blue flame and high heat output.
- Renewable and widely available as denatured alcohol or bioethanol.
Cons:
- It can be more expensive than other fuels.
- Highly flammable and requires careful handling.
Methanol
Pros:
- Affordable and easy to find in products like HEET fuel-line antifreeze.
- Burns efficiently with a steady blue flame.
- Works well in colder temperatures.
Cons:
- Produces moderate soot compared to ethanol.
- Toxic if ingested or inhaled in large quantities.
Isopropyl Alcohol
Pros:
- Commonly available in most pharmacies.
- Inexpensive compared to ethanol and methanol.
- Effective in emergencies when other fuels aren’t available.
Cons:
- Burns with a yellowish flame and produces heavy soot.
- Requires a higher concentration (91% or 99%) for efficient burning.
Denatured Alcohol
Pros:
- A mix of ethanol and methanol, making it highly efficient.
- Readily available at hardware stores and outdoor supply shops.
- Burns cleanly with little to no soot.
Cons:
- Strong odor due to additives.
- Slightly more expensive than methanol.
Everclear or Grain Alcohol
Pros:
- A food-safe option, useful for emergencies.
- Burns cleanly with minimal residue.
- Dual-purpose as a stove fuel and antiseptic.
Cons:
- Expensive and heavily regulated in some areas.
- High consumption rate compared to other fuels.
The best fuel for your alcohol stove depends on your needs and environment. For the cleanest burn and maximum efficiency, ethanol or denatured alcohol are ideal. Methanol is a budget-friendly alternative, but it must be handled carefully due to its toxicity. Isopropyl alcohol works in a pinch but produces heavy soot, while grain alcohol is excellent for multi-use situations. Understanding the pros and cons of each fuel will help you make the best choice for your next outdoor adventure.

Safety Tips for Using a DIY Alcohol Stove in the Outdoors
Using a DIY alcohol stove, like the popular pop can alcohol stove, is a great way to enjoy lightweight cooking while camping. However, since these stoves involve open flames and flammable liquids, safety should always come first. Following proper precautions will ensure a safe and enjoyable experience while making the most of your stove.
Choose a Safe Location
Always set up your pop can alcohol stove on a stable, flat surface away from flammable materials. Clear the area of dry leaves, twigs, or any items that could catch fire. Avoid using the stove inside a tent or enclosed space to prevent the buildup of fumes or accidental fire hazards.
Handle Fuel with Care
When using alcohol as fuel, pour it carefully into the stove to avoid spills. Never overfill the stove, as excess fuel can leak and cause uncontrolled flames. Keep your alcohol container tightly sealed and stored away from the stove during use to minimize the risk of ignition.
Use a Windscreen Wisely
A windscreen can improve the efficiency of your pop can alcohol stove, but it must be used with caution. Leave enough ventilation to prevent heat from building up around the stove, which could cause it to overheat and fail. Position the windscreen at a safe distance to allow for proper airflow while protecting the flame.
Have Fire-Extinguishing Tools Ready
Always keep a small fire extinguisher, a bucket of sand, or water nearby in case of emergencies. If the flame gets out of control, you’ll need a quick way to extinguish it. Avoid blowing on the stove to put it out, as this can spread the flames or fuel.
Let the Stove Cool Before Handling
Once you’ve finished cooking, allow the pop can alcohol stove to cool completely before touching or moving it. Aluminum can heat up quickly and cause burns. Ensure that all flames are extinguished, and any residual fuel is safely disposed of before packing up.
Avoid Improvised Fuels
Stick to recommended alcohol fuels, such as ethanol, methanol, or denatured alcohol. Using improvised or alternative fuels can produce toxic fumes or unpredictable flames. This is especially important for maintaining safety when using a DIY pop can alcohol stove.
A pop can alcohol stove is an efficient and reliable cooking solution when used responsibly. You can enjoy your outdoor adventures without unnecessary risks by choosing the right location, handling fuel carefully, and keeping safety tools within reach. Always follow these tips to keep your camping trips both fun and safe.
Conclusion
A pop can alcohol stove is a simple, lightweight, and efficient tool for outdoor cooking. With just a few basic materials, you can create a reliable heat source for camping, hiking, or emergency situations. When built and used safely, it’s a cost-effective and eco-friendly alternative to traditional stoves.
Do you need a larger cooking tool for camping? Check out our campfire tripod guide next!


