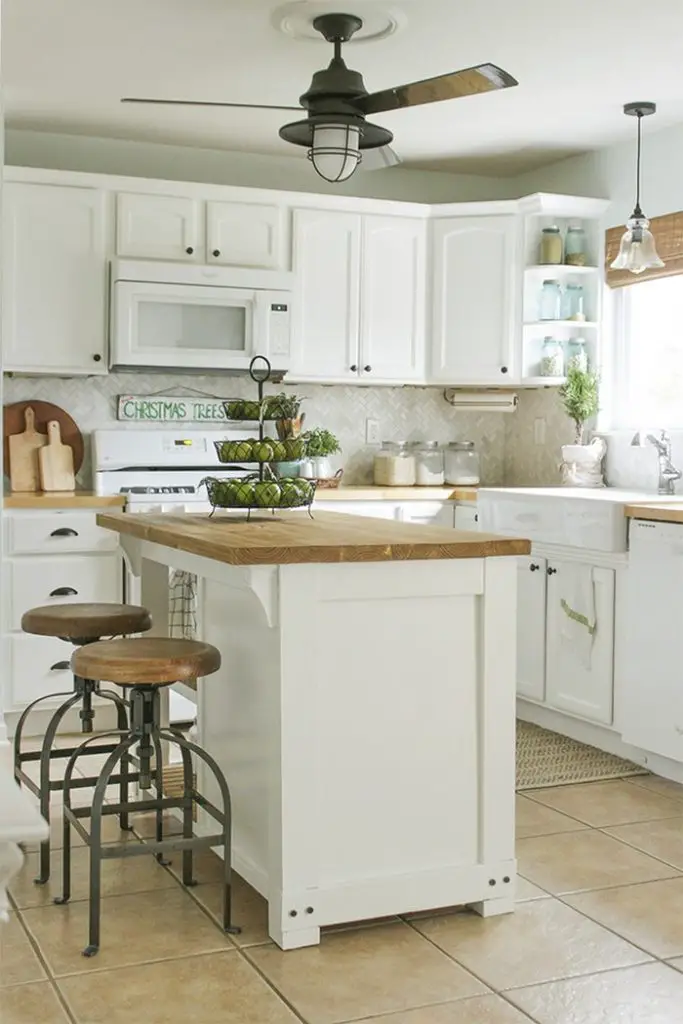
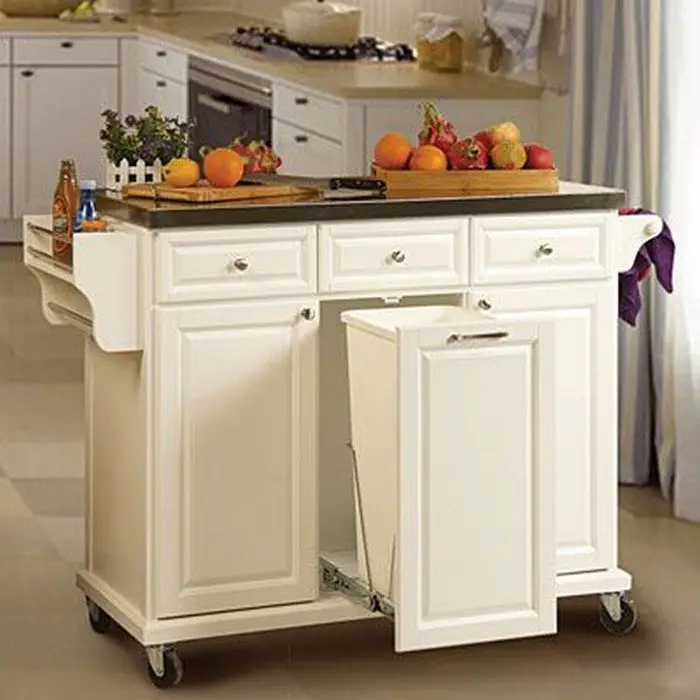
Clean as you go. Ideally, this applies to your kitchen especially if yours is frequently used. But is your kitchen set up in a way that it makes it easy for you to work in it? If your kitchen needs improvement in terms of functionality, here’s one project that can make working in the kitchen a delight!
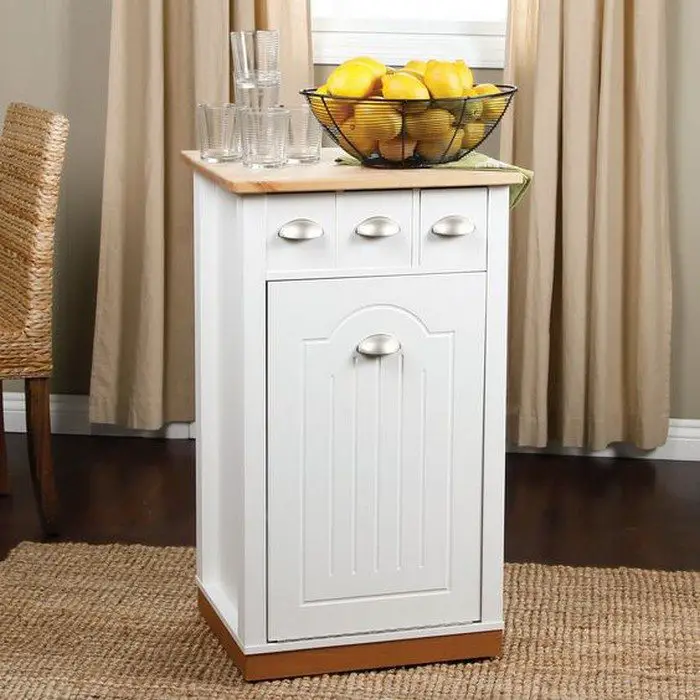
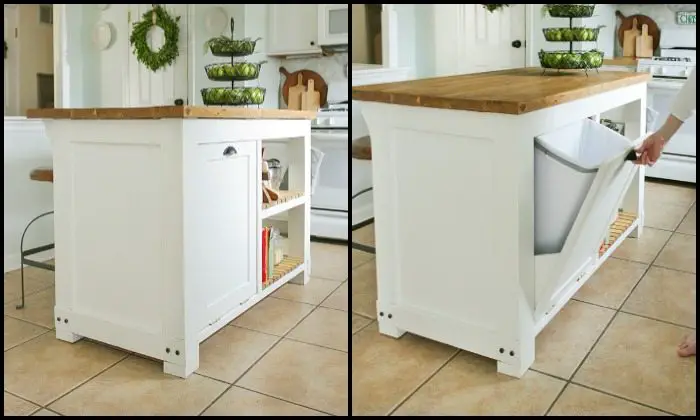
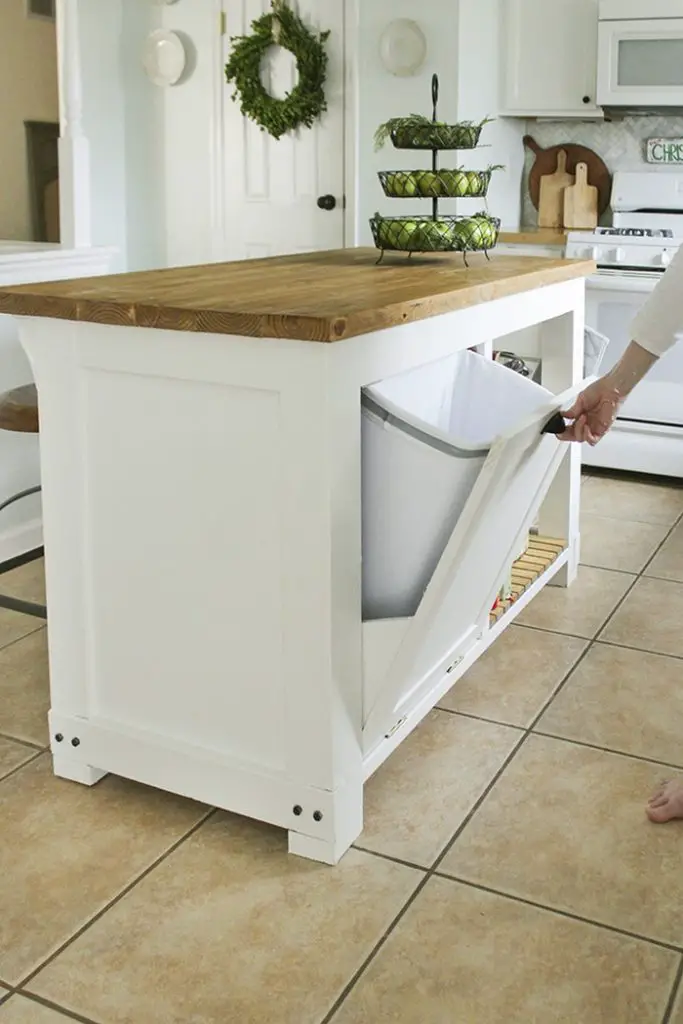
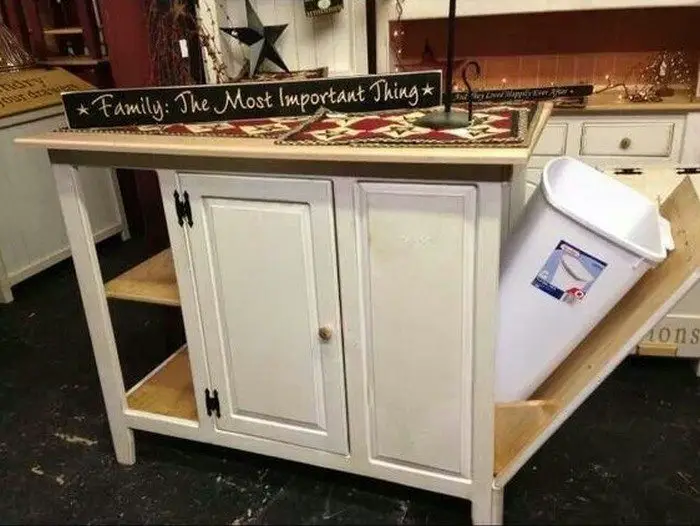
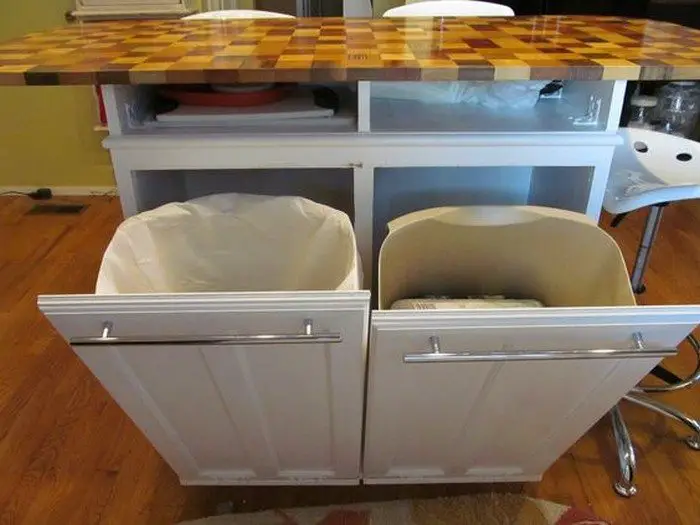
If you’ve got the space, a small kitchen island with a trash storage is a great project that you can do for your kitchen.

It makes preparing meals and keeping the kitchen clean at the same time easy. You can slice and peel food, and throw all the trash right away without having to go back and forth around the kitchen!
What’s also great is that your trash is kept out of sight – definitely better than having your trash bin simply sitting against a wall, exposed and perhaps wasting usable space!
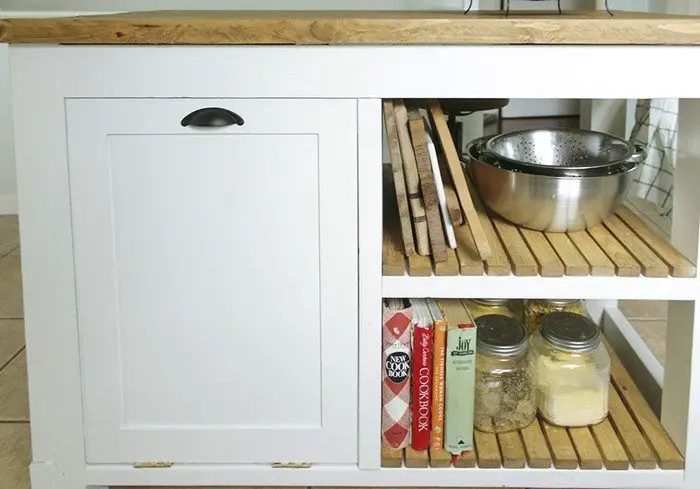
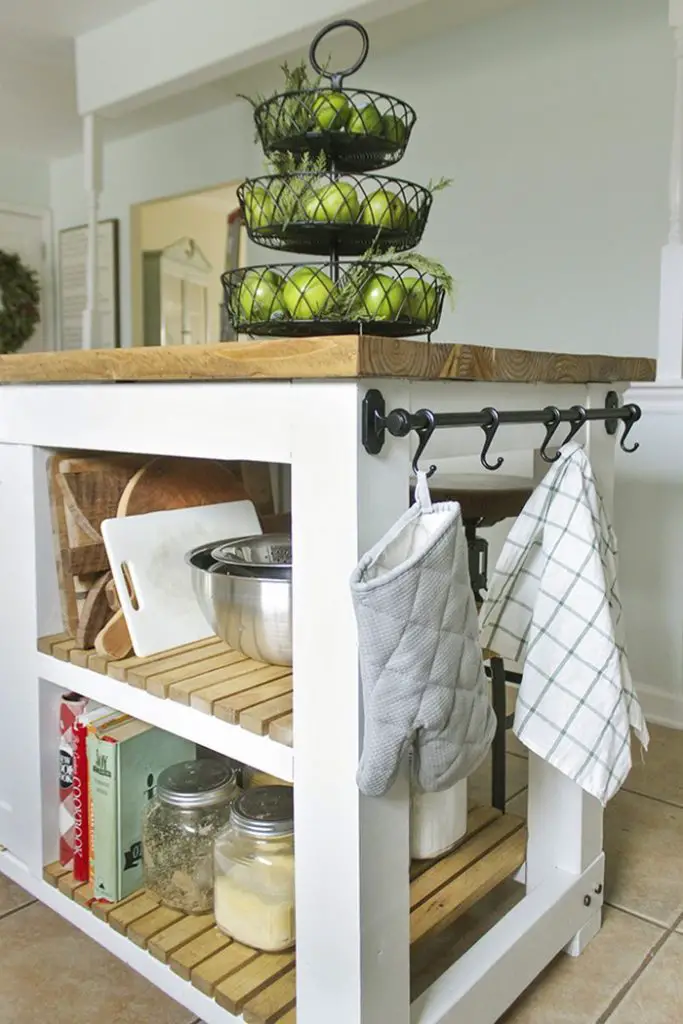
As with this featured kitchen island, you can add shelves to your DIY project so that your most commonly used kitchen equipment and ingredients are well within easy reach every time you cook!
Is this going to be your next kitchen project?
Contents
Building a Kitchen Island
Materials
- 4 pcs of 2×6 @ 8’
- 2 pcs of 4×4 @ 8’
- 4 pcs of 2×4 @ 8’
- 6 pcs of 1×2 @ 8’ Furring Strips
- 1 pc of 1×3 @ 8’
- 1 pc of ½” Plywood @ 4’x8’
- 1 pc of ¼” Plywood @ 2’x2’
- 2 Wooden Osborne Carpi Mission Corbel, 2 ¾” x 6” x 3”
- 8 Hex Lag Screws
- 1” Pocket Hole Screws
- 1 ¼” Pocket Hole Screws
- 2 ½” Pocket Hole Screws
- 4” Deck Wood Screws
- 1” Nails
- 2” Flat Hinges
- Wood Filler
- Ikea Fintorp Rail with Kooks
- 1 Cup Pull
Tools
- Measuring Tape
- Cordless Drill
- Circular Saw
- Table Saw
- Sliding Compound Miter Saw
- Kreg Jig Pocket Hole System
- Cordless Nailer
- Orbital Sander (with 150 and 220 grit sandpaper)
- Belt Sander (with 80 grit sandpaper)
- 1” Wood Chisel
- Wood Clamps
- Wood Glue
- Safety Gear
Instructions
Step 1: Design and Planning
- Measure and Plan: Determine the dimensions of your kitchen island. Standard kitchen islands are typically 36 inches tall. Plan the layout, including space for the trash bin and storage shelves.
- Sketch the Design: Draw a detailed plan including the top view, front, and side views of your island.
Step 2: Cutting Materials
- Cut the 4×4 Posts: Using the table saw, cut the 4×4 posts to your desired height, usually 34.5 inches, considering the countertop thickness.
- Prepare the Frame: Cut the 2×6 and 2×4 pieces to form the top frame and shelving framework.
- Cut Plywood: Using a circular saw, cut the ½” plywood for the island’s top and sides, and the ¼” plywood for the back panel.
Step 3: Assembling the Frame
- Build the Frame: Assemble the 2×6 and 2×4 pieces into a rectangular frame using the Kreg Jig for pocket holes and securing them with screws.
- Attach the Legs: Secure the 4×4 posts at each corner of the frame using hex lag screws for a sturdy structure.
- Install Shelves: Fit the 1×2 furring strips within the frame to support the shelving.
Step 4: Adding Panels and Features
- Attach Plywood Panels: Secure the ½” plywood panels to the sides and top using the cordless nailer and 1” nails.
- Mount Back Panel: Attach the ¼” plywood as the back panel using smaller nails or wood screws.
- Install Corbels: Attach the Osborne Carpi Mission Corbels under the countertop for additional support and decorative touch.
Step 5: Finishing Touches
- Sand the Island: Smooth all surfaces using the orbital and belt sanders. Start with a rougher grit and finish with a finer grit for a smooth finish.
- Apply Wood Filler: Fill any gaps or screw holes with wood filler, then sand smooth once dry.
- Paint or Stain: Choose a paint or stain to match your kitchen decor. Apply at least two coats, allowing ample drying time between coats.
- Install Hardware: Attach the Ikea rail for hooks on one side, and the cup pull on the drawer or cabinet door.
Step 6: Final Assembly
- Attach Hinges and Door: Install the door using the flat hinges to conceal the trash bin.
- Safety Check: Ensure all screws are tightened and there are no sharp edges or loose parts.
Step 7: Installation
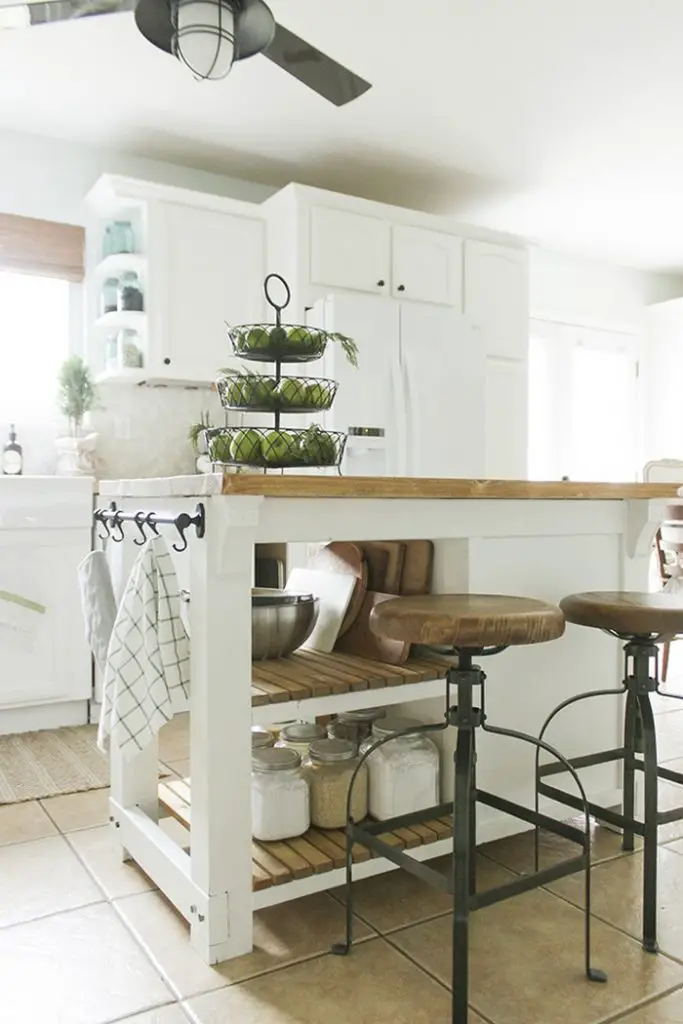
- Place in Kitchen: Move the island to your kitchen. Ensure it’s level by adjusting any necessary components.
- Enjoy Your New Kitchen Island: Organize your kitchen tools and enjoy the functionality of your new piece!
Click on any image to start lightbox display. Use your Esc key to close the lightbox. ![]()


You can get more step-by-step instructions from Shades of Blue Interiors over here…
Space-Saving Design Ideas for Small Kitchens
In small kitchens, maximizing space while maintaining functionality and style is crucial. Innovative space-saving designs can transform cramped kitchens into more efficient and enjoyable spaces. Here are some smart design ideas tailored for small kitchens:
Foldable Countertops
Foldable or pull-out countertops provide extra prep space when needed and tuck away easily when not in use. This feature is particularly useful in very small kitchens where permanent counter space is limited. Opt for a foldable counter that can be mounted on the wall or integrated into existing cabinetry.
Compact Kitchen Islands
Consider a small, movable kitchen island with built-in storage. This can serve as additional counter space, a breakfast bar, and a storage unit all in one. Choose an island on casters for flexibility, allowing you to move it aside when more floor space is needed.
Vertical Storage Solutions
Maximize vertical space by installing cabinets up to the ceiling. Use the higher shelves for storing seldom-used items like seasonal cookware. Adding a library ladder can enhance access and add a unique design element to the kitchen.
Hanging Pots and Pans
Free up cabinet space by using a ceiling-mounted rack to hang pots and pans. This keeps your cookware easily accessible and can add a stylish, industrial touch to the kitchen. Ensure the rack is securely mounted and positioned so it doesn’t obstruct kitchen traffic.
Appliance Garages
An appliance garage is a dedicated cabinet designed to house frequently used appliances, keeping them accessible but out of sight when not in use. This helps maintain a clean and uncluttered countertop, giving the illusion of more space.
Pull-out Pantries
A pull-out pantry can be an excellent space-saving alternative to traditional pantry cabinets. It provides easy access to food items and can be seamlessly integrated into existing cabinetry, making use of narrow spaces that might otherwise go unused.
Under-Sink Drawers
Make the most of the space under the sink with pull-out drawers. These can be customized to fit around plumbing and are ideal for storing cleaning supplies and other kitchen essentials.
Multi-functional Furniture
Choose furniture that can serve multiple purposes. A small dining table might also serve as a prep area, or a bench could offer additional storage underneath. Furniture that can adapt to different needs will make the most of limited space.
Mirrored Backsplashes
Installing a mirrored backsplash can visually expand the space by reflecting light and views, giving the impression of a larger kitchen. This also adds a modern and elegant touch to your décor.
Every square inch counts in the tiniest kitchens, which can be made more cosy and useful by implementing these space-saving ideas.
Customization Options for Kitchen Islands
Kitchen islands are a central feature in many homes, offering a unique blend of functionality and style. Customization is key to ensuring that a kitchen island not only fits the available space but also meets the specific needs of homeowners.
Here are several customization options that can enhance the utility and appeal of a kitchen island.
Adjustable Height Features
Incorporating an adjustable height mechanism into a kitchen island can cater to various activities, from food preparation to dining. This feature allows the island to be lowered for seating or raised for cooking, making it versatile and ergonomic.
Built-In Appliances
Integrating appliances such as dishwashers, refrigerators, or wine coolers into the kitchen island can save space and streamline the kitchen’s layout. This customization not only enhances functionality but also gives the kitchen island a sleek, modern look.
Custom Storage Solutions
Tailor the storage options in your kitchen island to suit your culinary needs. Install deep drawers for pots and pans, spice racks for seasonings, or specialized compartments for utensils. Custom storage makes the kitchen island a hub of organization and efficiency.
Choice of Countertop Materials
The countertop is one of the most visible parts of the kitchen island and offers extensive customization options. Whether it’s durable granite, sleek stainless steel, or warm wood, the choice of material can define the island’s aesthetic and functional qualities.
Pop-Up Electrical Sockets
For those who use the kitchen island as a workspace or charging station, pop-up electrical sockets are a must-have. These can be discreetly integrated into the countertop and are accessible with just a press, providing power exactly where and when you need it.
By exploring these customization options, homeowners can ensure their kitchen island is not only a statement piece but also a perfectly tailored addition to their living space. Each modification enhances the island’s function, proving that with the right choices, a kitchen island can transform any culinary environment.
Conclusion
Building a kitchen island with a compact trash bin enhances kitchen efficiency and aesthetics. This feature allows for easy disposal and keeps waste hidden, maintaining a clean and organized space. Ultimately, a kitchen island with this functionality is a smart addition for any home seeking to optimize kitchen activities and design.