Planting is fun! It can be a great pastime and an effective way to take your mind off things. Plus, it’s satisfying, too, especially when you harvest the fruits of your labour. But do you know what takes the fun out of planting? Back pain.
However, a simple solution to this problem is a DIY hand-held seed planter. With this tool, you can plant while standing upright, avoiding any discomfort or pain.
You know what I mean if you’ve been planting beans and corn. The task involves a lot of stooping, bending, and crawling. You must poke the ground with your finger to create a hole where you’d drop the seed.
When everything’s done, you end up with a sore back. You love doing it, but why deal with a sore back when you can prevent it in the first place?
Contents
How to Make a DIY Hand-Held Seed Planter?
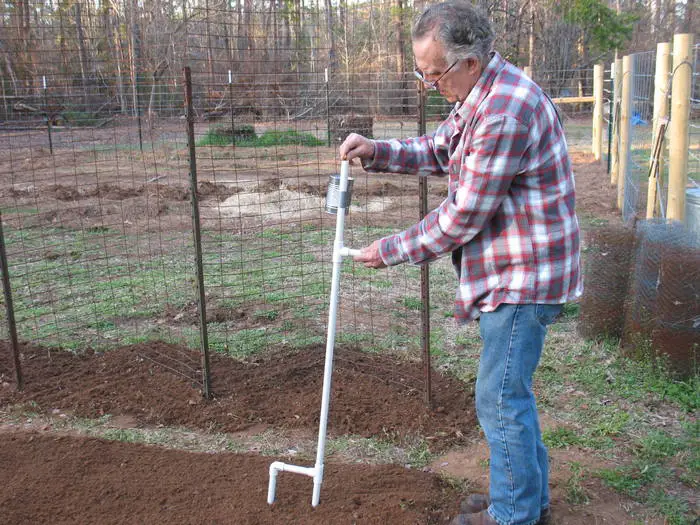
Here’s a great idea: A DIY hand-held seed planter! Say goodbye to stooping, bending, and crawling. You can poke a hole, drop a seed, and plant while standing upright. Neat stuff, right?
This hand-held seed planter is very easy to make. You can finish making this in under an hour – and it’s inexpensive, too! The materials are also easily found at your local plumbing or hardware store. Gather everything you need and let’s get to work!
Materials
What you’ll need to build a hand-held seed planter:
- 1 pc ½” PVC, 48” long
- This is the main component of the planter and it serves as the handle. You can adjust the length depending on your height.
- Inline-T fitting (2 pcs)
- T-connectors are utilized to connect two pipes at a 90-degree angle, in this instance, they join the planter handle to the remainder of the planter.
- 1 pc 8” long x ½” tubing
- This is part of the planter that will be the pathway of the seeds. It’s a hollow pipe that is attached to the handle.
- 1 pc 5 ½” long x ½” PVC tubing
- This tube will be inserted into the 8″ tubing to make a smaller hole for the seed to drop into.
- 1 pc elbow ½”
- This is a 90-degree elbow-shaped connector that is attached to the end of the 5 ½” tubing.
- 1 pc 6” long x ½” tubing
- This part of the planter will hold the wooden plug.
- 1 pc Tapered wooden plug
- This wooden plug will poke the holes for the seeds.
- 1 pc long, narrow bolt (cut the head off)
- This is used to hold the wooden plug and the PVC pipe together
- 2 pcs washers (2 pcs)
- These are used to secure the bolt in place.
- 2 pcs nuts (2 pcs)
- These are used to secure the washers in place.
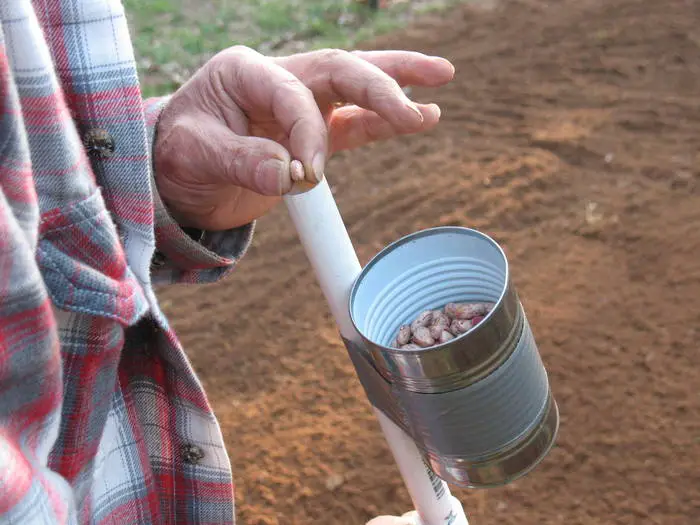
- 1 pc Tin can
- This will serve as the seed holder. The can is attached to the handle’s top using duct tape.
- Duct tape
- This is used to attach the tin can to the handle and to cover any exposed parts of the planter.
- Glue
- This secures the planter’s components, including the wooden plug and tubing.
Create a handheld seed planter to relieve the discomfort and pain of traditional planting techniques by gathering materials and following instructions.
Tools
To make a DIY hand-held seed planter, you’ll need the following tools:
- Drill
- A power drill is a must-have tool to create holes in PVC pipes, tin can, and wooden plug.
- Saw
- A saw is required to cut the PVC pipes, tubing, and wooden plug to the appropriate length.
- Tape Measure
- You need a tape measure to measure and mark the appropriate length of PVC pipes and tubing.
- Sandpaper
- Sandpaper is essential to sand and smooth the edges of the PVC pipes and tubing.
- Marker
- A marker will indicate the placement and dimensions for drilling holes.
Having these tools will enable the quick and easy assembly of your own manual seed planter.
Instructions
Ready to build your DIY hand-held seed planter? Great! Let’s begin the step-by-step process to create this helpful device. Follow these instructions carefully and you’ll be planting your crop effortlessly in no time!
Cutting the PVC Tubing
To begin constructing the DIY hand-held seed planter, the first step is to cut a piece of ½” PVC tubing to the desired length. It is recommended to use a length of about 48” for the planting tube. However, you can make adjustments to the length depending on your height and personal preferences.
If you are tall, consider using a longer piece of tubing to avoid excessive bending while planting seeds. Conversely, shorter individuals may opt for a shorter tubing length for convenience.
It’s essential to choose a comfortable length for the planting tube to make the entire process more manageable and efficient.
Add the Handle
After cutting the PVC tubing to the desired length, add a handle to make it easier to use. To achieve this, attach an inline-T fitting approximately 8 inches below the top of the PVC tubing using glue. This will create a T shape with the tubing and allow you to easily grip the planter.
Attach an 8-inch tubing to the inline T fitting to form the handle and ensure that it is securely attached to the planter by using a strong adhesive. Consider adding a cap to the handle’s end for a more polished appearance, though it is not required.

Attaching a handle to the planter enables improved handling while sowing seeds, thereby facilitating the process with greater efficiency. Additionally, this modification alleviates stress on your back and knees, enabling you to plant seeds for longer durations without experiencing any discomfort.
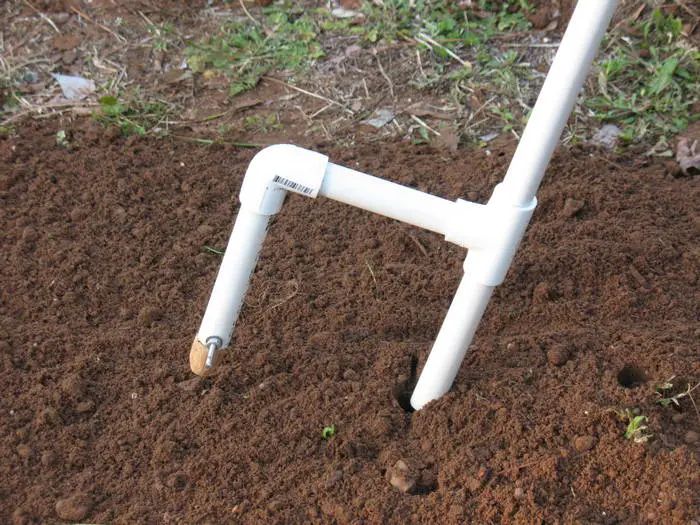
Add the Seed Spacer/Hole Poker
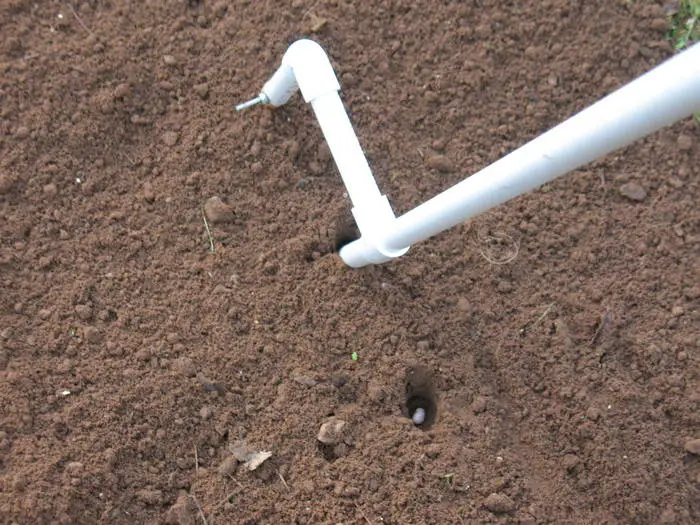
Adding the seed spacer and hole poker is a crucial step in creating a functional hand-held seed planter. To begin, secure another inline-T fitting to the PVC tubing, about 6 inches up from the bottom. This fitting will serve as the base for the seed spacer and hole poker.
Next, take a 5 ½” piece of tubing and glue it into the inline-T fitting. Ensure it is secure and straight, as it will be responsible for correctly spacing the seeds. After this, attach an elbow to the end of the tubing, making sure that it is securely glued into place.
The Wooden Plug
Next, glue a piece of tubing approximately 6 inches long into the bottom of the elbow. This tubing will be responsible for holding the wooden plug that will poke the holes for the seeds. To make a poker hole, insert a wooden plug into the tube’s base.
The plug must be created from a sturdy material capable of enduring frequent usage and sharpened to facilitate effortless piercing through the earth.

Ensure a tight fit between the wooden plug and the tube to prevent dislodging during use. To reinforce the attachment, drill a 3/16th hole through both components and thread the bolt, removing the head to create a small all-thread piece.
Insert the all-thread through the hole, put a washer and nut on each side, and snug them up to the tube. This will hold the wooden plug in place and ensure that it stays secure during use. Leave about an inch of all-thread sticking out on each side to serve as a depth gauge.
Add the Seed Holder
To complete your DIY hand-held seed planter, securely fasten a small tin can to the PVC tubing using duct tape.
The can functions as a seed container, enabling convenient access to the seeds for planting. Just transfer the seeds into the can, and proceed with ease, resulting in saved time and increased planting efficiency.
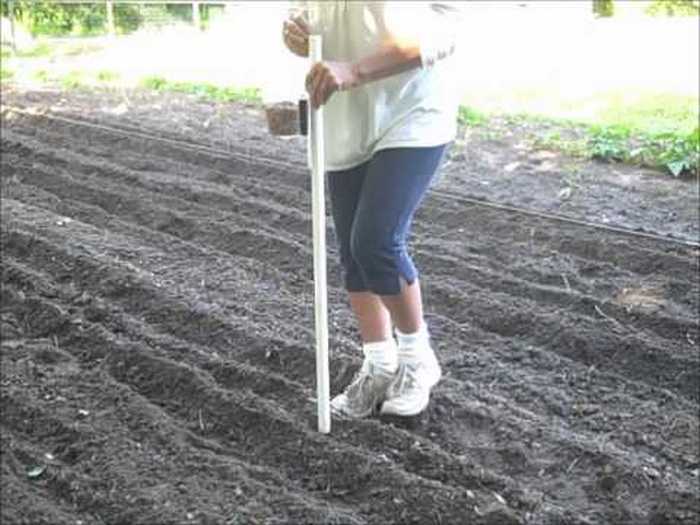
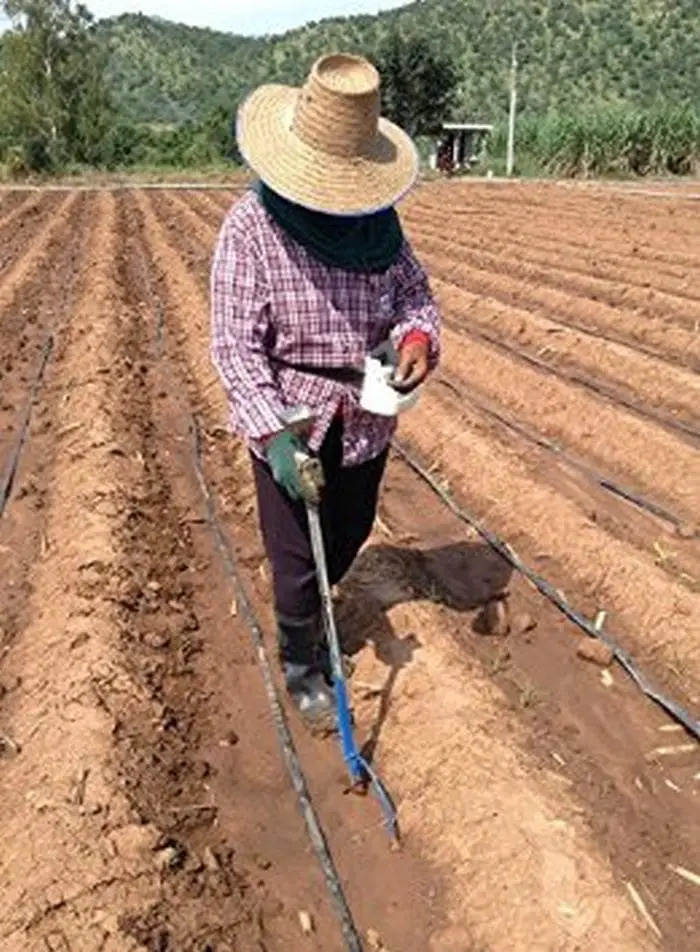
Using the Planter
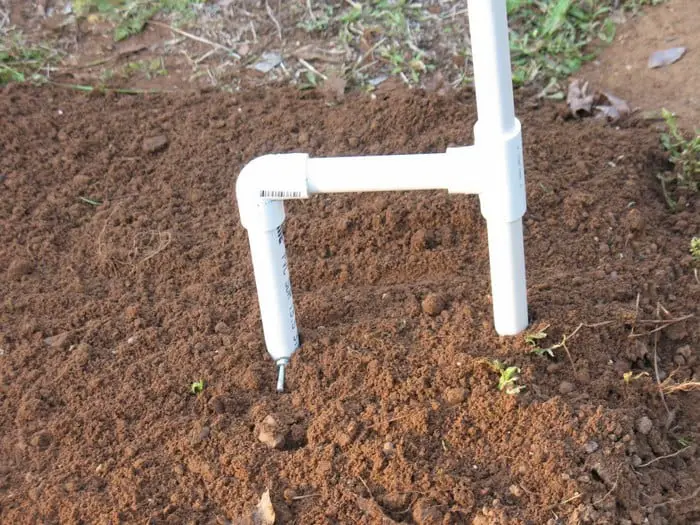
To start using the planter, use the hole poker to make a planting hole. Drop the seed down the PVC tubing to plant it in the hole. The device spaces the seeds at the correct interval and ensures that they are planted at the right depth.
With this simple and affordable DIY seed planter, you can make your planting process much easier and more efficient.
Benefits of Using a Hand-Held Seed Planter
A hand-held seed planter makes all the difference in your health and effort. Below are the reasons why you should consider making one at home.
No More Back Pain
The innovative design of the DIY hand-held seed planter addresses one of the most common complaints among gardeners: back pain. Traditionally, planting seeds has been a labor-intensive process involving a lot of bending, stooping, and kneeling.
However, with a hand-held seed planter, this is no longer necessary. This tool allows gardeners to work in an upright position, significantly reducing strain on the back, neck, and knees. It ensures that gardening remains a joy rather than a chore, making it accessible even to those with physical limitations. The hand-held seed planter is not just a tool; it’s a solution for a pain-free gardening experience.
Saves Time
Efficiency is key in any gardening endeavor, and the hand-held seed planter excels in this aspect. It streamlines the seed planting process, allowing for rapid and accurate seed placement. This is particularly beneficial when working on larger areas, where traditional methods would require considerably more time and effort.
The hand-held seed planter ensures that seeds are evenly spaced and planted at the correct depth with each use. This level of precision not only saves time during the planting process but also promotes better germination rates and healthier plant growth, leading to more fruitful outcomes.
Easy to Use
The hand-held seed planter stands out for its user-friendly design. It is intuitively designed, making it easy for even gardening novices to use effectively. There’s no complex setup or learning curve involved. Simply load the seeds into the planter, and you’re ready to start planting with precision.
This ease of use encourages more people to take up gardening, whether as a hobby or a step towards self-sufficiency. The hand-held seed planter proves that you don’t need advanced gardening skills to achieve a beautiful and productive garden.
Inexpensive
One of the most appealing aspects of a DIY hand-held seed planter is its cost-effectiveness. The materials required to construct this tool are readily available at any local hardware or plumbing store, and they’re surprisingly affordable.
By following simple instructions, gardeners can build their own hand-held seed planter, saving money that would otherwise be spent on more expensive commercial planting tools. This makes the hand-held seed planter an excellent investment, especially considering the benefits of reduced physical strain, time savings, and ease of use. It embodies the essence of DIY culture: innovative, economical, and empowering.
Check out the gallery below for a closer look at the finished product.

Click on any image to start the lightbox display. Use your Esc key to close the lightbox.
Thanks to Sensible Survival for this great project. You can get step-by-step instructions here…
Guide to Selecting the Right Seeds for Your Planter
Selecting the right seeds for your hand-held seed planter is crucial for maximizing its benefits and ensuring a successful and bountiful garden. The right seeds can make the difference between a thriving garden and one that falls short of expectations.
This guide will walk you through the key considerations and tips for choosing seeds that are compatible with your hand-held seed planter, ensuring an efficient planting process and a rewarding gardening experience.
Understanding Your Hand-Held Seed Planter
Before diving into seed selection, it’s essential to familiarize yourself with the specifics of your hand-held seed planter. These planters are designed for ease and efficiency but work best with certain sizes and types of seeds. Knowing the specifications of your planter, such as the size of the seed it can accommodate and the depth at which it plants, will guide you in selecting the most suitable seeds.
Seed Size and Type
The versatility of hand-held seed planters shines when paired with seeds of the appropriate size. These devices are particularly adept at handling small to medium-sized seeds, which can easily navigate the planter’s delivery mechanism. Larger seeds or those with irregular shapes may pose challenges, including blockages or inconsistent planting depth.
To ensure smooth operation, measure or research the dimensions of potential seeds. Select varieties that align with the capacity of your hand-held seed planter’s seed compartment. This careful selection guarantees a seamless planting experience, allowing you to cover more ground efficiently and with less effort.
Beyond size, the resilience and germination potential of seeds are paramount. High-quality seeds that exhibit strong vitality and are less susceptible to diseases ensure a fruitful garden. For users of hand-held seed planters, selecting robust seeds with high germination rates is crucial.
Vegetables, flowers, and herbs germinating without soaking or other pre-planting treatments are particularly suited to these devices. High-quality, untreated seeds, free from chemical treatments, are not only healthier for the environment but also tend to result in more vigorous plant growth. Utilizing your hand-held seed planter with such seeds enhances your garden’s success rate, making every planting session more productive.
Seasonality and Climate Compatibility
Timing is everything in gardening. The lifecycle of plants is deeply intertwined with the seasons, making it essential to match seed planting to the appropriate time of year. Hand-held seed planters offer an efficient means to sow seeds precisely when they stand the best chance of thriving.
Whether preparing for the spring vegetable garden or the fall flower bloom, using a hand-held seed planter can streamline the process. It allows for quick and accurate planting, ensuring that each seed is sown optimally. Planning your planting calendar around the seasons and using a hand-held seed planter can significantly boost your garden’s yield and vitality.
The adaptability of plants to your local climate is a critical factor in gardening success. Not all seeds will prosper in every environment, necessitating a selection tailored to your specific climate conditions. Factors such as temperature, humidity, and rainfall play significant roles in plant growth. Researching or consulting with local gardening experts can provide insights into the seeds best suited to your area.
Local extension services and gardening clubs are excellent resources for this information, offering tailored advice that considers your region’s unique climate characteristics. Choosing seeds that perform well in your local conditions and using a hand-held seed planter for precise sowing can enhance your garden’s resilience and productivity, ensuring a lush, thriving landscape.
Garden Space and Planting Goals
Your available garden space can influence seed selection. If you’re working with limited space, consider seeds for plants that grow vertically, such as beans or tomatoes. Your hand-held seed planter can help efficiently sow these seeds, maximizing your garden’s vertical space.
Whether aiming for a kitchen garden full of fresh herbs and vegetables or a vibrant display of flowers, your goals will dictate the types of seeds you should select. Use your hand-held seed planter to plant various seeds that align with your gardening ambitions, from culinary herbs to colorful blooms.
Experimentation and Diversity
Finally, don’t be afraid to experiment with different seeds in your hand-held seed planter. Each planting season offers an opportunity to try new varieties and discover what works best in your garden. Embrace the diversity of seeds available and use your hand-held seed planter to explore a wide range of plants. Experimentation can lead to surprising successes and add excitement to your gardening adventures.
Conclusion
Gardening is an enjoyable and fulfilling pastime, however, it may also be physically demanding. Back discomfort can take the fun out of it, but with a hand-held seed planter, you can enjoy gardening without any unease. Additionally, creating your own hand-held seed planter is a simple and economical option, why not try it?
Add more functionality to your garden by checking our outdoor DIY garden sink guide next!


