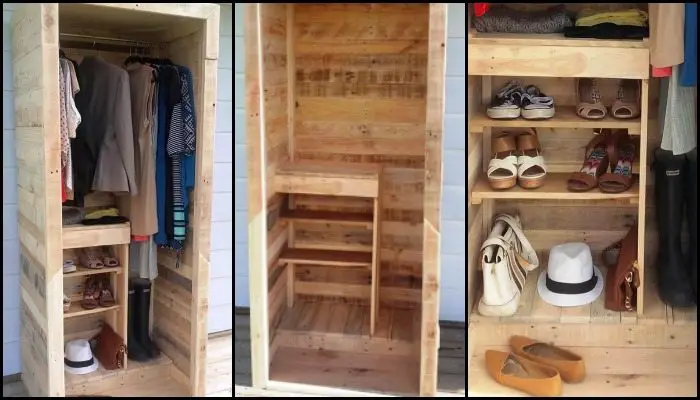
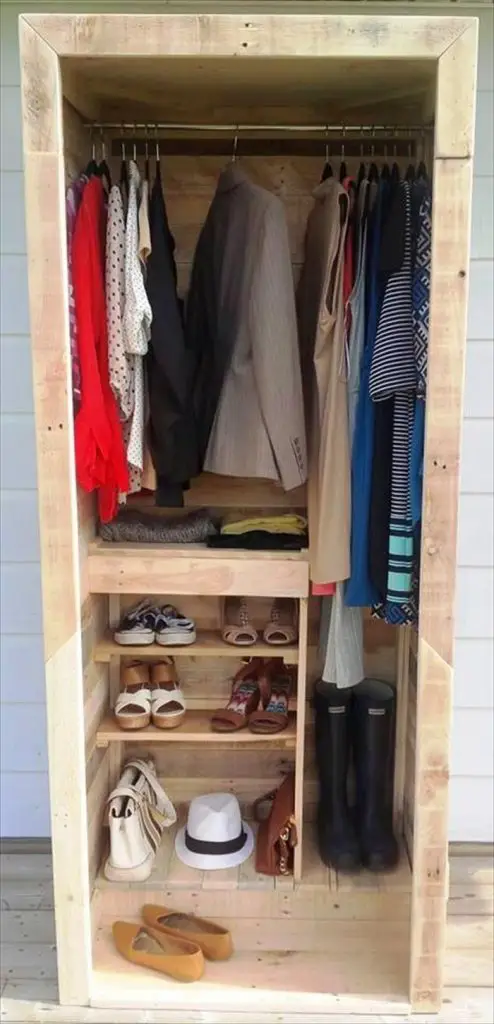
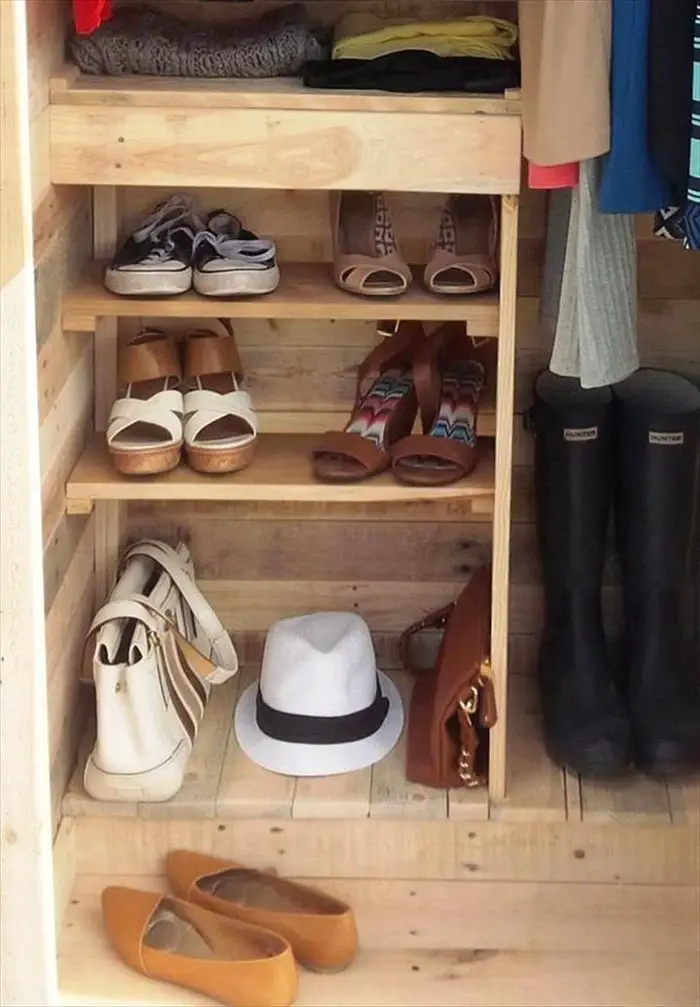
Do you want to start organizing your things more effectively to keep your room tidy? Bags, coats and jackets, hats and shoes – things we frequently use are the usual culprits for a messy room.
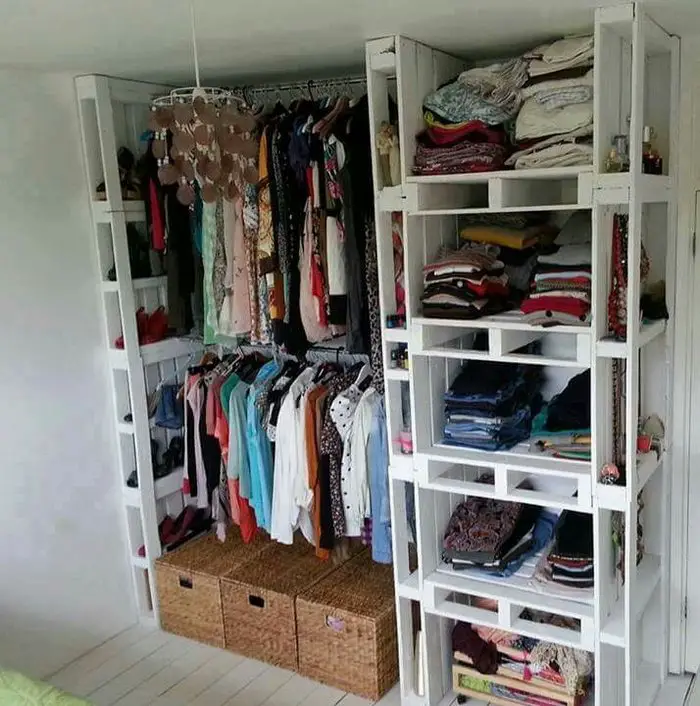
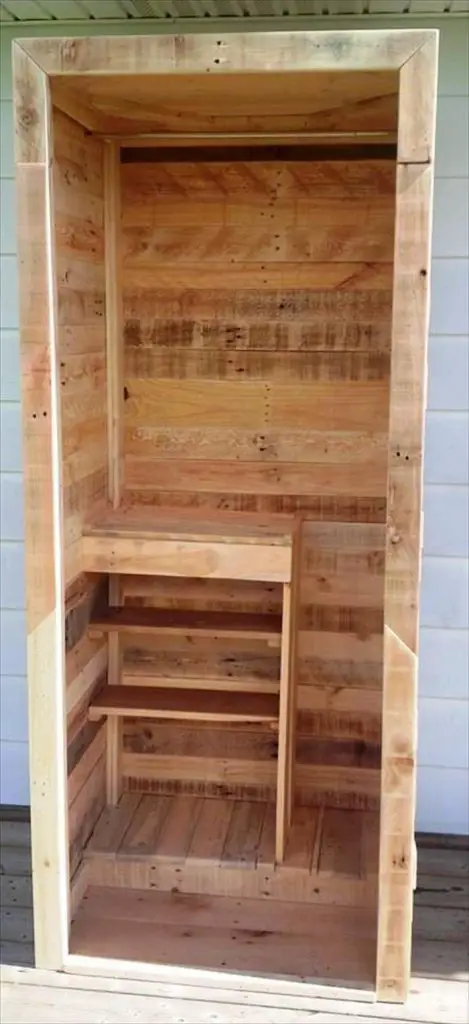
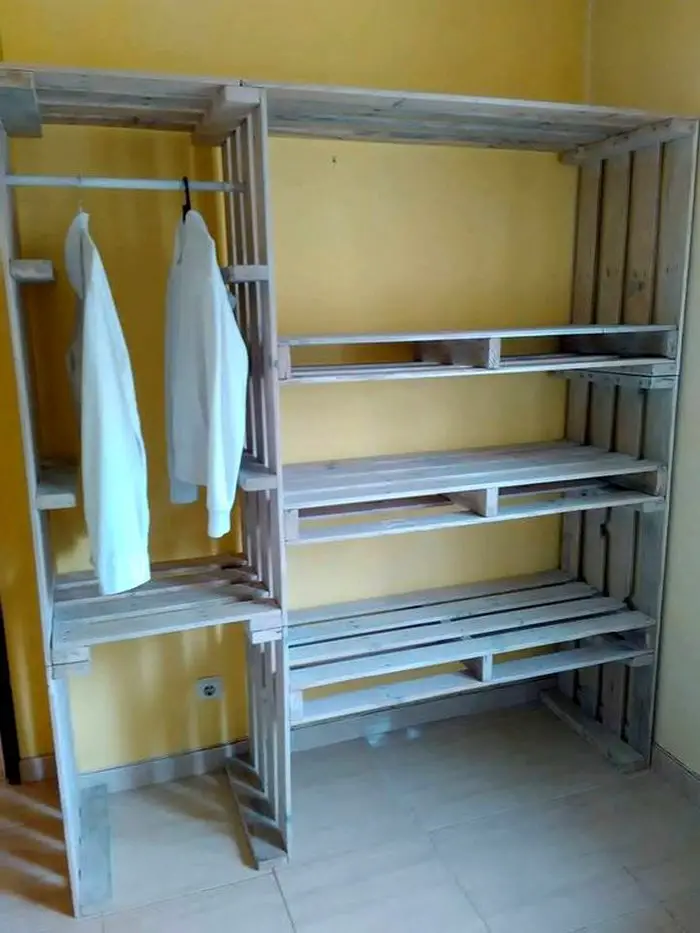
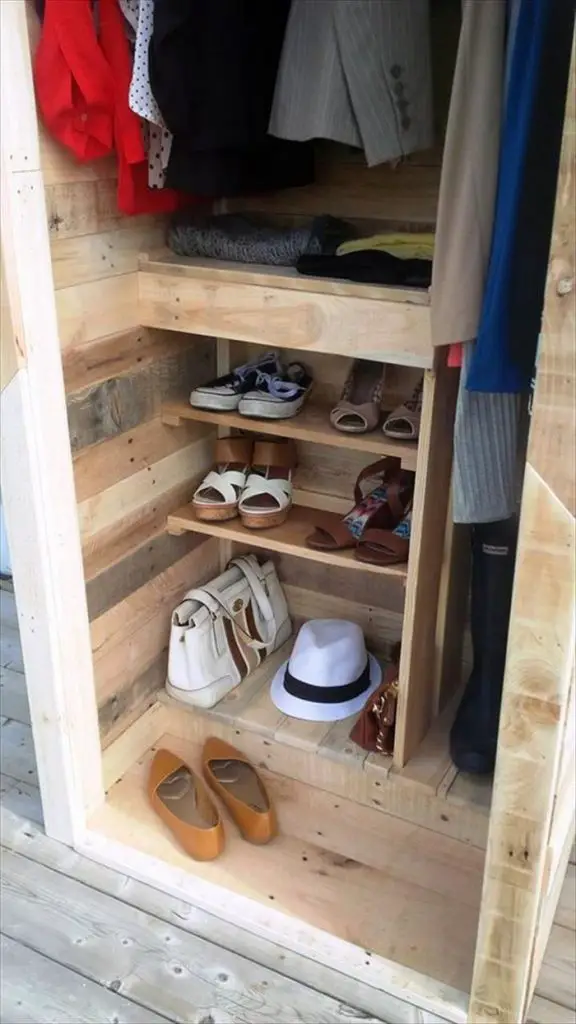
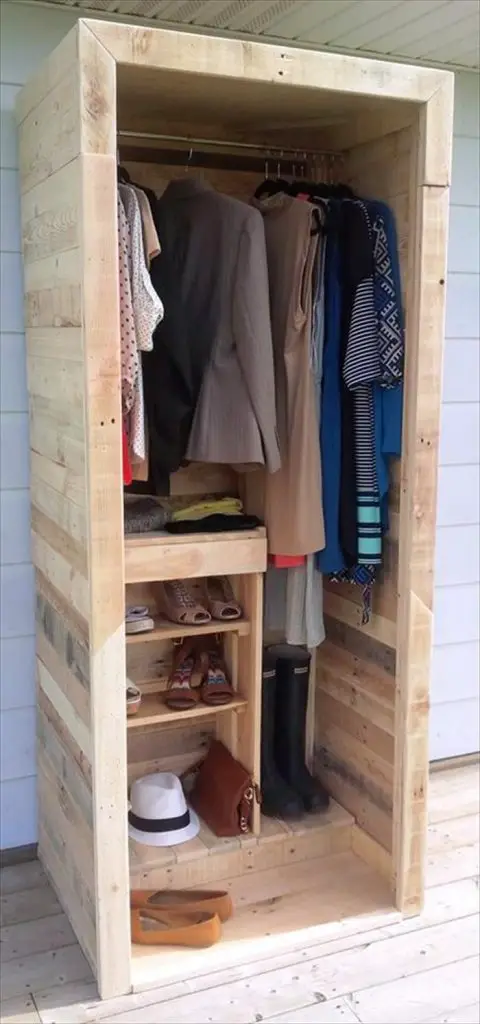
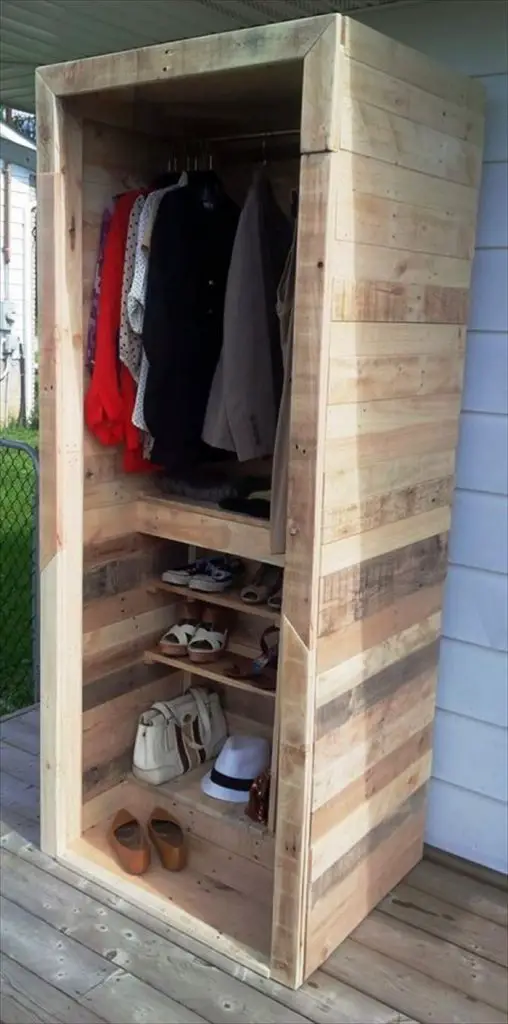
The solution? This easy-access DIY pallet wardrobe! It has a hanging rod for your clothing and some shelves for storing shoes, bags and hats. You can also add hooks for your bags. If you don’t have a place for your little accessories, you can simply install smaller shelves or a drawer to this pallet wardrobe!
It’s stylish and more importantly, not space-consuming so it’s perfect to put anywhere you want.
Aside from being an additional storage it can also serve as a main wardrobe for people temporarily living in a small dorm room or studio apartment!
Do you know someone who needs a pallet wardrobe? :)
Contents
Building a Pallet Wardrobe
Materials
- Old Pallets
- Wood Screws and Nails
- Wood Glue
- Rod
- Polyurethane
Tools
- Measuring Tape
- Sander
- Cordless Drill
- Spirit Level
- Nail Gun
Instructions
Step 1: Prepare the Pallets
- Inspect your pallets for any damaged areas or protruding nails.
- Use the sander to smooth out all surfaces, edges, and corners to prevent splinters.
- Depending on your design, dismantle some pallets using a crowbar for extra wood.
Step 2: Measure and Cut
- Decide the dimensions of your wardrobe based on available space and needs.
- Use the measuring tape to mark the cutting lines on your pallet wood.
- Carefully cut the wood to size using a saw.
Step 3: Assemble the Frame
- Lay out the cut pieces to form the frame of your wardrobe.
- Use the spirit level to ensure all parts are even and straight.
- Connect the pieces using wood screws and nails with the cordless drill and nail gun.
- Apply wood glue at the joints for extra stability.
Step 4: Install Shelves and Rod
- Measure and cut additional pallet wood for shelves according to your desired number and spacing.
- Secure the shelves within the frame using screws and nails.
- Install the rod at the desired height by attaching rod brackets to the inner sides of the wardrobe frame.
Step 5: Apply Finishing Touches
- Check the entire structure for any rough patches or loose screws.
- Sand any rough areas again if necessary.
- Apply a coat of polyurethane to all surfaces of the wardrobe to protect the wood and give it a finished look.
Step 6: Add Accessories and Customize
- You can add hooks for bags, small shelves for accessories, or even decorative elements to personalize your wardrobe.
- Consider painting or staining the wardrobe to match your room’s decor.
Step 7: Final Inspection and Placement
- Make sure the wardrobe is stable and all fittings are secure.
- Carefully move the wardrobe into its intended location in your room.
- Organize your clothing, shoes, and accessories in your new pallet wardrobe.
Click on any image to start lightbox display. Use your Esc key to close the lightbox.![]()
Space Optimization Tips
Maximizing space efficiency is crucial, especially when working with DIY projects like a pallet wardrobe. A well-organized wardrobe not only saves space but also makes your daily routine smoother by keeping everything neatly in place. Below are several tips to optimize the space within your wardrobe, ensuring that it serves not just as a storage solution, but as a stylish and functional addition to your room.
Optimal Layout Planning
Before assembling your pallet wardrobe, plan the layout carefully. Consider what items you’ll store and how frequently you use them. For larger items like coats and dresses, ensure there’s ample hanging space. For accessories and shoes, plan for smaller compartments or shelves. This initial planning helps in maximizing the usability of the space within the wardrobe.
Multi-Level Hanging Rods
If your wardrobe will store clothing of varying lengths, installing multi-level hanging rods maximizes vertical space. Place a higher rod for long garments and a lower rod for shorter items like shirts and jackets. This arrangement allows you to fit more clothing into the pallet wardrobe without anything getting crumpled or lost at the bottom.
Adjustable Shelving
Incorporate adjustable shelves into your wardrobe design. These allow you to reconfigure the storage space as your needs change, accommodating everything from large bags to stacks of folded clothes. Use sturdy brackets and slots that let you move shelves up or down depending on the items you need to store.
Use of Vertical Space
The top of the pallet wardrobe often goes unused but can serve as a perfect spot for less frequently used items. Install a high shelf above the hanging area to store seasonal clothing, luggage, or storage boxes. Ensure this area is accessible with a step stool or by designing the wardrobe such that this shelf is within easy reach.
Internal Organizers
To further enhance the functionality of your wardrobe, add internal organizers. Drawer dividers, small storage boxes, and accessory holders can be placed on shelves or mounted to the inside of the wardrobe doors. These organizers are perfect for keeping smaller items like belts, scarves, and jewelry neatly sorted and readily accessible.
Door Storage Solutions
If your pallet wardrobe includes doors, utilize this space effectively by adding hooks or hanging organizers. These are ideal for storing shoes, hats, or bags, keeping them off the floor and out of the way. This not only saves space but also helps prevent damage to your items.
Collapsible and Multi-Use Features
Consider incorporating collapsible or multi-use features into your pallet wardrobe. A drop-down desk or an ironing board that folds away when not in use can greatly enhance the utility of the wardrobe without taking up permanent space. These features make the wardrobe more versatile, especially in smaller living spaces.
Reflective Elements
Adding mirrors inside or on the doors of the pallet wardrobe can make a small room feel larger. Mirrors reflect light and give the illusion of more space, making your room brighter and more inviting. This is a practical addition that also adds aesthetic value to your wardrobe.
Regular Reassessment
Regularly reassess the organization and contents of your wardrobe. Over time, your storage needs may change, and items that were once essential might no longer be necessary to keep at hand. Reorganizing every few months ensures that you’re making the most efficient use of your space and that the wardrobe continues to meet your needs.
By implementing these space optimization tips, your pallet wardrobe will not only serve as a practical storage solution but also enhance the overall functionality and aesthetics of your room. With thoughtful design and careful planning, a wardrobe can be transformed into a highly efficient and stylish feature of any home.
Safety Precautions
Building a pallet wardrobe offers a unique opportunity to customize a piece of furniture that not only serves its functional purpose but also reflects your personal style and decor preferences. Here are several customization ideas that can transform a simple pallet wardrobe into a standout piece in your home.
Choose Your Finish
- Paint it up: Give your pallet wardrobe a quick facelift with a coat of paint. Choose a color that complements your room’s decor or go bold with a bright, eye-catching hue. Paint can also help protect the wood and make cleaning easier.
- Stain for a rustic look: If you prefer a more natural or rustic aesthetic, apply a wood stain. Stains enhance the wood’s natural grain and can add warmth and depth to your wardrobe.
- Distress for a vintage feel: For those who love a vintage look, distressing the painted or stained wood can add character and a sense of history to your wardrobe.
Add Functional Features
- Incorporate varied shelving: Customize the interior with different types of shelving tailored to what you plan to store. Adjustable shelves, cubbies for shoes, or special compartments for accessories can make your wardrobe more functional.
- Install a sliding door: If space allows, consider adding a sliding door to your pallet wardrobe. This not only saves space compared to a traditional door but also adds a modern touch.
- Include a fold-out feature: For multi-functionality, include a fold-out feature such as an ironing board or a work desk. This is especially useful in small spaces, making your wardrobe a versatile piece of furniture.
Enhance with Accessories
- Decorative handles and knobs: Swap out plain hardware for decorative handles and knobs to instantly elevate the look of your wardrobe. This small change can make a big difference in the overall style of the piece.
- Light it up: Add lighting inside your wardrobe to make it easier to find things. LED strips or small, battery-operated lights can be installed under shelves or near the hanging rod.
- Mirror installation: Attaching a mirror to the inside of the door or on the side panel of the wardrobe can add functionality and make the space feel larger.
Personalize with Art and Decor
- Decals and wallpaper: Use decals or wallpaper to add patterns and designs to your pallet wardrobe. This is an easy way to introduce visual interest without permanent alterations.
- Artistic touches: If you’re artistic, hand-paint designs, patterns, or murals on the pallet wood. This can turn your wardrobe into a piece of art that showcases your creativity.
- Theme-based customization: Tailor your wardrobe to a specific theme, such as coastal, bohemian, or industrial. Select materials and accessories that align with these themes to create a cohesive look.
By incorporating these customization ideas, your pallet wardrobe can not only be a practical storage solution but also a reflection of your personal style and creativity. Each customization enhances the originality of the piece, making your wardrobe a unique and cherished addition to your home.
Conclusion
Building a pallet wardrobe offers a practical and creative way to add storage and style to any room. Through customization, you can tailor it to meet specific needs and reflect personal taste, making the most of both functionality and aesthetics. This project not only recycles materials but also provides a satisfying sense of accomplishment as you craft a unique piece of furniture for your home.


