Do you like playing darts at home? Here’s a nice and easy DIY Dartboard Cabinet project for you!
Darts is a fun game to play but dart sets should be set up with extra care. Setting them up in the wrong place might cause damage or injuries. These can happen if your darts set isn’t stored properly, especially if you have curious kids at home!
You can purchase dartboard cabinets from a store, but if you have access to pallets or you have some timber at home, why not build one yourself? It’s fun to make and it’s cheaper.
With your DIY pallet dartboard cabinet, you can organize your dart tournament with family and friends right in your own home!
Do you know someone who loves the game just as much as you do? This pallet project would make a great DIY gift. :)
Click on any image to start lightbox display. Use your Esc key to close the lightbox. 8-)

Contents
How to Make a Pallet Dartboard Cabinet
Materials:
- Pallets
- Screws
- Wood Glue
- 4 Hinges
- Stain and Varnish
- Chalkboard (or wood and chalk spray paint)
Tools:
- Hammer
- Crowbar
- Reciprocating Saw (optional)
- Oscillating Sander (with 80 grit sandpaper)
- Paintbrush
- Drill
- Saw
Steps:

1. Deconstruct Pallets: At first I started taking apart the pallets using a hammer and crowbar. This works – I’ve done it before, but because I was concerned about saving my nice wood and not having any broken or wasted pieces (which happens), I wasn’t satisfied with this method. As you can see, the nails ends of the nails were bent back into the wood quite deep, so I had to dig them out.
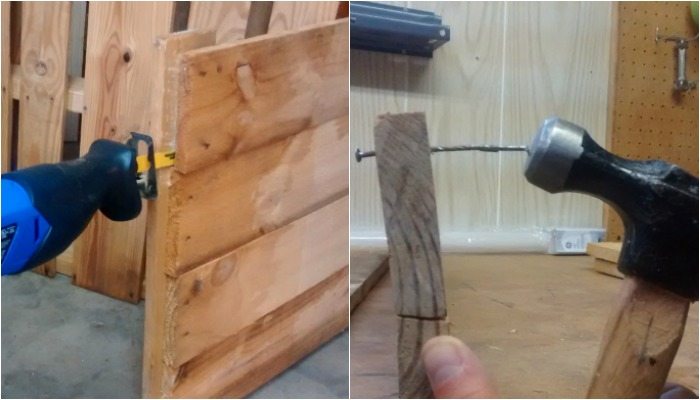
I took one pallet apart this way but then switched to using a reciprocating saw. This was much cleaner and easier. Make sure to get all the cut ends of nails out of your pallet material. This is easy to do by hammering a nail onto the cut end to shove the piece out the way that it was put in.
2. Prepare Pallets: I sanded down all of the pallets before I started. At this point, I should have used a planer to get the edges even, but I ended up doing this later.
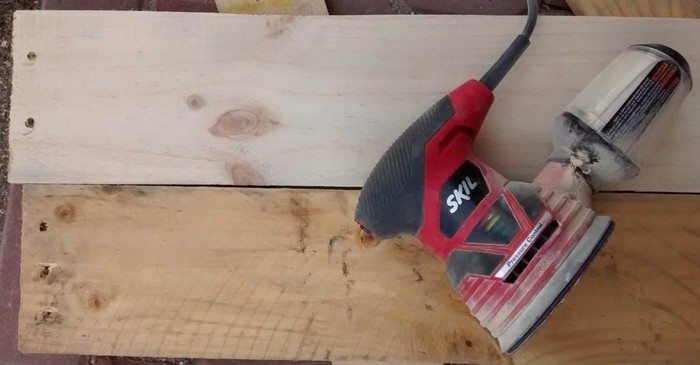
I also wanted the pallets to look worn, and the after sanding look was too pristine for me.

I decided to stain my material using a black stain cut to 1/2 strength using paint thinner to ensure that the grain would show through the wood.
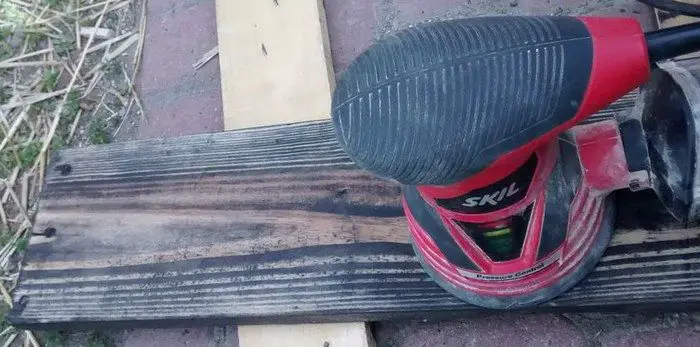
After letting the stain dry for a full day, I sanded down the pallets again. This achieved the look I wanted because I could sand some areas more than others and ensure that the grain showed through. It did bung up the sanding pads quite quickly, so was a bit wasteful.
NOTE: You could do this step after cutting out the pieces so that you didn’t have to refinish the ends – probably better. You could also do this step after building the entire cabinet, but my sander is round so wouldn’t fit in corners.
3. Lay Out Materials/Design: I had a vague idea before I started by looking at a friend’s cabinet and the size of my board, but truly this was a trial-by-error process. Others may use computer programs to sketch out the dimensions and materials they need beforehand, but this is not the way I work. I also think that when you are working with non-standard wood, having no preconceived notions of the materials beforehand allows the materials to tell what you can make with fewer cuts.
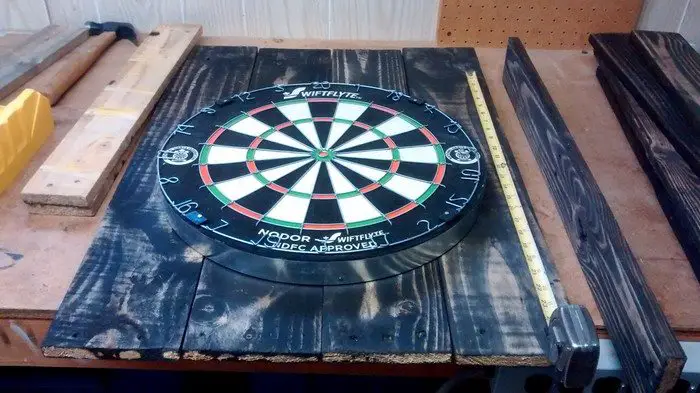
I simply placed my dartboard on my material and decided how big I wanted to build the cabinet around it. In this case, the pallet boards were standard sizes (both 1×6″ and 1×4″ boards). 4 large boards from the pallet made a perfect length across and the small boards were a perfect width.
Because of how the board looked, I decided to make the cabinet 22″ by 25″, with the doors 28″ with an angle curve.

The pieces did not fit together tightly, so I decided to use a planer. Should have done this before, but better late than never. After I was finished that, the cabinet ended up being 21 5/8″ by 25″.
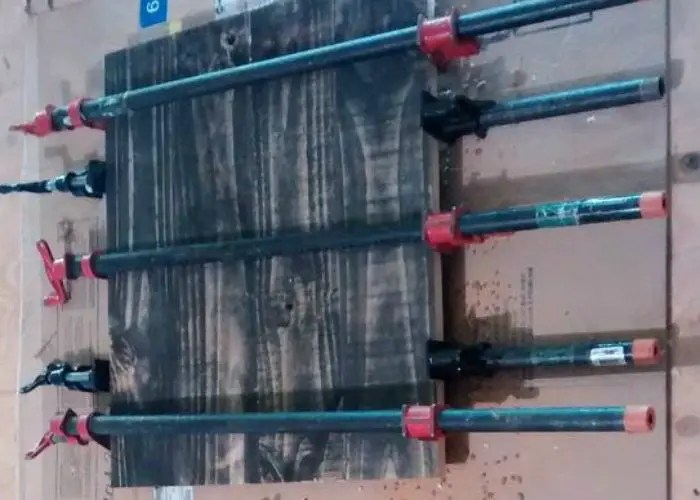
4. Cabinet: I glued and clamped the back of the cabinet together and allowed to dry.
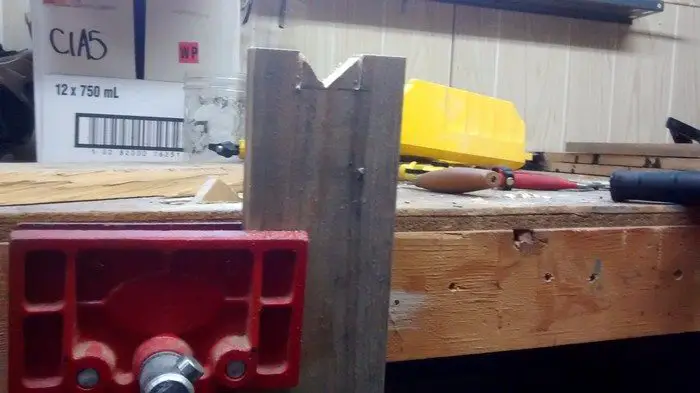
I wanted to put the frame of the cabinet together using without angles because I have had the experience of pallet wood warping and my angles separating. I decided to use cutouts.
After cutting my frame lengths (2 x 26 1/2″ and 2 x 23 1/8″) I measured cut-outs the same width as my wood (3/4″) and drew them onto the boards.
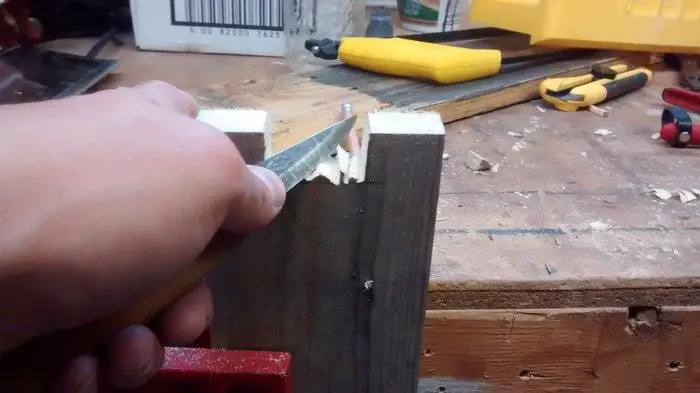
I used a handsaw to make a series of cuts for the centre hole, and then used my carving knife to smooth out the notch.

Next I had to attach the frame to the backboards – I ended up having to make a few adjustments here to make the frame square to my back.
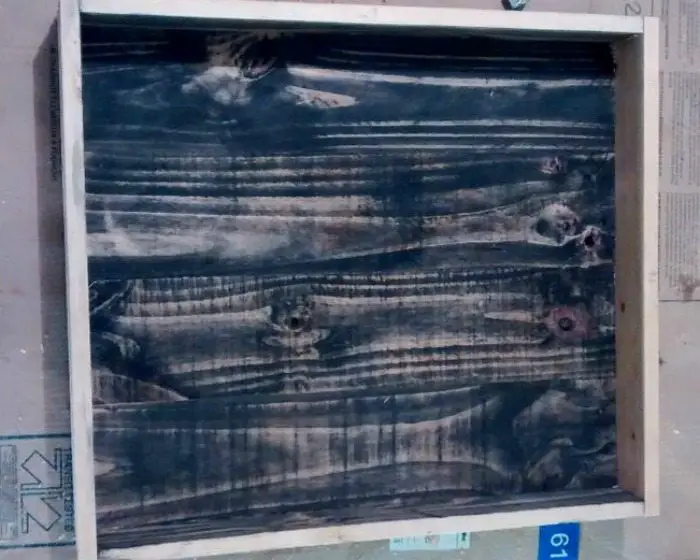
Once those were complete, I pre-drilled holes and glued and screwed everything in place.
I touched up the stain where needed, and gave everything another good sanding.
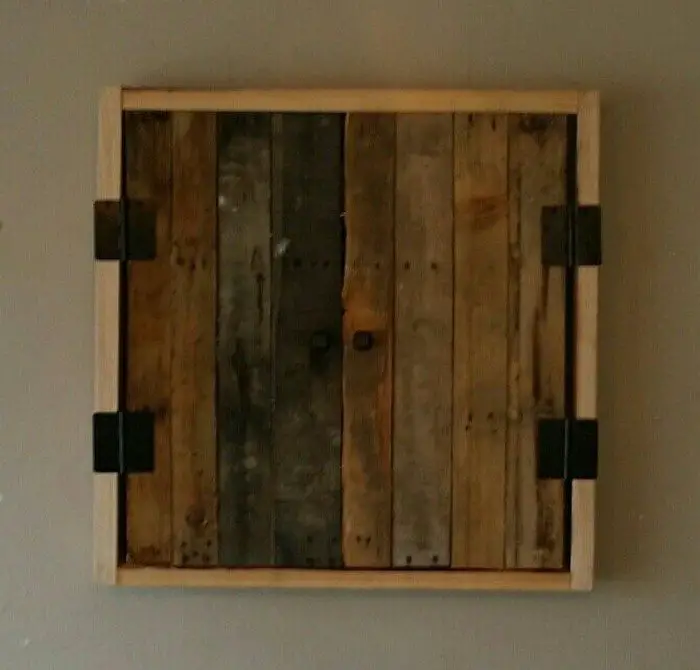
5. Doors: I glued my doors together and allowed to dry at the same time as I had done the back panels. Next, I squared up my doors to the cabinet – making a few adjustments where needed.
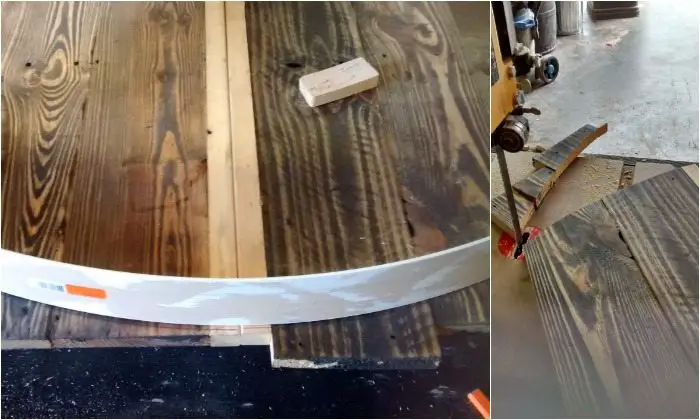
I wanted the doors to match the outside corners, but have a curved edge. A friend helped by executing the idea of drawing the curve by bending some flexible wood as a pattern. It worked perfectly and was much simpler than cutting out a template.
I cut the curve using the bandsaw and gave everything a good sand – touching up the stain where needed.
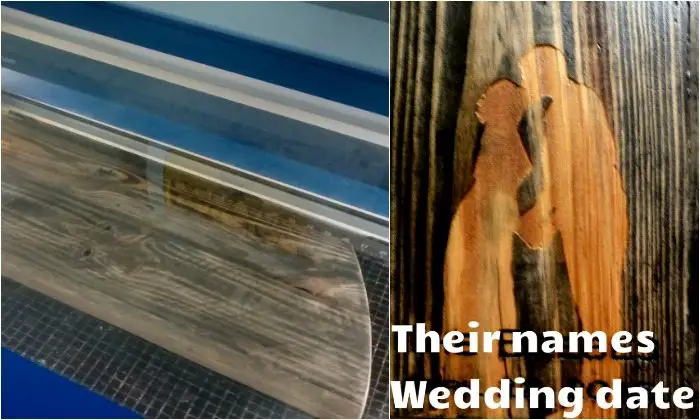
I decided to personalize the front by adding a lasercut silhouette of my friends on their wedding day.
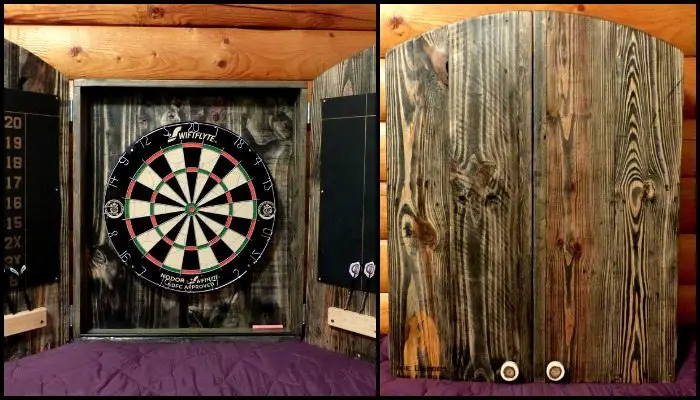
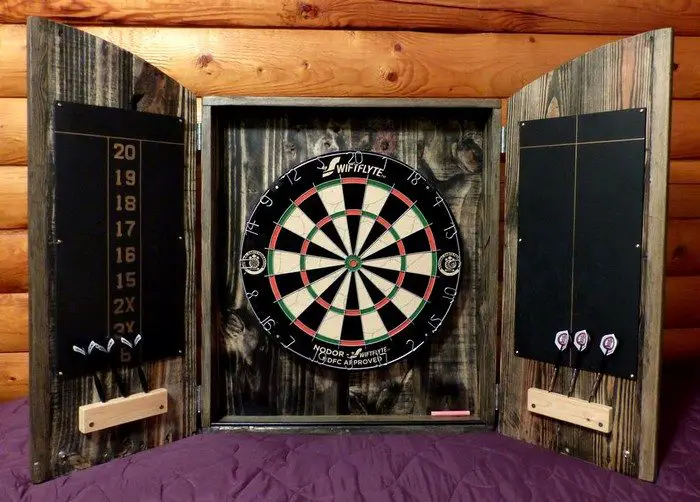
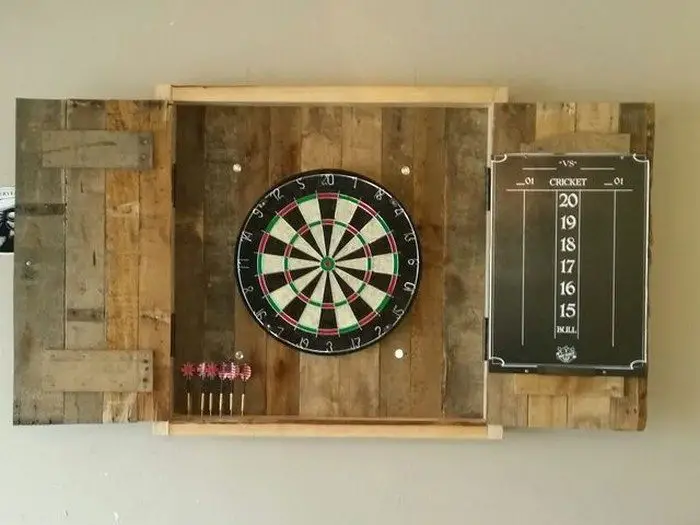
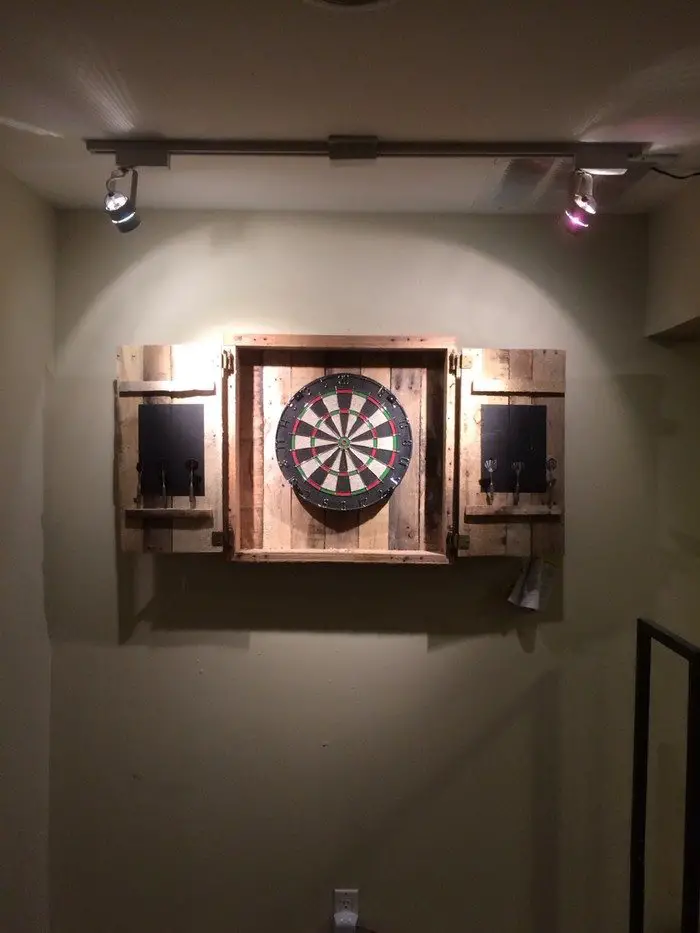
6. Putting It All Together: I attached the doors with hinges, and attached the dartboard to the cabinet by following the instructions that it came with.
I also attached holders for the darts which I left a natural wood colour. I just drilled the holes using a slightly bigger drill piece than the darts themselves.
I applied 3 coats of protective varnish to the entire cabinet.
The final step was making two chalkboards with thin birch veneer wood and 2 coats of chalkboard spray paint. I used a bronze-coloured sharpie to make the lines and cricket scoreboard.
Thanks to Loblaw for this great project!
Safety Precautions to Consider
1. Inspect Pallets Carefully
Before starting, thoroughly inspect the pallets for any signs of damage, such as splinters, cracks, or protruding nails. Discard any pallets that are in poor condition or may pose a safety hazard.
2. Use Personal Protective Equipment (PPE)
Wear appropriate PPE, including safety glasses, gloves, and closed-toe shoes, to protect yourself from splinters, cuts, and other potential injuries.
3. Handle Tools Safely
Use tools such as a saw, hammer, and drill with caution and according to the manufacturer’s instructions. Keep your fingers away from sharp blades and moving parts, and always use tools in a controlled manner.
4. Secure Workpieces Properly
Secure the pallets firmly in place before cutting, drilling, or assembling to prevent them from shifting or falling. Use clamps or vices to hold the pallets securely on your work surface.
5. Be Mindful of Sharp Edges and Nails
Be aware of sharp edges, splinters, and protruding nails on the pallets. Sand down rough edges and remove any nails or staples that may pose a safety risk.
6. Work in a Well-Ventilated Area
Work in a well-ventilated area to minimize exposure to dust and fumes. If working indoors, consider using a dust mask or respirator to protect yourself from airborne particles.
7. Take Breaks and Stay Hydrated
Take regular breaks to rest and rehydrate, especially if you’re working in hot or humid conditions. Stay hydrated by drinking plenty of water throughout the project.
8. Follow Safe Lifting Practices:
Lift and carry heavy pallets and tools with proper lifting techniques to avoid strain or injury. Bend your knees keep your back straight when lifting, and ask for assistance if needed.
By following these safety precautions, you can minimize the risk of accidents and injuries while making a sturdy dartboard cabinet using pallets. Always prioritize safety and take your time to ensure a safe and enjoyable DIY experience.
Maintenance Practices
Maintaining a dartboard cabinet made from pallets is essential to ensure its longevity and safety. Here are some maintenance tips:
1. Inspect Regularly
Periodically inspect the dartboard cabinet for any signs of damage, wear, or loosening of components. Look for cracks, splits, or warping in the wood, and check the hinges, latches, and mounting hardware for any signs of rust or deterioration.
2. Clean Thoroughly
Clean the dartboard cabinet regularly to remove dust, dirt, and debris that can accumulate on the surface. Use a soft brush or cloth to gently wipe down the wood, and avoid using harsh chemicals or abrasive cleaners that can damage the finish.
3. Repair Damage Promptly
Address any damage or issues as soon as they arise to prevent further deterioration. Repair or replace any broken or damaged components, such as hinges, latches, or mounting brackets, and reinforce weak or loose areas as needed.
4. Protect from Moisture
Keep the cabinet dry and protected from moisture, as exposure to water can cause the wood to warp, rot, or become damaged over time. Avoid placing the cabinet in areas prone to high humidity or moisture, such as basements or outdoor spaces.
5. Apply Protective Finish
Apply a protective finish or sealant to the wood to help repel moisture and protect it from damage. Choose a finish that is suitable for outdoor use if the cabinet will be exposed to the elements.
6. Secure Mounting
Ensure that the cabinet is securely mounted to the wall or surface to prevent it from falling or becoming dislodged during use. Check the mounting hardware regularly and tighten any screws or bolts as needed.
7. Rotate Dartboard
To promote even wear on the dartboard, periodically rotate it within the cabinet. This can help extend the lifespan of the dartboard and prevent excessive wear in any one area.
8. Store Properly
If the cabinet will not be used for an extended period, such as during outdoor off-seasons, store it in a dry, protected area away from direct sunlight and moisture.
By following these maintenance tips, you can keep your dartboard cabinet made from pallets in good condition and ensure many years of enjoyment and use.
The Wrap Up
Creating a dartboard cabinet using pallets offers a fantastic opportunity to blend creativity, sustainability, and functionality. In this DIY project, we’ve explored six steps to guide you through the process, from disassembling pallets to assembling the cabinet. By repurposing pallet wood, you not only add a rustic charm to your gaming area but also contribute to reducing waste and promoting eco-friendly practices.
Throughout the construction process, safety precautions are paramount. Ensure you use proper tools, wear protective gear, and follow safety guidelines to prevent accidents and injuries. Additionally, consider the maintenance needs of your dartboard cabinet to prolong its lifespan and keep it in excellent condition. Regular inspections, cleaning, and refinishing will help preserve the wood and maintain the cabinet’s integrity over time.
As you complete your pallet-based dartboard cabinet, take pride in your craftsmanship and enjoy the satisfaction of creating a unique piece of furniture. Whether you’re a seasoned DIY enthusiast or a novice crafter, this project offers a rewarding experience and the opportunity to showcase your skills. With attention to detail and a touch of creativity, your dartboard cabinet will not only serve its practical purpose but also become a conversation piece in your home.
Building a dartboard cabinet using pallets is more than just a woodworking project—it’s a statement of craftsmanship, sustainability, and personal style. Embrace the challenge, unleash your creativity, and embark on this journey to create a one-of-a-kind piece that reflects your passion for gaming and your commitment to environmental responsibility.
Frequently Asked Questions
1. Are pallets safe to use for DIY projects like dartboard cabinets?
When handled properly and with appropriate safety precautions, pallets can be used safely for DIY projects. It’s essential to inspect the pallets for any damage, such as splinters, nails, or chemical treatments, and take necessary steps to mitigate any risks.
2. How can you ensure that your dartboard cabinet made from pallets is sturdy and durable?
To ensure sturdiness and durability, choose high-quality pallets with intact wood and minimal damage. Additionally, reinforce the structure of the cabinet with appropriate fasteners, such as screws or nails, and consider adding additional support where needed.
3. Can you customize the design of my dartboard cabinet to fit my preferences?
Crafting a dartboard cabinet from pallets offers a fantastic opportunity for customization. You can tailor the dimensions to fit your space perfectly, add decorative elements like carvings or engravings, and even incorporate personalized features such as initials or logos.
Whether you’re aiming for a rustic, modern, or vintage look, pallet wood provides a versatile canvas for your creativity. Plus, you can experiment with different finishes, stains, or paints to achieve the desired aesthetic. This level of customization ensures that your dartboard cabinet not only serves its functional purpose but also becomes a unique and eye-catching addition to your game room or recreational space.
4. What tools and materials do you need to make a dartboard cabinet using pallets?
The tools and materials needed may vary depending on the design and complexity of the cabinet. However, common tools include a saw, hammer, drill, screws or nails, sandpaper, and paint or stain for finishing. You’ll also need pallets, hinges, and hardware for the cabinet doors.
Remember to prioritize safety while working with tools and materials. Wear appropriate safety gear such as gloves and safety goggles, and work in a well-ventilated area.
5. Are there any specific safety precautions I should take while working with pallets?
Yes, working with pallets requires certain safety precautions. Wear appropriate protective gear, such as gloves and safety glasses, to protect yourself from splinters and debris. Be cautious when handling tools and machinery, and follow safety guidelines to prevent accidents.
6. How do you maintain your dartboard cabinet made from pallets?
To maintain your dartboard cabinet, regularly inspect it for any signs of damage or wear. Clean the surface with a damp cloth or wood cleaner as needed, and reapply the finish or sealant to protect the wood and enhance its appearance. Keep the dartboard cabinet away from moisture and direct sunlight to prevent warping or discolouration.
When not in use, store your dartboard cabinet in a dry and climate-controlled environment. Avoid storing it in damp basements or garages where moisture levels may fluctuate, as this can damage the wood and compromise its structural integrity.
Utilize your dartboard cabinet regularly to prevent it from becoming stagnant or accumulating dust. Playing darts regularly not only keeps the cabinet in use but also adds to the enjoyment of your recreational space.
These FAQs should help you get started with your dartboard cabinet project using pallets. Always prioritize safety and quality craftsmanship for the best results.


