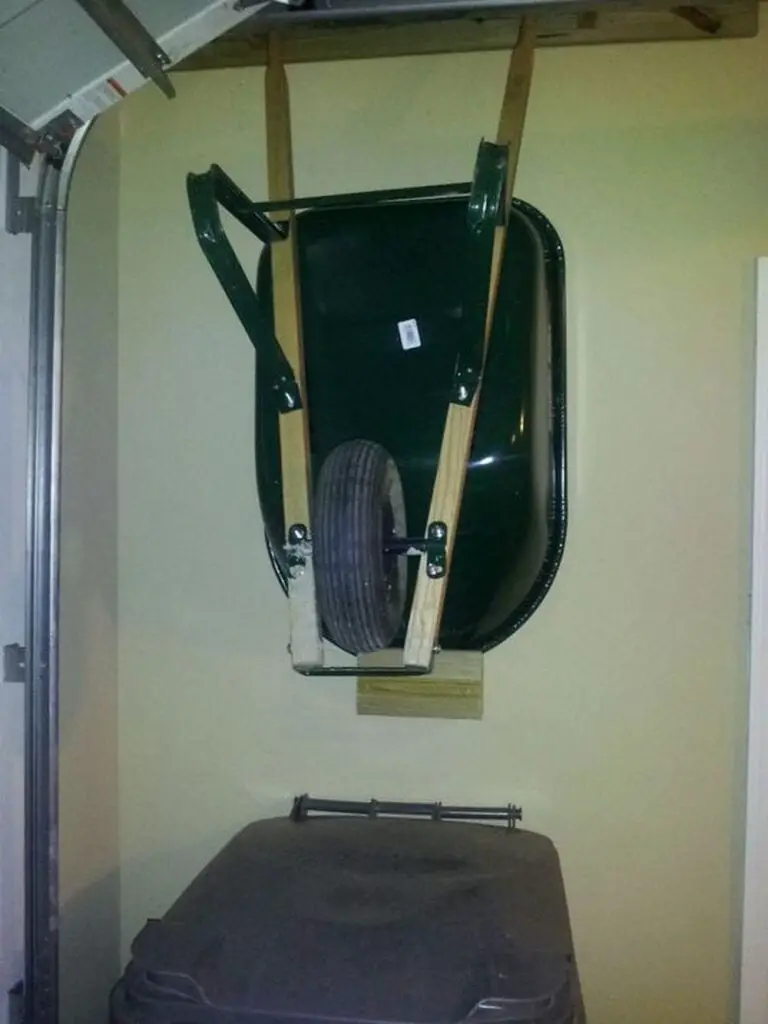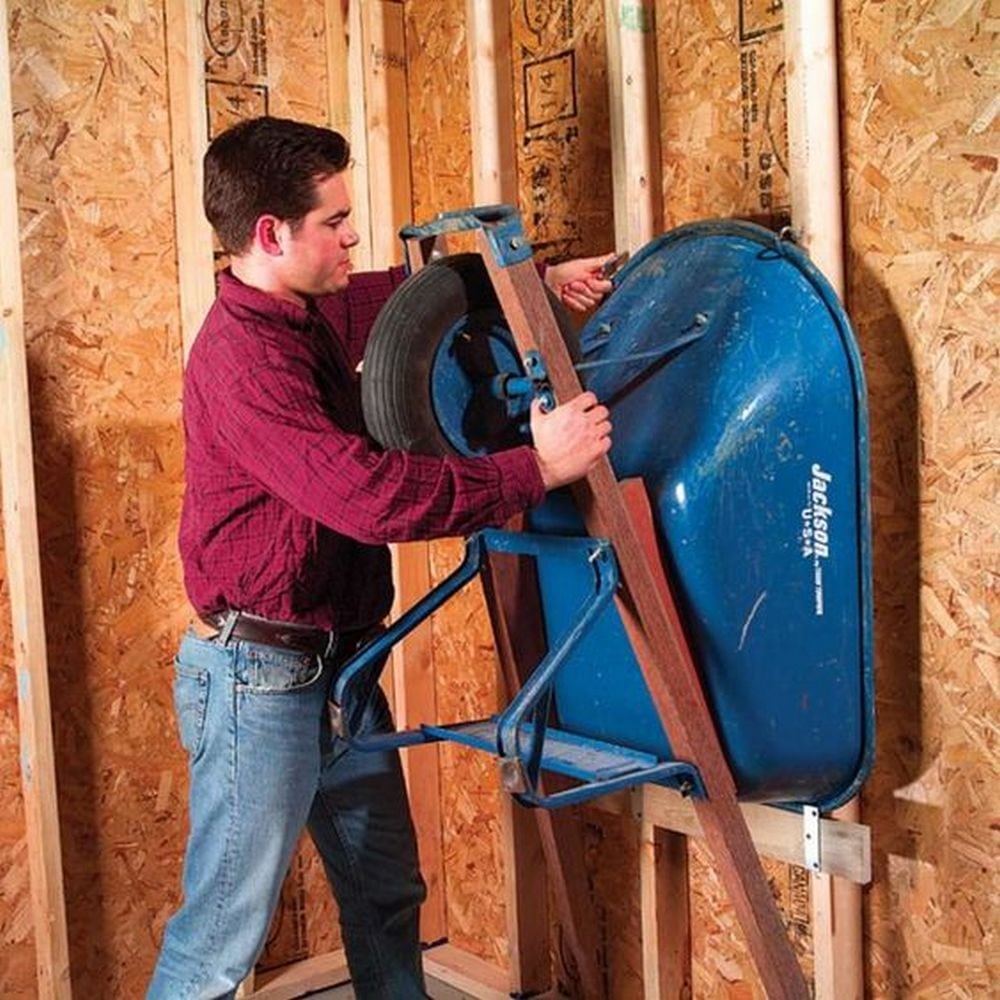
Admit it, wheelbarrows take up a lot of space in whatever room we put them in. But since it’s something that we need, we “tolerate” its presence.
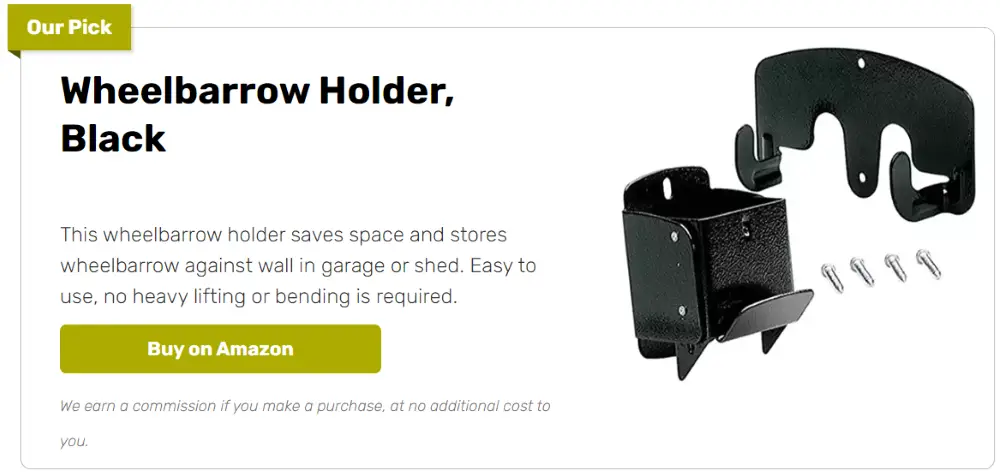
Handy Wheelbarrow Storage Rack: 6 Easy Building Steps
I hurt my shin every time someone forgets to put the wheelbarrow back in its proper place. I’ve complained a lot about it to my husband – begged him to do something about it. When he finally got tired of my nagging, he went to work.
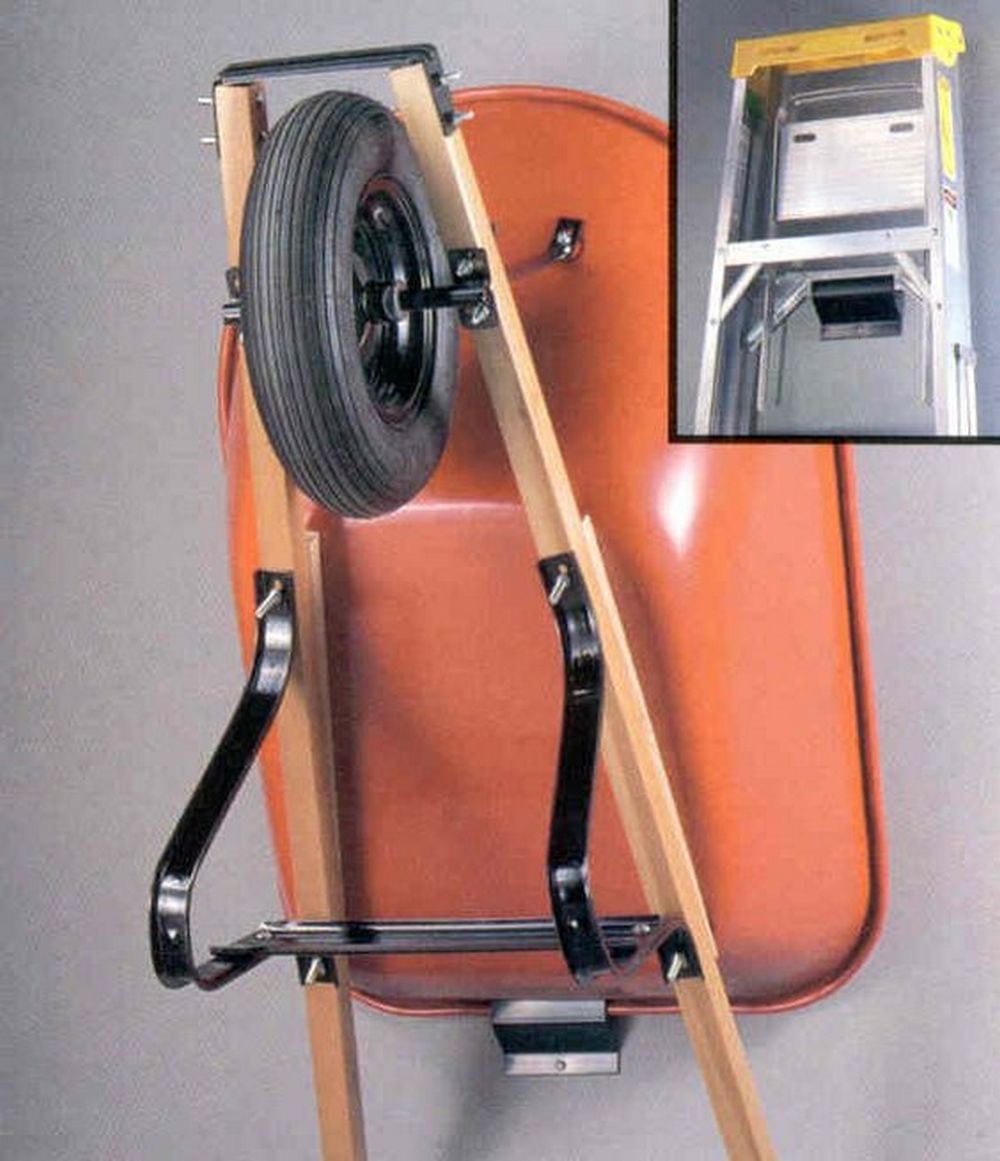
Building a Wheelbarrow Storage Rack
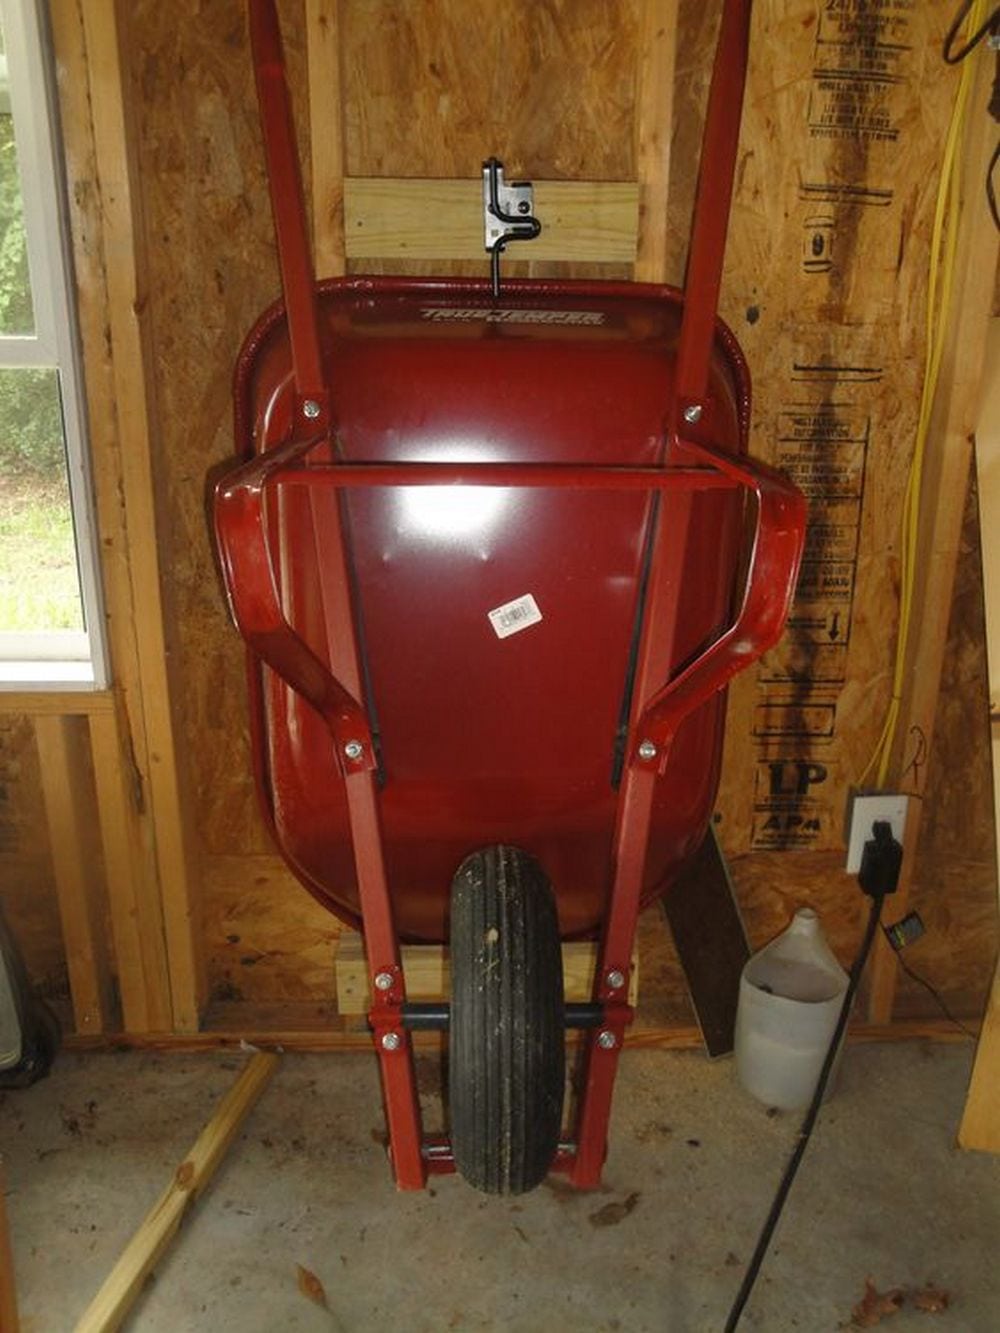
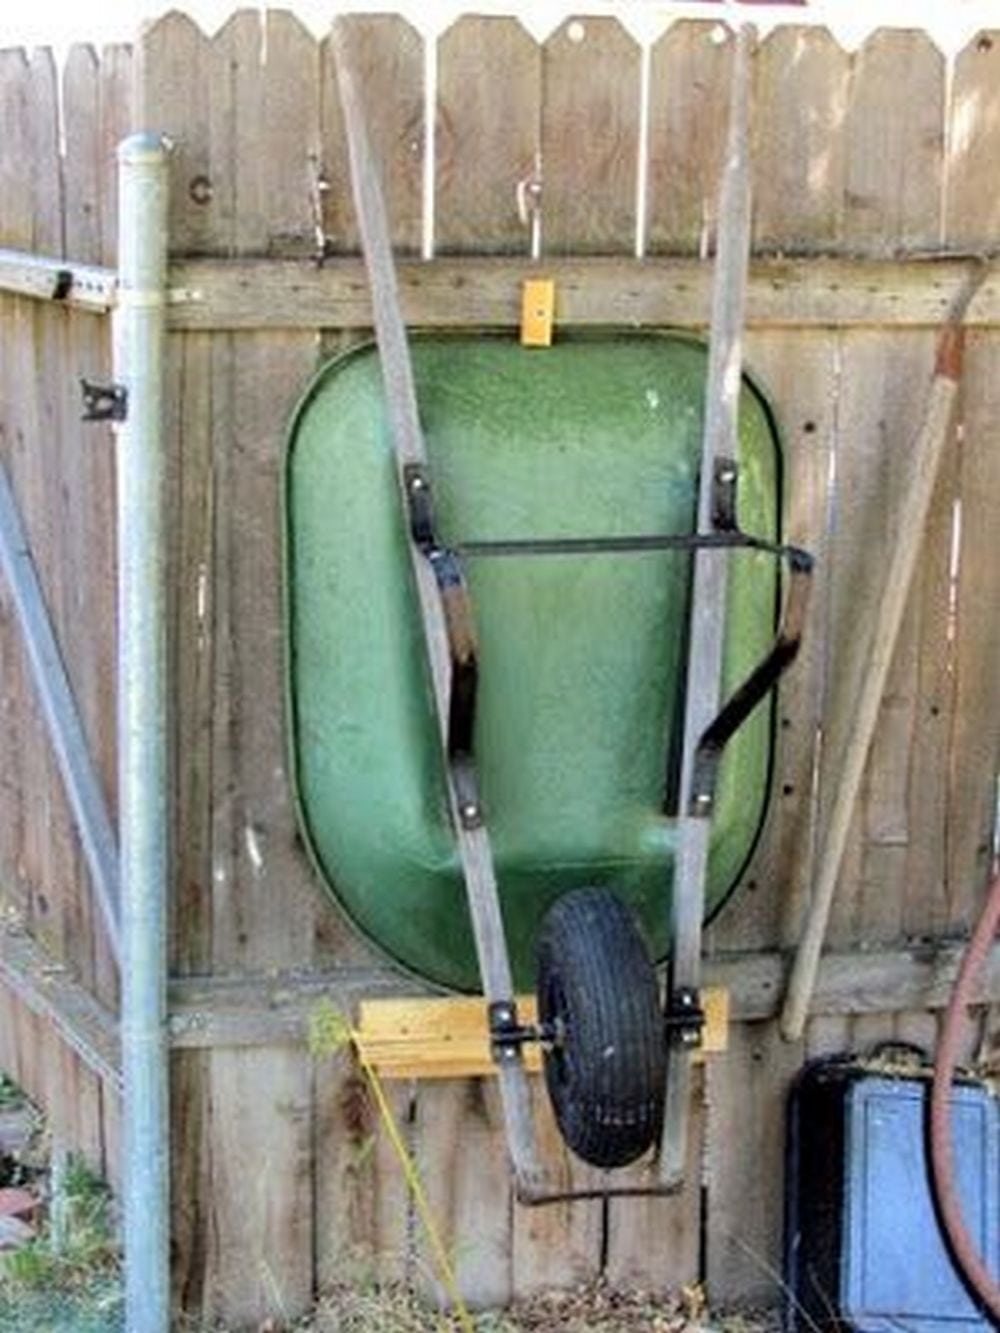
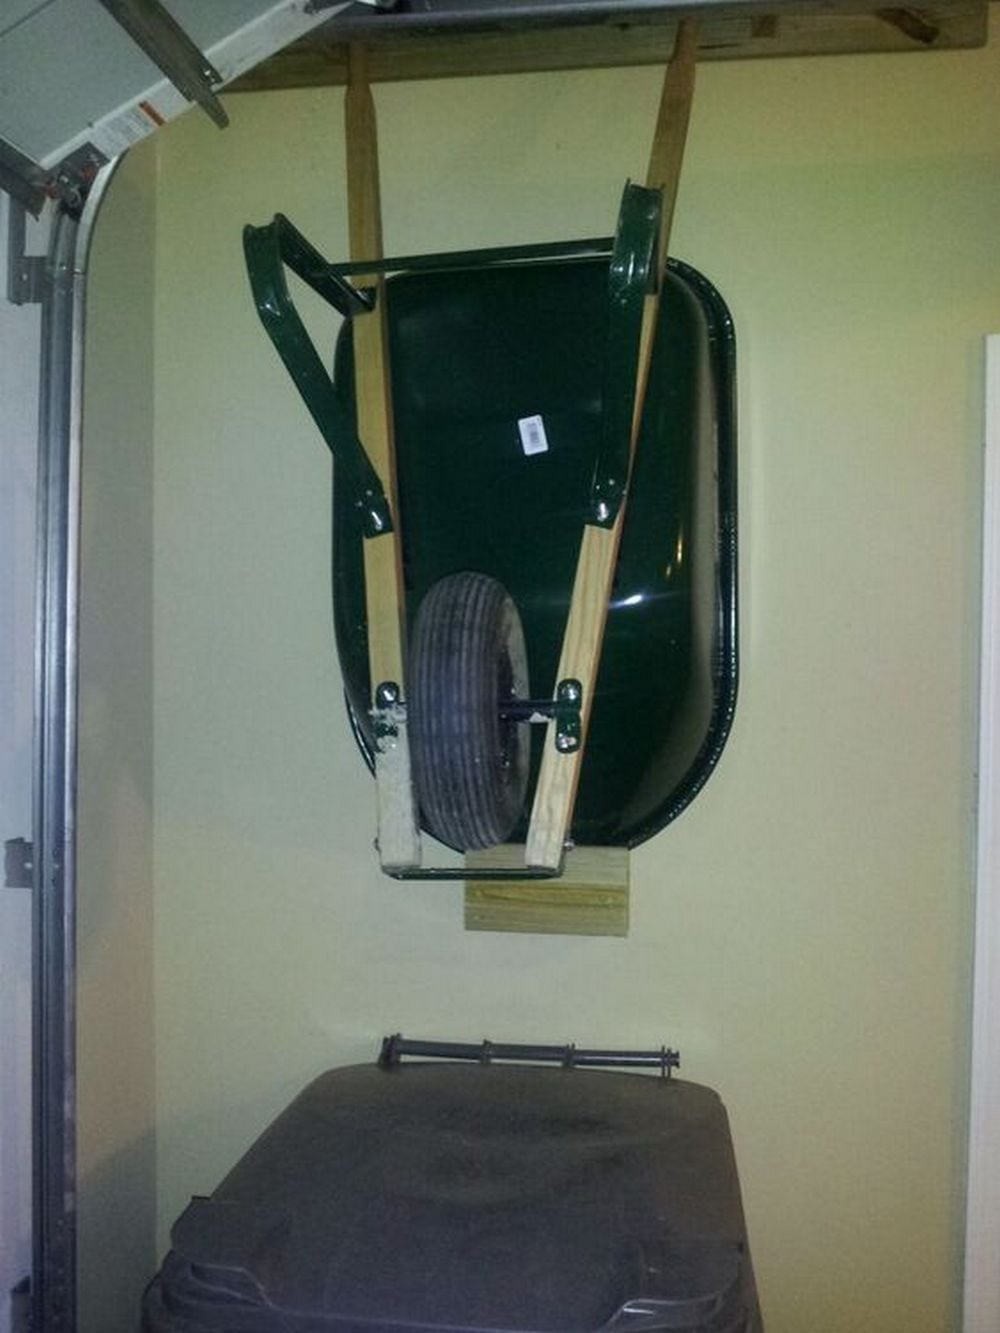
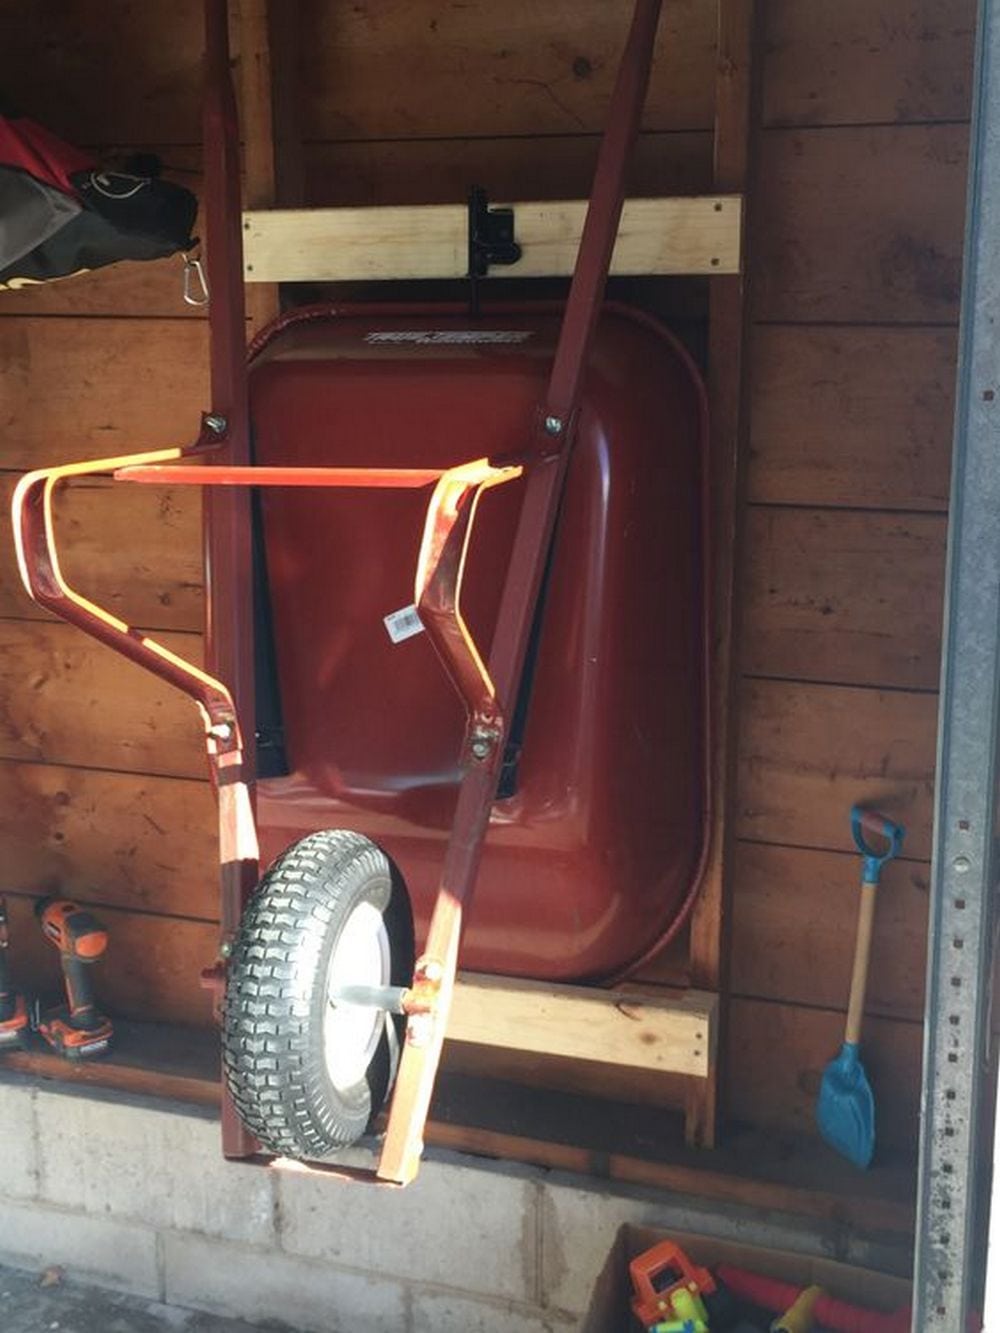
He made a wheelbarrow storage rack, a DIY project he found over the Internet. He started working on it on a weekend and finished on the same day. Our wheelbarrow is now off the floor.
He said the work is so simple and easy. I believe him – he did the wheelbarrow racks for my parents and his! Are you ready to get that wheelbarrow off your garage floor and onto the wall?
Materials:
Ultimate DIY Guide: Building a Wheelbarrow Storage Rack
Tired of your wheelbarrow taking up space on the garage floor? With this simple DIY project, you can create a sturdy and reliable rack to store your wheelbarrow on the wall. This guide breaks the process into easy-to-follow steps so even a novice can confidently complete the project in one day.
Materials You’ll Need
- Wood (2×4 planks work best)
- Screws (wood screws, 2-3 inches)
- Metal mending plates (for added stability)
- Ceiling hooks (optional, for additional storage options)
Tools You’ll Need
- Drill (for creating pilot holes and driving screws)
- Saw (if wood needs to be cut to size)
- Screwdriver
- Level (to ensure everything is straight)
- Tape measure
- Pencil
Click on any image to start the lightbox display. Use your Esc key to close the lightbox.


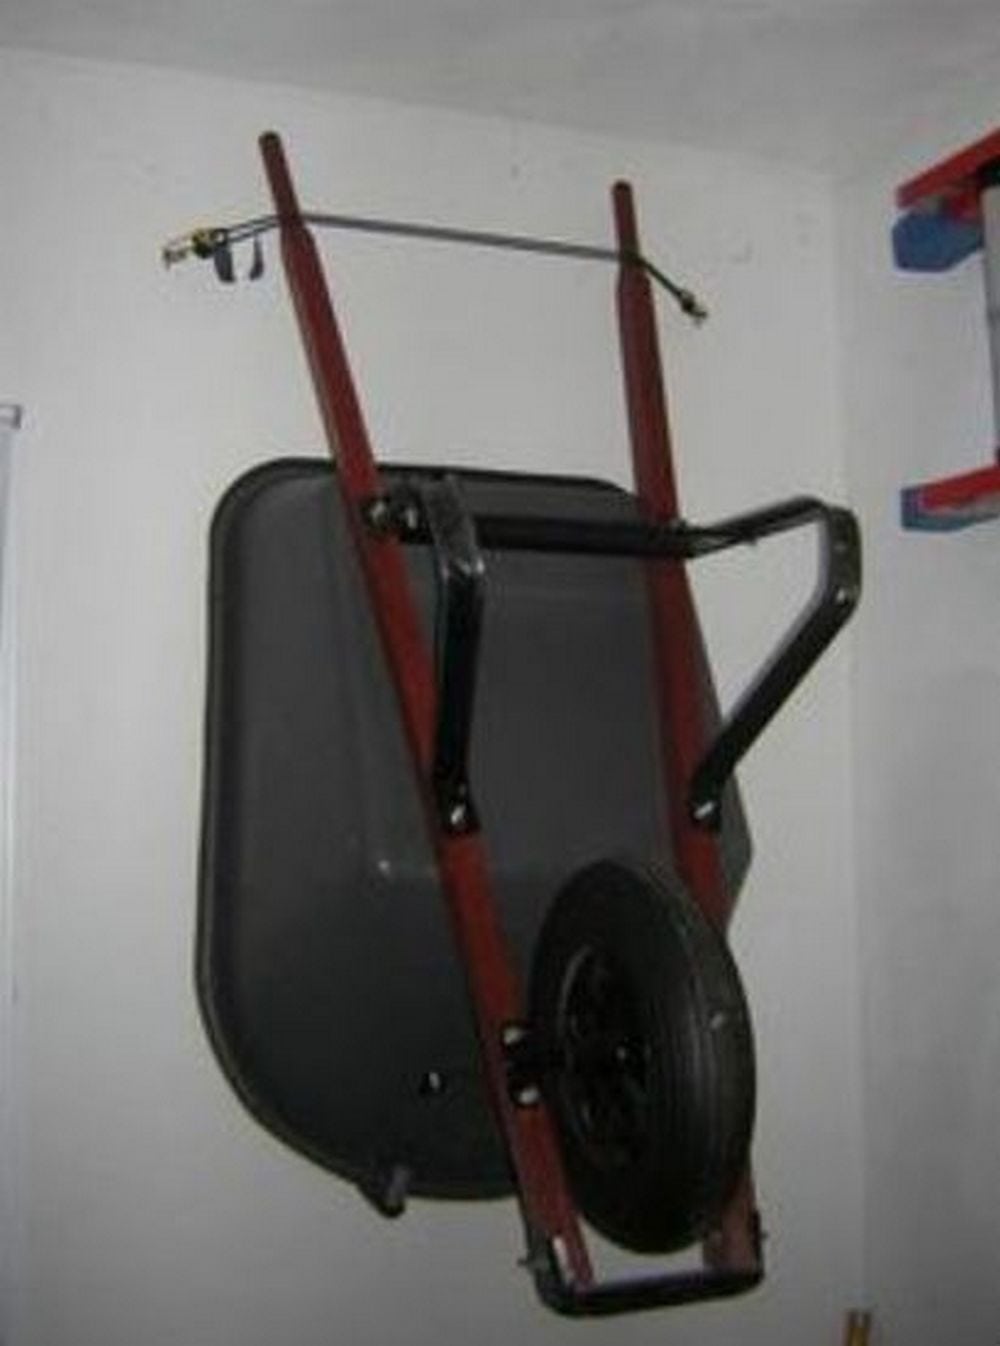

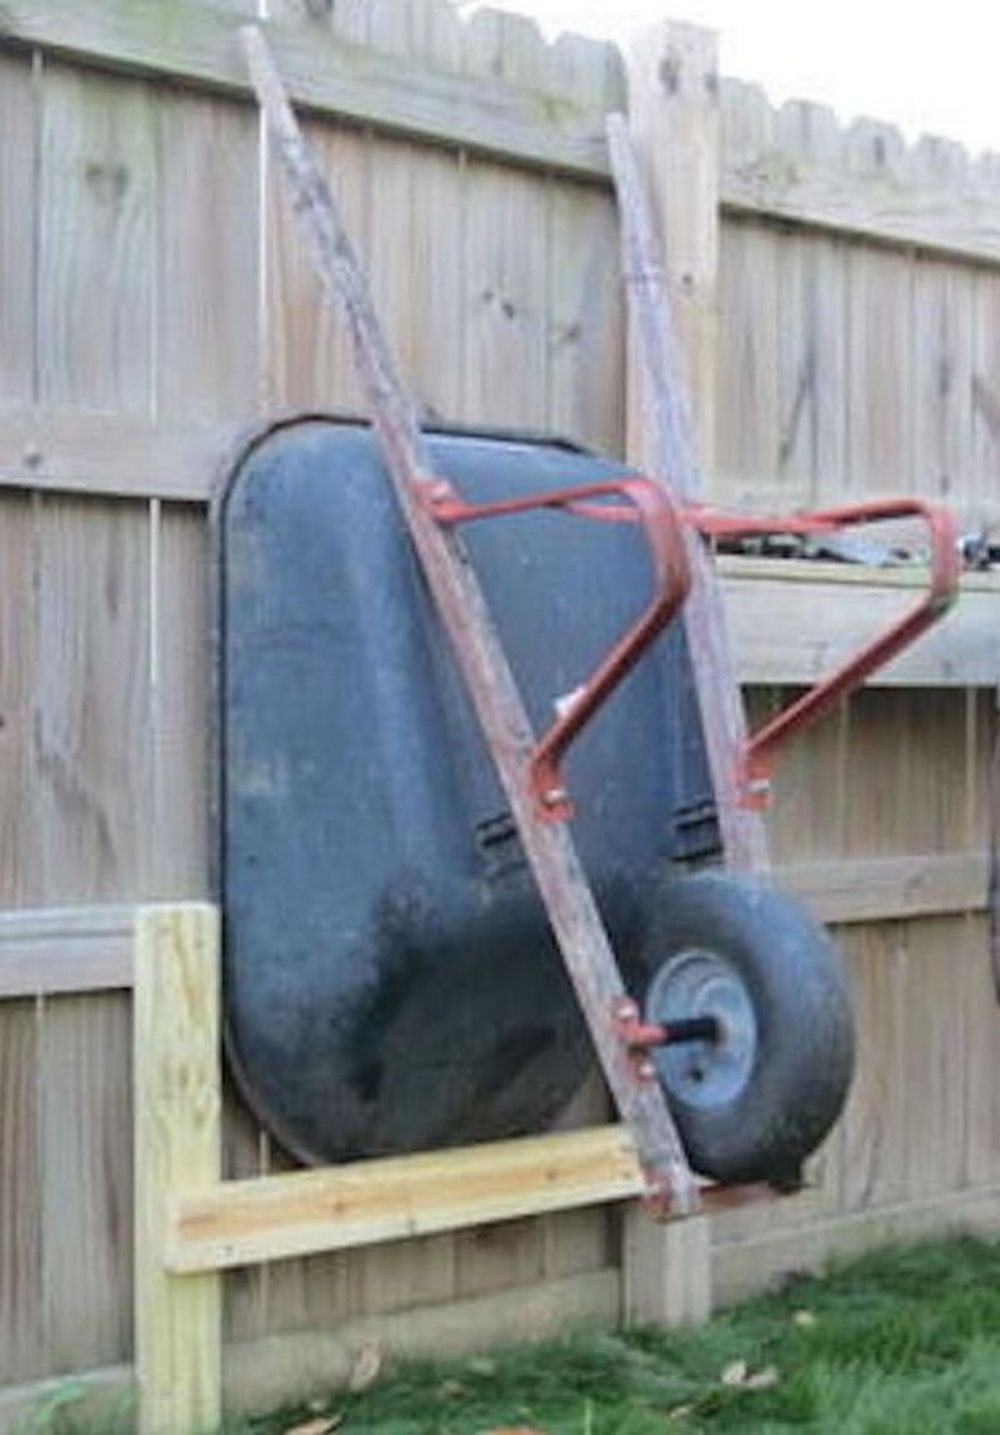
Step-by-Step Instructions
Step 1: Plan and Measure
- Choose a sturdy section of a wall or fence to mount the rack. Ensure the wall can support the weight of the wheelbarrow.
- Measure its widthfrom the wheel to the handles.
- Mark the height at which it will rest—typically a few feet off the ground for easy lifting and access.
Step 2: Prepare the Wood
- Cut one sturdy plank (around 12-16 inches) to act as its support at the bottom.
- Cut or use a smaller block of wood (about 4-6 inches) for the upper stopper that will secure the handles.
- Sand the wood pieces to remove splinters or sharp edges.
Step 3: Install the Bottom Wheel Support
- Attach the longer plank horizontally to the wall or fence at the height where the wheel of the wheelbarrow will rest.
- Tip: The plank should be long enough to provide stable support for the wheel.
- Secure it using screws, ensuring you drill into studs or use heavy-duty anchors if attaching to a fence.
Step 4: Add the Top Stopper for the Handles
- Attach the smaller block of wood above the bottom plank. This stopper will prevent it from tipping forward.
- Position it so the handles fit snugly behind the block when it is mounted.
- Use screws to secure the stopper firmly in place.
Step 5: Test the Rack
- Place it on the rack by resting the wheel on the bottom plank and sliding the handles behind the top stopper.
- Ensure it is stable and doesn’t wobble or tip.
Step 6: Optional Customizations
Paint or Seal: Apply paint or wood sealant to protect the wood from weather and wear, especially if the rack is mounted outdoors.
Add Padding: Attach rubber strips or foam to the wood to prevent scratches on your wheelbarrow.
Safety Tips and Maintenance for Your Wheelbarrow Storage Rack
- Regular Inspection
- Regularly inspect your wheelbarrow storage rack for any signs of wear and tear. Check for loose screws, weakened joints, or corrosion.
- For wooden racks, look for signs of rot or splintering. Addressing these issues prevents accidents and extends the life of your rack.
- Proper Installation
- Ensure it is properly installed. Use the right tools and follow installation guidelines closely.
- For wall-mounted racks, secure them to studs for maximum stability. Freestanding racks should be on a level surface to prevent tipping.
- Weatherproofing for Outdoor Racks
- For outdoor wheelbarrow storage racks, weatherproofing is key. Treat wooden racks with a weather-resistant sealant.
- For metal racks, use rust-resistant paint. This maintenance step protects the rack from the elements and prolongs its durability.
- Safe Handling
- Practice safe handling when placing it on and off the rack. Lift with your legs, not your back, to avoid strain. Ensure it is securely positioned before letting go.
- Cleaning and Upkeep
- Keep your wheelbarrow storage rack clean. Wipe down metal and plastic racks to prevent dirt buildup.
- For wooden racks, a gentle cleaning with soapy water works well. Regular cleaning keeps the rack looking good and allows you to spot potential issues early.
- Checking for Stability
- Periodically check the stability of your wheelbarrow storage rack. Make sure it doesn’t wobble or shift.
- Secure or tighten any loose parts immediately. It is especially important for racks that are frequently used.
- Store Wisely
- Store it correctly on the rack. Position it so that it’s balanced and won’t fall off. Organization is crucial for safety and maintaining its integrity and the rack.
Following these safety tips and maintenance guidelines, your wheelbarrow storage rack will remain a secure, functional, and long-lasting storage solution. Regular care ensures it is always stored safely and ready for use.
Design Variations for Different Spaces
Building a wheelbarrow storage rack is a practical way to organize your space. The design you choose can depend on the space you have. Whether it’s a compact garage, a spacious shed, or an outdoor area, there’s a rack design that fits.
Compact Garage Designs
In small garages, making the most of available space is crucial. The key is to utilize vertical space effectively. A vertical wheelbarrow rack is the perfect solution. This design uses height rather than floor space, making it ideal for compact areas.
- Wall-Mounted Wheelbarrow Storage Rack
- A wall-mounted rack is a great choice. It secures the wheelbarrow against the wall, freeing up valuable floor space.
- This design can be as simple as sturdy hooks or brackets custom-fitted for it. It hangs flush against the wall, minimizing its footprint.
- Ceiling-Hung Solutions
- For an even more space-efficient option, consider a ceiling-hung rack. This design suspends the wheelbarrow above, using ceiling space that often goes unused.
- Pulley systems can be installed to make lifting and lowering it effortless. This option is perfect for very tight spaces.
- Customizable and Flexible Designs
- These racks can be customized to fit various garage sizes and wheelbarrow types. Adjustable arms or hooks allow for a snug fit, ensuring it is secure and stable.
- With some creativity, these racks can also incorporate additional storage its accessories.
- Easy Access
- Despite being out of the way, these vertical racks ensure it remain easily accessible. They can be designed for simple, one-person operation, making storing and retrieving it convenient.
- Space Efficiency and Organization
- You maximize your space efficiency by opting for a vertical wheelbarrow storage rack in a compact garage.
- It helps keep the garage organized and it is readily available without compromising floor space.
These compact garage designs offer practical, space-saving solutions. They are perfect for storing your wheelbarrow securely and efficiently accessible, even in the most miniature garages.
Spacious Shed Solutions
There are more expansive options for those with the luxury of a large shed. A robust wheelbarrow storage rack design not only stores it but also maximizes the utility of the space.
- Horizontal Wheelbarrow Storage Rack
- A horizontal storage rack is an excellent fit for spacious sheds. It lays the wheelbarrow flat, either on the ground or slightly elevated.
- This design is sturdy and can handle heavier ones easily. Its accessibility makes it perfect for frequent use.
- Integrated Storage Features
- The beauty of a horizontal rack in a spacious shed is the ability to integrate additional storage.
- You can add shelves beneath or beside the rack for storing garden tools, soil bags, or pots.
- Wheelbarrow hooks can be attached to the sides for hanging smaller tools, gloves, or hoses. This turns it into a multi-functional storage unit.
- Doubling as a Workspace
- With ample space, the top of the horizontal storage rack can serve as a makeshift workspace. It’s ideal for potting plants, organizing tools, or planning your next gardening project.
- The sturdy, flat surface of the rack provides a convenient area for these activities.
- Customizable for Various Tools
- In a large shed, you can customize the rack size and shape. You can build it to accommodate a wheelbarrow and other bulky yard tools like lawnmowers or leaf blowers. This adaptability makes it a versatile addition to your shed.
- Enhanced Accessibility
- The horizontal design allows easy access to it without needing to lift or maneuver it into position. This is particularly beneficial for those who use them regularly and need quick, effortless access.
- Improved Organization and Efficiency
- This solution dramatically improves the organization and efficiency of your shed. Consolidating your wheelbarrow and garden tools in one area saves time and keeps your space tidy.
A spacious shed offers the opportunity to create a robust, multi-functional rack. It not only stores your wheelbarrow but also enhances the overall functionality of your shed, making it an organized, efficient workspace.
Outdoor Rack Options
Regarding outdoor spaces, selecting the right wheelbarrow rack involves considering the elements. Durability and weather resistance are paramount. An outdoor rack must withstand various weather conditions, from harsh sun to heavy rain.
- Choosing Weather-Resistant Materials
- The material of your outdoor rack is crucial. Opt for materials that resist rust and decay, like treated wood, stainless steel, or heavy-duty plastic. These materials ensure the rack remains strong and durable, even in adverse weather.
- Freestanding Rack Designs
- A freestanding rack is a versatile choice for outdoor areas. It doesn’t require walls for support and can be placed anywhere.
- Position it near your garden, work area, or along a fence for easy access. This flexibility makes it a practical solution for various outdoor layouts.
- Secure Anchoring Systems
- In outdoor settings, it’s important to anchor your rack securely. It prevents it from tipping over in strong winds or when loaded with a heavy wheelbarrow.
- Use concrete anchors for a permanent solution or heavy-duty ground stakes for a more temporary placement. Ensuring the rack is stable and secure is key to its functionality.
- Integrated Covers for Protection
- Consider adding a cover or canopy to your outdoor rack. Covers protect the wheelbarrow from rain, snow, and sun, prolonging its life.
- Depending on your preference and budget, the cover can be a simple tarp or a more elaborate wooden or metal structure.
- Easy Accessibility
- The design of the outdoor rack should prioritize ease of access. Ensure that it allows for straightforward storing and retrieving of the wheelbarrow.
- Avoid complicated locking mechanisms or designs that require excessive maneuvering.
- Multi-Functional Options
- Incorporate shelves or hooks into the rack design for storing garden tools or accessories for added utility. It turns the rack into a multi-purpose storage solution, further optimizing outdoor space.
- Aesthetic Considerations
- An outdoor rack can also enhance the visual appeal of your space. Choose a design that complements your garden or outdoor area. Paint or finish the rack in colors that blend or accentuate your outdoor decor.
An outdoor wheelbarrow storage rack should be durable, weather-resistant, and securely anchored. Its design should balance practicality with aesthetics, providing a functional yet attractive solution for storing it in the great outdoors.
Each design caters to specific needs and spaces. Choose the one that best fits your space and enhances your efficiency.
Cost Analysis and Budgeting for Building a Wheelbarrow Rack
Building a wheelbarrow rack can be a cost-effective solution to organize your space. Understanding the costs involved helps in budgeting effectively. Here’s a breakdown of the expenses you might incur.
Material Costs
- Wood
- The cost varies depending on the type and quantity. Pine is a cost-effective option. Expect to spend around $20-$50.
- Screws
- A pack of screws typically costs around $5-$10.
- Metal Mending Plates
- Depending on size and quality, these can range from $3 to $10.
- Ceiling Hooks
- Sturdy ceiling hooks can cost between $5 and $15.
Tool Expenses
If you already own basic tools like a drill, saw, screwdriver, and measuring tape, there’s no extra cost. Renting or purchasing these tools can add to the budget. A basic drill can cost around $30-$60.
Additional Costs
- Protective Gear: Safety glasses and gloves may cost around $10-$20.
- Finishing Supplies: Paint or varnish for the wood can add another $10-$20 to your budget.
Budgeting Tips
- Compare Prices: Shop around for the best deals on materials. Check different hardware stores or online retailers.
- Reuse Materials: If you have spare wood or screws, use them to cut costs.
- DIY Tools: Borrow from friends or neighbors instead of buying new ones.
- Quality vs. Price: Opt for quality where it matters, like in load-bearing components. Save on aesthetic elements.
Projected Total Cost
A basic wheelbarrow rack can cost anywhere from $50 to $150. The price varies based on material choices, tool availability, and whether you need additional supplies.
By planning and budgeting, building a wheelbarrow rack can be a cost-effective and rewarding DIY project. You can create a sturdy and functional rack with the right approach without overspending.
Conclusion
Building a wheelbarrow storage rack is a practical and rewarding project. It offers an efficient way to store your wheelbarrow, saving space and keeping your area organized. With options for every type of space – compact garages, spacious sheds, or outdoors – there’s a design that fits your needs.
You can create a durable and functional wheelbarrow storage rack by following the step-by-step guide, considering the cost analysis, and adhering to the safety tips and maintenance advice. This DIY project adds convenience to your daily routine and brings a sense of accomplishment in enhancing your home or garden workspace.
FAQ for Building a Wheelbarrow Rack
- What materials do I need to build it?
- You’ll need wood, screws, metal mending plates, and ceiling hooks. The type and quantity depend on your rack design and size.
- How much does it cost to build this storage rack?
- The cost can range from $50 to $150, depending on your chosen materials and tools. Using existing tools and materials can reduce the cost.
- Can I build this storage rack if I have limited space?
- Yes, you can opt for a vertical rack design. It uses wall or ceiling space, ideal for compact areas like small garages.
- Is it difficult to build this storage rack?
- Building it is a straightforward DIY project. With basic tools and materials, most people can construct a simple rack in a day.
- How do I ensure it rack is safe?
- Regularly inspect the rack for loose screws and wear. Ensure it’s properly anchored to the wall or ceiling. Follow the weight capacity guidelines for safety.
- Can I customize it?
- Absolutely. You can adjust the size, add additional storage features, or paint it to match your space.

