
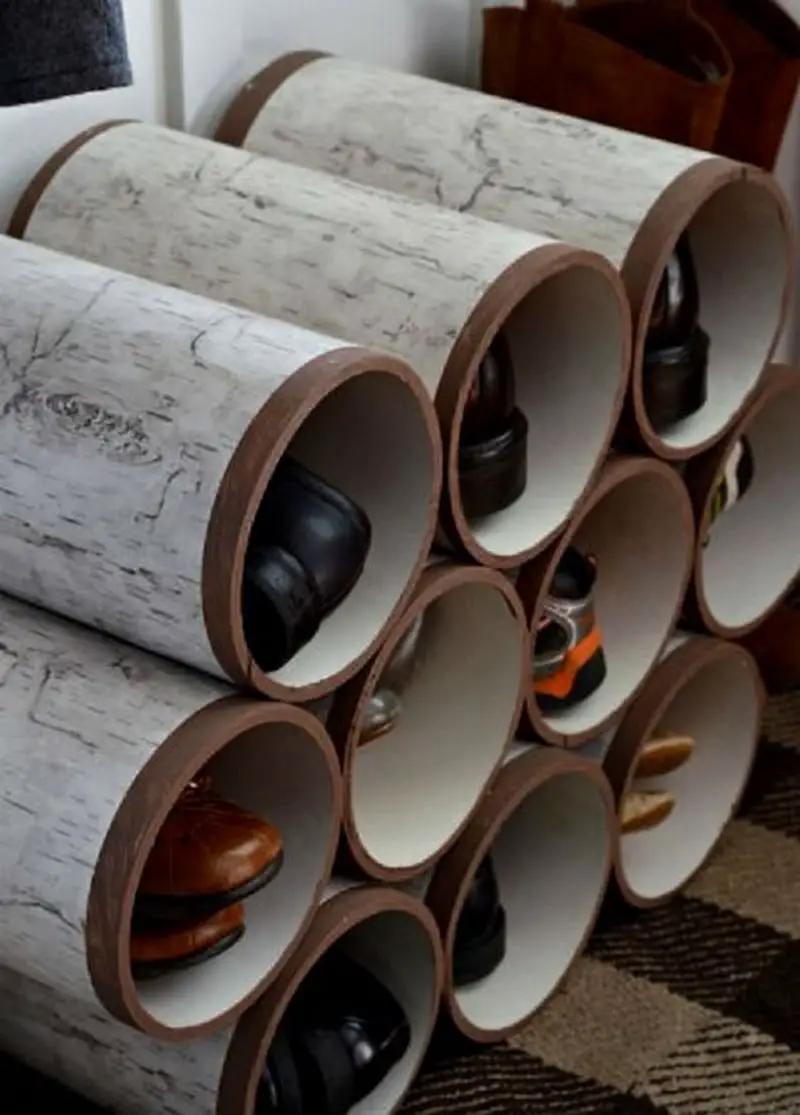
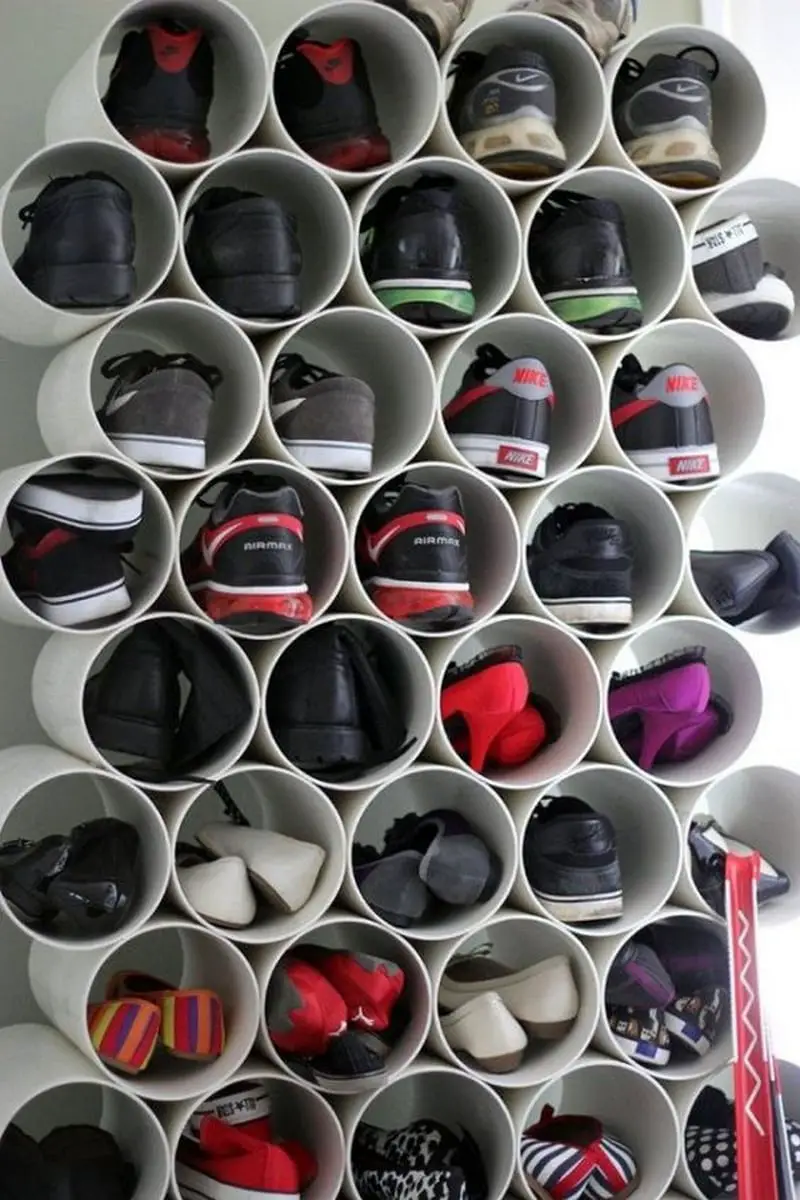
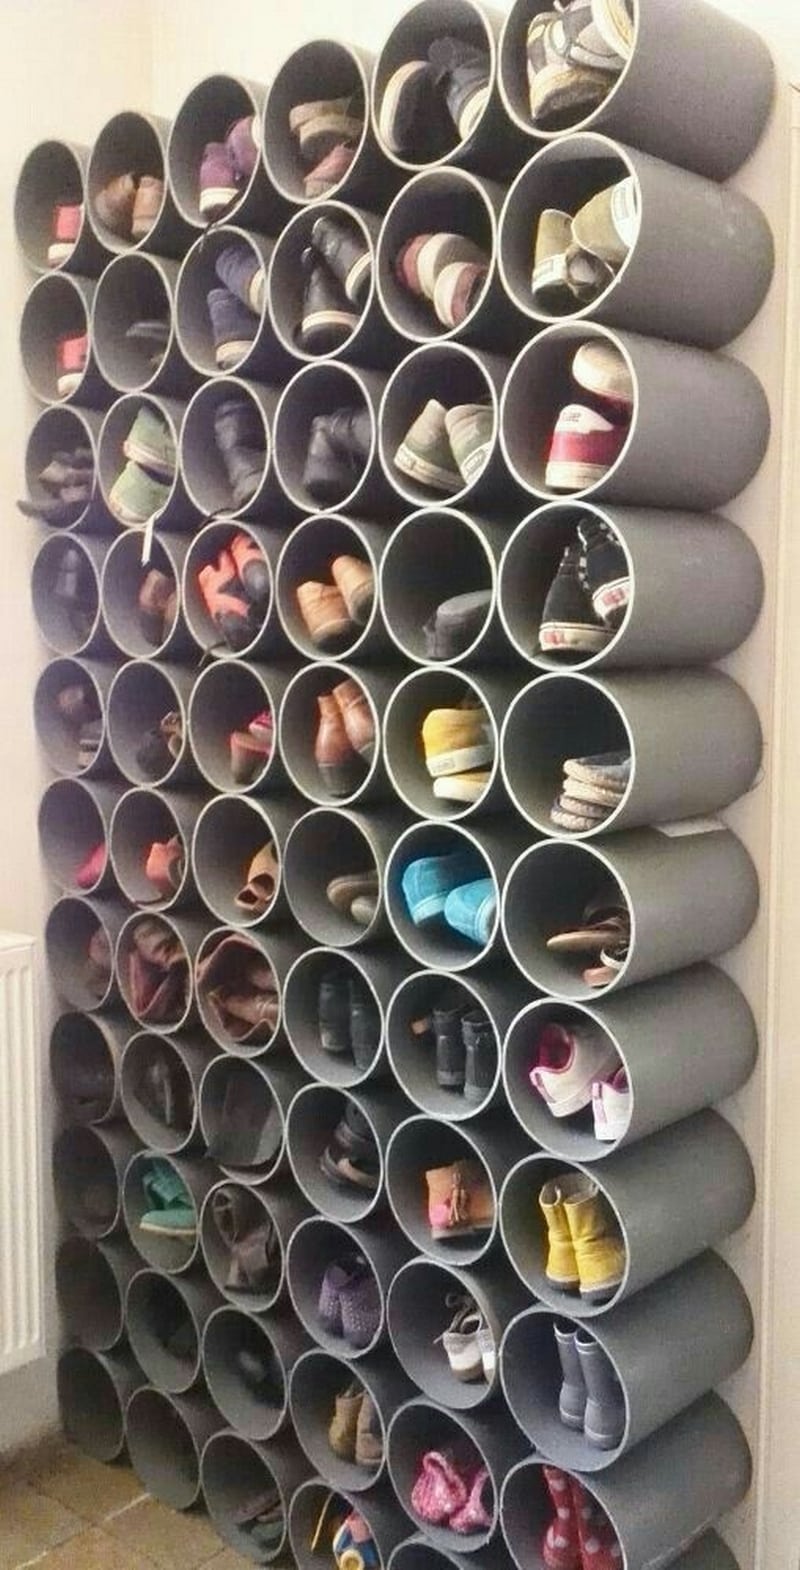
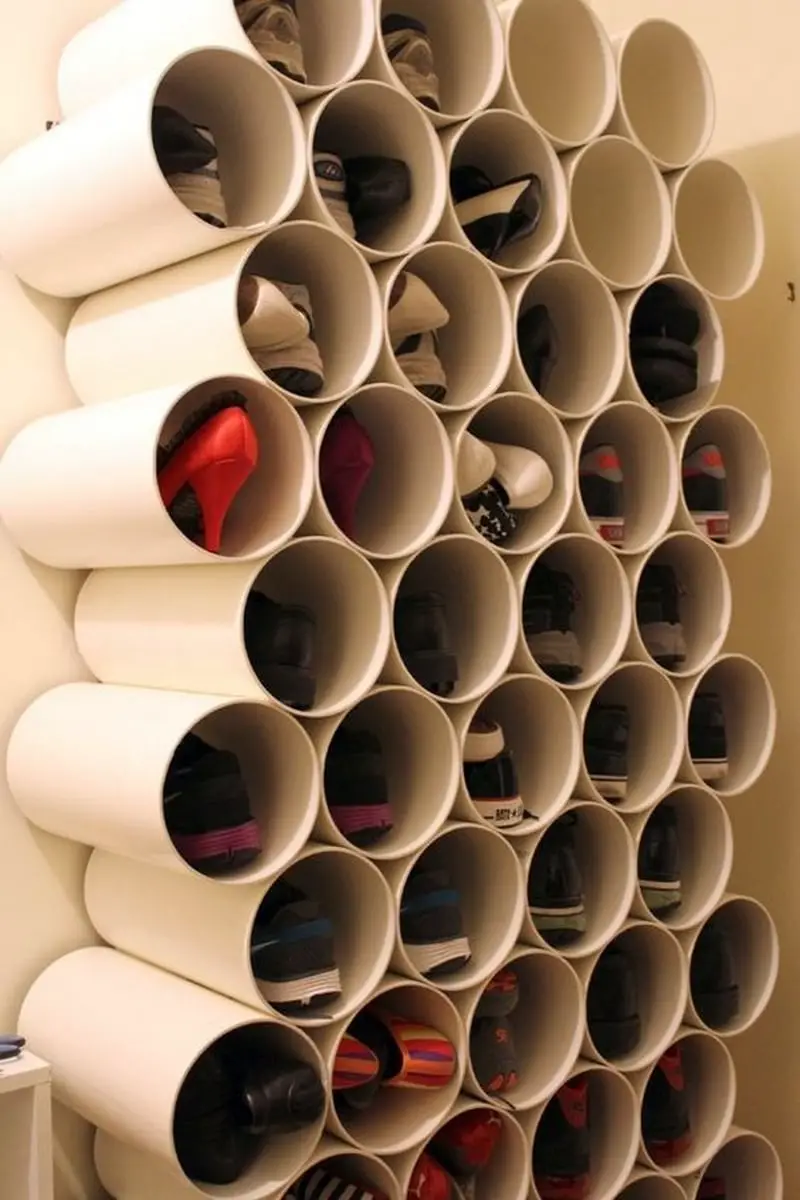
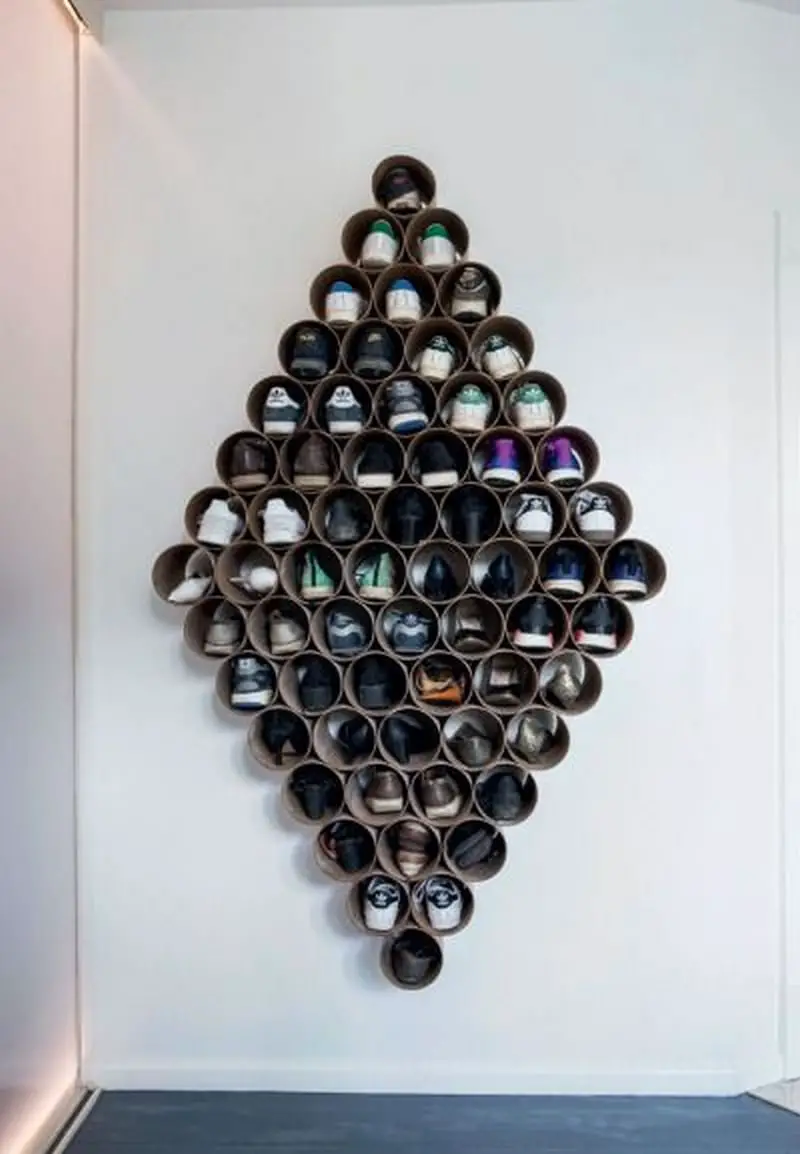
DIY projects have gained immense popularity today due to their focus on organization and storage solutions. Maintaining a neat and orderly space often requires additional measures regardless of your home or apartment size. A wall-mounted PVC pip shoe rack is a great way of keeping your footwear organized without taking up too much space.
Contents
The Need for Effective Organization and Storage
Effective organization and storage are essential components of a harmonious living space, encompassing everything from kitchen and bathroom arrangements to the orderly storage of shoes and cosmetics.
The challenge of maintaining such order becomes even more pronounced in a bustling household. With two teenagers navigating their busy lives, a four-year-old whose curiosity knows no bounds, and three lively dogs adding to the dynamic, finding practical and efficient storage solutions is not just a preference; it’s a necessity.
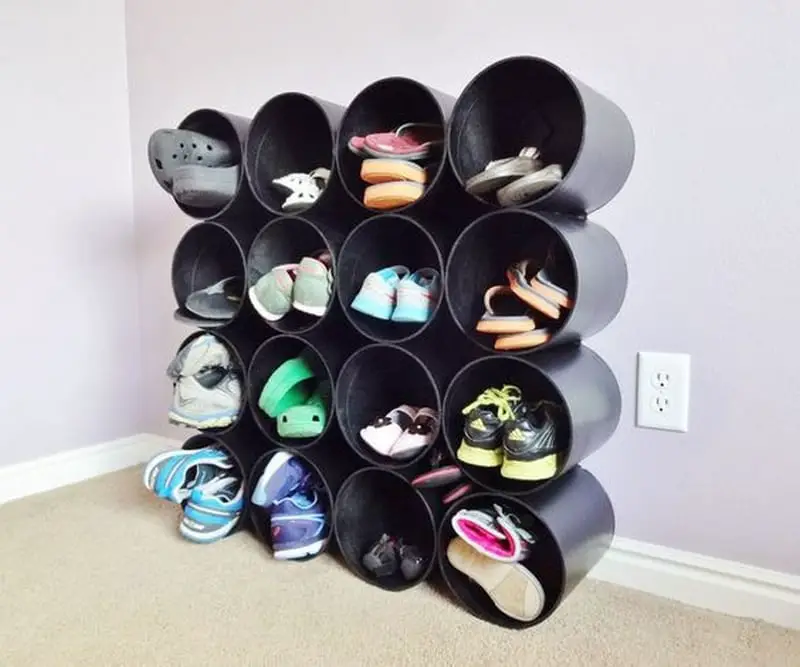
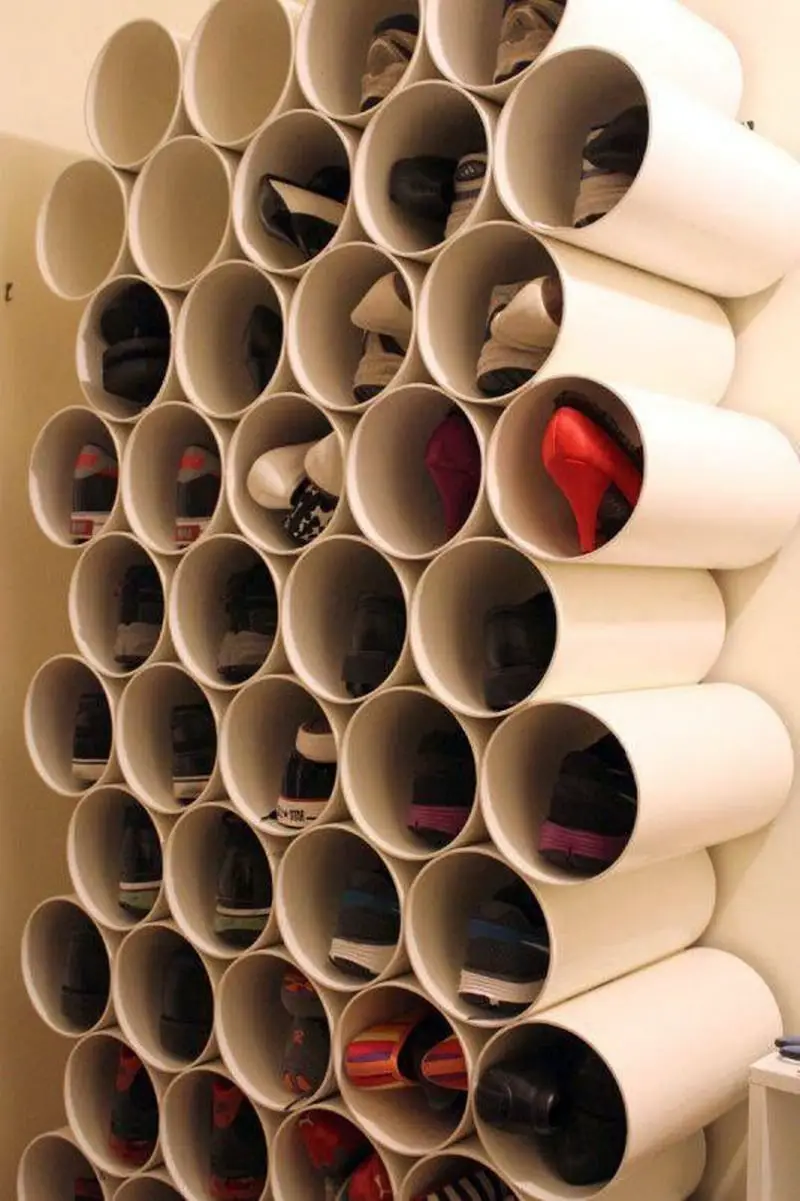
Enter the concept of a PVC wall-mounted shoe rack—a solution that not only promises to keep footwear neatly organized but also reclaims valuable floor space, contributing to the overall cleanliness and organization of our home. This shoe storage approach is functional and customizable, creating a creative and aesthetically pleasing addition to any room. In navigating the complexities of household organization, adopting such innovative storage solutions becomes a cornerstone in the quest for a serene and orderly living environment.
When it comes to maintaining an organized space, having appropriate storage solutions is crucial. A cluttered environment can lead to increased stress, difficulty finding necessary items, and an overall sense of disarray.
With the daily demands of a busy household, it’s essential to have systems that promote tidiness and efficiency. From personal experience, I understand the frustrations that arise when shoes go missing or are scattered around the house.
Building a Recycled Wall-Mounted PVC Pipe Shoe Rack
It’s frustrating, really. Good thing I found this neat DIY project. It came with clear instructions on building a recycled wall-mounted PVC pipe shoe rack.
The materials aren’t really expensive and making the wall-mounted PVC pipe shoe rack was pretty straightforward. So I thought, why not give it a try? I really wanted to organize my family’s shoes and keep them off the floor.
Are you with me? Let’s start building it!
Materials
When embarking on the journey of building a DIY wall-mounted PVC pipe shoe rack, it’s important to understand why each material is necessary. Let’s explore the purpose and significance of each item:
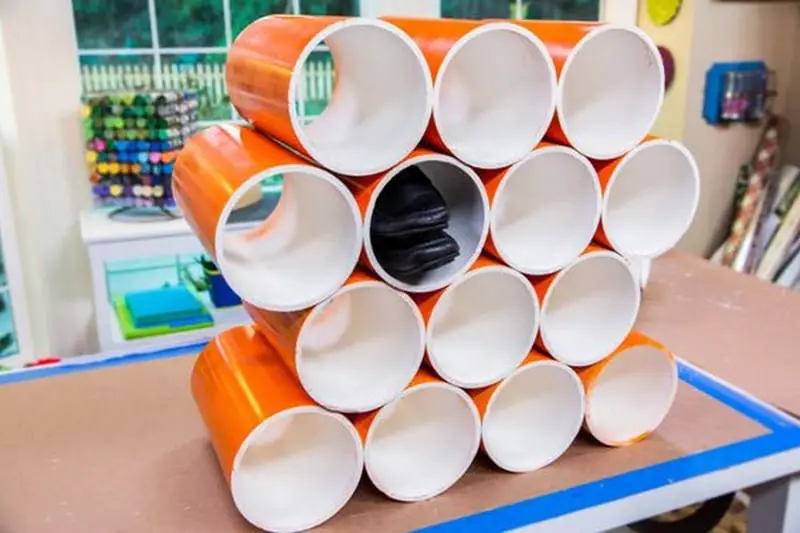
- 10-foot long 6-inch diameter drainage pipe (2 pieces)
- These drainage pipes serve as the main structure of the shoe rack.
- The length and diameter provide ample space to accommodate multiple pairs of shoes.
- PVC pipes are lightweight, durable, and resistant to moisture, making them an ideal choice for this project.
- A giant bottle of Gorilla Glue (1 piece)
- Gorilla Glue is a high-strength adhesive that ensures a strong and secure bond between the PVC pipes and other components of the shoe rack.
- It provides long-lasting durability, even in challenging environments.
- Metal L brackets with 2 pre-drilled holes on each side (6 pieces)
- L brackets act as support brackets for attaching the shoe rack to the wall.
- These brackets are sturdy and provide stability, ensuring that the shoe rack remains firmly in place once installed.
- Nuts and bolts (12 pieces)
- These essential hardware components are used to secure the shoe rack to the L brackets.
- By tightly fastening the nuts and bolts, you create a solid connection between the shoe rack and the brackets, adding to the overall strength and stability of the structure.
- Wall mounting hardware (12 pieces)
- The specific type of wall mounting hardware required may vary depending on the type of wall you have. It can include items such as screws, anchors, or hooks.
- This hardware ensures that the PVC wall-mounted shoe rack is securely attached to the wall, preventing it from shifting or falling.
- Sandpaper
- Sandpaper is used to smooth out any rough edges or surfaces of the PVC pipes. It helps create a polished and finished look, making the shoe rack aesthetically pleasing. Sanding also ensures a safer handling experience by removing any sharp edges.
Tools
To successfully build a DIY PVC wall-mounted shoe rack, you’ll need a few essential tools.
- Hacksaw and/or Jig Saw for cutting
- These cutting tools are crucial for shaping and resizing the PVC pipes to the desired lengths.
- A hacksaw is a versatile hand tool with a fine-toothed blade that allows you to make precise cuts on the pipes.
- A jig saw, on the other hand, is a powerful tool that uses a reciprocating blade to cut through the PVC with greater speed and efficiency.
- Depending on your preference and availability, you can choose either tool to achieve accurate and clean cuts.
- 6 pcs clamps or locking pliers
- Clamps or locking pliers are used to secure the PVC pipes in place during the cutting and assembly process.
- Clamps ensure stability and accuracy, making it easier to work with PVC pipes and achieve precise measurements.
- Drill
- The drill enables you to create holes with precision, ensuring a secure and sturdy connection between the components of the shoe rack.
Instructions
Creating a successful PVC wall-mounted shoe rack requires careful planning and execution. Follow these step-by-step guidelines to ensure a smooth and effective construction process:
Measure and cut the PVC pipes
To begin creating your wall-mounted PVC pipe shoe rack, it’s essential to measure and cut the PVC pipes accurately. Follow these detailed steps to ensure precise measurements and achieve smooth and even cuts:
Measure the Desired Lengths
Take a measuring tape and determine the length you want for each section of the PVC pipe. It’s crucial to plan and decide on the appropriate dimensions based on the available space and the number of shoes you intend to store.
Mark the Measurements
Once you have determined the desired lengths for the pipes, use a marker or pencil to mark the measurements directly on the surface of the PVC pipes. Make clear and visible marks, ensuring accuracy and consistency across all the pipes.
Prepare for cutting
Before cutting, secure the PVC pipe in a stable position using clamps or locking pliers. This prevents the pipe from moving or rolling during cutting, ensuring clean and precise cuts.
Cut the pipes
Depending on your preference and available tools, you can use a hacksaw or a jig saw to cut the PVC pipes. If using a hacksaw, position the blade perpendicular to the pipe and apply firm, steady pressure while making long, smooth strokes back and forth along the marked line.
If using a jig saw, follow the manufacturer’s instructions to insert the appropriate blade and make controlled cuts along the marked lines. Remember to maintain a steady hand and apply consistent pressure to achieve even cuts.
Sand the Edges
Once you have completed cutting the pipes, carefully examine the ends to ensure they are smooth and even. If there are any rough edges or uneven cuts, use sandpaper to sand and smoothen them out gently. This step is essential for the overall safety and aesthetics of the PVC wall-mounted shoe rack.
Join the Pipes Together
Once you have ensured that the PVC pipes are clean and the edges are smooth, the next step is to connect the cut pipes together securely. Follow these instructions to join the PVC pipes using nuts and bolts:
Prepare the pipes
Double-check that the ends of the PVC pipes are clean and free from any debris or rough edges. If needed, use sandpaper to smooth out any imperfections. Cleaning the pipes ensures a proper fit and prevents any obstructions during assembly.
Determine the connection points
Decide where you want to connect the pipes. Align the ends of the pipes, ensuring they are level and straight. Mark the points where the pipes will be joined together. These points will serve as the locations for drilling holes.
Drill holes in the pipes
Using a drill with a drill bit appropriate for the size of the nuts and bolts, carefully create holes at the marked connection points on the PVC pipes. The holes should be slightly smaller than the diameter of the bolts to ensure a snug fit.
Insert the nuts and bolts
Once the holes have been drilled, take the nuts and bolts and insert them through the holes. Place a washer on each bolt to distribute the pressure evenly.
Tighten the nuts onto the bolts using a wrench or a pair of pliers, ensuring a secure connection between the PVC pipes. Be cautious not to overtighten, as this could potentially damage the pipes or strip the threads.
Check the alignment and stability
Inspect the alignment and stability of the PVC pipes after fastening the nuts and bolts, ensuring their straightness and proper alignment. Enhance the security of your PVC wall-mounted shoe rack by applying gorilla glue for added reinforcement. Verify the joint’s stability and absence of wobbling or movement.
Mount It on the Wall
Once you have successfully joined the PVC pipes together, your PVC wall-mounted shoe rack is beginning to take shape. The next step in the process is to mount it securely on the wall. Follow these instructions to ensure a proper installation.
First, choose a convenient and accessible spot on the wall for your wall-mounted PVC pipe shoe rack that has enough space and can support its weight without blocking walkways or door openings. Then, move on to the next step.
Prepare the wall surface by cleaning it to remove dust and debris. Use a dry or damp cloth and let it dry before mounting the shoe rack. Pick a mounting method based on wall type and preference; options include screws, anchors, or hooks, each with unique requirements.
Use an L bracket for stability and security to install your wall-mounted PVC pipe shoe rack on the wall. These metal brackets come in different sizes and shapes to fit your needs, keeping your shoes off the ground and protected from dirt and moisture.
It is crucial to ensure that the PVC wall-mounted shoe rack is level, so use a spirit level to check that it is straight before attaching it to the L bracket.
Thanks to The Awesomer for this great project.
Here’s a quick video tutorial of the PVC wall-mounted shoe rack…
Click on any image to start the lightbox display. Use your Esc key to close the lightbox.

Conclusion
Organizing your living space is essential for maintaining a clean and stress-free environment. DIY projects focusing on organization and storage solutions have gained significant popularity, providing individuals with creative and cost-effective ways to keep their belongings in order.
By building a recycled PVC wall-mounted shoe rack, you can tackle the common issue of misplaced shoes and create an aesthetically pleasing storage solution. Remember to involve your family in the process and turn it into a fun activity.
With a little effort and creativity, you can transform your space and ensure a clutter-free home. If you want to upgrade your home, check out these energy-efficient electrical upgrades.
FAQ: PVC Pipe Shoe Rack
- How does the shoe rack improve closet organization?
- A wall-mounted shoe rack offers a transformative solution for closet organization. By utilizing vertical space, it clears the floor of cluttered shoes, creating room for other storage needs and promoting a tidy environment.
- Shoes are neatly displayed on the wall, increasing visibility and making it easier to select the perfect pair quickly. This system also improves accessibility and cleanliness, keeping your closet organized and simplifying your daily routine.
- How do you add shoes to the completed shoe rack?
- Start by sorting your shoes into categories, such as everyday wear, formal shoes, and seasonal footwear, and place frequently used pairs at accessible levels. Use inserts, dividers, or boot shapers to maintain the shape of your shoes and maximize space by alternating shoe directions or adding hanging organizers for sandals. For added style, arrange your collection by color or design, turning your shoe rack into a functional yet eye-catching display.
- Why might painting the PVC pipe be unnecessary?
- Painting a PVC pipe in low-visibility areas like a closet can often be skipped. Since the pipe is typically hidden, its appearance doesn’t impact the overall aesthetic. Skipping the paint saves time and effort, allowing you to focus on more visible parts of your project. It also reduces material costs, making it a practical and cost-effective decision if the pipe’s functionality remains unaffected.
- What is the process for mounting the shoe rack on the wall?
- Mounting your PVC wall-mounted shoe rack securely on the wall is the final step to complete your project. Start by selecting a convenient and accessible spot that offers enough space without blocking walkways or doors. Hold the rack against the wall to mark the mounting points, ensuring precise placement.
- Clean the wall surface to remove dust, choose a suitable mounting method like screws, anchors, or hooks, and consider using L brackets for extra stability. Drill the holes, install the hardware, and check the rack with a spirit level before securing it in place for a neat and functional finish.
- What is the final step to complete the installation?
- After the hardware is in place, mount the shoe rack onto it, ensuring everything is aligned and secure. This final step completes the installation process.
- What is the process for attaching the mounting hardware?
- Once the holes are drilled, insert the mounting hardware into each hole. This step is crucial to ensure the shoe rack is properly secured to the wall.
- What tools and actions are necessary for the mounting process?
- You’ll need a pen for marking the spots on the wall and a drill for making the holes. These tools are essential for preparing the wall and ensuring the hardware can be installed securely.
- What are the exact steps involved in mounting the shoe rack?
- Begin by marking the wall at the desired locations for the hardware. Next, drill holes at these marked spots, insert the mounting hardware, and then secure the shoe rack in place.
- How do you determine where to mount the shoe rack?
- To find the perfect spot for your shoe rack, hold it up against the wall where you envision it being placed. Use this positioning to mark the spots where the mounting hardware will be installed.
- How are the L brackets attached to the shoe rack?
- L brackets provide essential support for attaching the shoe rack securely to the wall, offering stability and ensuring it stays firmly in place. To achieve this sturdy construction, drill holes into the PVC pipe at the points where the brackets will be attached.
- Secure the L brackets with bolts, using two bolts each at the top, middle, and bottom for even weight distribution and maximum stability. This setup guarantees that your shoe rack remains both functional and durable. With well-anchored L brackets, your rack will hold your footwear reliably for years to come.
- What problem does the DIY PVC wall-mounted closet shoe rack solve?
- A PVC wall-mounted shoe rack offers a practical and stylish solution to keep footwear organized while reclaiming valuable floor space. It transforms a cluttered closet into a serene and functional space, where each shoe has its designated spot.
- Elevating your shoes not only promotes cleanliness but also eliminates the hassle of navigating through scattered footwear, ensuring a safer and more efficient start to your day. This customizable and creative storage option becomes a key step in achieving an orderly and harmonious living environment, turning shoe chaos into a thing of the past.
- How do you ensure straight cuts when cutting the PVC pipe?
- Preparing for cutting is essential to ensure clean and accurate results when working with PVC pipes. Secure the pipe in a stable position using clamps or locking pliers to prevent any movement during cutting. Create a straight edge using a piece of thin cardboard, such as from a cereal box, wrapping it around the pipe at the cutting point and marking a clear line with a pen.
- Depending on your tools, use a hacksaw or jigsaw for cutting, maintaining steady pressure and controlled movements along the marked line. By following these steps, you’ll achieve precise and straight cuts, setting a strong foundation for your PVC project.


