Small spaces don’t get the credit they deserve. Most homeowners will tell you that they’re cozy, convenient, stylish, and low maintenance. But their potential is often overlooked because of the common problems we always associate with tight quarters. Storage is one of the more common dilemmas of the small home.
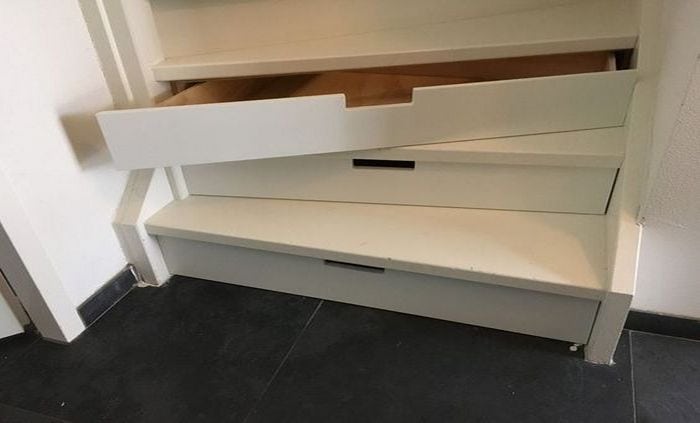
If storage is the problem because of the lack of space, DIY staircase drawers are the solution. For DIY-ers, a problem is an opportunity to create something. If storage is the problem because of the lack of space, there is a solution. These DIY staircase drawers are such a brilliant idea you’ll want to make your own.
Contents
The Advantages of Adding Staircase Drawers
Turn your stairs into the hottest spot in the home with the undeniable groove of staircase drawers. These space-saving sensations are about to drop some serious advantages that’ll have you dancing to the rhythm of organization. Let’s crank up the volume and dive into the top six reasons why staircase drawers are the ultimate storage bangers.
1. Under-Stair Rave: Where Unused Space Gets a Storage Glow-Up
Feel like your stairs are missing out on the party? Staircase drawers transform that under-stair space into a storage rave. It’s like turning a storage snooze into a full-on dance-floor extravaganza. Your stairs are about to become the VIP section for your belongings!
2. Sleek and Sneaky: Stylish Storage That Drops the Cool Vibes
Storage doesn’t have to be a bore – cue the cool cats of organization, the staircase drawers! These sleek wonders bring the chic, seamlessly blending style with functionality. It’s not just about stashing stuff; it’s about giving your home a storage facelift that’s as hip as your favourite dance move!
3. Clutter Commanders: From Chaos to an Organized Dance-Off
Ready to kick the clutter to the curb? Staircase drawers are the maestros of organization, turning your home into a choreographed dance-off of order. Say goodbye to the mess mambo and hello to the storage shuffle – because who wouldn’t want their stairs to be dance-ready?
4. Custom Groove: Tailor-Made Storage Beats for Your Space
One-size-fits-all is so yesterday. With staircase drawers, customize the number, size, and arrangement to create a storage symphony that’s in tune with your vibe. It’s like creating your storage mixtape – because your home, your rhythm!
5. Effortless Elegance: Grab, Go, and Glam Up Your Storage Game
Tired of the storage hustle? Staircase drawers bring a touch of glam to convenience. Everything you need is just a pull away – grab, go, and conquer the day with elegance and ease. Storage has never looked this smooth and sophisticated!
6. Maximize the Groove: Turn Unused Space into a Storage Boogie Wonderland
Staircase drawers are the funk masters of maximizing space. Turn neglected nooks into a storage boogie wonderland, ensuring every inch of your home grooves to the storage beat. It’s time to let your stairs steal the show and make storage the life of the party.
Are you ready to amp up your storage game with the sizzle and swagger of staircase drawers?
Heads-up, though. This isn’t an easy task. You’ll need to invest time, patience, and effort to get this done. But then again, it’ll solve your storage problem. So it’s worth it.
How to Build DIY Staircase Drawers
Ready to transform your staircase into a storage sensation? Get ready to bust out some serious DIY moves with our guide on building your very own staircase drawers! Let’s dive into the rhythm of organization and turn those stairs into storage dance partners.
Materials:
- Wood: Choose durable wood like plywood, MDF, or hardwood for the drawer boxes and facings. Ensure the wood is cut to precise measurements.
- Drawer Slides: Heavy-duty slides will allow the drawers to glide smoothly. Opt for full-extension slides for better access.
- Wood Glue: For strong joints.
- Pin Nails: For securing pieces temporarily.
- Screws: For permanent assembly.
- Sandpaper: To smooth out surfaces (use 120-grit and 220-grit for best results).
- Wood Filler: To fill gaps or holes.
- Paint or Stain: To finish the drawers and match them with your staircase.
- Handles or Pulls: For opening and closing the drawers.
- Paraffin Wax: To reduce friction between surfaces.
Tools:
- Track Saw: For precise long cuts.
- Hand-Held Circular Saw: Ideal for cutting larger pieces of wood.
- Miter Saw: To cut angles and edges cleanly.
- Table Saw: For ripping wood into uniform widths.
- Drill and Driver: For creating pilot holes and driving screws.
- Nail Gun: To quickly secure the wood pieces.
- Sander: For smoothing edges and surfaces.
- Clamps: To hold pieces in place while gluing.
- Measuring Tape: For accurate measurements.
- Square Ruler: To ensure perfect 90-degree angles.
- Utility Knife: For precise trimming.
Step 1: Prepare the Staircase
- Remove existing risers if necessary.
- Inspect the staircase structure to ensure it can handle the modifications.
- Reinforce the staircase if needed with additional framing.
Step 2: Build the Drawer Boxes
- Cut the wood to size for the drawer sides, back, front, and base.
- Assemble the box using wood glue and pin nails. Secure with screws for durability.
- Use clamps to hold the pieces while the glue dries.
- Sand all surfaces until smooth.
Step 3: Attach the Drawer Slides
- Install the drawer slides inside the staircase cavity, ensuring they are level.
- Attach the corresponding slides to the sides of the drawer boxes.
Step 4: Create the Drawer Fronts
- Cut wood for the drawer fronts, matching the dimensions of each stair riser.
- Sand and finish the fronts with paint or stain.
- Attach the fronts to the drawer boxes using screws or adhesive.
Step 5: Install the Drawers
- Slide the drawers into place, ensuring they glide smoothly on the tracks.
- Adjust the alignment as needed.
Step 6: Add Handles or Pulls
- Mark the placement of handles or pulls on each drawer front.
- Drill holes and attach the hardware securely.
Click on any image to start the lightbox display. Use your Esc key to close the lightbox.
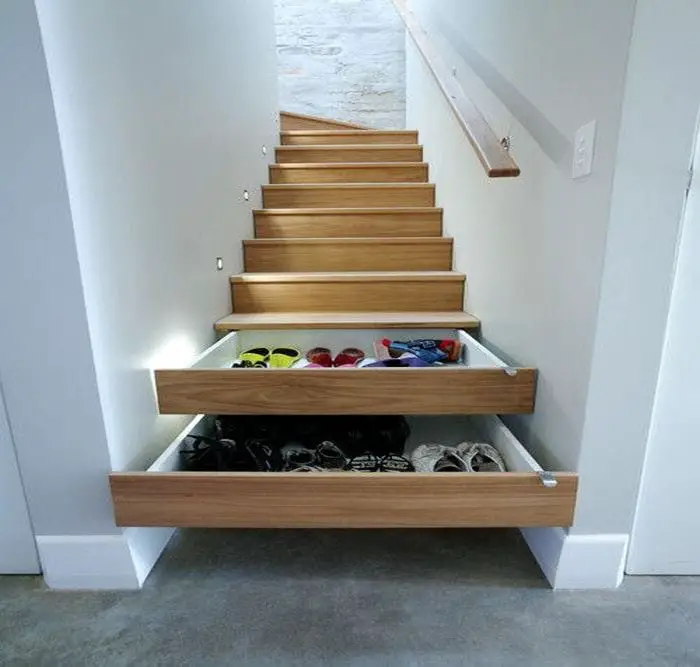

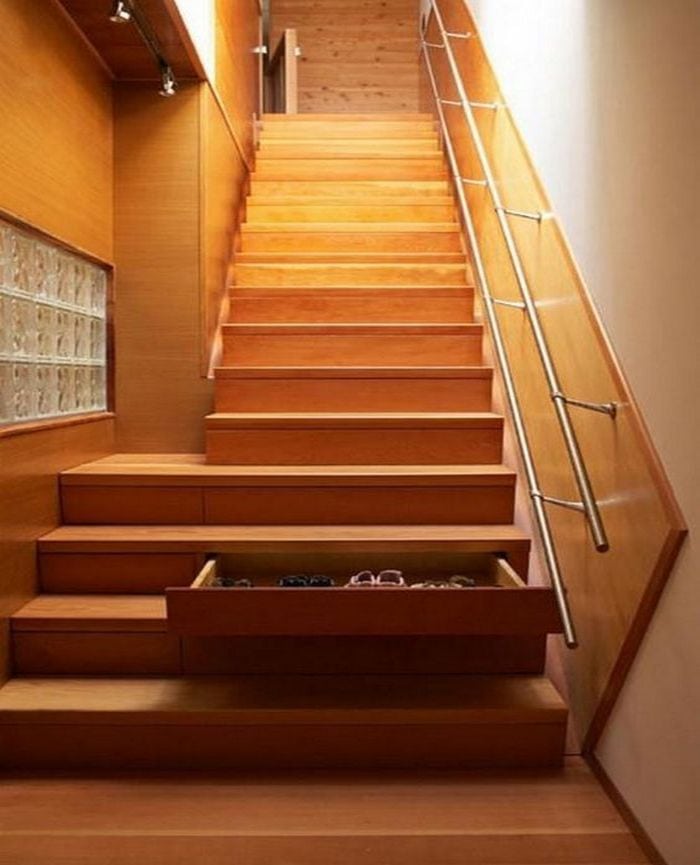

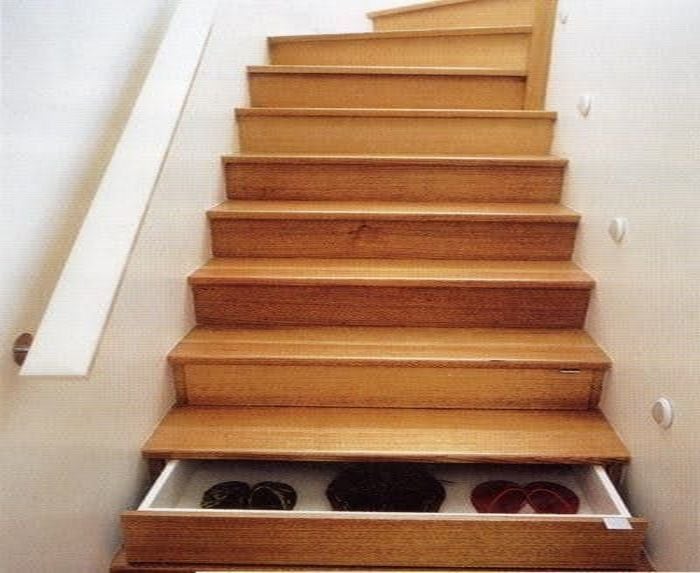


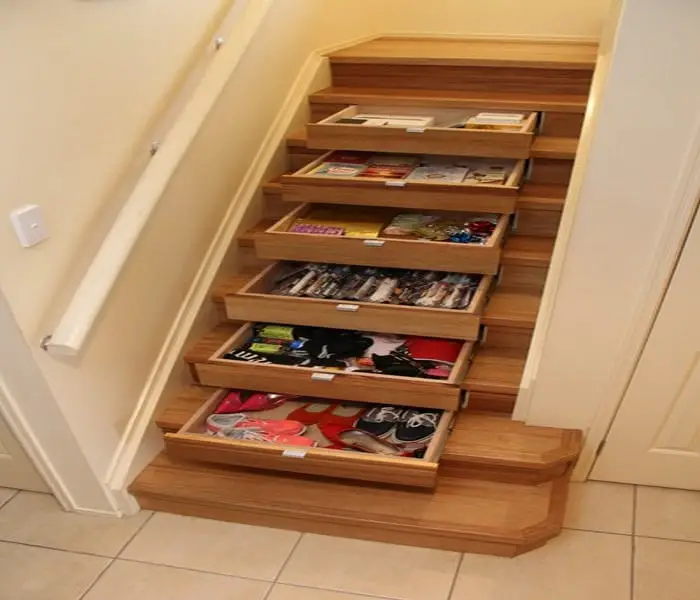
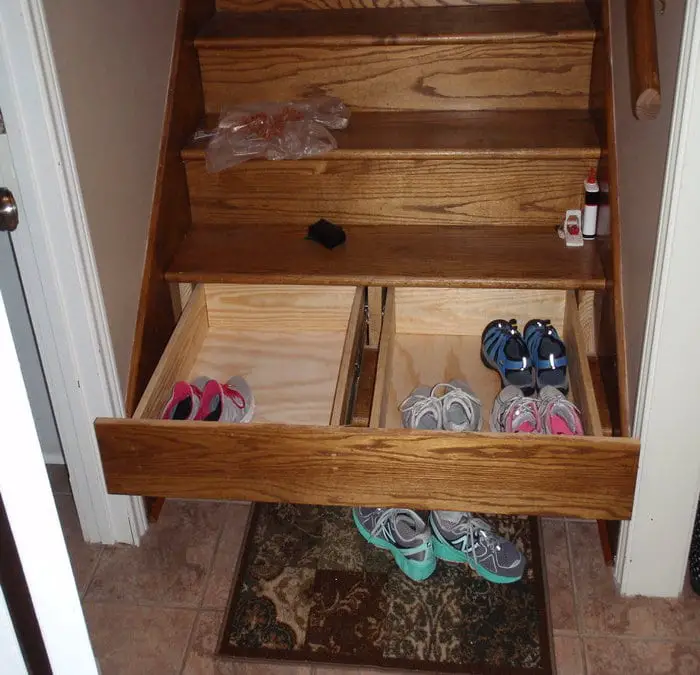
Here’s a more detailed video tutorial to guide you with this project. Thanks to Sebastiaan Mollema for this great project. You can get step-by-step instructions down below…
How to Install Heavy-Duty Drawer Slides for Under-the-Stairs Storage
Installing heavy-duty drawer slides in under-the-stairs storage can maximize space and enhance accessibility. Here’s a step-by-step guide to help you through the process.
- Position the Slides:
- Begin by positioning the drawer slides. Ensure they are set back approximately 3/16 inch from the front of the finished furring strips. This alignment is crucial for a seamless finish and ensures the slides are unobtrusive.
- Secure the Slides:
- Attach the slides securely to the support structures. Make sure the slides are perfectly level to avoid any operational hiccups once the drawers are in use. Secure them with screws that are appropriate for the surface you are working with.
- Handle Non-Separable Slides
- Unlike some drawer slides that can be detached for easy installation, heavy-duty versions are often non-separable. This requires you to mount them in a slightly unconventional manner.
- Position the Drawer
- Extend the slides and carefully place the back end of the drawer onto a 3/8-inch shim within the opening. This ensures the drawer sits at the correct height and allows for smooth operation.
- Level and Attach the Drawer
- Use a 2×4 along with additional shims to fine-tune the drawer’s levelness. Adjust as needed until the drawer is perfectly horizontal. Once you’re satisfied with the leveling, attach the slides to the drawer. Double-check that everything is secure and functioning smoothly.
By following these steps, you will ensure the heavy-duty drawer slides are installed correctly, providing a practical and durable storage solution under your stairs.
Building Staircase Drawers Like a Pro: More Tips and Tricks
Building Staircase Drawers Like a Pro: Tips and Tricks
Turning your staircase into a functional storage solution is an efficient use of space that can add value to your home. While the basic process of building staircase drawers is straightforward, there are numerous small details and techniques that can elevate your project from average to professional-grade.
Below are practical tips and tricks to help you achieve the best results.
1. Understand the Structural Requirements
Before beginning your project, it’s critical to assess the structural integrity of your staircase. Here’s what to keep in mind:
- Load-Bearing Considerations
- Stairs are designed to support significant weight. Ensure that your modifications won’t compromise the load-bearing capacity.
- Support Framing
- Reinforce the staircase framing if you plan to remove risers or cut into structural components.
- Material Strength
- Use sturdy materials, such as hardwood or high-quality plywood, to maintain the staircase’s durability.
2. Prioritize Accurate Measurements
Precision is the foundation of any successful woodworking project. These tips can help:
- Measure Twice, Cut Once
- Double-check all dimensions to avoid costly mistakes.
- Account for Drawer Slides
- Include the thickness of the slides in your measurements to ensure proper fitting.
- Test Fit Before Assembly
- Dry-fit each component to confirm that it aligns with the staircase cavity.
3. Choose the Right Materials
Selecting the correct materials is essential for durability and a professional appearance:
- Plywood vs. MDF
- While plywood is more durable and resistant to warping, MDF offers a smooth finish for painted surfaces.
- Heavy-Duty Drawer Slides
- Opt for full-extension slides that can handle the weight of the contents.
- Finish-Grade Wood
- Use high-quality wood for drawer fronts to achieve a polished, professional look.
4. Use Advanced Joinery Techniques
While screws and nails are effective, using professional joinery methods can improve the strength and aesthetics of your drawers:
- Dado Joints
- Cut grooves in the wood to create a snug fit for drawer sides and bottoms.
- Pocket Holes
- Use a pocket hole jig to create clean, concealed joints for a more polished finish.
- Rabbet Joint
- Ideal for drawer corners, these joints provide added stability and are easy to construct with a table saw or router.
5. Install Slides with Precision
The functionality of your staircase drawers depends heavily on correctly installed slides:
- Alignment
- Ensure slides are perfectly level and parallel to prevent sticking or misalignment.
- Reinforcement
- Secure slides with multiple screws along their length to prevent sagging over time.
- Soft-Close Options
- For a more professional touch, install soft-close mechanisms to avoid slamming drawers.
6. Focus on Finishing
A well-finished staircase drawer system is both functional and visually appealing:
- Sanding
- Use progressively finer grit sandpaper to smooth all surfaces before applying a finish.
- Paint or Stain
- Choose a finish that matches the surrounding staircase. Apply multiple coats for durability.
- Sealant
- Protect the wood with a clear polyurethane or varnish to prevent damage from wear and tear.
- Hardware Placement
- Align handles or pulls consistently across all drawers for a uniform look.
7. Optimize the Design for Functionality
Customizing your staircase drawers to suit your needs ensures they’ll be as practical as they are attractive:
- Dividers
- Add adjustable dividers inside the drawers for better organization.
- Hidden Compartments
- Incorporate secret compartments for storing valuables discreetly.
- Push-to-Open Mechanisms
- Eliminate the need for handles, giving a sleek, modern appearance.
8. Invest in Quality Tools
Using professional-grade tools makes the process faster, safer, and more precise:
- Router
- For creating smooth edges and intricate designs.
- Jig Saw
- Ideal for cutting curves or irregular shapes if your staircase has non-standard dimensions.
- Clamps
- Essential for holding pieces securely in place during assembly and drying.
9. Maintain Proper Workflow
An organized workspace and a logical assembly process can save time and reduce errors:
- Pre-Cut Components
- Cut all pieces before starting assembly to avoid interruptions.
- Label Everything
- Mark each piece with its corresponding drawer location for easy identification.
- Work Station Setup
- Keep your tools and materials within reach to streamline the building process.
10. Plan for Maintenance
Finally, consider the long-term care of your staircase drawers:
- Inspect Slides
- Periodically check and tighten the screws on drawer slides to maintain smooth operation.
- Clean Regularly
- Dust and debris can accumulate in the tracks, so clean them routinely.
- Reapply Finish
- Depending on wear, you may need to refinish the drawer fronts every few years.
By following these tips and tricks, you can achieve professional-quality staircase drawers that are both functional and stylish. This project not only enhances storage but also demonstrates skilled craftsmanship that can elevate the overall look of your home.
How to Fill Edges and Nail Holes on Drawer Fronts
Achieving a smooth and seamless finish on your drawer fronts is crucial for a polished look. Follow these steps to effectively fill edges and nail holes:
- Prepare the Surface
Ensure the drawer front is clean and free of dust or debris. This helps the filler adhere better and results in a more even finish. - Choose the Right Filler
Select a high-quality putty or spackling compound for the task. These materials are ideal for filling voids and creating a smooth surface. - Fill the Edges
Apply the chosen filler along the edges of the drawer front using a putty knife. Gently press the compound into any gaps, ensuring it’s level with the surface. - Address the Nail Holes
For nail holes, use a smaller amount of filler directly over each hole. Press it in firmly to eliminate any depressions. Smooth over the area with the putty knife after application. - Allow for Drying
Let the filler dry completely as per the manufacturer’s instructions. This might take a few hours, so patience is key. - Sand Smooth
Once dry, sand the filled areas with fine-grit sandpaper to ensure a smooth, even finish. Remove any excess filler and create an even, seamless surface.
By following these steps, your drawer fronts will have a flawless finish that’s ready for painting or staining, enhancing the overall look of your project.
The Wrap Up
So there you have it, storage trailblazers—the Staircase Drawers. We’ve pirouetted through the Glue and Screw Symphony, grooved to the Smooth Storage Serenade, and set the stage ablaze with Illuminate the storage stage.
Handle storage with style allows your drawers to strike a pose and turn your project into a storage marvel worthy of adult-sized LEGO champions. Cable management wrestles cable chaos into submission, while future-proof storage wisdom transforms you into a storage oracle foreseeing the needs of tomorrow.
From the safety-first storage dance to the vibrant strokes of the colourful storage palette extravaganza, we’ve navigated the DIY dance floor with flair. Your staircase drawers aren’t just containers; they’re the VIPs of your organization empire, ready to take the spotlight.
So, whether you’re a storage maven or a DIY diva, these tips have turned your drawers into more than just storage—they’re a symphony of craftsmanship, a dance of efficiency, and a visual spectacle that’s ready to dazzle. Get ready to revel in the glory of organized living because the storage party is about to kick into high gear!
Your drawers aren’t merely drawers; they’re a statement, a masterpiece, and a testament to your storage prowess. Armed with the epic tips from this storage odyssey, let your staircase drawers become the rockstars of organization. Craft, dance, illuminate, and future-proof your way to storage greatness.
It’s not just storage; it’s a lifestyle, a celebration, and your staircase is the grand stage for this storage spectacular! Raise a toast to organized bliss and let this journey inspire your staircase drawers to become legends in the realm of storage mastery.
Whether you’re sliding them in or pulling them out, may your drawers always be in tune with the rhythm of an organized life. Let the storage anthem play on, and may your drawers be forever in the spotlight of efficiency!


