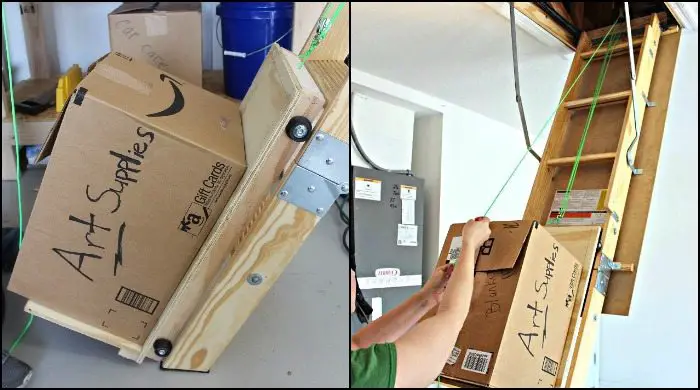
Are you one of those who always struggle when you store items in the attic? Here’s a clever system that might just be what you need – a DIY attic storage lift!
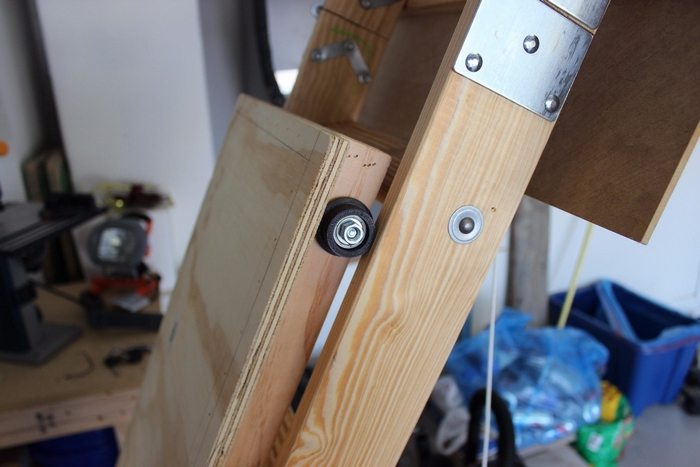
Attics are great for the extra storage space they provide. These storage lifts are ideal for securely storing seasonal items such as Christmas trees and other infrequently used belongings. However, one drawback is that they can be challenging to access, especially when you need to transport heavy items or boxes into the attic.
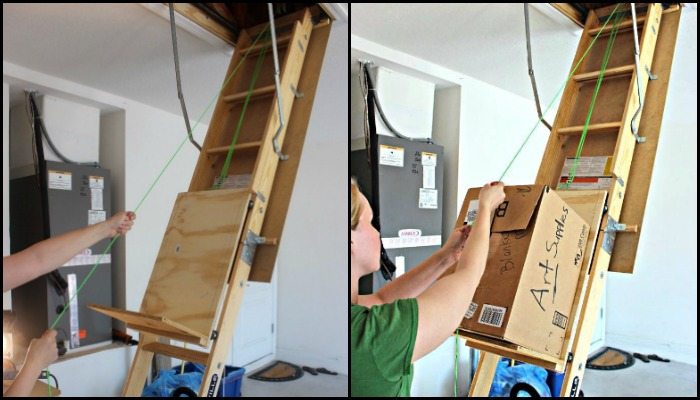
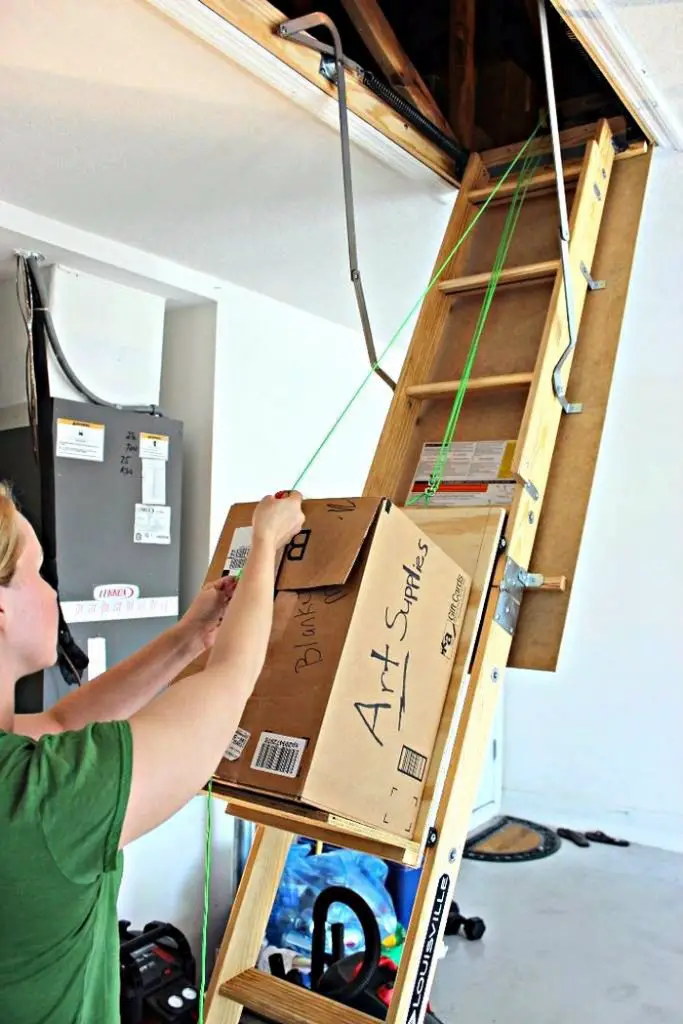
Instead of giving yourself a hard time, and risk breaking your back or falling from the ladder, use a pulley system to help you bring those boxes up the attic!
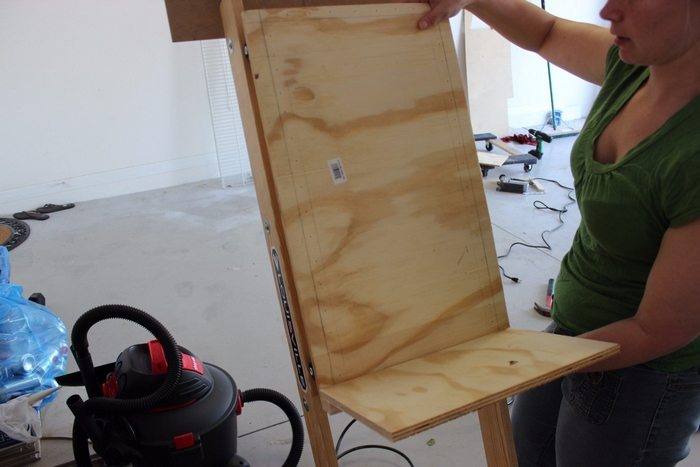
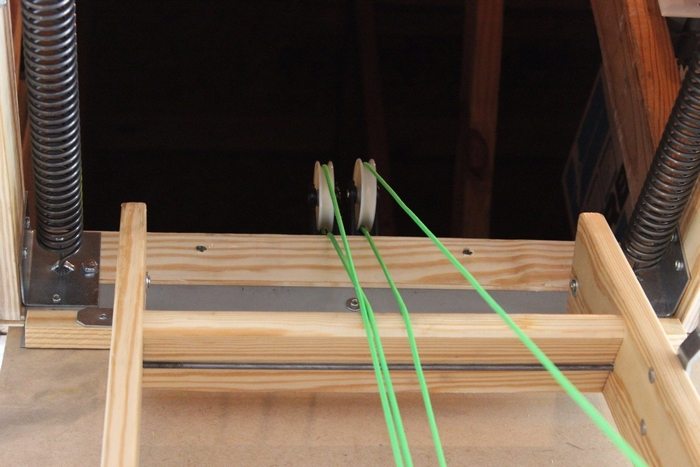
This featured DIY attic storage life project is a simple build that works for those with pull-down attic ladders that have straight side rails.
Now since every attic is of course different, your measurements would be different from the ones mentioned by the source DIY-er. You might also need to use different-sized hardware or materials.
But in case you want to know what we’re using for this particular project, the complete details are listed below. Her tutorial will serve as a great guide to help you build your very own attic storage assistant. ;)
With this clever and easy DIY attic storage lift, you’ll never dislike storing boxes in the attic after the holidays again. It’s also a big help for the elderly and those who often live alone!
Do you know someone who needs this one, too?
Contents
- 1 The Benefits of Making Your Own Attic Storage Lift
- 2 How to Make Your Own DIY Attic Storage Lift
- 3 Maintenance Tips for Your DIY Attic Storage Lift
- 4 FAQ on Building a DIY Attic Storage Lift
- 4.1 What is a DIY attic storage lift?
- 4.2 Why should I consider building a DIY attic storage lift?
- 4.3 What materials and tools will I need?
- 4.4 How do I ensure the lift can handle the weight of my items?
- 4.5 How can I maintain my DIY attic storage lift?
- 4.6 What should I do if I encounter issues with my attic storage lift?
- 4.7 Can I customize my attic storage lift to fit my space?
- 4.8 Is it safe for elderly individuals or those living alone?
- 4.9 How does a DIY attic storage lift enhance home organization?
- 4.10 Can installing a DIY attic storage lift increase my home’s value?
- 4.11 What maintenance tasks are essential for the longevity of my DIY attic storage lift?
- 5 Rising Above the Clutter!
The Benefits of Making Your Own Attic Storage Lift
The DIY Attic Storage Lift offers a range of benefits that can greatly enhance your home organization and daily life:
1. Space Optimization: Utilize your attic’s space efficiently. The innovative storage life system allows you to store more items, maximizing the available storage capacity.
2. Time and Effort Savings: Say goodbye to the hassle of manually carrying heavy boxes up and down the attic. The lift simplifies the process, saving time and effort when storing or retrieving items.
3. Customizable Solutions: As a DIY project, you have the freedom to customize the storage lift according to your needs and available space. You can tailor it to fit the specific dimensions and requirements of your attic.
4. Versatile Storage: The lift accommodates a variety of items, from seasonal decorations and household goods to rarely used belongings. It’s an ideal solution for keeping your attic organized and clutter-free.
5. Increased Safety: The pulley system ensures controlled and steady lifting, reducing the risk of accidents associated with manual handling of heavy objects in confined spaces.
6. Cost-Effective: Building a DIY attic storage lift can be more budget-friendly compared to purchasing pre-made storage solutions, making it a cost-effective option for optimizing your attic space.
7. Eco-Friendly Option: Repurposing materials and using sustainable building practices for your DIY attic storage lift can contribute to a more environmentally friendly approach to organization.
9. Home Value Enhancement: By adding a practical and space-saving storage solution, you can increase the overall value and appeal of your home.
The DIY attic storage lift is a rewarding project that offers numerous advantages. It’s an excellent way to transform your attic into an organized and efficient storage space while enjoying the satisfaction of a successful DIY endeavour.
How to Make Your Own DIY Attic Storage Lift
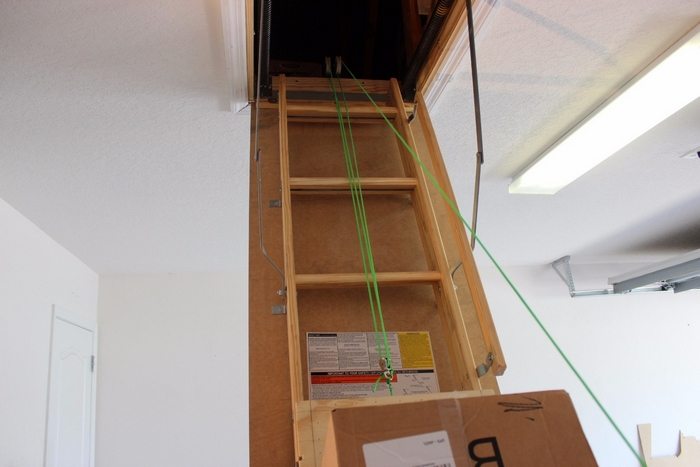
If you’ve ever struggled with storing items in your attic due to limited access or space constraints, worry no more. In this guide, you will discover the secrets of building a practical and efficient storage lift system that will revolutionize the way you organize and utilize your attic space.
Say goodbye to the hassle of carrying heavy boxes up the narrow attic stairs or dealing with cluttered spaces that hinder easy retrieval of your belongings. With a DIY Attic Storage Lift, you’ll not only save time and effort but also gain a newfound sense of organization and order.
Materials
- 2’x2′ 3/4″ Plywood
- 4′ of 1×2 Hardwood
- Wheels
- Skateboard Bearings
- 2+ Pulleys (your choice; the more you have the easier the load will be)
- 5/16″ Washers
- 5/16-24 Nut 4 count
- 5/16-24 x 1-1/2 Bolt
- 50ft Paracord/Rope
Tools
- Measuring Tape
- Saw/Jigsaw
- Wood Clamps
- Nail Gun
- Socket Wrench
- Drill
- Speed Square
Click on any image to start the lightbox display. Use your Esc key to close the lightbox. ![]()





Steps
Thank you very much to Patricia Sheldon for giving detailed instructions for the DIY attic storage elevator. You can access and explore these invaluable insights right here, courtesy of Patricia’s expertise and dedication to making the attic organization effortless and efficient.

Extra Tips
Here are some extra tips and tricks to help you make the most out of your pulley-powered storage lift. With these additional tips, you can enhance the efficiency and functionality of your DIY attic storage lift system even further.
1. Optimal Weight Distribution: Balance the load to prevent strain on the pulley system and ensure smooth and steady operation. Be mindful of the weight limit and avoid overloading the lift.
2. Secure Attachment Points: Double-check the attachment points of your pulleys and ropes. Ensure they are securely fastened to sturdy beams or supports in your attic. Stability is significant for the safe functioning of your DIY attic storage lift, so don’t compromise the integrity of the installation.
3. Lubricate Pulleys and Ropes: Regular maintenance is essential for the longevity of your storage lift. Apply lubricant to the pulleys and ropes to reduce friction and prolong their lifespan. This will also contribute to smoother operation and less strain on the lifting mechanism.
4. Regular Inspections: Periodically inspect your storage lift’s pulleys, ropes, and all components to identify any signs of damage. Addressing potential issues early can prevent accidents and ensure the continued smooth functioning of your lift.
5. Keep Attic Access Clear: Make sure the area around the attic access point is clear and easily accessible. Avoid cluttering this space, as it may hinder the smooth movement of the lift when loading or unloading items.
By incorporating these extra tips into your DIY attic storage lift project, you’ll create a highly functional, well-maintained, and properly utilized storage lift that can significantly improve your attic organization and simplify your daily life.
Maintenance Tips for Your DIY Attic Storage Lift
Maintaining your DIY attic storage lift ensures it stays in top condition, safe, and efficient. Regular upkeep helps prevent accidents and prolongs the life of your lift. Here are essential maintenance tips to follow.
Check Pulleys and Cables Regularly
Inspecting the pulleys and cables regularly is vital to ensure the smooth operation of your DIY attic storage lift. These components bear the brunt of the load and are crucial for safely lifting and lowering items into the attic. Over time, cables can fray, and pulleys can wear down or rust, compromising the system’s reliability and safety.
Look closely for any signs of damage, such as fraying on the cables or rust on the pulleys. Any indication of wear or deterioration should be addressed immediately by replacing the affected parts. This proactive approach helps maintain the system’s integrity and safety, preventing potential accidents and ensuring the lift operates efficiently for years.
Lubricate Moving Parts
Lubrication is key to preserving functionality and extending the lifespan of your DIY attic storage lift. All moving parts, including pulleys, cables, and joints or mechanisms, should be lubricated regularly to reduce friction. Friction can lead to increased wear and tear, which over time, might cause the lift to operate less smoothly or even fail.
Use a lubricant suitable for metal components and compatible with the materials of your lift, such as lithium grease. If you’re unsure which lubricant to use, consult the manufacturer’s recommendations or opt for a general-purpose lubricant designed for metal machinery. Applying lubricant at regular intervals ensures that your attic storage lift remains in optimal working condition, preventing premature wear and making the operation smoother and more reliable.
Test Weight Limits
It’s crucial to adhere to the recommended weight limit of your DIY attic storage lift to ensure its longevity and safety. Exceeding this limit can strain the lift mechanism, leading to potential failures or accidents. To prevent such issues, regularly test your attic storage lift with weights close to the suggested maximum. This practice helps identify signs of stress or malfunction within the lifting mechanism.
By conducting these tests, you can ensure that your DIY attic storage lift operates within its safe capacity, maintaining the system’s integrity and safety. If you notice any problems during these tests, such as the lift struggling under certain weights or unusual noises, address these issues promptly to avoid more serious complications.
Secure and Inspect Mounting Points
The security of its mounting points directly influences the effectiveness and safety of your DIY attic storage lift. These points bear the entire load of the lift and the items it carries, making their stability paramount. Regularly inspect the mounting points for any signs of looseness, wear, or deterioration.
Any bolts or fixtures that have become loose over time should be tightened immediately. Additionally, assess the condition of the material where the lift is mounted; if it shows signs of weakness or damage, reinforcing the mount might be necessary to ensure the lift remains stable and secure.
This step is essential for the functionality of your attic storage lift and the safety of anyone who uses it. A well-secured lift reduces the risk of structural failure, enhancing your DIY project’s overall safety and reliability.
Clean the Lift Area
Maintaining a clean area around your DIY attic storage lift is crucial for its efficient operation and safety. Over time, debris, dust, and other items can accumulate around the lift area, potentially causing obstructions that might interfere with the lift’s movement or the safety of its operation. Regularly sweeping, vacuuming, and removing any objects near your attic storage lift will help prevent these issues.
Ensuring the lift area is free from clutter facilitates smoother operation and minimizes the risk of accidents. A clean environment allows for better visibility and access, making it easier to use and maintain your DIY attic storage lift effectively.
Routine Safety Checks
Conducting routine safety checks is essential to ensure the ongoing reliability and safety of your DIY attic storage lift. These checks should include thoroughly examining the stop mechanism to verify it functions correctly, preventing the lift from moving unexpectedly. Additionally, operate the lift to observe its smoothness and listen for unusual noises or detect irregular movements.
Any deviations from normal operation could indicate underlying issues that need attention. Regular safety inspections help in early identification of potential problems, allowing for timely interventions to maintain the lift’s safety and operational integrity. Keeping a checklist and schedule for these inspections can help systematically manage the maintenance of your DIY attic storage lift.
Seek Professional Advice When Needed
While many aspects of maintaining your DIY attic storage lift can be managed independently, certain situations may require professional expertise. If you encounter complex issues or if your attic storage lift requires significant repairs, seeking advice from a qualified technician is advisable.
Professionals bring expertise and experience that can be crucial for diagnosing and fixing problems that might be beyond the scope of DIY maintenance. They can offer solutions that ensure your lift operates safely and efficiently, adhering to safety standards. Moreover, a professional can provide insights into preventative maintenance practices to avoid future issues. Whenever in doubt, consulting with an expert can help preserve the functionality and safety of your DIY attic storage lift, ensuring it serves its purpose effectively for many years.
FAQ on Building a DIY Attic Storage Lift
What is a DIY attic storage lift?
A DIY attic storage lift is a homemade system designed to easily move items into the attic. It uses a pulley system to lift heavy and bulky items, making storage easier and safer.
Why should I consider building a DIY attic storage lift?
Building a DIY attic storage lift can save you time and effort, provide customizable storage solutions, enhance safety, and optimize attic space. It’s also cost-effective and can be an eco-friendly option.
What materials and tools will I need?
You’ll need materials such as plywood, hardwood, wheels, skateboard bearings, pulleys, washers, nuts, bolts, and paracord. Tools include a measuring tape, saw, wood clamps, nail gun, socket wrench, drill, and speed square.
How do I ensure the lift can handle the weight of my items?
Regularly test the lift with various weights up to the recommended limit to ensure it can safely handle the load. Never exceed this limit to avoid straining the mechanism.
How can I maintain my DIY attic storage lift?
Maintain your lift by regularly checking pulleys and cables for wear, lubricating moving parts, ensuring mounting points are secure, cleaning the lift area, and performing routine safety checks.
What should I do if I encounter issues with my attic storage lift?
If basic troubleshooting doesn’t resolve the issues, seek professional advice. A qualified technician can help ensure your lift remains safe and functional.
Can I customize my attic storage lift to fit my space?
Yes, one of the benefits of a DIY attic storage lift is the ability to customize it according to your attic’s dimensions and your specific storage needs.
Is it safe for elderly individuals or those living alone?
Yes, a DIY attic storage lift is particularly beneficial for the elderly and those living alone, as it reduces the need to carry heavy items up and down the stairs, minimizing the risk of falls and injuries.
How does a DIY attic storage lift enhance home organization?
By providing a simple and efficient way to store items in the attic, a DIY attic storage lift helps keep your home organized and clutter-free, making it easier to find and access stored items.
Can installing a DIY attic storage lift increase my home’s value?
Adding a practical and innovative solution like an attic storage lift can enhance your home’s appeal and functionality, potentially increasing its overall value.
What maintenance tasks are essential for the longevity of my DIY attic storage lift?
Essential maintenance tasks include regularly inspecting and lubricating pulleys and cables, testing weight limits, securing and inspecting mounting points, keeping the lift area clean, and conducting routine safety checks. These practices help ensure smooth operation, prevent accidents, and extend the life of your lift.
Rising Above the Clutter!
There you have it! The process of crafting a space-saving and efficient DIY attic storage lift is now at your fingertips. Equipped with step-by-step instructions and harnessing the power of pulleys, you have discovered how to construct a customizable lift system that effortlessly streamlines attic organization.
The guide also provided bonus tips to maximize the lift’s potential, including weight distribution, secure attachments, and regular maintenance. By incorporating these insights, you can optimize your attic storage and keep your belongings easily accessible and well-organized.
Embrace the DIY spirit and elevate your attic storage to new heights with this ingenious pulley system. Get rid of clutter and welcome a tidy, well-utilized attic space that simplifies your life and enhances your home’s organization.
Ready to transform your attic into a functional and stress-free haven? Effortlessly achieve this transformation through a DIY attic storage lift!
For more convenient storage solutions, check out our staircase cabinet project next!

