Do you need a little extra lighting on your walkway? Having sun jars in your yard is fine, but they don’t always get enough sun exposure, thus rendering them useless sometimes.
If your yard doesn’t get enough sunlight during the day, especially if you have a lot of trees that provide some shade, then this project is for you! It’s still solar-powered, tweaked just a little bit to make it more effective. ;)
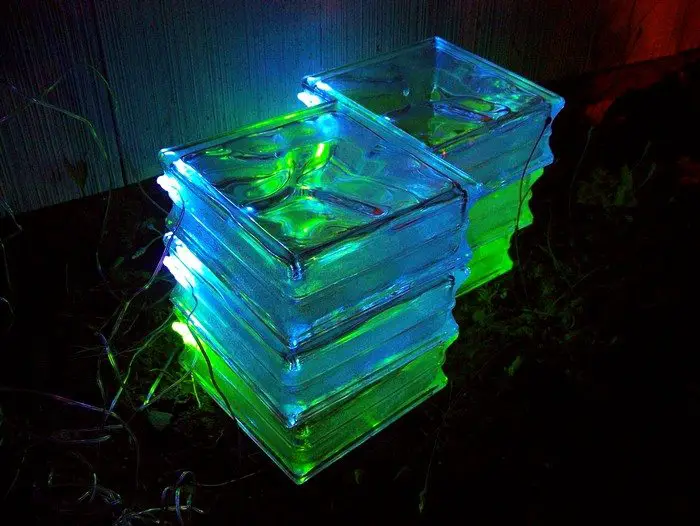
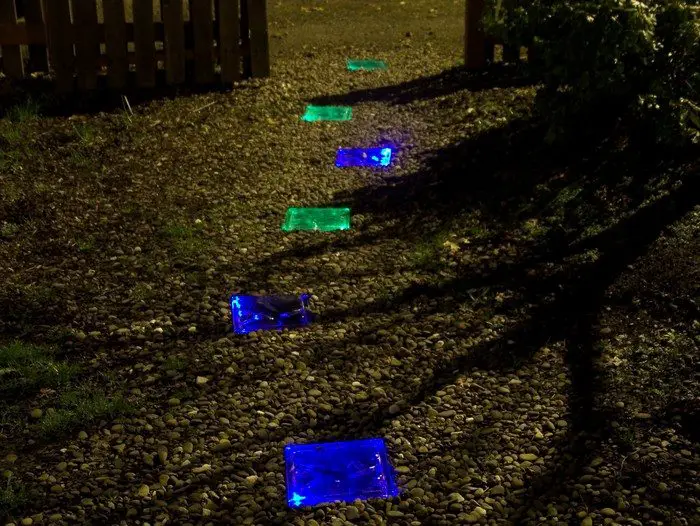
Instead of simply putting the solar lights on the ground, the DIY-er of this project basically took his lights apart so that he can replace the wiring with longer ones. This way he can mount the solar panel on his roof so that it accumulates enough power from the sun. But the LEDs are placed on the ground, attached to glass blocks that serve as stepping stones.
These stepping stones are set just a little bit higher than the ground surrounding them, while all the wires are sealed and buried deep to protect and hide them from sight.
This DIY project doesn’t only give ample lighting, it also makes your walkway more attractive at night!
Is this the kind of walkway that you would want for your yard? Learn how to make it through the step-by-step tutorial below!
Click on any image to start the lightbox display. Use your Esc key to close the lightbox.![]()
Contents
Building Your Solar Stepping Stones
Materials:
- Glass Blocks
- Solar Lights (with separable solar panels)
- Wiring
- Electric Tape
Tools:
- Shovel
- Wiring Tools
- Measuring Tape
- Hot Glue Gun
- Staple Gun
Steps:
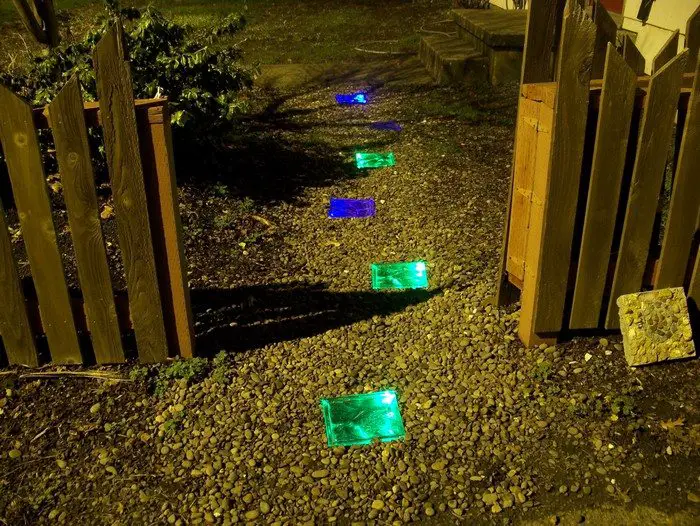
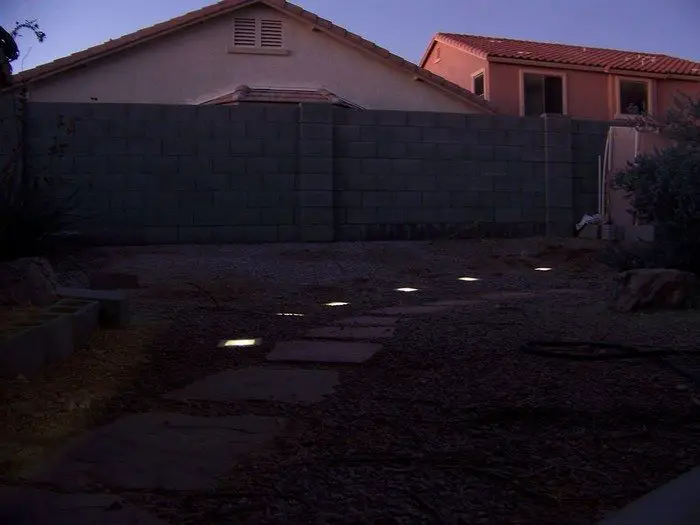
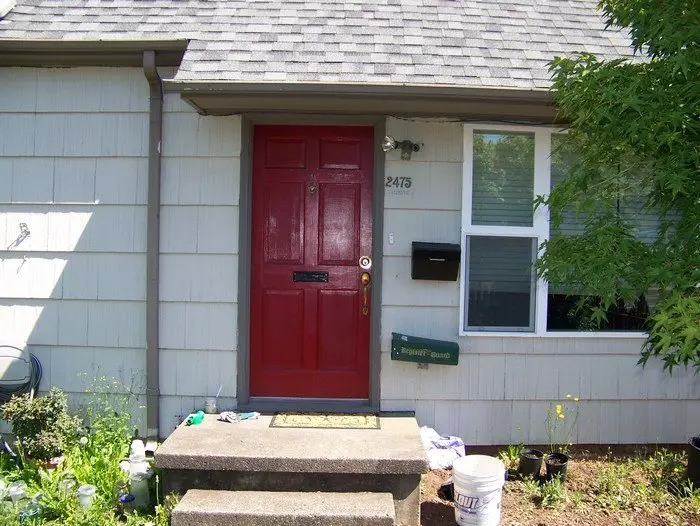
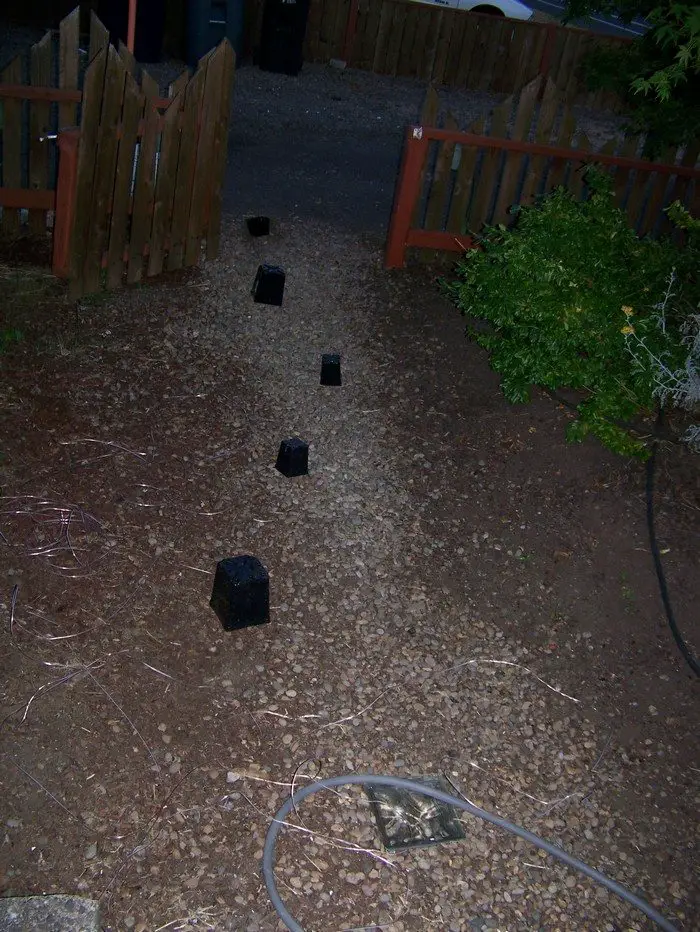
The Walkway: Here is the little path that goes from my driveway to the front door. I decided this was the best place to put the solar stepping stones, mostly because I wouldn’t have to move a bunch of concrete, but also because I’d get to walk the path each night when I came home from work.
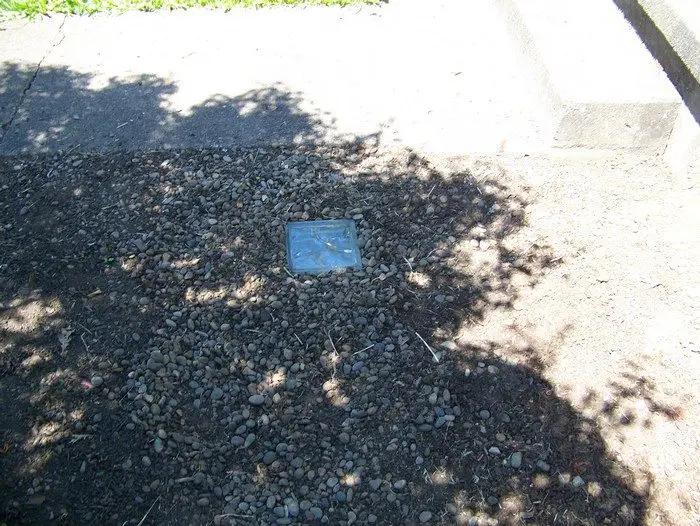
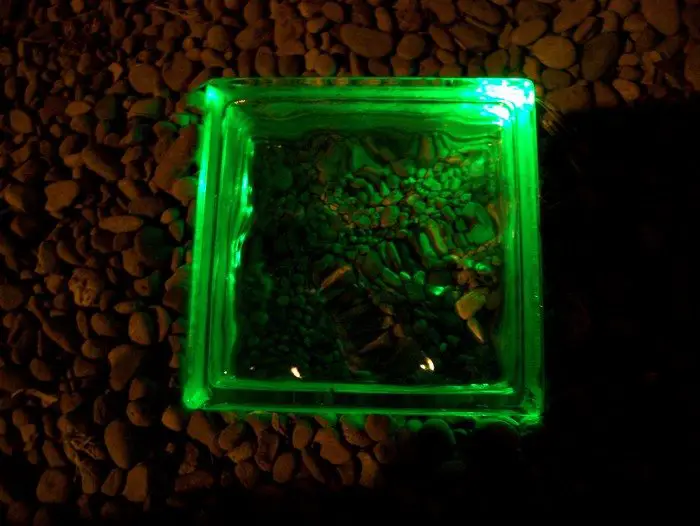
I figured I’d put one of the solar stepping stones in the path first just to see how it would look during the day. I dug a little hole, just a bit deeper than the result would be. I poured a little fine gravel into the bottom of the hole, so you wouldn’t just be looking at dirt through the glass. I filled it back in around the block, and left the top just a bit higher than the surrounding gravel, as I figured it would settle out a bit. Everyone who saw it thought it looked nice, so it was off to the next step.
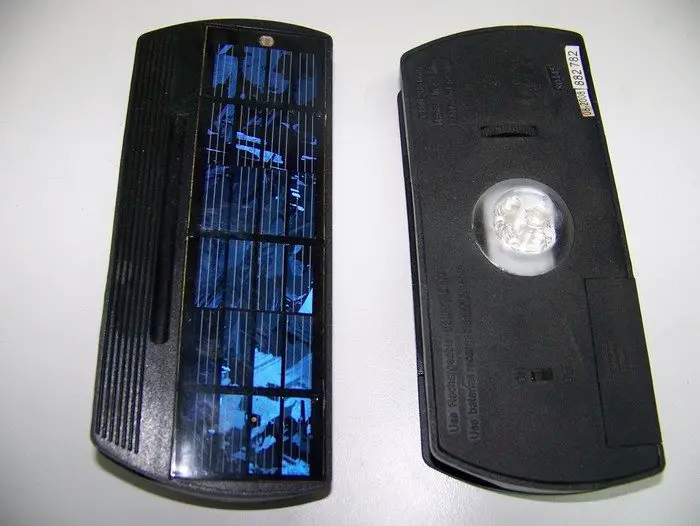
Solar Power: I found these awesome solar lights designed to clip on to a patio umbrella at Home Depot for about 8 bucks. I decided to go with these because the solar panel was separable and the batteries drove six separate LEDs. If I’d used the standard solar lights it would have meant six little solar panels and a lot more wires running around.
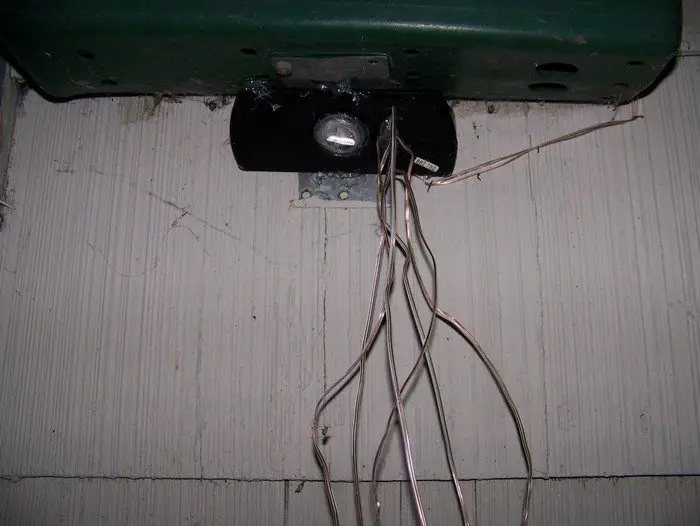
I separated the solar panel from the battery/circuit board case and extended the wires that connected them. The panel went on my roof just over the front door (see picture) and the battery case went under my newspaper box, with wires running discreetly along with the corners and the edge of the window.
Note: This type of solar light is no longer available, but you can search on Amazon for a similar product.
I just want to say that I don’t recommend the deal extreme lights for the walkway project, they were a bit dimmer than I would like for this. They worked out well for a bottle lights project I did, but I don’t think they’d be so good for this one.
I also don’t recommend ANY of the Christmas light options for this, they are all too dim.
Get to work: Crack open the solar lights and separate the panel from the body. Three wires connect them, so measure the distance from where you’ll be mounting the panel to where the body will be mounted, and then add several inches. Extend the three wires by that amount.

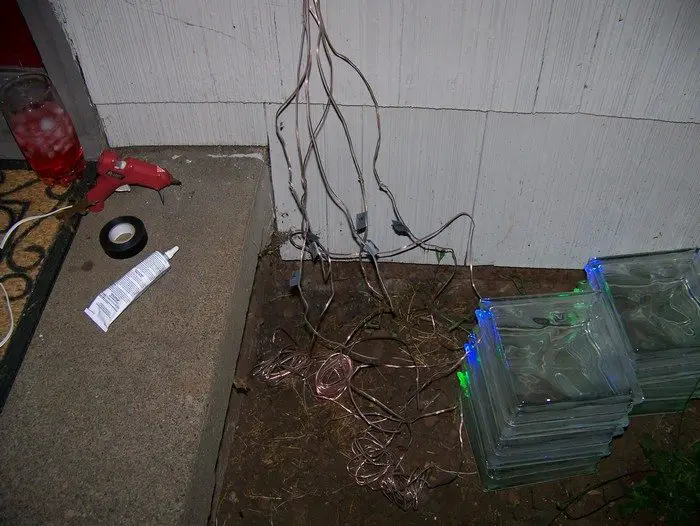
Within the body of the light, unsolder the LEDs and replace them with about 6-10 inches of speaker wire. Make sure to seal everything up well with epoxy or silicone! Mount this whole assembly on your house first, make sure it works, then prepare your glass blocks. I used epoxy (because I’m an idiot) to mount the panel to the roof and the body under the paper box, and then stapled the wires in place.
Update: It’s been mentioned that speaker wire isn’t really meant for outdoor use — you may want to upgrade to something heavier or use some conduit. Also, silicone might not be the best option for sealing these, as it reacts with solder and copper and could cause problems down the line.

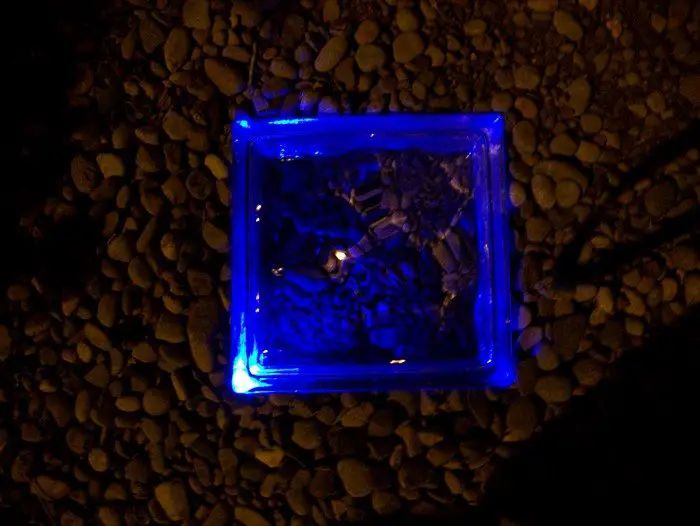
At the corner of each of your blocks, mount an LED of your chosen color, tack it in place with hot glue, then cover the whole shebang in epoxy or silicone. Make sure you leave the leads exposed!
Get to more work: I marked the spots on my path where I wanted the bricks, and measured the distance from there to the case of the solar light, and added about afoot. I found out the hard way that I probably should have added more like three feet just to be safe!
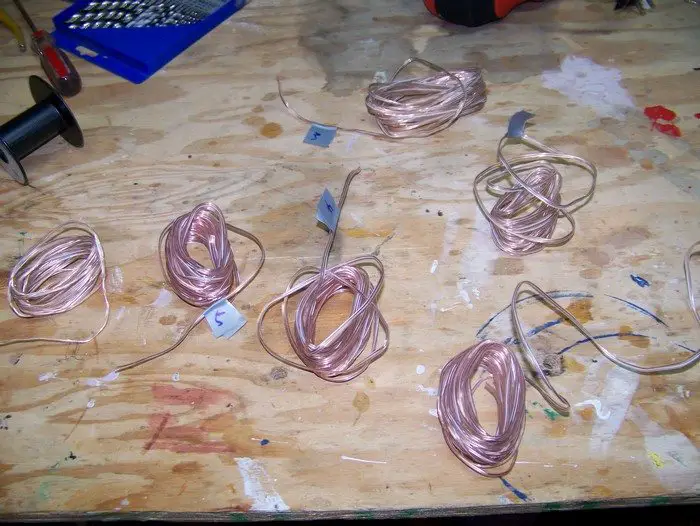
Cut the wire to these lengths. Make sure you label them for easy installation later.
Strip the ends of the wires and solder up one end to each of the bricks. After these are attached, epoxy or silicone any exposed wire or solder.
As described in step one, dig the holes in the path, fill the bottom with gravel, and install your blocks. Also, you’ll need to dig out a little trench between each block, to run your wires through. For this reason, I started with the one that was farthest from the solar light, accumulating more wires in the trench with each brick I added.
Eventually, I ended up at the solar light and soldered each of the block wires to one of the loose wires installed where the LEDs used to be in the solar light. Let me tell you, soldering outdoors in the dark is a little bit trickier than doing it at the workbench! Make sure you coat all your exposed wires in epoxy to keep the rain out.
When you’re done, bury all the wires, flip the switch, and enjoy your Solar Powered Walkway!
Benefits of Solar Stepping Stones
Solar stepping stones are a unique blend of functionality and aesthetics for outdoor spaces. They offer an eco-friendly solution to lighting up pathways and gardens. Here are some key benefits of using solar stepping stones:
Eco-Friendly Lighting Solution
Solar stepping stones harness the sun’s power, providing an energy-efficient way to light up outdoor areas. This reduces reliance on electricity and minimizes environmental impact. Using renewable energy makes these stepping stones an excellent choice for eco-conscious homeowners.
Cost-Effective and Low Maintenance
After the initial investment, solar stepping stones incur minimal costs. They do not add to your electricity bill and require little maintenance. Their durability ensures they last for years, making them a cost-effective lighting solution for gardens and walkways.
Safety and Visibility
These stepping stones enhance safety by illuminating pathways and reducing the risk of trips and falls at night. They provide clear visibility in gardens and walkways, ensuring safe navigation through outdoor spaces after dark.
Aesthetic Appeal
Solar stepping stones come in various designs and colors, adding a decorative touch to gardens and paths. They create an inviting ambiance and can complement the overall design of your outdoor living space.
Easy Installation
These stepping stones are easy to install without wiring or electrical connections. This makes them a convenient option for homeowners who enjoy DIY projects.
Incorporating solar stepping stones into your landscaping elevates the beauty of your outdoor space and contributes to a more sustainable and cost-effective home environment.
Installation Tips for Solar Stepping Stones
Installing solar stepping stones is a straightforward process that enhances the beauty and functionality of your outdoor spaces. These tips will ensure a successful and efficient installation.
Choose the Right Location
Select a location that receives ample sunlight during the day. Solar stepping stones need exposure to sunlight to charge effectively. Avoid placing them in heavily shaded areas.
Prepare the Ground
Ensure the ground is level where you plan to install the stepping stones. Remove any grass, rocks, or debris. This preparation helps in placing the stones evenly and securely.
Determine the Spacing
Decide on the spacing between each stone. It should be comfortable for walking. Typically, a distance of about 12 to 18 inches works well for most people.
Dig the Appropriate Depth
Each stone should be partially buried to ensure stability. Dig a hole slightly larger than the size of the stone and about 2 to 4 inches deep. This depth allows for a firm placement while keeping the stone visible.
Add a Base Layer
For added stability, pour a layer of sand or fine gravel into the hole before placing the stone. This base aids in drainage and helps level the stone.
Position the Stones
Place your solar stepping stones in their respective hole. Ensure they are level with the ground or slightly above to prevent water pooling.
Fill and Compact
Fill the gaps around the stones with soil, sand, or gravel. Tamp down the filling material to secure the stones and prevent shifting.
Test the Solar Panels
After installation, check that the solar panels on each stone are clean and unobstructed. This ensures maximum sunlight absorption for optimal performance.
By following these installation tips, your solar stepping stones will enhance the aesthetics of your garden or pathway and provide efficient, eco-friendly lighting for your outdoor space.
Innovative Uses of Solar Stepping Stones in Landscaping
Solar stepping stones are not just functional but also offer creative landscaping possibilities. Their versatility and aesthetic appeal can transform ordinary gardens into enchanting spaces. Here are some innovative ways to use solar stepping stones in your landscaping projects.
Create Patterns and Designs
Solar stepping stones offer a unique way to add artistic flair to your garden. Arrange them to form captivating shapes like spirals, which can create a sense of movement and flow. Waves or curved patterns can add a soft, organic feel, seamlessly integrating with the natural landscape. Geometric patterns, on the other hand, lend a more structured and modern look.
These designs serve more than a decorative purpose; they guide visitors along a specific path, ensuring they don’t miss any highlights of your garden. The illuminated stones at night transform these patterns into glowing artwork, adding an enchanting touch to your outdoor space.
Highlight Garden Features
Solar stepping stones are perfect for showcasing special features in your garden. Strategically place them around a central fountain or pond, creating a luminous frame that draws the eye towards these water features. This accentuates their beauty and adds a reflective element to the water’s surface, creating a mesmerizing effect at night.
Similarly, placing these stones around a cherished plant or tree can elevate its presence in the garden, making it a focal point. The soft glow from the stones can highlight the textures and colors of the plants, enhancing their appearance and making them stand out in the evenings.
Define Garden Boundaries
Use solar stepping stones to clearly define different areas of your garden. They are an elegant solution for delineating spaces without fences or barriers. For instance, creating a lit border around flower beds can separate them from the lawn or walkways, highlighting the beauty of the blooms while providing a clear visual boundary.
In vegetable patches or herb gardens, these stones mark the area and make night-time visits easier for maintenance or harvesting. The gentle illumination offers a practical and aesthetic way to organize and enjoy various sections of your garden.
Illuminate Pathways to Outdoor Features
Incorporating solar stepping stones to light up pathways leading to outdoor features like gazebos, fire pits, or secluded benches enhances the usability and appeal of these areas. A well-lit path invites exploration and ensures safe passage, encouraging people to venture and enjoy these outdoor spots even after dusk.
Depending on the desired effect, the stones can be laid out to create a direct route or a meandering path. This not only adds an element of charm but also integrates these features into the overall garden design, making them accessible and welcoming at all hours.
Create a Welcoming Front Walkway
Installing solar stepping stones along the front walkway of your home transforms it into an inviting path. As guests approach, the illuminated pathway offers a warm welcome, guiding them to your front door. This not only adds to your home’s curb appeal but also enhances safety by providing clear visibility.
You can choose stones that complement the exterior of your house, whether it’s a classic, modern, or rustic style. In the evening, the glow from these stones creates a charming atmosphere, making your home stand out in the neighborhood. This simple addition can significantly uplift the entrance of your home, making it more welcoming and elegant.
Integrate with Deck and Patio Design
Solar stepping stones are a versatile element that can seamlessly blend into the design of decks and patios. They offer a subtle yet effective lighting solution, creating a cozy, intimate outdoor living space. These stones can be placed around the perimeter of a deck or along the edges of a patio, providing gentle ambient lighting for evening gatherings or quiet nights outdoors.
The soft illumination is perfect for setting a relaxing mood, and it can highlight key features of your deck or patio, like planters or seating areas. Additionally, the solar aspect ensures an eco-friendly and energy-efficient lighting solution, enhancing your outdoor space’s functionality and aesthetic appeal.
Accentuate Lawn Art and Statues
Strategically positioned solar stepping stones can bring attention to lawn art and statues in your garden. Placing these illuminated stones around such features creates a spotlight effect that highlights their details and craftsmanship. This adds a dramatic touch to your garden and allows you to enjoy these art pieces even after sunset.
The interplay of light and shadow can cast intriguing patterns, enhancing the visual interest of your lawn art. This lighting method adds depth and dimension to your garden, turning sculptures and art pieces into focal points of nighttime beauty.
Use in Water Features
While solar stepping stones cannot be submerged, they are perfect for enhancing the edges of ponds or water features. Placing them around the perimeter illuminates the water, creating a mesmerizing effect as the light reflects off the surface. This adds a sense of tranquility and serenity to the garden, especially in the evening. The gentle glow can outline the shape of the pond, making it a standout feature in your landscape even in low-light conditions.
Additionally, the reflected light can create interesting visual effects, such as rippling patterns, that add to the peaceful ambiance of your outdoor space.
Innovating solar stepping stones into your landscaping can create a functional, visually appealing, and eco-friendly outdoor space. These stones light up pathways and add a touch of creativity to your garden design.
Conclusion
I guess the one downside (if you see it as a downside) to having a glowing path in front of your house and visible from the street is that it seems to draw in weirdos like moths to a flame. I have on two separate occasions gone out of my garage for a smoke and caught someone on the path–one guy was just standing there staring, and one lady who was in her forties was hopping from brick to brick. My solar stepping stones are a great touch to my outdoor movie screen for that garden cinema.


