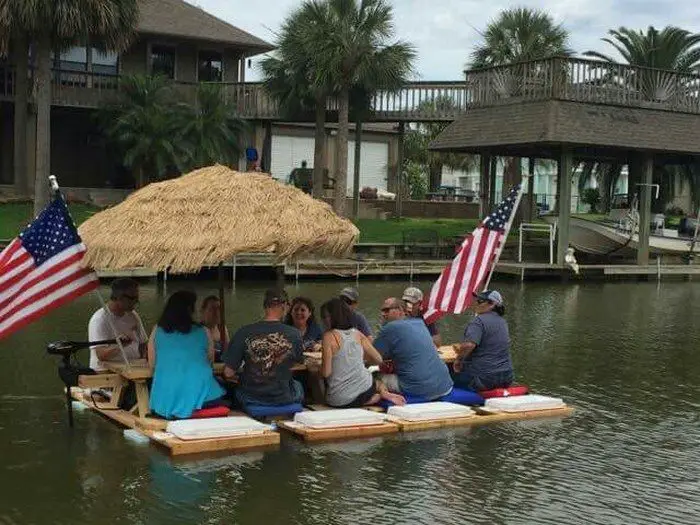
Why buy a costly boat when you can DIY a floating picnic table? It’s easy to build and an extraordinary way to spend some time on the lake!
This clever mechanism has a lot of great features that would make many of us want to own one. It serves as a picnic table and a pontoon at the same time. You can dine comfortably even to the gentle sway of the water, just like you would on a boat.
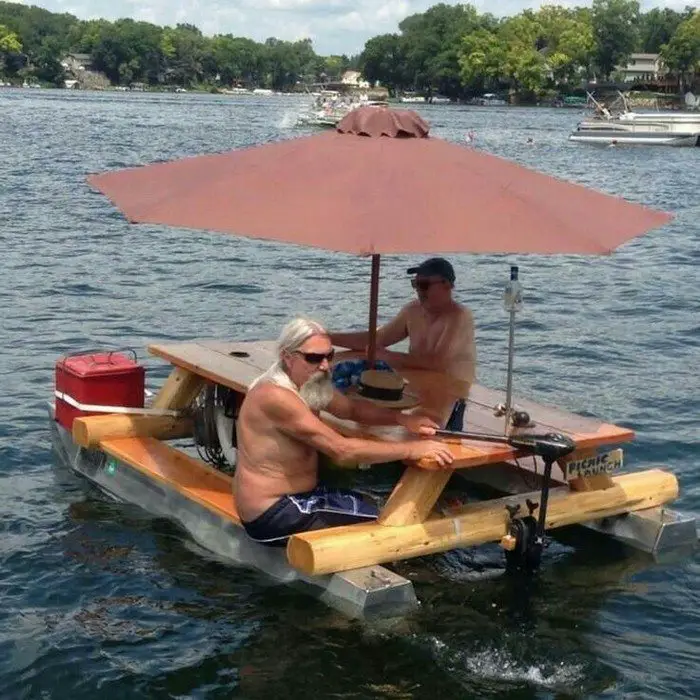
It makes the perfect setup for catching up with friends, because you can eat on it, or fish, or cruise the waters if you want to. You can jump off it to swim and get back on it to soak in the sun without leaving the water!
And since this is a DIY project, you also get to enjoy the fact that it is way more affordable than a boat ;)
Now many DIY-ers have been building their own floating picnic tables, but not a lot of them have shared the process. Well, we found the best step-by-step article there online and you can view it by clicking on the link below the album.
Have a look at our album for inspiration when you build your own floating picnic table!
To improve this idea, here are a few suggestions:
- Build a long picnic table that would fit a total of six people so that more can join you in your outdoor adventure.
- Don’t forget to include a built-in cooler when building your tabletop. (Of course, you’re going to have a few drinks while you are out dining, fishing or swimming!)
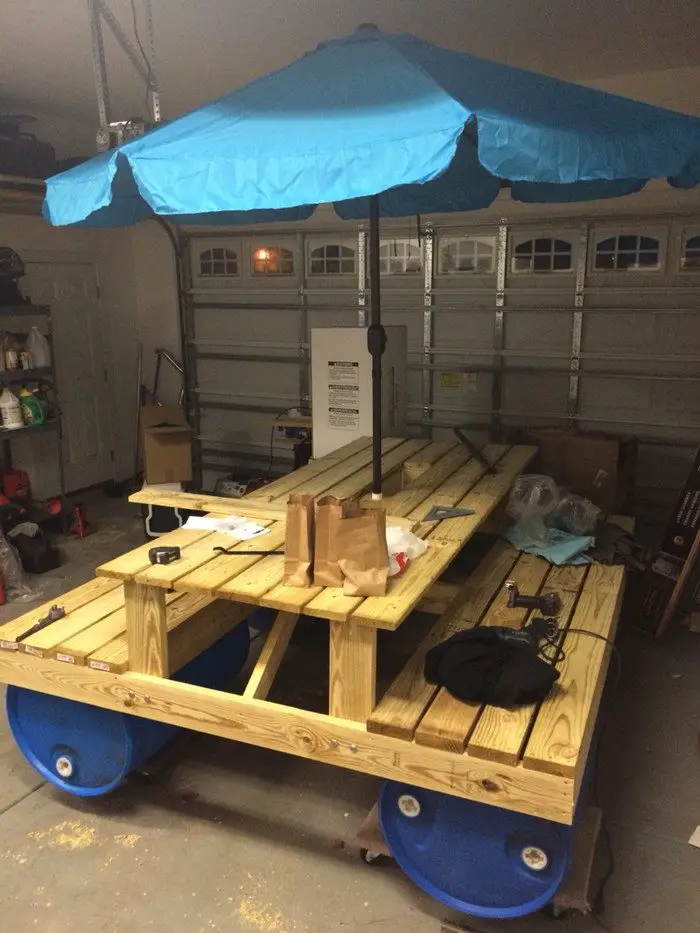
- Make sure to install an umbrella for the picnic table for a more pleasant cruise around the lake during the day.
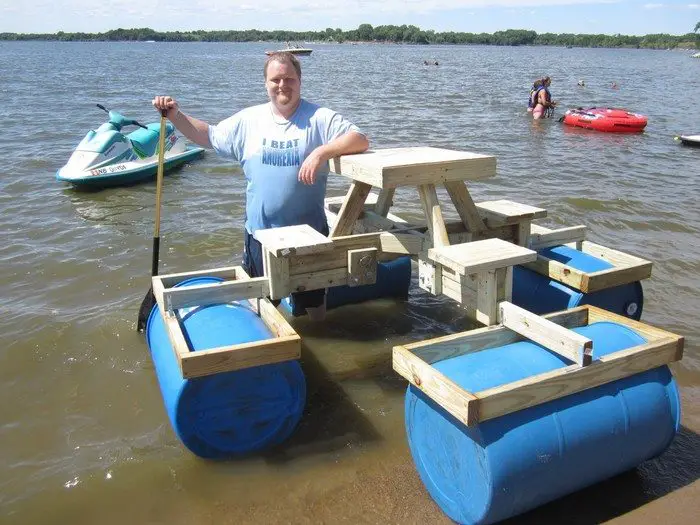
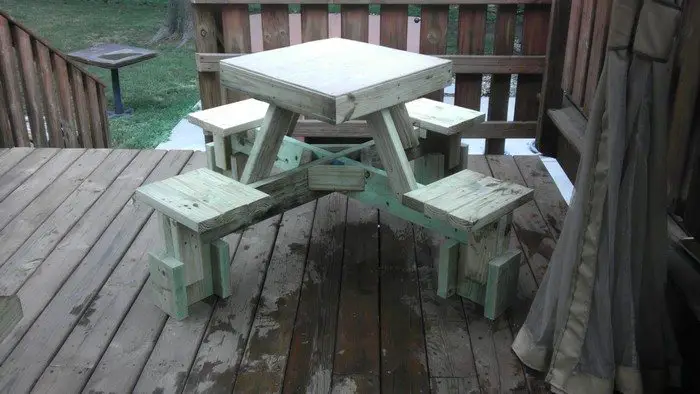
- Similar to the project featured in the link below, build a floating picnic table wherein the plastic drums can be removed and replaced with regular table legs. This way, you can make use of your picnic table both on land and on the water!
Having a DIY floating picnic table is not just practical; it’s also incredibly fun! Imagine spending a sunny afternoon out on the water, surrounded by friends and family, enjoying delicious food and good company. With your own floating picnic table, the possibilities for outdoor enjoyment are endless.
In this article, we’ll explore why having a DIY floating picnic table is so much fun and how it can enhance your outdoor experiences.
Unique Outdoor Dining Experience
A DIY floating picnic table offers a one-of-a-kind dining experience. Instead of sitting on land, you’ll be floating on the water, surrounded by nature’s beauty. Whether you’re picnicking on a calm lake, a lazy river, or even a backyard pool, the sensation of dining on a floating surface adds an element of excitement and adventure to your mealtime.
Socializing with Friends and Family
A floating picnic table provides the perfect setting for socializing with friends and family. Gather everyone together for a leisurely lunch, an afternoon snack, or a sunset dinner. You can share stories, play games, or simply relax and enjoy each other’s company while floating on the water.
Versatility for Different Activities
Your DIY floating picnic table isn’t just for dining; it’s also versatile enough for a variety of activities. Use it as a platform for sunbathing, fishing, or even as a base for water sports like swimming or paddleboarding. With a floating picnic table, you can turn any body of water into your own personal playground.
Relaxation and Serenity
There’s something inherently relaxing about being on the water, and a floating picnic table amplifies that feeling. Whether you’re gently bobbing on calm waves or drifting along a tranquil river, the soothing sounds and gentle movement of the water can help you unwind and de-stress. It’s the perfect way to escape the hustle and bustle of everyday life and reconnect with nature.
Bonding With Nature
Being on the water gives you a unique perspective on the natural world around you. You’ll have the opportunity to observe wildlife up close, from birds soaring overhead to fish swimming beneath the surface. With your floating picnic table as your base, you can immerse yourself in the sights, sounds, and sensations of the great outdoors.
DIY Satisfaction
The satisfaction of building something with your own two hands adds an extra layer of fun to the experience. Knowing that you created your own floating picnic table from scratch, using basic materials and tools, is incredibly rewarding. Plus, you can customize the design to suit your preferences, making it truly your own creation.
Memorable Moments
Some of life’s most memorable moments happen when we’re surrounded by loved ones, enjoying simple pleasures together. Whether it’s watching the sunset from your floating picnic table, sharing a laughter-filled meal with friends, or splashing around in the water with family, these are the moments that create lasting memories.
Adventure and Exploration
Having a DIY floating picnic table opens up a world of adventure and exploration. You can embark on leisurely floats down meandering rivers, discover hidden coves and secluded beaches, or simply drift wherever the current takes you. Every outing becomes an opportunity for new discoveries and unexpected delights.
Connection to the Outdoors
In today’s fast-paced world, it’s easy to feel disconnected from nature. But when you’re out on the water, with the sun on your face and the wind in your hair, you can’t help but feel a sense of connection to the natural world. Your floating picnic table becomes a gateway to outdoor adventures and a reminder of the beauty that surrounds us.
Joy and Laughter
Above all, having a DIY floating picnic table is just plain fun! Whether you’re splashing in the water, indulging in delicious food, or simply enjoying the company of friends and family, there’s an undeniable sense of joy and laughter that comes with spending time on the water. It’s an experience that will leave you smiling long after the day is done.
Having a DIY floating picnic table is an incredibly fun and rewarding experience. From unique dining adventures to unforgettable moments with loved ones, it’s a simple pleasure that can bring endless joy and excitement to your outdoor life. So why wait? Grab your materials, build your own floating picnic table, and get ready for a summer filled with fun on the water!
Is this going to be your next DIY project? Get your friends to help you make it!
How to Make a DIY Floating Picnic Table
You’ll need these materials:
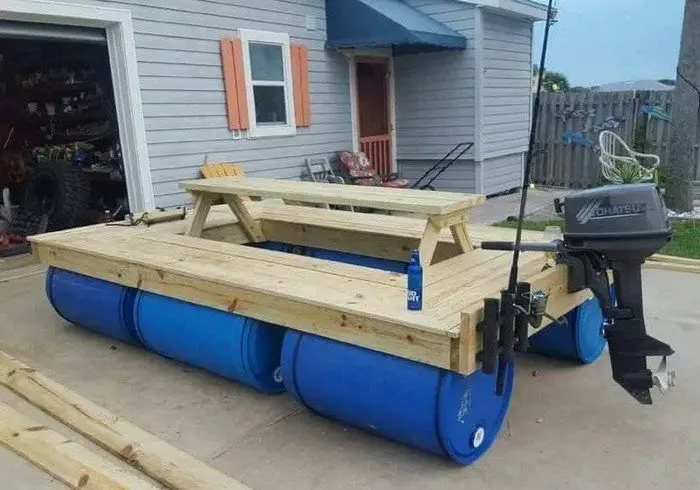
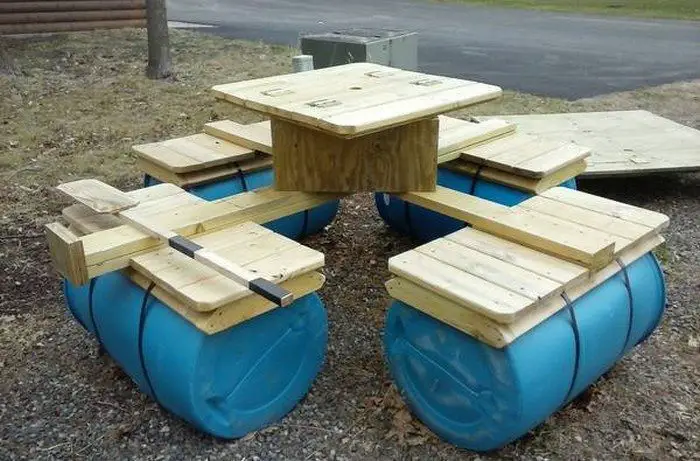
- 55-Gallon Closed-Head Plastic Drums
- 2×6 Timber
- Decking Joists
- L-Bracket Corner Braces
- Deck Screws
- Cotter Pins
- Wood Glue
And these tools:
- Measuring Tape
- Miter Saw
- Sander
- Cordless Drill
- Wood Clamp
Click on any image to start the lightbox display. Use your Esc key to close the lightbox.![]()
Making a floating picnic table with 55-gallon closed-head plastic drums, 2×6 timber, decking joists, L-bracket corner braces, and deck screws is a fun and rewarding project that can provide hours of enjoyment on the water. Follow these steps to create your own floating picnic table:
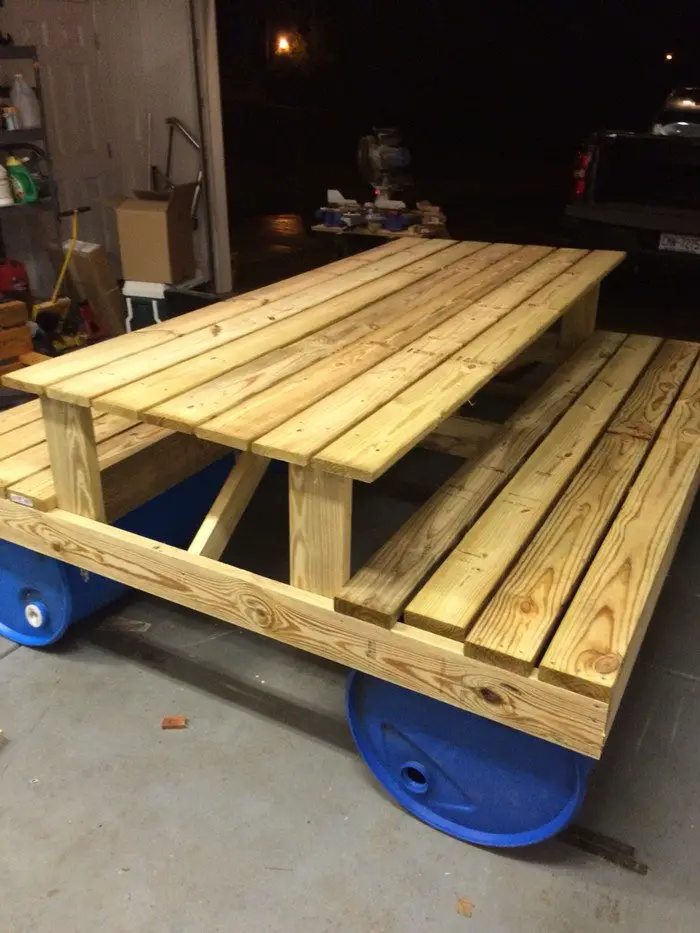
Step 1: Prepare the Plastic Drums
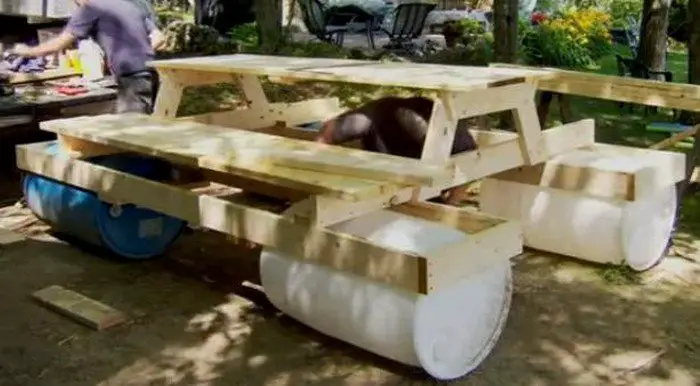
Clean the plastic drums thoroughly to remove any dirt or debris. Cut openings in the top of each drum large enough to accommodate the timber beams. These openings will serve as the recessed seating areas for the picnic table.
Step 2: Construct the Tabletop Frame
Measure and cut the 2×6 timber into lengths to create the tabletop frame. Assemble the timber beams to form the perimeter of the tabletop frame, ensuring they are aligned evenly. Use L-bracket corner braces to secure the corners of the frame, and pre-drill pilot holes to prevent splitting.
Step 3: Attach Decking Joists
Measure and cut the decking joists to fit between the timber beams, providing support for the tabletop decking. Space the joists evenly across the frame, typically 12-16 inches apart. Attach the decking joists to the timber frame using deck screws, ensuring they are flush with the top of the frame. Pre-drill pilot holes to prevent splitting and use wood glue for added strength.
Step 4: Install Picnic Tabletop
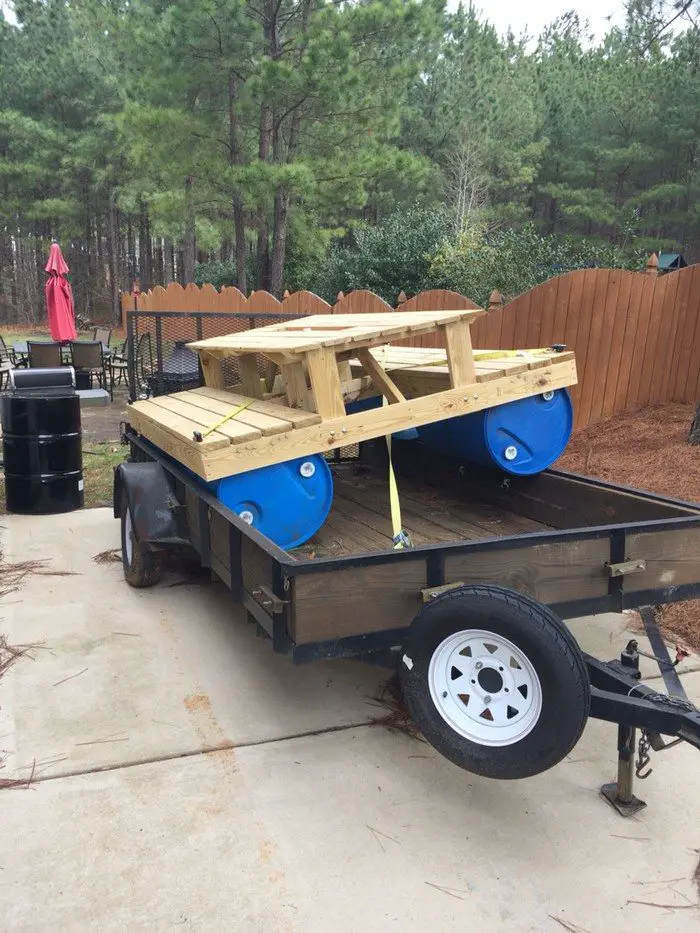
Position the plastic drums underneath the tabletop frame, aligning them with the openings cut in Step 2. Lower the tabletop frame onto the plastic drums, allowing the drums to fit snugly into the recessed openings. Secure the frame to the drums using deck screws, driving them through the timber beams and into the sides of the drums.
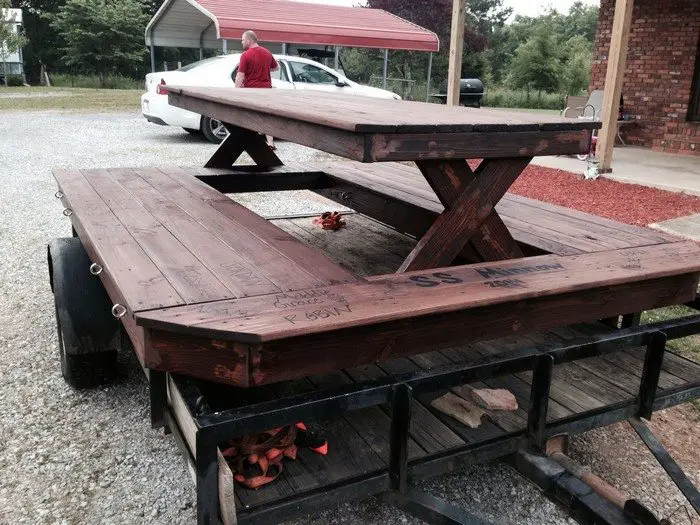
Step 5: Final Touches and Safety Precautions
Sand the edges of the timber frame to smooth out any rough edges. Apply a waterproof sealant or outdoor paint to protect the wood from moisture and UV damage. Ensure all connections are secure and reinforced to prevent any dislodging or separation while on the water. Always wear PFDs and practice water safety when using the floating picnic table.
Step 6: Launch Your Floating Picnic Table
Place the floating picnic table in the water and ensure it floats evenly and securely. Use caution when boarding and disembarking from the table to avoid tipping or instability. Enjoy your time on the water with family and friends, and have fun with your DIY floating picnic table!

Thanks to imgur for sharing tips and strategies on how to make a DIY floating picnic table.
When building a DIY floating picnic table, safety is paramount to ensure a fun and enjoyable experience on the water. Here are some essential safety precautions to consider:
1. Wear Personal Floatation Devices (PFDs): Always wear properly fitting PFDs when assembling and using the floating picnic table, especially if you’re not a strong swimmer or if the water is deep.
2. Choose a Stable Water Location: Select a calm and stable water location for launching the picnic table. Avoid areas with strong currents, high boat traffic, or hazardous obstacles.
3. Inspect Materials and Equipment: Thoroughly inspect all materials, tools, and equipment before use to ensure they are in good condition and free of defects.
4. Follow Manufacturer Instructions: If using commercially available components like plastic drums, follow the manufacturer’s instructions and guidelines for proper installation and use.
5. Secure Components Properly: Ensure all components, including plastic drums, timber frame, and fasteners, are securely attached and reinforced to prevent any dislodging or separation while on the water.
6. Distribute Weight Evenly: Distribute weight evenly across the floating picnic table to maintain stability and prevent tipping. Avoid overloading with heavy items or unevenly distributing weight.
7. Avoid Overcrowding: Limit the number of occupants on the picnic table to avoid overcrowding, which can compromise stability and safety.
8. Supervise Children: Keep a close watch on children while they’re on the floating picnic table and ensure they wear PFDs at all times. Children should be accompanied by adults and instructed on safe behaviour.
9. Be Mindful of Weather Conditions: Check weather forecasts before heading out and avoid using the floating picnic table in inclement weather, strong winds, or thunderstorms.
10. Practice Water Safety: Familiarize yourself and others with basic water safety practices, including how to swim, tread water, and safely board and disembark from the floating picnic table.
11. Emergency Preparedness: Carry essential safety and emergency equipment, such as a first aid kit, whistle, and communication devices, in case of accidents or emergencies.
12. Monitor Conditions Constantly: Stay vigilant and monitor water conditions, including changes in currents, tides, and wind direction, to ensure the safety of everyone onboard.
By following these safety precautions, you can minimize risks and ensure a safe and enjoyable experience while using your DIY floating picnic table. Always prioritize safety and take necessary precautions to protect yourself and others while on the water.
Building a DIY floating picnic table is not just about assembling materials and following steps; it’s about creating memories, fostering connections, and embracing the joys of outdoor living. As we conclude our journey through the six fun steps of constructing a floating picnic table, let’s reflect on the experience and address some common questions that may arise.
A Journey of Creativity and Adventure
Building a DIY floating picnic table is a testament to human ingenuity and creativity. From the initial gathering of materials to the final launch onto the water, each step is an opportunity to learn, grow, and challenge ourselves. As we’ve seen, the process involves more than just constructing a functional piece of furniture; it’s about embracing the spirit of adventure and exploring new ways to enjoy the great outdoors.
Throughout this journey, we’ve discovered the satisfaction of building something with our own hands, the joy of spending time with loved ones in nature, and the excitement of embarking on new adventures. Whether it’s picnicking on a serene lake, floating down a lazy river, or simply basking in the sunshine with friends and family, a DIY floating picnic table opens up a world of possibilities for outdoor enjoyment.
As we celebrate the completion of our project, let’s remember that the true value lies not just in the finished product, but in the memories we create along the way. Whether it’s the laughter shared while sanding the edges of the timber frame or the sense of accomplishment felt when launching the picnic table onto the water, each moment is a reminder of the joy that comes from embracing life’s simple pleasures.
Frequently Asked Questions
1. Is it safe to use a DIY floating picnic table?
Yes, when constructed properly and used responsibly, a DIY floating picnic table can be a safe and enjoyable addition to your outdoor adventures. However, it’s essential to follow all safety precautions, including wearing personal flotation devices (PFDs), ensuring proper weight distribution, and monitoring water conditions.
2. How do you ensure the picnic table floats evenly?
Achieving proper buoyancy is crucial for the stability and safety of the floating picnic table. Ensure that the plastic drums are securely attached to the tabletop frame and evenly spaced to distribute weight evenly. Additionally, test the table in shallow water before venturing into deeper waters to ensure it floats evenly and securely.
3. Can you customize the design of my floating picnic table?
Absolutely! One of the joys of building a DIY project is the ability to customize it to suit your preferences. Whether you want to add decorative touches, incorporate storage compartments, or experiment with different materials, the possibilities are endless. Let your imagination guide you and make the picnic table uniquely yours.
4. How do you maintain your floating picnic table?
Proper maintenance is essential to ensure the longevity and durability of your floating picnic table. Regularly inspect the table for any signs of wear or damage, such as loose fasteners or waterlogged materials, and address any issues promptly. Additionally, store the picnic table in a dry, sheltered location when not in use to protect it from the elements.
5. What safety precautions should you take when using the picnic table?
Always prioritize safety when using the floating picnic table. Ensure that everyone on board wears personal flotation devices (PFDs), especially non-swimmers and children. Avoid overcrowding the table, distribute weight evenly, and practice water safety at all times. Be mindful of weather conditions, currents, and other potential hazards.


