Want to hatch your own chicken eggs? Then you need a broody hen or an incubator!
If you’ve been raising chickens for a while, you might be considering hatching chicks in an incubator. That can be a fun project for the entire family. 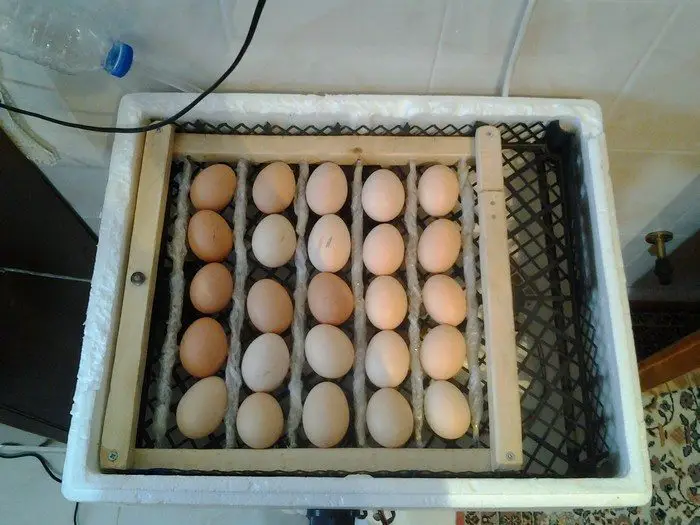
Unlike broody hens, you can use incubators at any time of the year. They allow more eggs to be hatched and is easier to get! While store-bought incubators are convenient and offer additional features, building your own homemade incubator can yield excellent results.
Name brand incubators can cost as much as $200. A DIY styrofoam egg incubator costs less than $100. If you can re-purpose some materials already found in your home, then you can have one that’s even cheaper.
Now there are lots of DIY styrofoam egg incubator tutorials out there, but quite a number may be too complicated to follow. The tutorial we have linked for you below is one of the simplest yet definitely effective DIY egg incubators you can find. It’s perfect for those trying to hatch their own chickens’, ducks’, or other poultry eggs for the first time!
Contents
Making a DIY Egg Incubator
If you’re making this DIY incubator, follow the easy steps in the tutorial provided and let us know how it goes. We’d love to hear from you!
Materials
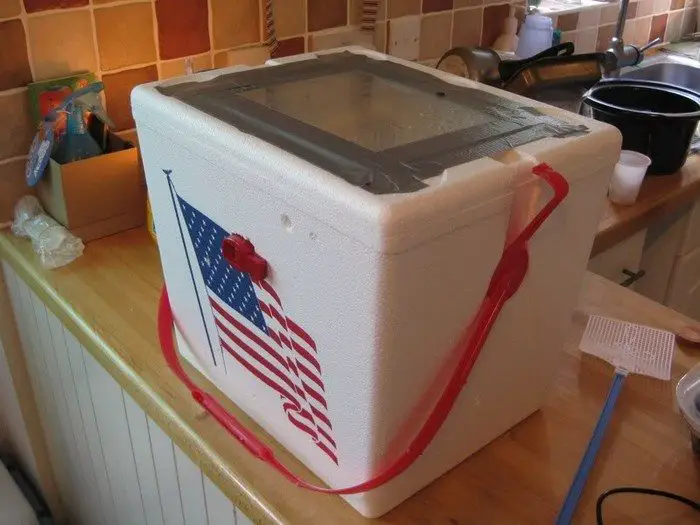
- 1 Styrofoam Cooler with Lid
- 1 Light Socket with Cord
- 1 Dimmer Switch (for table lamps)
- 8×11 Glass or Plexiglass
- Thermometer/Hygrometer
- Tape
- Wood Glue
- 40 watt Light Bulb
- Small Plastic Fan
- Small Bowl of Water
Tools
- Utility Knife
- Pencil Marker
Instructions
Step 1: Carve Out Space for the Fan
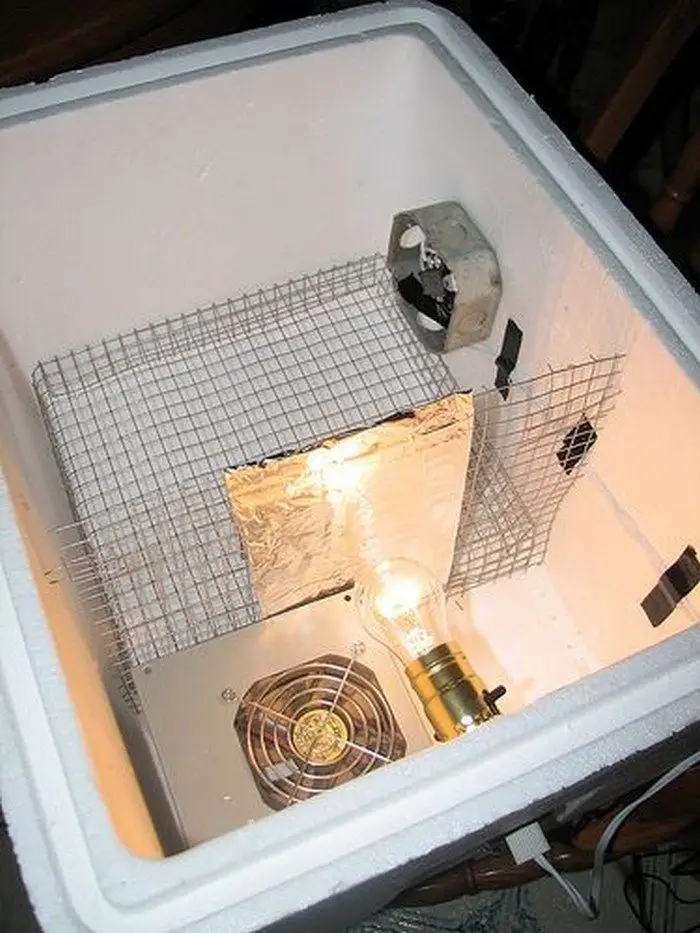
- Grab your utility knife and make a cut on the side of the Styrofoam cooler. This should be just right to snugly fit your small fan, which helps keep air moving inside.
Step 2: Install the Fan
- Fit the fan into the hole you just made, making sure it’s blowing air inside. Seal around the edges with tape to keep it tight.
Step 3: Light Socket Installation
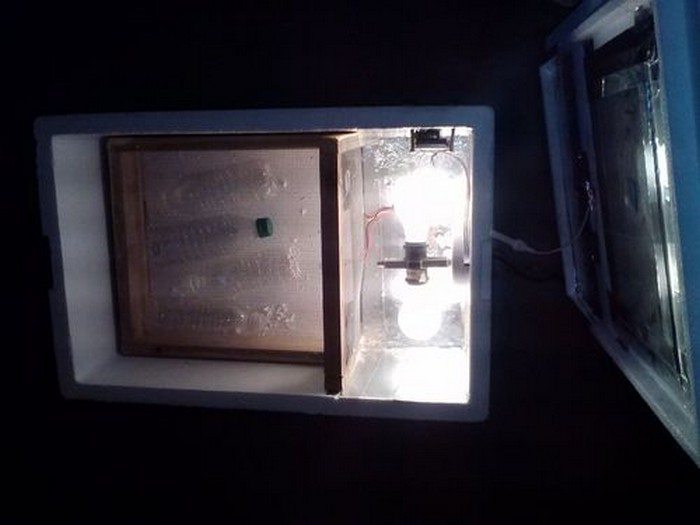
- Make a small incision on the cooler’s opposite side for your light socket. This is your heat source. Slide the socket in and secure it with some wood glue or tape.
Step 4: Set Up Your Dimmer
- Hook up the dimmer switch to your light socket’s cord. This little device lets you control how hot your bulb gets, so you can keep the inside of the incubator just right.
Step 5: Screw in the Bulb
- Place your 40-watt bulb into the socket. Make sure it’s not touching the Styrofoam to avoid any melting mishaps.
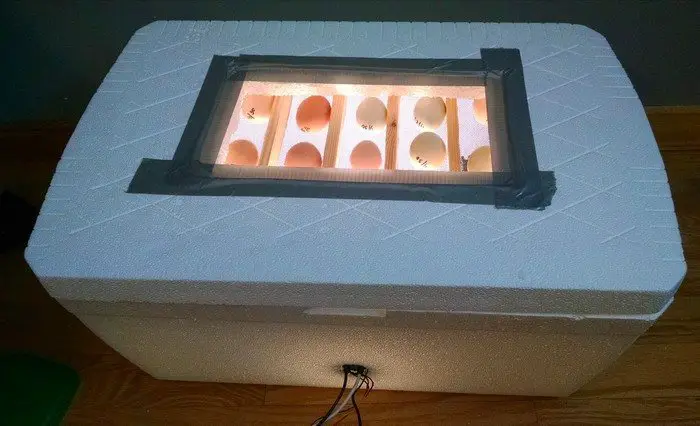
Step 6: Make a Window
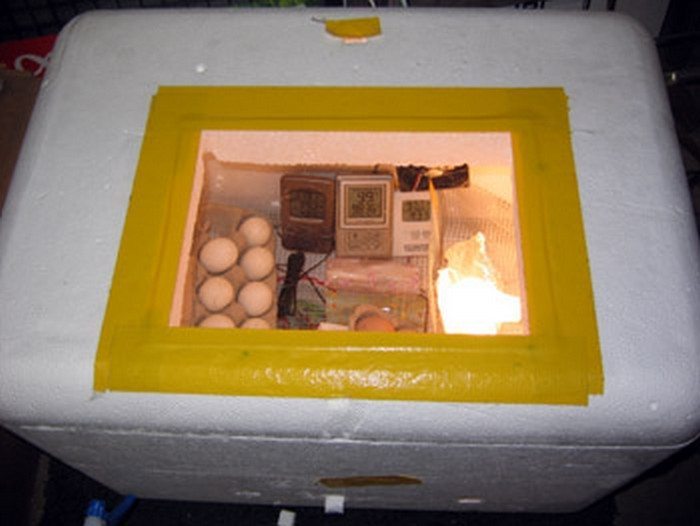
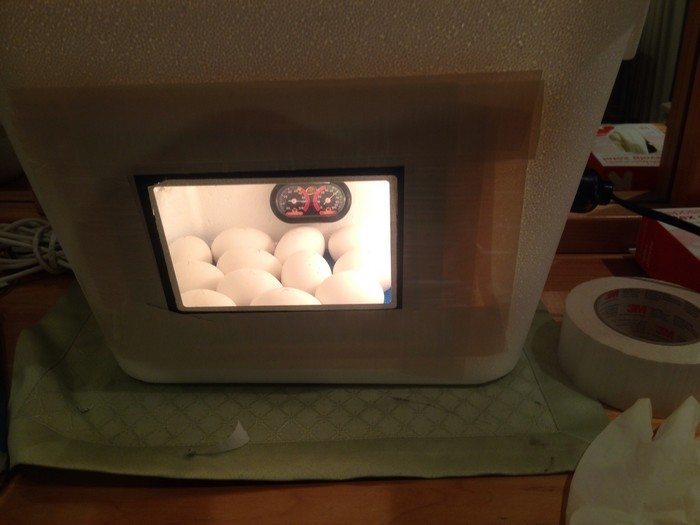
- Use your pencil to draw an 8×11 rectangle on the lid. Carefully cut this out with your utility knife. Cover it with the glass or Plexiglas piece and secure it using tape or glue. Now you can peek inside without lifting the lid!
Step 7: Monitoring Gear
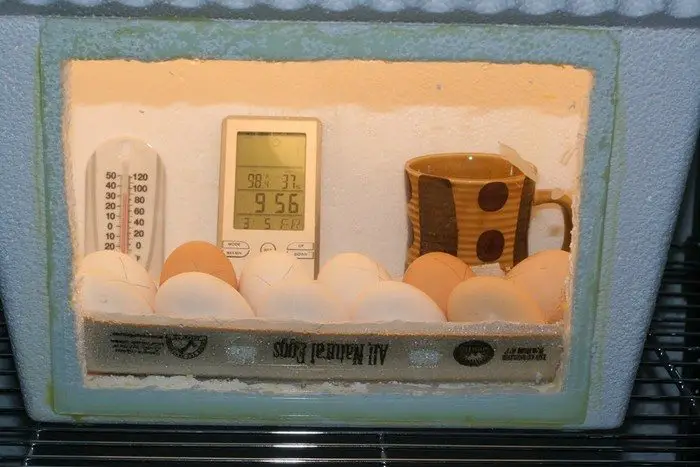
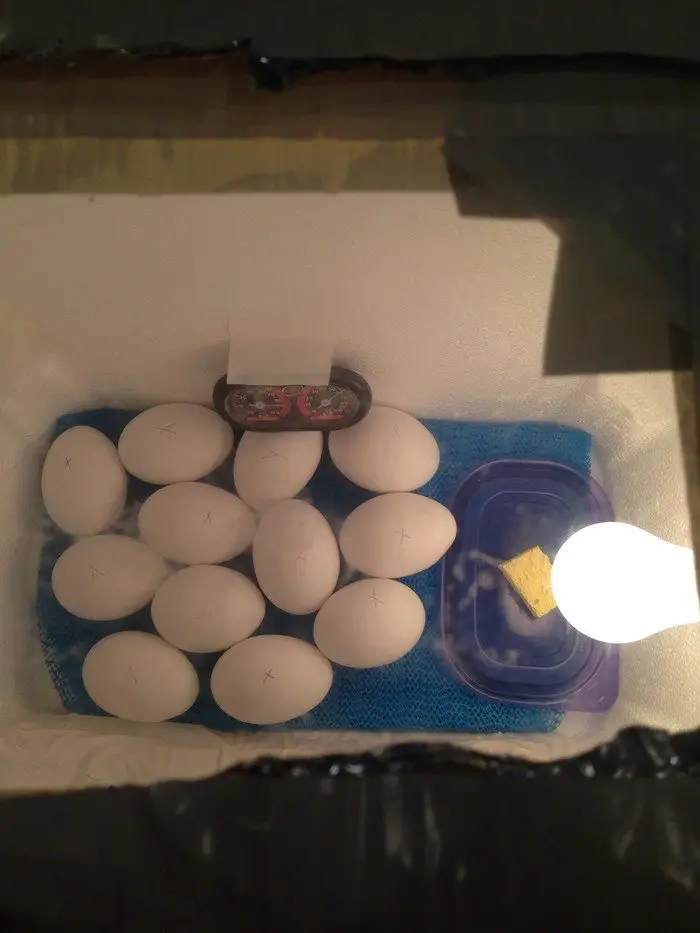
- Drop your thermometer/hygrometer inside the cooler. You want to place it somewhere you can see it easily through your new window.
Step 8: Humidity Helper
- Put your water bowl inside to help keep the air moist. You’ll need to check on this occasionally to make sure there’s always water in there.
Step 9: Testing Time
- Plug in the fan and light. Turn them on and adjust the light using the dimmer to get your inside temp to about 99.5°F, ideal for chicken eggs. Give it a few hours to make sure it stays steady.
Step 10: Egg Time
- Once everything’s stable, place your eggs inside. Remember to turn them about three to five times a day to help the chicks develop properly.
Click on any image to start the lightbox display. Use your Esc key to close the lightbox. ![]()


You can get more step-by-step instructions here…
What You Need to Know About Egg Incubator Materials
If you’re excited about hatching your own eggs, building a DIY egg incubator is a fantastic project that’s not only fun but also quite an educational experience. The key to a successful hatch lies heavily in choosing the right materials. Let’s dive into what you’ll need to gather to set up a reliable egg incubator.
Insulation is Everything
First things first: your egg incubator needs to keep a steady temperature. Styrofoam is a go-to for many homemade projects like this because it’s great at keeping the heat in. It’s lightweight, easy to cut and shape, and pretty forgiving if you’re not the handiest person. You could also consider using polystyrene sheets—they work just as well, though they might be a bit tougher to handle.
See What’s Happening
One of the coolest parts of hatching eggs is watching the chicks start to emerge. For that, you’ll need a clear lid. Plexiglas or a piece of glass can be cut to fit into the lid of your cooler or box. This setup lets you peek inside without letting out the heat and humidity that the eggs need to develop properly.
Warmth Where It Counts
The heating element in your egg incubator is like the heart of the whole operation. You’ll need a good, sturdy light socket and a dimmer switch that lets you tweak the temperature. Ceramic sockets are best because they can handle the heat without melting down over time. Stick with a simple 40-watt bulb—it’s all you need, and it’s easy to replace if it burns out.
Keep It Fresh
Lastly, don’t forget about ventilation. Your eggs need fresh air, just like they would under a mother hen. A small plastic fan can circulate air inside your egg incubator without taking up too much space or cooling things down too much. Position it so it’s moving air around rather than blowing directly on the eggs, which could dry them out or cool them unevenly.
Picking the right stuff to build your egg incubator can make all the difference. With these materials, you’re well on your way to hatching your first batch of chicks. Good luck, and enjoy the process—it’s really something special to watch life start right before your eyes!
Temperature and Humidity Control Techniques
The success of egg hatching depends on your egg incubator’s temperature and humidity levels being just correct. It might be challenging, particularly if you’ve never done this before, but you can create the perfect environment for your eggs to develop if you take the necessary steps. Here are some key strategies to assist you in efficiently monitoring and adjusting these critical factors.
Understanding the Basics
It’s important to understand the right circumstances before modifying your egg incubator’s settings. The ideal internal temperature of an egg incubator for chicken eggs is usually maintained around 99.5°F (37.5°C). The humidity should range from 45 to 55 percent during incubation and reach 65 percent in the final few days before hatching.
Setting Up Accurate Measuring Tools
To maintain these circumstances, you’ll need reliable tools. A decent thermometer and hygrometer are essential for monitoring the conditions within your egg incubator. Consider investing in digital models that provide precise readings. Having at least two sets of these devices within the incubator is a good idea in order to ensure accuracy through cross-verification.
Controlling Temperature
The key to the success of your egg incubator is temperature control. To keep temperatures constant, use a heat source that is thermostatically regulated. Since dimmer switches allow for precise control over heat output, many do-it-yourself builders opt to employ light bulbs with them. Use a tiny fan to move the air about the incubator to ensure that the heat is spread evenly.
Managing Humidity
In an egg incubator, managing humidity can be trickier than temperature. You can use water trays to raise humidity, adjusting their size or water volume for precise control. Some also use water-soaked sponges to speed up evaporation.
Regular Adjustments and Monitoring
Maintaining an egg incubator requires constant attention to detail. Check and change the settings frequently as necessary. The conditions within your incubator may change in response to variations in ambient temperature or barometric pressure, so be ready to make minor modifications frequently. Digital controls can help automate this process to give your eggs the best chance of developing correctly.
Double-Check Those Gadgets
Before you pop those eggs in, let’s make sure your tools are telling the truth. Thermometers can get a bit off sometimes, especially if they’ve been around the block. Test yours in icy water to see if it hits 32°F (0°C). If it’s off, adjust it so you know you’re reading things right. Same goes for the hygrometer; a quick salt test can sort it out.
Consider a Fancy Thermostat
If you’re serious about this, maybe upgrade to a pulse proportional thermostat. This isn’t your average thermostat; it gently pulses heat into your egg incubator, keeping the temp super steady. It’s like cruise control for your incubator, avoiding those big swings that can mess up your hatch.
Where’s Your Water?
Think about where you put those water trays. Near the heater? You’ll get more steam. Farther away? Not so much. Play around with their spots to see what gets you the best humidity without having to fiddle with it too much.
Dry Things Out a Bit
If things are looking a bit damp in there, a small sack of rice or some silica gel can be a game changer. These guys suck up extra moisture and can be just the thing to dial down the humidity to where you need it.
More Padding, Please
Is your egg incubator feeling the chill from outside? Wrap it up! Throw a blanket over it or stick some extra Styrofoam around the sides. It’s like giving your incubator a cozy jacket, helping it keep the heat just right.
Keep a Diary
Jot down what’s happening each day in a little incubator diary. What’s the temp? How’s the humidity? Any tweaks you made? This isn’t just busywork—it’ll show you patterns and help you get ahead of any issues. Plus, it’s pretty cool to look back at how you nailed it once those chicks are peeping.
Maintain consistent temperature and humidity in your egg incubator. This will increase the chances of a successful hatch. Regular observation will help you ensure the ideal conditions for your eggs to hatch.
Conclusion
Constructing a homemade egg incubator is a fulfilling endeavor that enables you to precisely manage the hatching procedure. You can provide the best possible environment for your eggs by choosing your materials wisely and paying close attention to humidity and temperature regulation. You can effectively introduce new life into the world with your handmade incubator if you put in a little effort and pay attention to detail.