Creativity is such a broad concept, that it’s difficult to define. Finding examples of creativity would be a much easier challenge. And when it comes to good housekeeping, creativity properly includes clever repurposing.
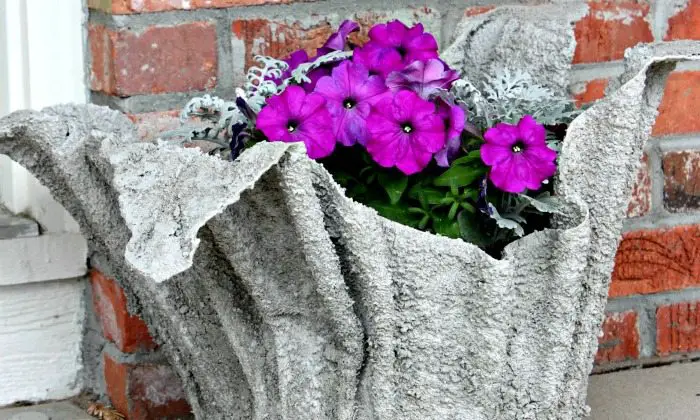
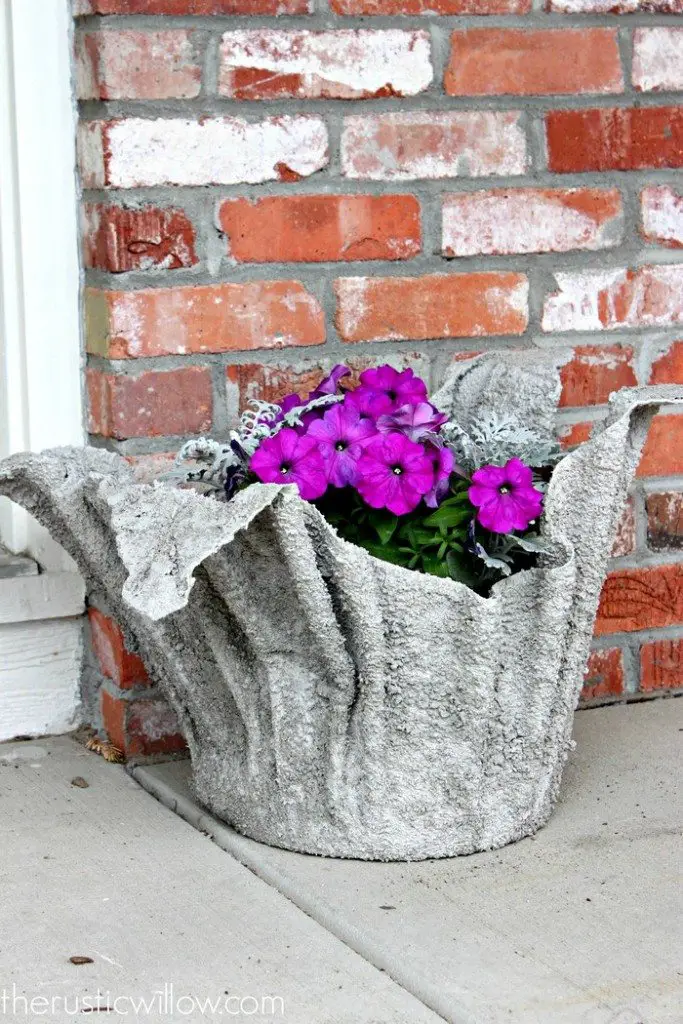
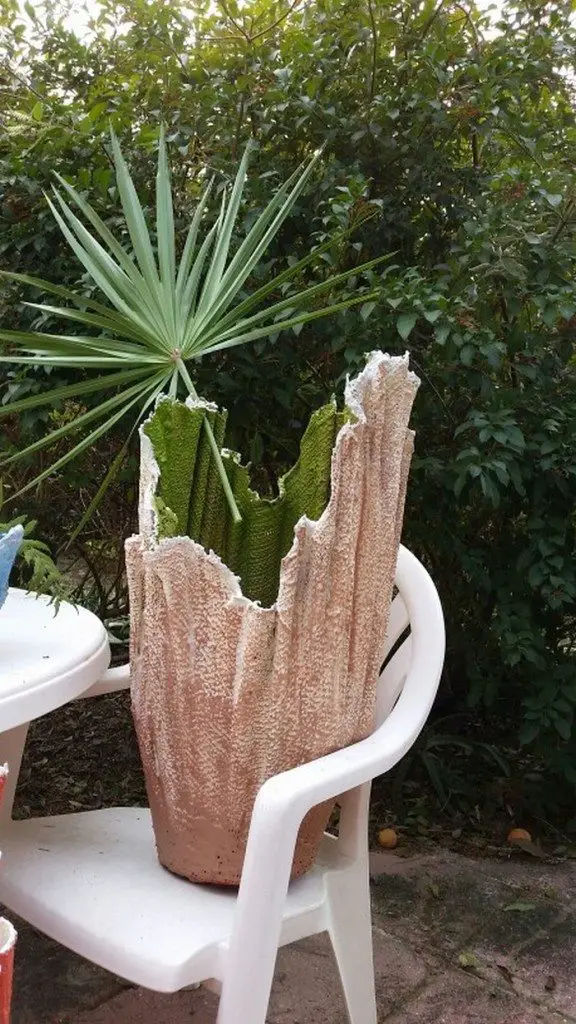
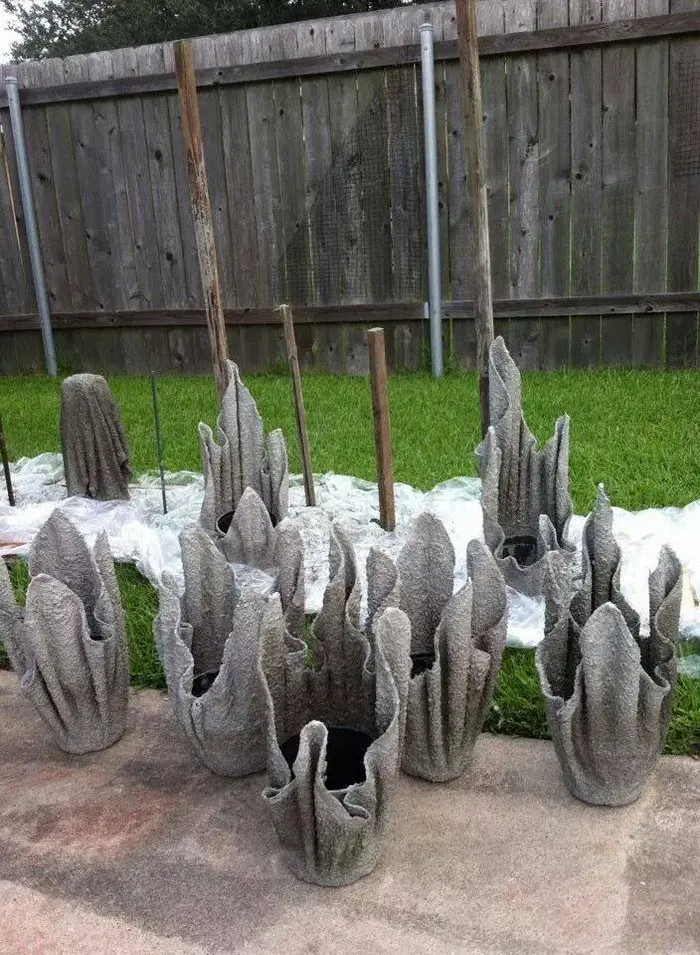
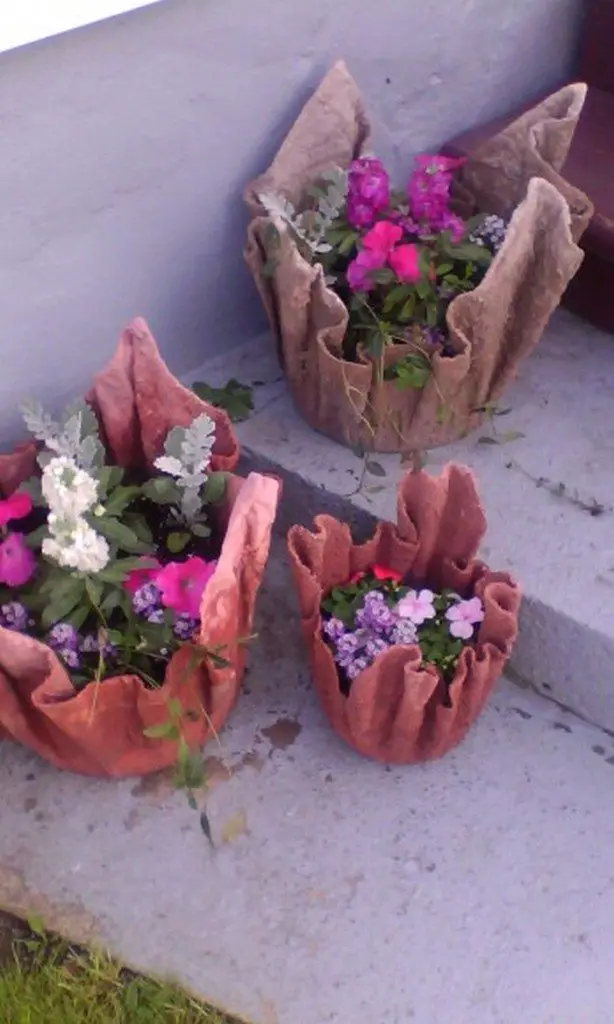
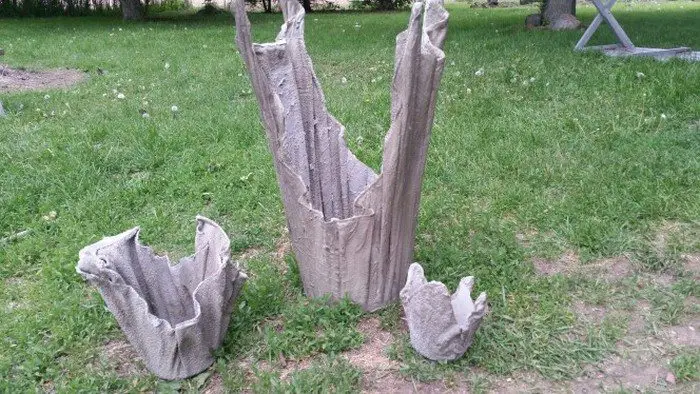
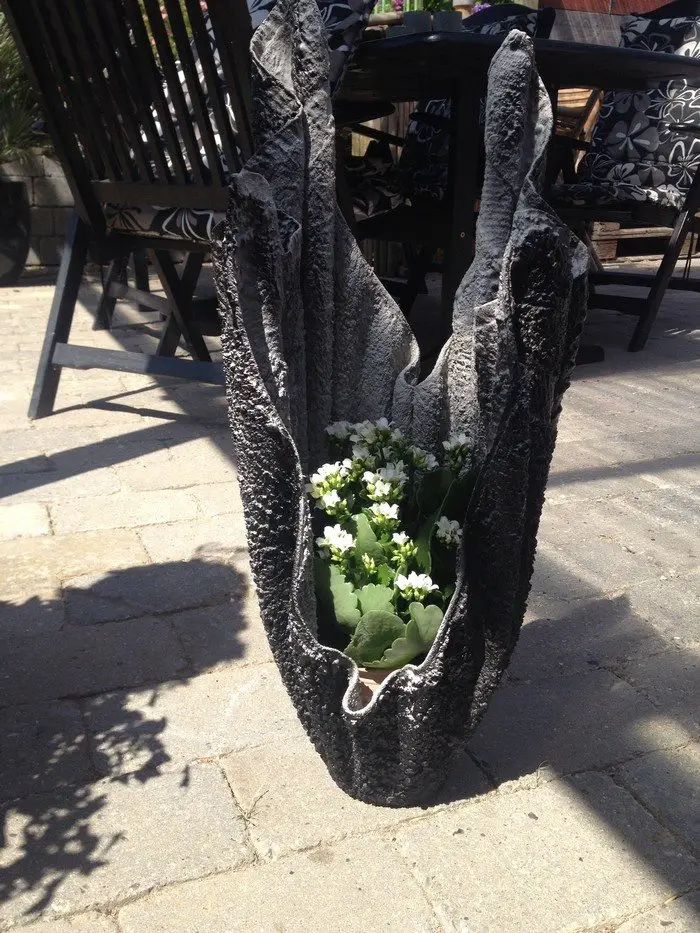
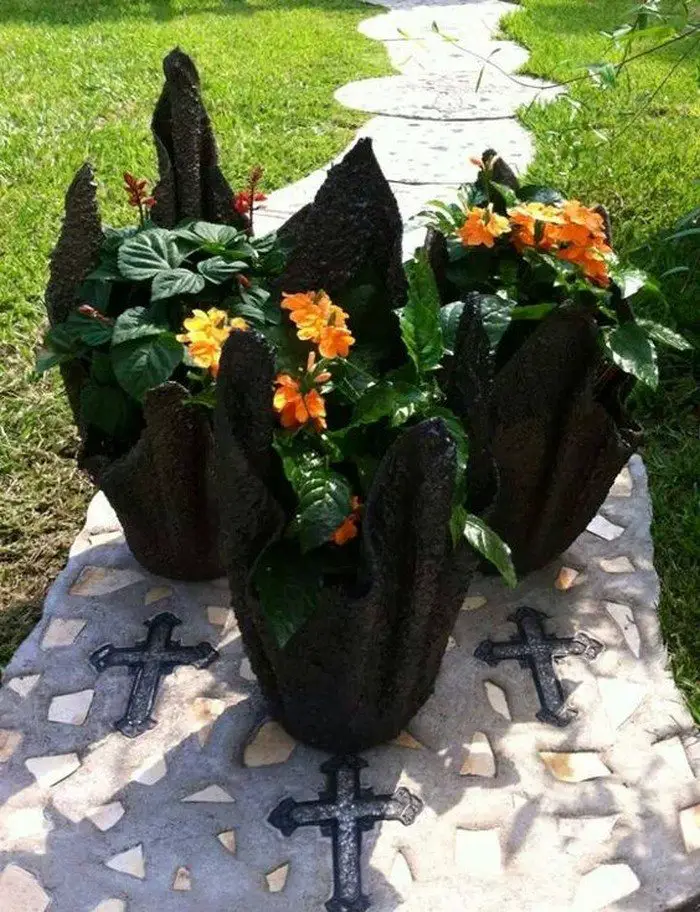
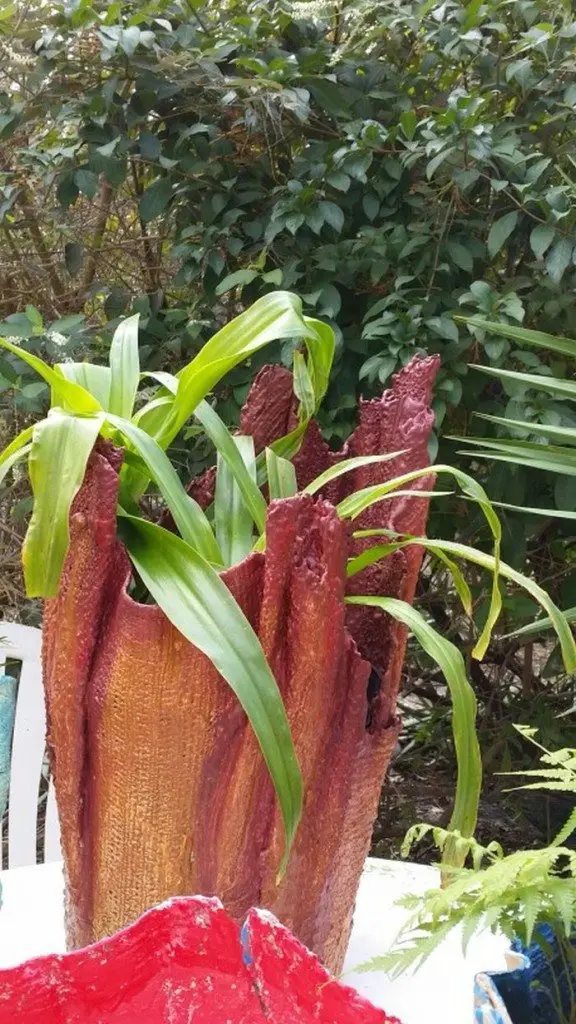
For instance, here’s an interesting project made with an old bath towel. Take a look at the linen cupboard. Have you got a towel or two past their ‘use by date’? Maybe one or two were gifted to you by a colourblind friend? Well, here’s a fun way to give that old towel or two a whole new opportunity for longevity… a concrete tower planter!

At first glance, this might look like a job best left to the experts but this old towel garden planter is a very basic concrete project – quick and easy but robust and long-lasting! It’s also guaranteed to be a ‘one of a kind’ feature in your garden :)
All you have to remember for this DIY old towel garden planter project, as with any project involving concrete, is that it is important to wear protective gloves at all times to prevent skin damage. Cement is very corrosive and will quickly damage exposed skin. Suitable gloves cost less than $1.50 a pair so there is no excuse for not wearing them.
It is also important to make sure that your towel is really soaked through with the concrete mix so that you don’t end up with a weak and soft planter. Therefore the amount of concrete mix that you need will depend on the size and number of towels you wish to turn into planters. One bucket can cover one big towel and two small towels. :)
If you want to get a bit more creative, make a hypertufa mix by adding some vermiculite or perlite together with some coconut coir or sphagnum moss. The advantage of hypertufa over a straight concrete mix is that it is more absorbent making it better for your plants. There’s a touch more effort required but the result is worth it.
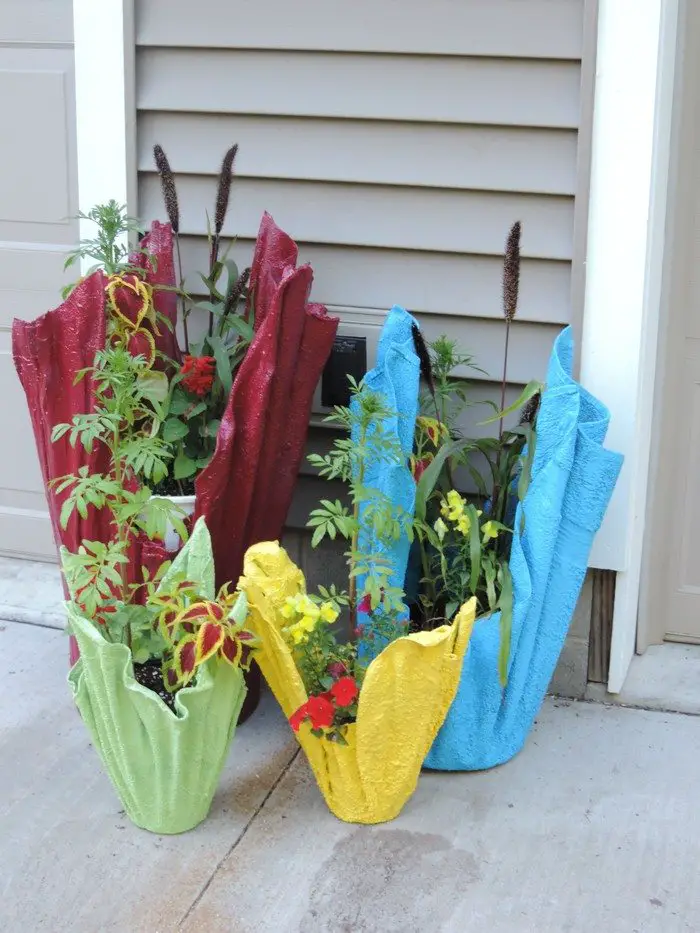
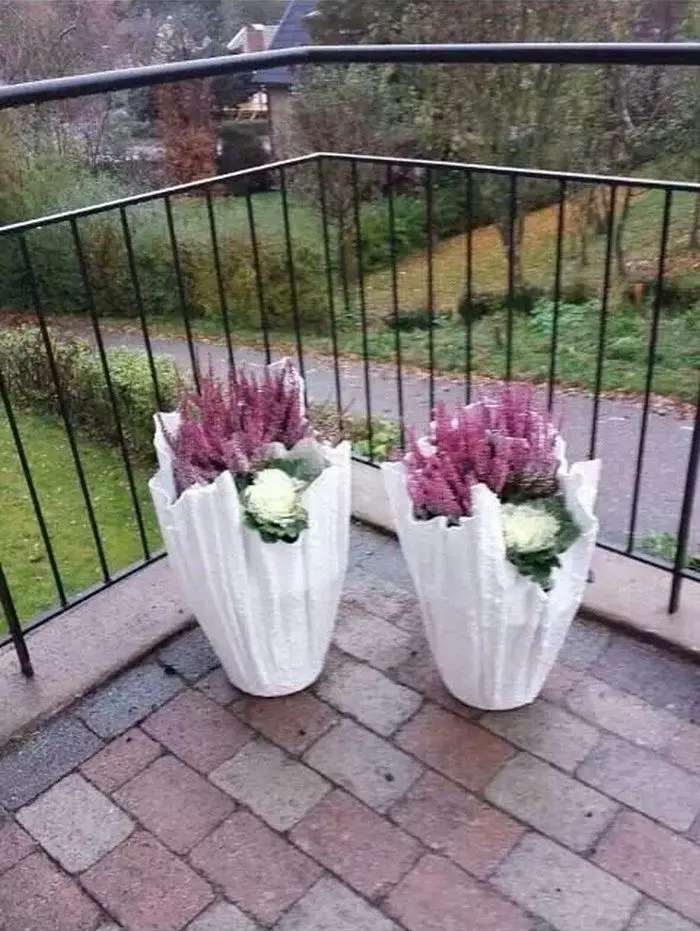
Get more concrete towel planter ideas from our album below and learn how to do it by watching the step-by-step tutorial shown below!
Contents
How to Make an Old Towel Garden Planter
You’ll need these materials:
- 1/2 bag of Quikrete
- Water
- 2 x 5-gallon Buckets
- 1 Towel
- Gloves (for concrete work)
And these tools:
- 1 Mixing Stick (for concrete)
- Drill
Steps:
Gather Your Materials and Tools
Start by setting up everything you need. You will need half a bag of Quikrete, water, two 5-gallon buckets, a towel, and a pair of gloves. Get your mixing stick and drill ready. Make sure you work in a well-ventilated area, preferably outdoors or in a garage with good airflow.
Protect Yourself and Your Workspace
Put on gloves designed for concrete work. Cement is corrosive and can cause skin irritation, so this step is non-negotiable. Lay down a tarp or old newspaper to protect your workspace from spills or splatters.
Prepare the Concrete Mixture
Pour half a bag of Quikrete into one of the 5-gallon buckets. Slowly add water while mixing with your stick. Stir thoroughly until the mixture has a consistency similar to thick pancake batter. If it’s too dry and crumbly, add a little more water. If it’s too runny, add a bit more Quikrete.
Soak the Towel in Concrete
Fully submerge the towel into the bucket filled with your concrete mix. Use the mixing stick to push it down and make sure every part of the towel is coated. You want the towel completely saturated but not dripping excessively.
Prepare Your Form
Turn the second 5-gallon bucket upside down. This bucket will act as your mold. Make sure it is clean and dry. Some people like to cover the bucket with a plastic bag to make removal easier later, but this step is optional.
Drape the Towel Over the Form
Carefully lift the soaked towel from the concrete mixture. Let any excess drip off into the bucket. Drape the towel over the upside-down bucket. Adjust the folds and draping until you get the look you want. You can create soft pleats or more dramatic folds depending on your style.
Shape and Smooth the Towel
Use your gloved hands to gently arrange the towel. Smooth out any clumps of concrete and make sure the towel hangs evenly around the form. Pay attention to the top edge and the folds. These details will define the final shape of your concrete towel planter.
Let It Dry Completely
Leave the towel planter to dry for at least 24 to 48 hours. Drying time depends on your local humidity and temperature. Do not move or disturb the towel while it is drying. It needs to harden fully to maintain its shape.
Remove the Planter From the Form
Once the planter feels hard and solid, gently lift it off the bucket form. If you used a plastic bag, the removal will be even easier. Handle it carefully at first because the concrete might still be curing inside.
Cure and Finish the Planter
Allow your concrete towel planter to cure for another few days in a dry, shaded area. Full curing can take up to a week. Once it’s completely cured, you can paint or seal it if you wish. Adding a concrete sealer will protect it from moisture and extend its life outdoors.
Incorporating Natural Elements into Your Concrete Towel Planter
Adding natural elements is an easy way to give your concrete towel planter more texture, character, and beauty. You can create a rustic or artistic look without adding much time or effort to the basic process. These small details make your planter feel custom-made and visually striking in any garden or patio setting.
Pressing Leaves and Flowers
Before your concrete towel planter fully dries, press fresh leaves, flowers, or ferns gently into the surface. Choose plants with strong veins or interesting textures for the best imprint. Let them stay in place as the concrete cures. Once dry, brush off the plant material to reveal delicate patterns left behind.
Embedding Stones or Pebbles
While the towel is still soft and pliable, press small stones, pebbles, or bits of gravel into the folds and edges. This adds a natural, rugged look to your concrete towel planter. Use smooth river rocks for a polished style or rough stones for a more organic feel. Be sure to gently push them deep enough so they stay in place after curing.
Using Wood, Shells, or Driftwood
Natural wood slices, seashells, or pieces of driftwood can also be incorporated into the design. Attach them at the base or along the folds to create a beachy or woodland theme. If you’re working with larger objects, you may need to use a little extra concrete mixture to secure them into the planter.
Coloring With Natural Pigments
Another creative idea is to tint your concrete mix with natural pigments. Crushed charcoal, red clay, or ground-up moss can give the surface a soft, earthy tone. This enhances the natural theme and makes your concrete towel planter blend beautifully with its surroundings.
Sealing for Longevity
Once the planter is fully cured and all natural elements are set, apply a clear, outdoor concrete sealer. Sealing protects both the concrete and any organic details you added. It also brings out the textures and colors, making the features stand out even more.
Incorporating natural elements into your concrete towel planter adds personality and artistic flair to a simple project. With just a few small touches, you can create a planter that feels deeply connected to the outdoors while staying durable and functional.
Concrete Towel Planter Gallery
Click on any image to start lightbox display. Use your Esc key to close the lightbox.![]()


Pro Tips to Consider
Crafting an extraordinary old towel garden planter with simple materials can be an innovative and rewarding project. Here’s a comprehensive guide on pro tips to make it happen:
1. Choose the Right Towel
Opt for old towels that are no longer in use but are still absorbent and durable. Avoid towels with excessive wear and tear or stains that might affect the appearance of the planter.
2. Select a Suitable Container
Consider the size and shape of the container based on the plants you intend to grow. Ensure that the container has adequate drainage holes to prevent waterlogging.
3. Prepare the Towel
Cut the towel into strips or squares, depending on the size of the container and the desired look of the planter. You can also fold the towel to create a thicker layer for better water retention.
4. Layering Technique
Start by lining the bottom of the container with a layer of soil or gravel for drainage. Then, add a layer of towel pieces, ensuring they cover the entire bottom surface. Repeat the process, alternating between soil and towel layers until you reach the top of the container.
5. Plant Selection
Choose plants that are suitable for your climate and the conditions of your garden. Consider factors such as sunlight exposure, soil type, and watering needs when selecting plants for your old towel garden planter.
6. Watering Strategy
Since towels have excellent water retention properties, be mindful not to overwater your plants. Check the moisture level regularly and adjust your watering frequency accordingly. You may need to water less frequently than traditional soil-based planters.
7. Maintenance Tips
Keep an eye on the towel planter to ensure it’s retaining moisture effectively and that the plants are thriving. Prune any wilted foliage to promote healthy growth. Periodically replace the towel layers as they break down over time.
8. Enhance Aesthetics
Get creative with the design of your old towel garden planter by using towels in different colours or patterns. You can also experiment with layering techniques to create a visually appealing arrangement.
9. Sunlight Exposure
Place your towel garden planter in an area that receives adequate sunlight for the plants you’ve chosen. Monitor the sun exposure throughout the day to ensure optimal growing conditions.
10. Fertilization
Consider using a slow-release fertilizer or organic compost to provide essential nutrients to your plants. Apply fertilizer according to the specific needs of the plant species you’re growing.
11. Pest Control
Keep an eye out for common garden pests such as aphids, snails, and slugs, and take appropriate measures to control them. You can use natural remedies or organic pest control products to keep pests at bay.
12. Seasonal Care
Adjust your care routine based on the changing seasons. During hot summer months, you may need to water more frequently, while in colder weather, you may need to protect delicate plants from frost.
13. Monitor Plant Health
Regularly inspect your plants for signs of stress, disease, or nutrient deficiencies. Address any issues promptly to prevent them from worsening and affecting the overall health of your garden.
14. Harvesting and Pruning
If you’re growing edible plants, such as herbs or vegetables, harvest them as needed for fresh culinary use. Prune back overgrown or leggy growth to maintain the shape and appearance of your old towel garden planter.
15. Experiment and Have Fun
Don’t be afraid to experiment with different plant combinations, container sizes, and towel arrangements. Gardening is a creative and enjoyable hobby, so embrace the opportunity to express your style and preferences.
By following these pro tips, you can create an extraordinary old towel garden planter that not only looks beautiful but also provides a thriving environment for your plants to flourish. Enjoy the process and the rewards of nurturing your own green oasis!
The Wrap Up
Making a concrete towel planter is a fun, creative, and sustainable way to repurpose old towels while enhancing your outdoor space. This DIY project lets you personalize every detail, from colors to embellishments, creating a planter that reflects your style. It’s a rewarding experience that deepens your connection to nature and brings beauty to your garden. Gather your materials and start crafting a planter that will delight and inspire for years to come.
FAQ: Concrete Towler Planter
1. What type of towels should you use for the garden planter project?
You can use any old towels that are no longer in use, but it’s best to choose towels that are absorbent and in good condition. Avoid towels that are overly worn or stained, as they may affect the appearance of the planter.
2. Can you use towels with patterns or designs?
Yes, you can use towels with patterns or designs to add visual interest to your garden planter. Just make sure the patterns or designs won’t bleed or fade when exposed to moisture.
3. Do you need any special tools or equipment for the old towel garden planter project?
No, you don’t need any special tools or equipment. The materials required for this project are simple and readily available, and you can easily complete it using basic household items such as scissors and glue.
4. How do you choose the right container for your old towel garden planter?
When choosing a container for your old towel garden planter, consider the size and shape based on the plants you intend to grow. Make sure the container has drainage holes to prevent waterlogging and that it’s sturdy enough to support the weight of the soil and plants.
5. How do you prevent the towel from becoming waterlogged?
To prevent the towel from becoming waterlogged, make sure to create adequate drainage in the container by adding a layer of gravel or rocks at the bottom. This will allow excess water to drain away freely and prevent it from saturating the towel.
6. Can you use the old towel garden planter indoors?
Yes, you can use the DIY old towel garden planter indoors as long as it’s placed in a well-lit area with proper ventilation. Just be mindful of watering to avoid any potential water damage to indoor surfaces.
7. How often do you need to water the plants in the old towel garden planter?
The frequency of watering will depend on factors such as the type of plants you’re growing, the weather conditions, and the moisture retention properties of the towel. It’s important to monitor the moisture level regularly and water as needed to keep the plants healthy.
8. Can you use the old towel garden planter for edible plants?
Yes, you can use the old towel garden planter for edible plants such as herbs or vegetables. Just make sure to use organic towels and non-toxic materials to ensure the safety of your plants.
9. How do you clean and maintain the old towel garden planter?
To clean and maintain the old towel garden planter, simply remove any wilted foliage and wipe down the container as needed. You can also replace the towel layers periodically to keep the planter looking fresh.
10. Can you use the old towel garden project as a fun activity for kids?
Absolutely! The old towel garden planter project is a great way to engage kids in gardening and DIY activities. They can help choose the towels, arrange the layers, and plant the seeds, fostering a love for nature and creativity.
We have more interesting planters for your garden. Check out our picture frame planter project!