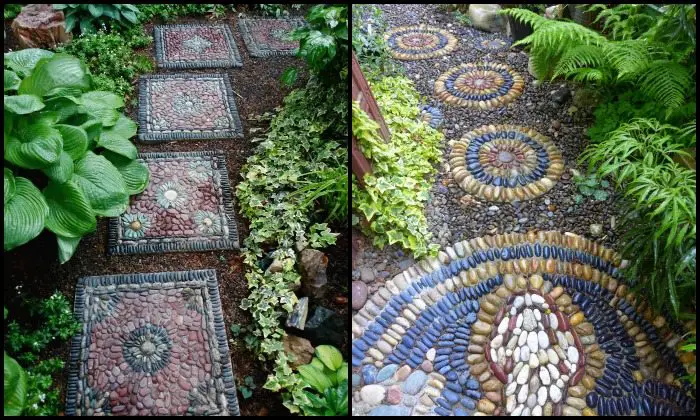
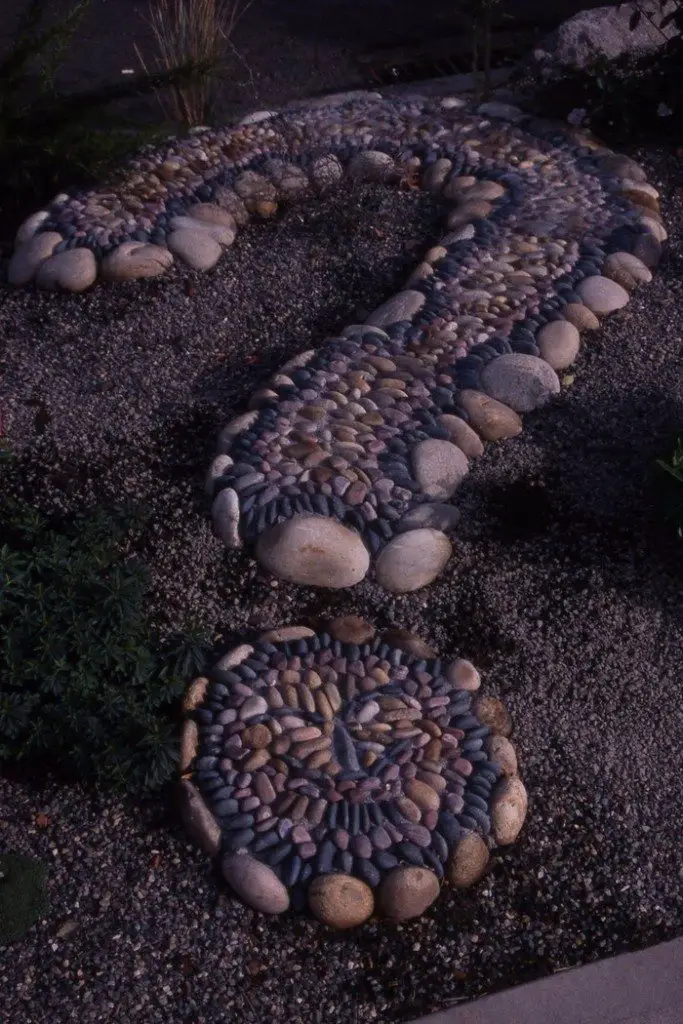
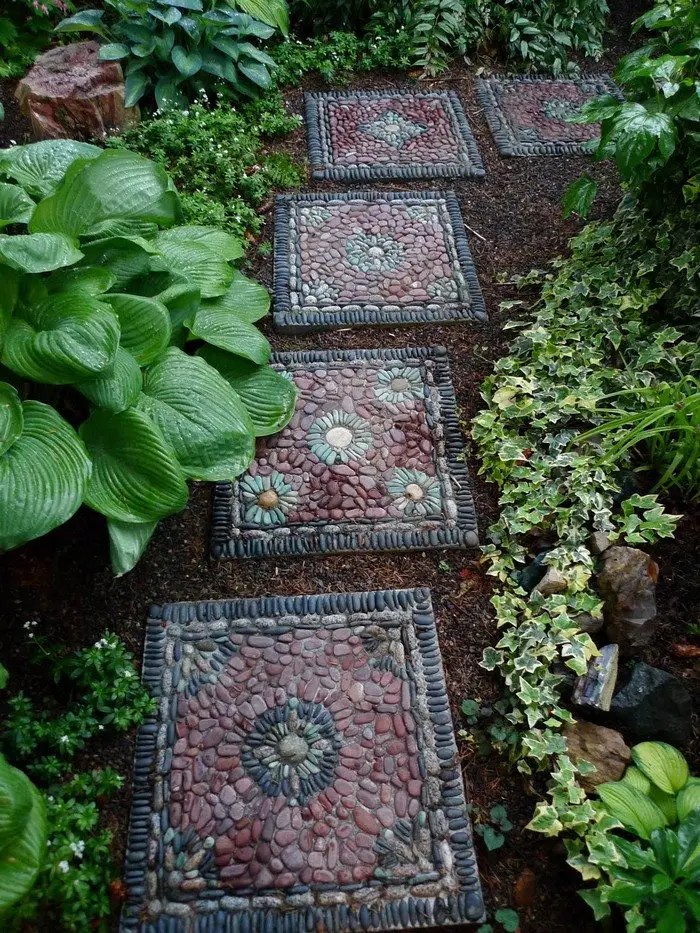
Ever wanted to have a pebble mosaic stepping stone in your garden? Mosaic stepping stones are a great addition to your backyard. They highlight the color of the greenery and are a wonderful way to personalize that beloved corner of your home.
This beautiful collection of Jeffrey Bale’s pebble mosaic stepping stones will make you want to do this as your very next DIY project!
There’s no doubt that these beautiful and detailed stepping stones require hard work. It includes tedious tasks and attention to detail, but anybody with the right amount of patience can definitely DIY their own mosaic stepping stones. You don’t need any special tools nor skills!
Because of the numerous people wanting to learn how to do this garden project, Jeffrey Bale decided to share a detailed article about building a pebble mosaic stepping stone. It discusses the entire process from start to finish with the appropriate materials to use. It also includes important points to make sure your stepping stones come out as you want it to be!
View the album of his amazing pebble mosaic stepping stones and get the link to the step-by-step guide below! :)
Is this going to be your next big project?
Contents
Making Pebble Mosaic Stepping Stones
Materials
- Pebbles
- 2 Plywood
- 2×4 Timber Frame
- Type S Mortar
- Sand
- 2 1/2″ long Screws
- Rolled Flexible Lawn Edging (optional; for rounded corners)
- 3/8th or 1/2″ Rebar (for reinforcement)
- Garden Hose (with squeeze handle spray nozzle)
- Dust Mask
- Rubber Gloves
- 5-Gallon Bucket (with water)
- Muriatic Acid
Tools
- Drill
- Hacksaw
- Framing Square
- Contractors Wheel Barrow and Garden Hoe
- Flat Screwdriver
- Nylon Bristle Brush
Instructions
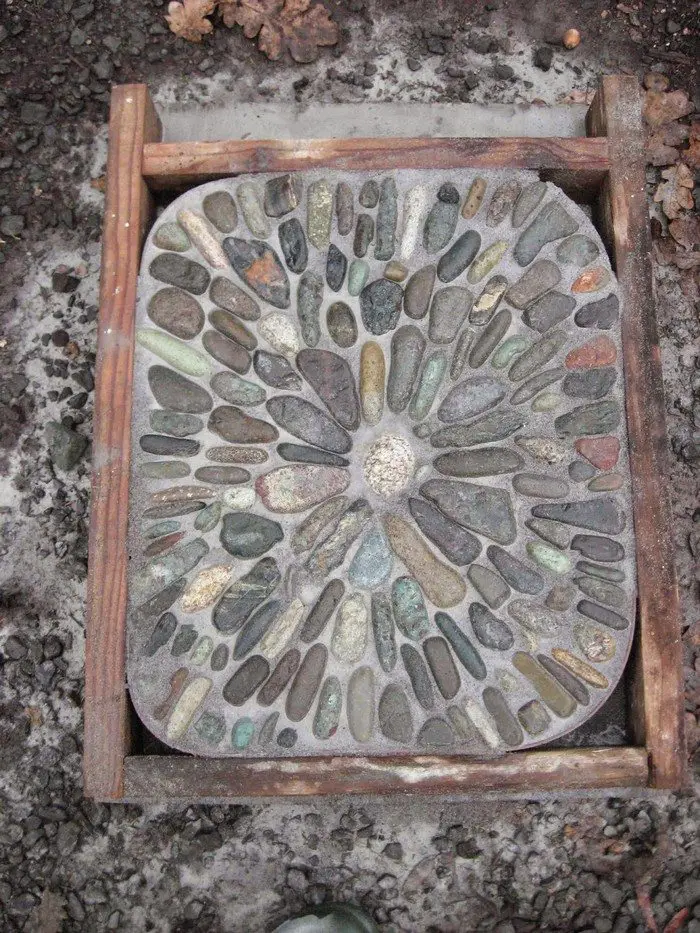
Step 1: Prepare the Frame
- Cut the 2×4 timber using the saw to create a square or rectangular frame based on the desired size of your stepping stone.
- Assemble the frame using the drill and screws to secure the corners.
- If rounded corners are desired, attach rolled flexible lawn edging inside the frame to shape the mortar.
Step 2: Set Up the Reinforcement
- Cut the rebar to fit inside the frame using the hacksaw.
- Lay the rebar within the frame to act as reinforcement. This step is crucial for durability, especially in larger stepping stones.
Step 3: Mix the Mortar
- In the wheelbarrow, mix the Type S mortar with sand and water according to the package instructions. Use the garden hoe for thorough mixing.
- Ensure the mix is consistent but not overly wet, aiming for a moldable texture.
Step 4: Pour the Mortar
- Place the frame on a flat, level surface lined with plywood to prevent sticking.
- Pour the mortar into the frame, spreading it evenly with the hoe or a trowel.
- Tap the sides of the frame gently to remove air bubbles and level the surface.
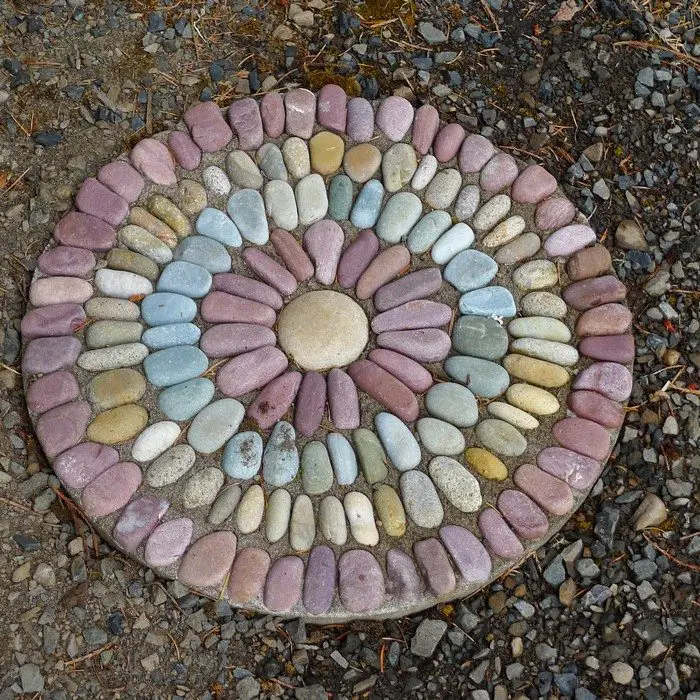
Step 5: Place the Pebbles
- While the mortar is still wet, begin placing the pebbles into the design of your choice. Press them slightly into the mortar.
- Keep a consistent gap between the pebbles, and use the framing square to keep lines straight and symmetrical.
Step 6: Cure the Mortar
- Allow the mortar to set slightly, then gently spray with water using the garden hose. Cover with plastic to retain moisture.
- Let the mortar cure for at least 48 hours.
Step 7: Finishing Touches
- Once the mortar has fully cured, remove the stepping stone from the frame.
- Use the nylon bristle brush to clean off any loose mortar from the pebbles.
- Optionally, apply a diluted muriatic acid solution (carefully, with gloves and a dust mask) to remove any mortar haze from the pebbles.
- Rinse thoroughly with the garden hose.
Step 8: Installation
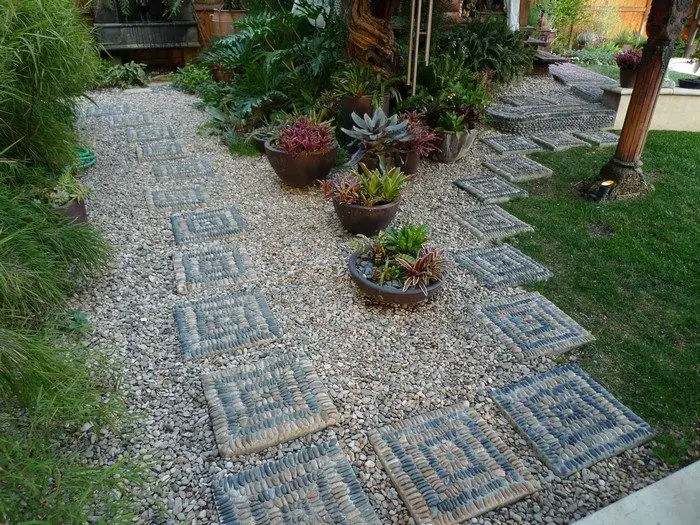
- Place the stepping stone in your garden. You can embed it into the ground or lay it on a prepared sand bed for stability.
Click on any image to start the lightbox display. Use your Esc key to close the lightbox.![]()


You can get more step-by-step instructions here…
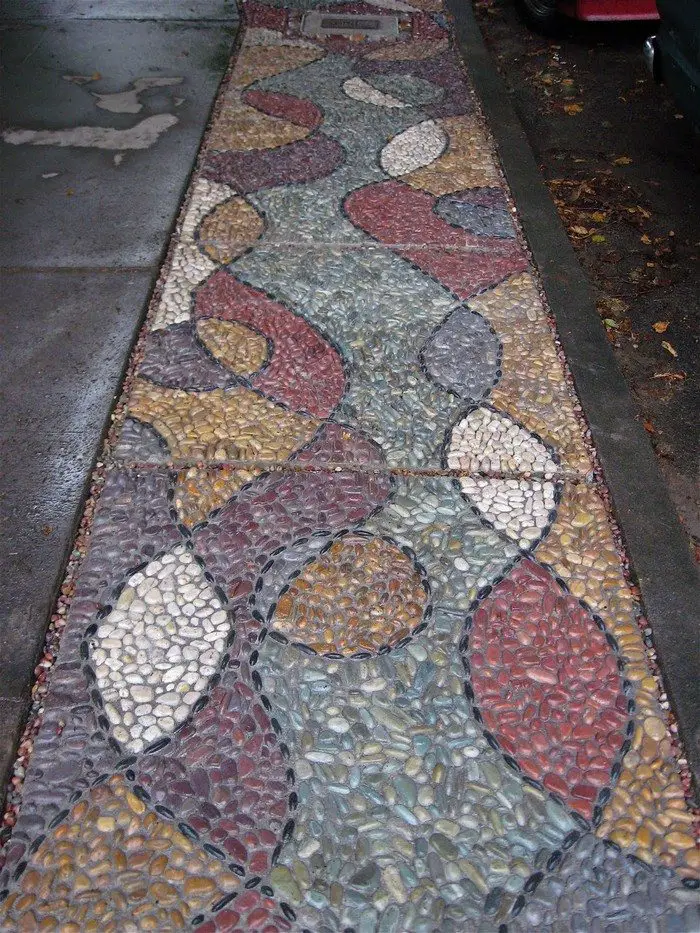
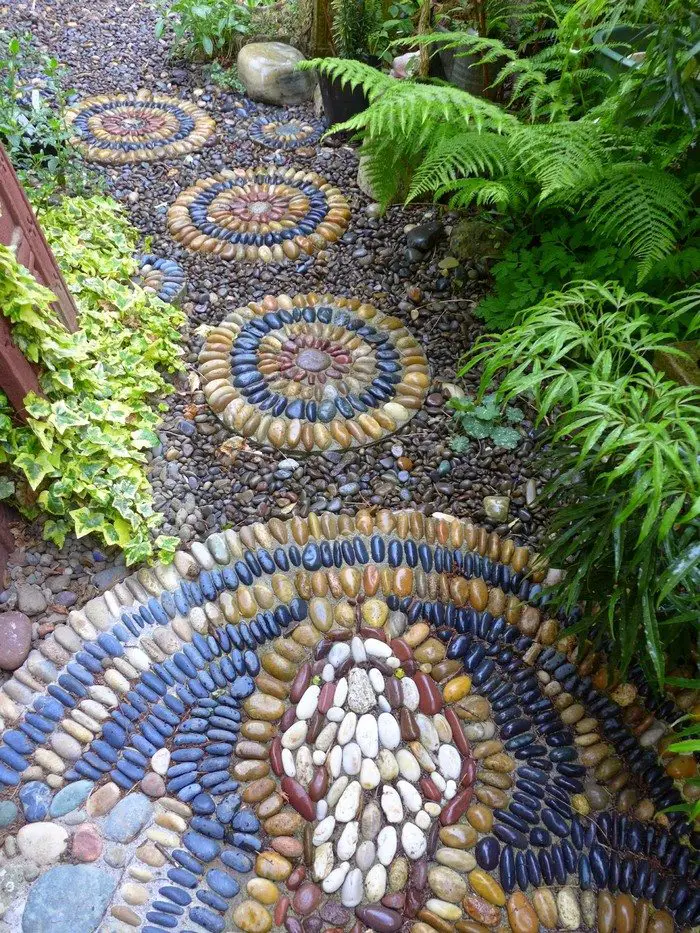
Design Inspiration for Pebble Mosaic Stepping Stones
Pebble mosaic stepping stones not only serve a functional purpose in gardens and pathways but also add a touch of artistic flair to outdoor spaces. Whether you’re an avid gardener looking to enhance your landscape or a DIY enthusiast seeking a new project, these stepping stones offer a unique opportunity to showcase creativity. Here’s some inspiration to get you started on your next garden project.
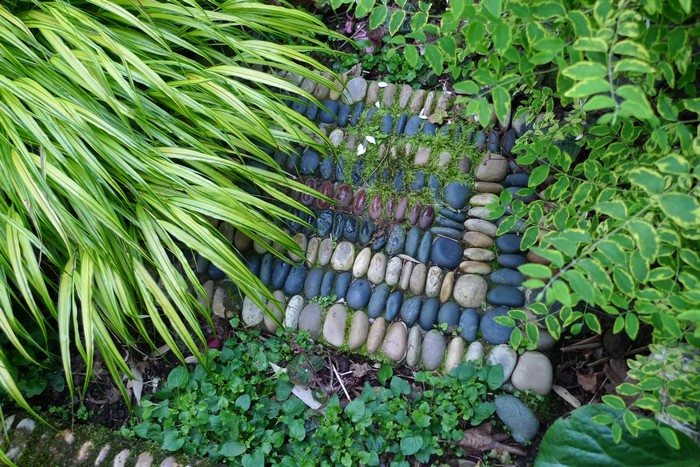
Nature-Inspired Designs
Embrace the natural beauty of your garden by incorporating organic shapes and patterns into your pebble mosaic stepping stones. Designs such as spirals evoke the curves of a vine or tendrils, while floral patterns can mirror the blooms above ground, creating a direct connection between the walkway and the garden’s living elements.
Concentric circles, resembling ripples on water, can add a calming, meditative element to your garden paths. Such patterns not only complement the organic forms and colors of your garden’s foliage and flowers but also enhance the natural flow of the space, making each step a part of a larger natural tapestry.
Geometric Patterns
For those who prefer a more contemporary look, geometric patterns in pebble mosaic stepping stones can provide a stark, beautiful contrast to the organic forms of nature. Utilizing shapes such as triangles, squares, and hexagons can give your garden a touch of modern artistry, with clean lines and sharp angles that draw the eye and create a compelling landscape feature.
These patterns can be arranged in repetitive sequences or interlocking designs to build visually striking pathways that lead the way through your garden. The structured nature of geometric designs also serves a practical purpose by defining spaces and delineating pathways clearly, making your garden not only more navigable but also stylistically unified.
Colorful Creations
Color is a powerful tool that can transform simple pebble mosaic stepping stones into vivid art pieces. By selecting pebbles in various hues, you can create vibrant mosaics that stand out against the more muted tones of soil and grass. Consider a palette that complements the colors of your home or existing garden elements, or go bold with bright, contrasting colors to make each step a statement.
Personalized Motifs
Personalize your pebble mosaic stepping stones by embedding initials, dates, or special symbols that hold meaning. This not only adds a unique touch but also makes your garden feel more connected to your personal history or interests. Whether it’s a family crest, a favorite animal, or a symbolic flower, these designs can tell a story through your garden path.
These design ideas for pebble mosaic stepping stones can turn a simple walk through the garden into an immersive artistic experience. With a bit of planning and creativity, you can transform ordinary pebbles into extraordinary pathways that enhance the beauty and character of your outdoor spaces.
Common Mistakes and How to Avoid Them
Creating pebble mosaic stepping stones is an enriching DIY project that adds beauty and functionality to any garden. However, like any craft, it comes with potential pitfalls. Understanding these common mistakes and knowing how to avoid them can ensure your pebble mosaic stepping stones turn out just as you envision. Here’s a guide to sidestepping these issues for flawless results.
Inconsistent Pebble Placement
One of the first challenges you might encounter is the inconsistent placement of pebbles, which can lead to a less aesthetically pleasing result.
How to Avoid: To ensure uniformity in your pebble mosaic stepping stones, sketch your design on paper first. During the placement, frequently step back to assess the arrangement from different angles. Using a straight edge or a set of dividers can help maintain even spacing and symmetry.
Insufficient Mortar Depth
Another common error is not using enough mortar, which can cause the pebbles to become loose over time and potentially lead to breakage.
How to Avoid: Ensure the mortar layer is thick enough to firmly hold the pebbles. A good rule of thumb for pebble mosaic stepping stones is having a mortar depth of at least half the height of the pebbles. This depth provides adequate grip while allowing the beauty of the pebbles to stand out.
Poor Weather Planning
Working on your pebble mosaic stepping stones in unsuitable weather conditions, like rain or extreme temperatures, can affect the setting of the mortar and the overall durability of the stepping stones.
How to Avoid: Always check the weather forecast before starting your project. Ideal conditions for working on pebble mosaic stepping stones are a clear, mild day with temperatures ranging from 50 to 77 degrees Fahrenheit (10 to 25 degrees Celsius). This range helps ensure the mortar sets properly.
Inadequate Curing Time
Rushing the curing process is a frequent mistake that can weaken your pebble mosaic stepping stones.
How to Avoid: Allow ample time for the mortar to cure fully. This process can take up to 48 hours, depending on weather conditions and the mortar mix used. Cover the stepping stones with a plastic sheet to protect them from the elements during this period, and avoid walking on them until they have completely set.
By steering clear of these common mistakes, you can enhance the durability and appearance of your pebble mosaic stepping stones, ensuring they remain a beautiful part of your garden landscape for years to come.
Conclusion
Building pebble mosaic stepping stones is a rewarding project that enhances the aesthetic appeal of any garden. With careful planning and attention to detail, you can create durable, beautiful pathways that reflect your personal style. Enjoy the process and the transformative effect these unique elements bring to your outdoor space.