
Love pallet projects, but hate the process of taking them apart? You can DIY this tool and you’ll enjoy building with pallets even more!
Your pallet breaker can be made from different scrap metals and old yard tools. No expensive materials are needed, only some welding skills are required.
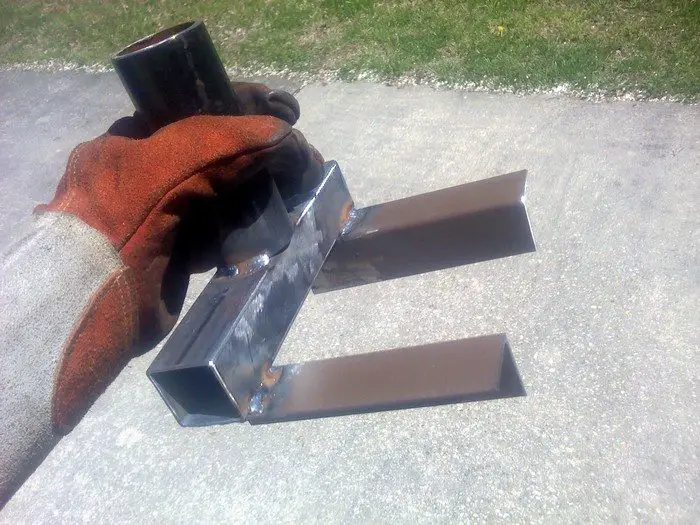
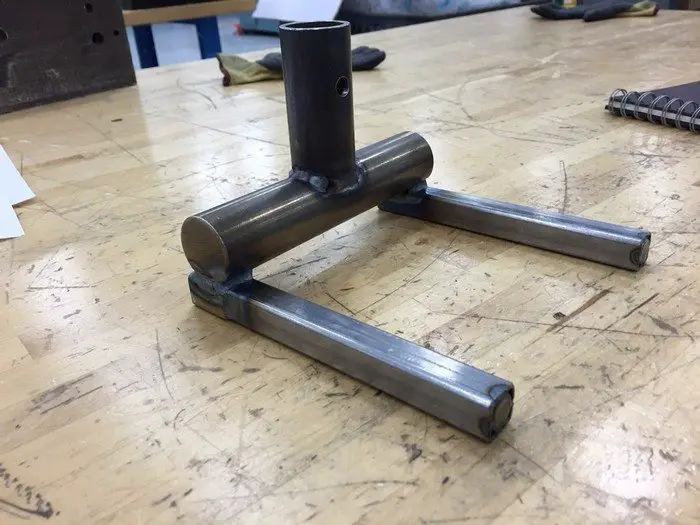
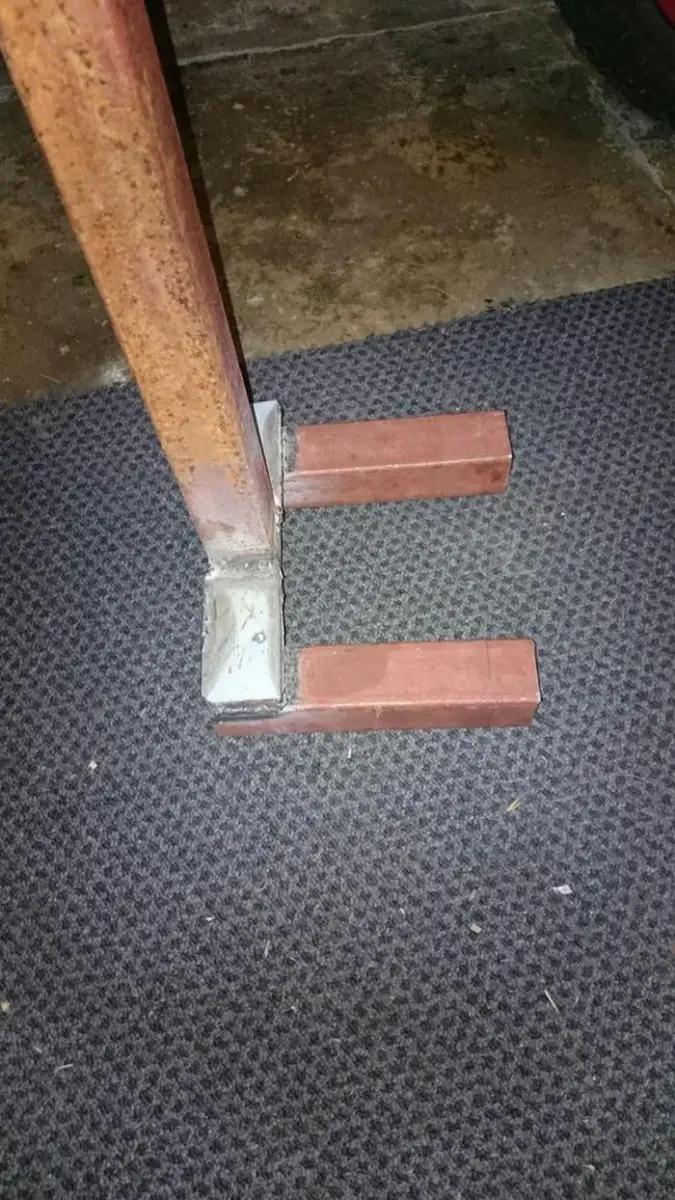
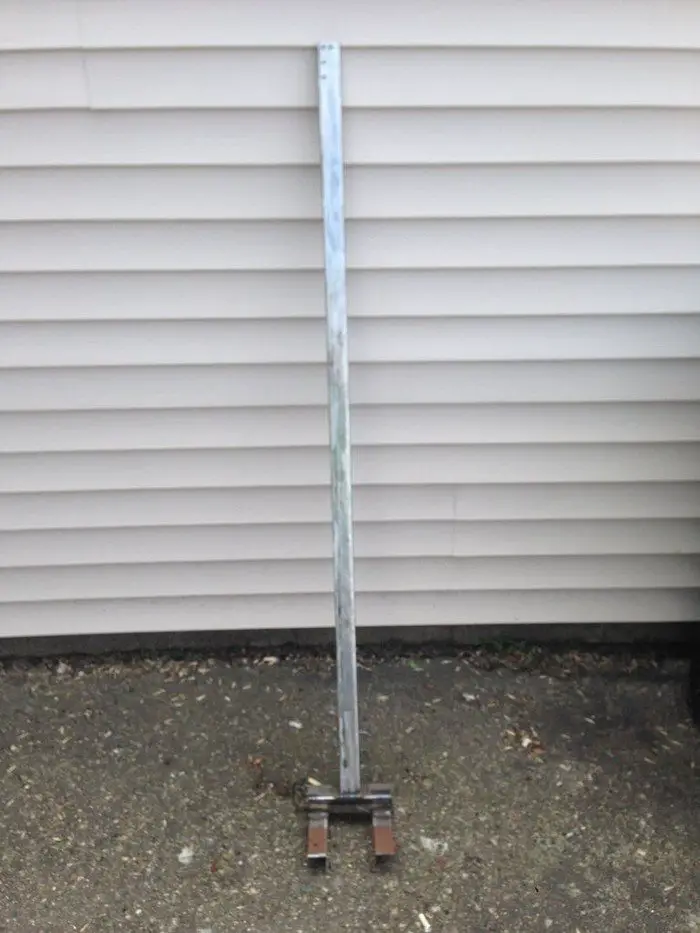
The idea is very simple and straightforward in that it doesn’t need an actual step-by-step tutorial. As long as you can (or you have a friend who can) weld, you can easily figure out how to make your pallet breaker! The only point to remember is to make sure the fork is wide enough for a 4-inch stringer. If the pallet breaker doesn’t fit the pallet, you can remove one slat first using a hammer.
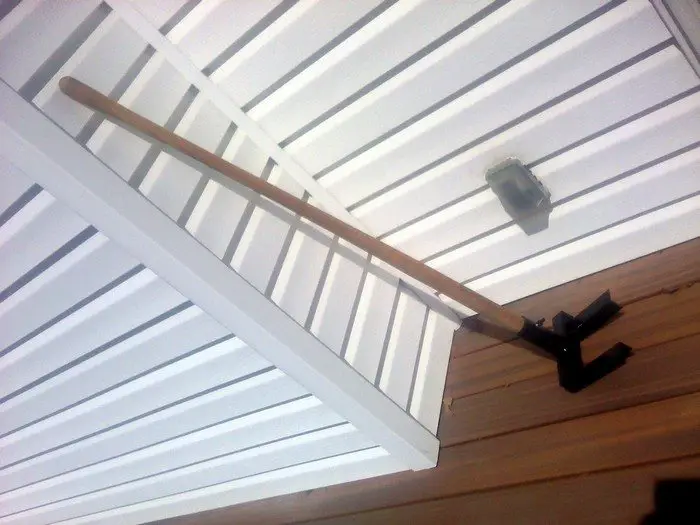
If you’re planning on working on a big project that requires dismantling several pallets, this DIY tool will surely help a lot, making the job easier and faster!

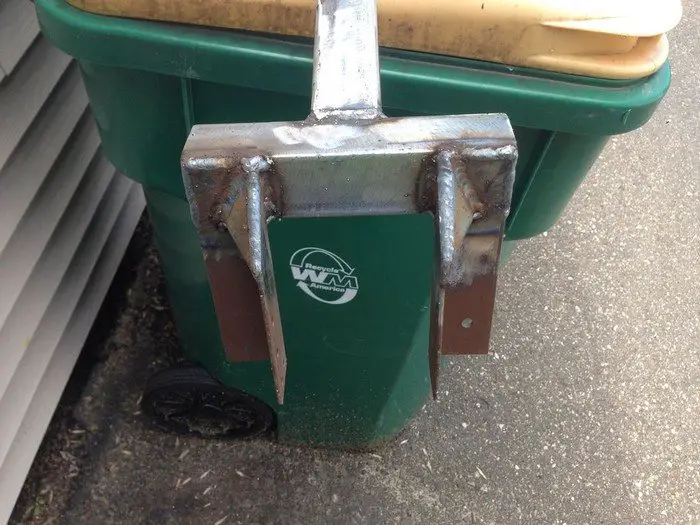
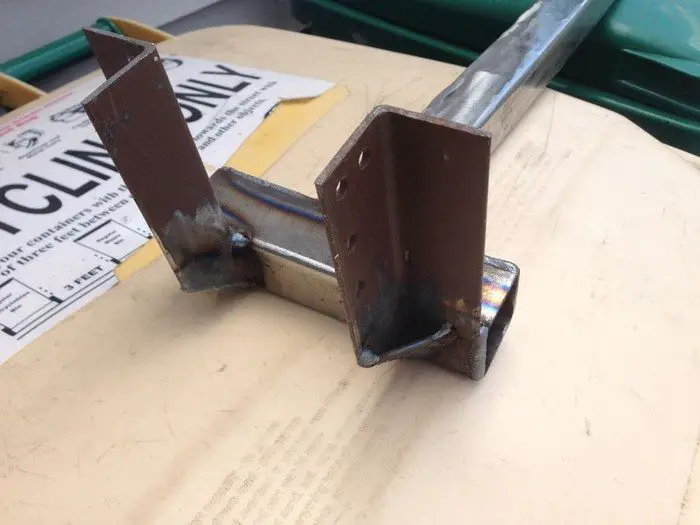
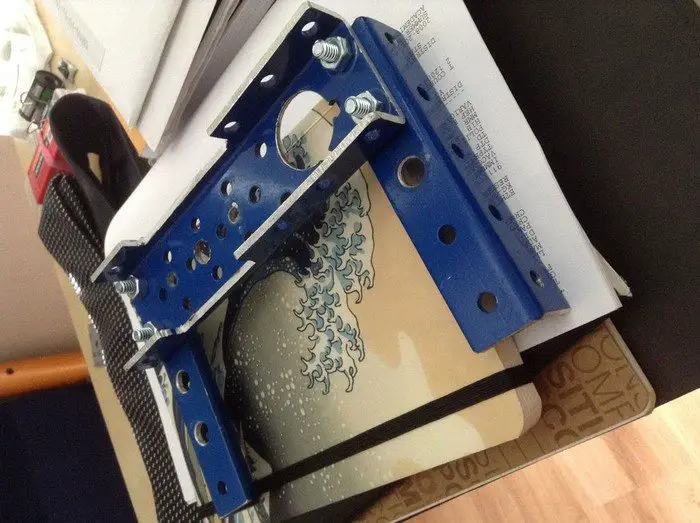
See the gallery below showing different versions of this DIY pallet breaker to get some ideas on what metal parts you can use when building your pallet breaker!
Do you know someone who needs this, too?
Contents
DIY Pallet Breaker: Turning Metal Scrap into a Functional Tool
You’ll need these materials:
- Metal Scrap (Bed Frame, Angle Iron, Black Pipe, Square Tubing, Shovel Handle)
- Bolts and Nuts
- Wooden Rod
And these tools:
- Angle Grinder
- Welding Machine
Click on any image to start the lightbox display. Use your Esc key to close the lightbox.![]()

Thanks to walkthewalk for this great idea!
Repurposing metal scrap into practical tools not only reduces waste but also showcases creativity and resourcefulness. In this guide, we’ll explore how to create a pallet breaker—a handy tool for dismantling pallets—using readily available materials such as bed frames, angle iron, black pipe, square tubing, and a shovel handle.
By following seven simple steps, you can transform these scraps into a durable and efficient pallet breaker, complete with bolts and nuts for easy assembly and maintenance.
Step 1: Prepare the Components
Begin by preparing the metal components for assembly. Using an angle grinder or hacksaw, cut the bed frame and angle iron to the desired lengths. The bed frame will serve as the main body of the pallet breaker, providing stability and support. The angle iron will be used to create the prying teeth for lifting the pallet boards.
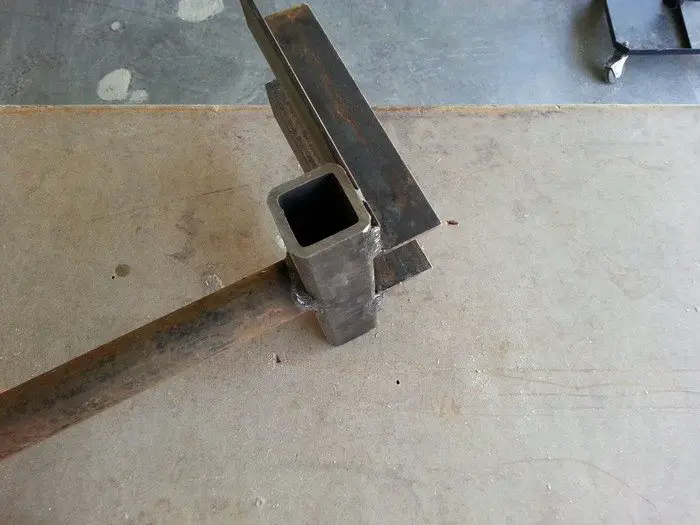
Next, cut the square tubing to size, ensuring it fits snugly around the handle of the shovel. This tubing will reinforce the connection between the handle and the bed frame, adding strength and durability to the pallet breaker.
Step 2: Weld the Components Together
Once the metal components are cut to size, it’s time to weld them together to form the pallet breaker’s frame. Begin by welding the angle iron pieces onto the bed frame, evenly spaced apart to create the prying teeth. Ensure that the teeth are securely welded to the frame, as they will bear the brunt of the force when breaking apart pallets.
Next, weld the square tubing onto the bed frame, aligning it with the handle attachment point. This tubing will provide additional support and reinforcement for the handle, preventing it from bending or breaking during use.
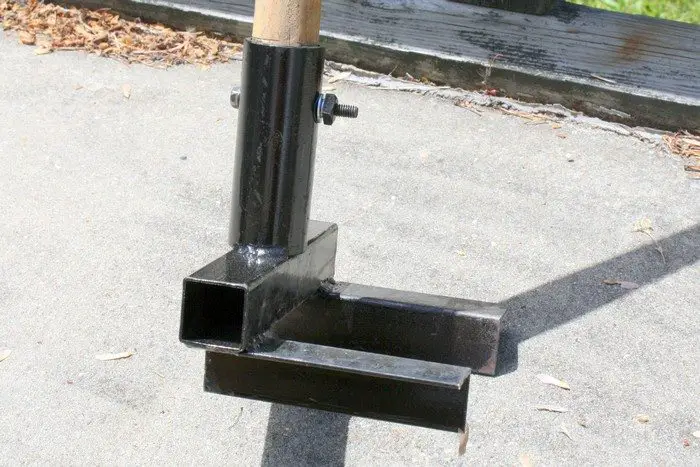
Step 3: Attach the Handle
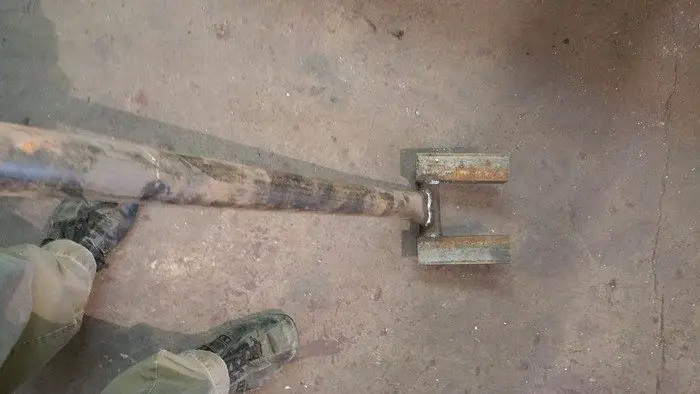
With the frame assembled, it’s time to attach the handle to the pallet breaker. Slide the shovel handle through the square tubing, ensuring a tight fit. If necessary, use a hammer to gently tap the handle into place.
Once the handle is in position, secure it with bolts and nuts, drilling holes through the square tubing and handle to accommodate the bolts. Use wrenches or sockets to tighten the bolts securely, ensuring that the handle is firmly attached to the pallet breaker.
Step 4: Test and Adjust
Before putting the pallet breaker to use, it’s essential to test its functionality and make any necessary adjustments. Hold the handle firmly and apply pressure to the prying teeth, simulating the action of lifting pallet boards. Ensure that the frame remains stable and that the handle feels comfortable and secure in your grip.
If any issues are identified during testing, such as loose welds or insufficient reinforcement, address them promptly. Weld any loose joints, reinforce weak points with additional metal, and adjust the handle attachment if necessary. The goal is to create a pallet breaker that is sturdy, reliable, and ergonomic to use.
Step 5: Apply Protective Finish (Optional)
To prolong the lifespan of your pallet breaker and enhance its visual appeal, consider applying a protective finish to the metal components. This could involve painting the frame with rust-resistant spray paint or applying a coat of clear sealant to prevent corrosion.
Before applying any finish, ensure that the metal surfaces are clean and free of grease or debris. Allow the finish to dry completely before using the pallet breaker to avoid smudges or damage to the coating.
Step 6: Maintenance and Care
Once your pallet breaker is complete, it’s important to maintain it regularly to ensure optimal performance and longevity. Here are some maintenance tips to keep in mind:
- After each use, inspect the pallet breaker for any signs of damage or wear, such as bent teeth or loose bolts. Address any issues promptly to prevent further damage.
- Keep the metal components clean and free of debris by wiping them down with a damp cloth after use. This helps prevent rust and corrosion and ensures smooth operation.
- Store the pallet breaker in a dry, sheltered area when not in use to protect it from the elements. Avoid leaving it exposed to moisture or extreme temperatures, as this can damage the metal and compromise its integrity.
- Periodically lubricate moving parts, such as the handle attachment point, with a light coat of oil or grease to prevent friction and ensure smooth movement.
By following these maintenance tips and caring for your pallet breaker properly, you can prolong its lifespan and continue to enjoy its benefits for years to come.
With just a few simple materials and tools, you can transform metal scrap into a functional and durable pallet breaker. By following the seven steps outlined in this guide, you can create a sturdy tool that makes quick work of dismantling pallets, complete with a comfortable handle and easy assembly and maintenance.
Whether you’re a seasoned DIY enthusiast or a novice metalworker, building your pallet breaker is a rewarding and practical project that showcases creativity, resourcefulness, and ingenuity.
Prioritizing Safety in DIY Pallet Breaker Project
Crafting your own pallet breaker can be an empowering DIY endeavor, offering both practical utility and creative fulfillment. However, safety should always be the foremost concern throughout the construction process to mitigate risks and ensure a successful outcome. In this detailed guide, we will explore a comprehensive set of safety precautions to adhere to when constructing a DIY pallet breaker.
1. Personal Protective Equipment (PPE):
Before embarking on your DIY pallet breaker , it’s imperative to equip yourself with the necessary personal protective equipment (PPE) to safeguard against potential hazards. This includes:
- Safety goggles: Protect your eyes from flying debris, sawdust, or metal shavings generated during cutting, drilling, or grinding.
- Heavy-duty gloves: Shield your hands from sharp edges, splinters, and potential cuts while handling materials or operating tools.
- Sturdy work boots: Provide adequate foot protection from falling objects, heavy materials, or accidental impacts.
Wearing the appropriate PPE is fundamental for preventing injuries and ensuring a safe working environment throughout the project.
2. Workspace Safety:
Creating a safe and organized workspace is essential to minimize hazards and optimize productivity. Consider the following safety measures:
- Adequate ventilation: Ensure proper airflow and ventilation in the workspace to prevent the buildup of dust, fumes, or harmful vapors.
- Well-lit environment: Illuminate the workspace with sufficient lighting to enhance visibility and reduce the risk of accidents or errors.
- Clear workspace: Maintain a clutter-free work area by organizing tools, materials, and debris to mitigate tripping hazards and promote a safer working environment.
- Stable work surface: Utilize a sturdy and level workbench or table to provide a secure foundation for your project, preventing instability or accidents during construction.
By implementing these workspace safety precautions, you can create an environment conducive to safe and efficient DIY pallet breaker construction.
3. Tool Safety:
Familiarizing yourself with the safe and proper use of tools is paramount to prevent accidents and ensure successful project completion. Follow these guidelines:
- Read the manual: Review the instruction manuals and safety guidelines provided by manufacturers for all tools and equipment used in the project.
- Operate tools responsibly: Utilize tools according to their intended purpose and avoid improvising or using them in unsafe ways that could lead to accidents or injuries.
- Inspect tools regularly: Conduct routine inspections of tools to identify any signs of damage, wear, or malfunction, and address issues promptly to maintain optimal safety and performance.
- Unplug power tools when not in use: Disconnect power tools from electrical sources when not in use to prevent accidental activation or unauthorized use, reducing the risk of injuries.
Adhering to proper tool safety practices is crucial for minimizing risks and ensuring a safe DIY pallet breaker construction process.
4. Material Handling:
Exercise caution when handling materials to prevent injuries and accidents. Follow these safety precautions:
- Use appropriate lifting techniques: Lift heavy or bulky materials using proper lifting techniques, such as bending at the knees and keeping the back straight, to minimize the risk of strains or musculoskeletal injuries.
- Wear gloves: Wear protective gloves to shield your hands from sharp edges, splinters, or rough surfaces when handling wooden pallets or metal components.
- Secure materials properly: Ensure materials are securely positioned and supported to prevent them from shifting, tipping, or falling during construction, reducing the risk of accidents or injuries.
- Be mindful of sharp edges: Exercise caution around sharp edges, protruding nails, or metal splinters when handling materials to avoid cuts, punctures, or other injuries.
By practicing safe material handling techniques, you can mitigate risks and maintain a safe working environment throughout the construction process.
5. Follow Construction Plans:
If utilizing construction plans or instructions for your DIY pallet breaker project, it’s essential to follow them meticulously to ensure safety and accuracy. Consider the following precautions:
- Review plans thoroughly: Carefully review the construction plans or instructions before starting the project to familiarize yourself with the steps involved and any safety considerations.
- Double-check measurements: Verify measurements, dimensions, and specifications to ensure accuracy and prevent errors that could compromise the structural integrity or functionality of the pallet breaker.
- Seek clarification if needed: If you encounter any uncertainties or ambiguities in the construction plans or instructions, seek clarification from experienced builders, DIY enthusiasts, or online resources to ensure safe and accurate project execution.
Adhering to construction plans diligently is essential for minimizing risks and ensuring the safety and effectiveness of the DIY pallet breaker.
6. Test Safely:
Before deploying your DIY pallet breaker for its intended use, conduct thorough testing to ensure its functionality and safety. Follow these safety guidelines:
- Conduct controlled testing: Perform initial testing of the pallet breaker in a controlled environment to assess its functionality, stability, and safety under simulated operating conditions.
- Apply gradual pressure: Exercise caution during testing by applying gradual pressure or force to evaluate the performance of the pallet breaker without subjecting it to excessive stress or strain that could compromise its integrity.
- Inspect for stability: Inspect the pallet breaker carefully during testing to ensure its stability, structural integrity, and resistance to failure or collapse under load-bearing conditions.
By testing your DIY pallet breaker safely and methodically, you can identify any potential issues or concerns and address them proactively before deploying the tool for practical use.
7. Emergency Preparedness:
Prepare for emergencies by establishing a plan and equipping yourself with the necessary resources and information to respond effectively. Consider the following precautions:
- First aid kit: Maintain a well-stocked first aid kit containing essential medical supplies and equipment to address minor injuries or medical emergencies promptly.
- Emergency contact information: Keep a list of emergency contact numbers, including local emergency services, medical facilities, and relevant personal contacts, readily accessible in case of emergencies.
- Communication: If working alone, inform a trusted individual of your location, activities, and estimated timeline to ensure someone is aware of your whereabouts and can provide assistance or support if needed.
By adopting a proactive approach to emergency preparedness, you can mitigate risks and ensure a timely and effective response to unforeseen circumstances or emergencies during the DIY pallet breaker construction process.
Maintenance Tips for Continued Safety
Once your DIY pallet breaker is constructed, it’s crucial to maintain it properly to preserve its safety, functionality, and longevity. Consider the following maintenance tips:
- Regular inspection: Conduct periodic inspections of the pallet breaker to identify any signs of wear, damage, or deterioration, and address them promptly to prevent safety hazards or performance issues.
- Lubrication: Apply lubricants or corrosion inhibitors to moving parts, hinges, or joints of the pallet breaker to ensure smooth operation, minimize friction, and prevent premature wear or damage.
- Cleaning: Clean the pallet breaker regularly to remove dirt, debris, or buildup that could impair its performance, compromise safety, or accelerate corrosion or deterioration.
- Storage: Store the pallet breaker in a dry, well-ventilated area away from moisture, humidity, or extreme temperatures to prevent rust, corrosion, or structural damage.
- Handle with care: Handle the pallet breaker with care during use, transportation, or storage to avoid impacts, drops, or mishandling that could cause damage, distortion, or failure of critical components.
By adhering to these maintenance practices, you can ensure the continued safety, reliability, and effectiveness of your DIY pallet project for years to come.
The Wrap Up
Embarking on a DIY pallet breaker project offers a rewarding opportunity to create a useful tool while indulging in your creative instincts. However, it’s essential to prioritize safety throughout the construction process and address common concerns to ensure a successful outcome.
Safety should always be the top priority when undertaking DIY projects like building a pallet breaker. Equip yourself with the necessary personal protective equipment, maintain a clean and organized workspace, and adhere to proper tool usage and handling practices.
Regular maintenance, including inspections, lubrication, cleaning, and proper storage, is essential for preserving the safety, functionality, and longevity of the DIY pallet breaker.
Frequently Asked Questions
1. Can you use any type of wood for constructing a pallet breaker?
While hardwoods like oak or maple are ideal due to their strength and durability, softer woods like pine or spruce can also be used. However, ensure that the wood is sturdy enough to withstand the forces involved in breaking apart pallets.
2. DoyouI need welding skills to build a pallet breaker?
Welding skills are not always necessary, as there are various DIY pallet breaker designs that require minimal or no welding. However, if your chosen design involves welding, it’s advisable to seek guidance or assistance from experienced welders to ensure proper technique and safety.
3. How can you ensure the stability and safety of your DIY pallet breaker?
Ensuring proper construction, using sturdy materials, and testing the pallet breaker in a controlled environment are essential steps to ensure stability and safety. Additionally, regular inspections, maintenance, and adherence to safe usage practices contribute to its continued safety and effectiveness.
4. What are the common maintenance tasks for a DIY pallet breaker?
Common maintenance tasks include regular inspections for signs of wear or damage, lubrication of moving parts, cleaning to remove dirt and debris, and proper storage to prevent rust or corrosion. Handle the pallet breaker with care during use and transportation to avoid damage.
5. Can you modify or customize you DIY pallet breaker design?
Absolutely! DIY projects encourage creativity and innovation, so feel free to modify or customize your pallet breaker design to suit your preferences or specific needs. However, ensure that any modifications maintain the safety and functionality of the tool.
6. Is it safe to use a DIY pallet breaker alone?
While using a pallet breaker alone is possible, it’s always safer to have someone nearby in case of emergencies or accidents. If working alone, ensure that you have emergency contact information readily available and follow proper safety protocols at all times.


