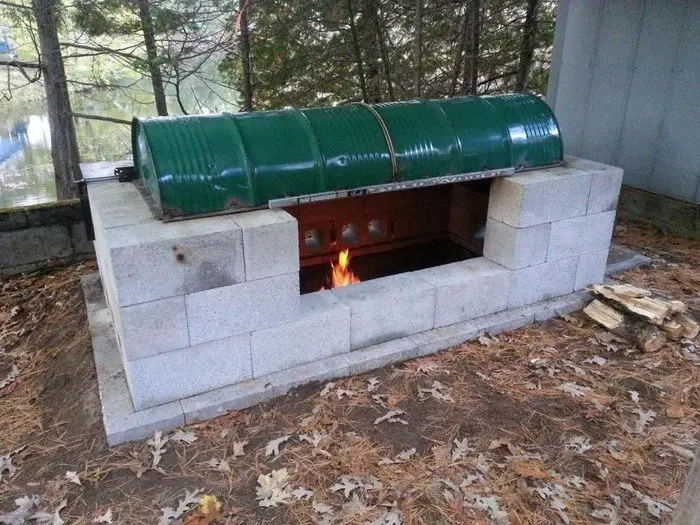
A large rotisserie pit BBQ for a large gathering! Learn how to build this DIY project in your backyard for some delicious turkey and other BBQ favorites!
Don’t be fooled by the word ‘large’! This DIY rotisserie pit BBQ is a dry-fit project which makes it easy to build. Yes, that means no mortar. :)
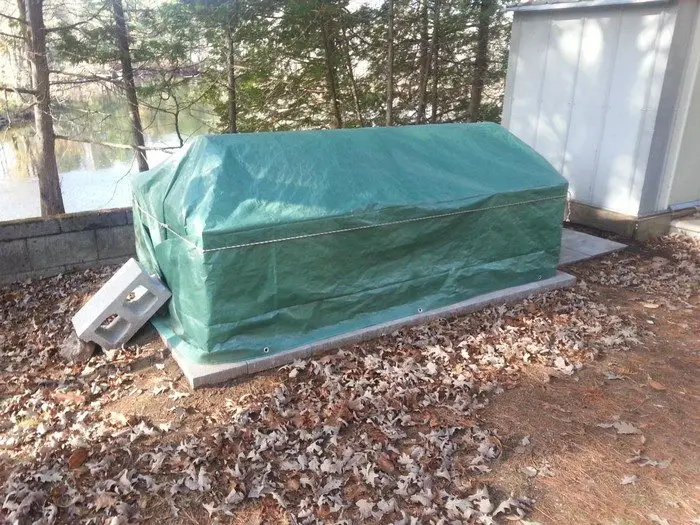
And with that said, it is also a low-maintenance outdoor cooker. You can easily replace broken blocks if needed. You can also relocate the BBQ pit anytime and anywhere you want!
Plans are provided by the owner-builder below, and you can use it as a reference for building one in your yard. The design is simple, so you shouldn’t have any trouble with scaling it to fit your space!
Is this going to be your next outdoor project? :)
Click on any image to start lightbox display. Use your Esc key to close the lightbox. ?

Contents
Building a Rotisserie Pit BBQ
Materials
FOR THE BBQ BODY:
- 25 pieces – 8″ x 8″ x 16″ Standard Blocks
- 15 pieces – 8″ x 8″ x 16″ Cap Blocks (or standard)
- 4 pieces – 8″ x 8″ x 8″ Half Blocks
- 22 pieces – 12″ x 12″ Patio Stones (optional)
- 4 to 8 pieces – Wood/Metal Stakes
- Flagging Tape or String
FOR THE PIT:
- 16′ x 12″ Wide Expanded Steel (optional)
- 6 to 8 pieces – 24″ Rebar (optional)
- 2 to 3 Cubic feet – Sand or Gravel
- 2 pieces – 4′ x1.5″ Metal Pipe
FOR THE TOP / LID:
- Food-grade steel drum
- 20′ x 1.5″ angle iron (bed frames are great)
- Wooden hockey stick
- 4 pieces – 5″ x 5/16″ Bolts (with nuts & washers)
- 2 pieces – 2′ x 1/2″ Threaded Rod (with nuts & washers)
- 7′ x 12″ (1/8″ thick) Steel Plate
- High-heat Flat-black BBQ Spray Paint
FOR THE GRILL (optional):
- Expanded Steel 30″ x 48″
- 2 pieces – 1″ x 64″ Steel Pipe
Tools
- Shovel
- Gloves
- Hammers
- Long Level
- Short Level
- Safety Glasses
- Measuring Tape
- Old Chisel or Axe
- Permanent Marker
- Carpenters Square
- Hand-held Grinder
- Metal Cutting Discs
- Masonry Cutting Discs (optional)
- Wheelbarrow (optional)
- Friendly Welder Person

Instructions
Using standard concrete blocks – aka “Cinder Blocks” – the rotisserie pit BBQ design is easily scale-able. Make it any size you want. The blocks are found at most hardware stores (Home Depot, Lowes, etc.) but I was able to save money by buying “seconds” from a wholesale distributor at $2.00 apiece here in Ontario, Canada.
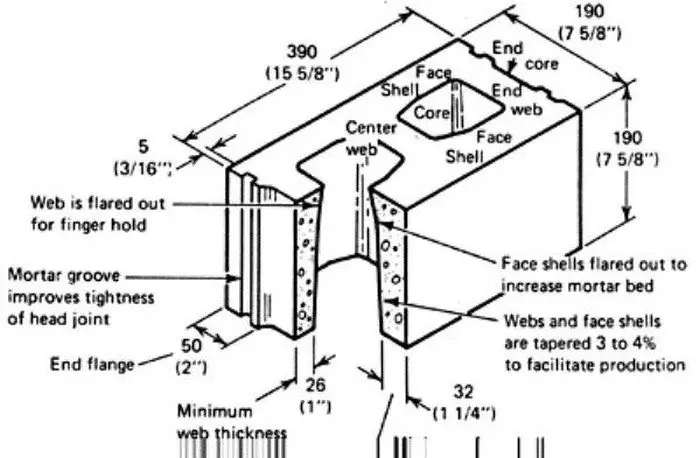
The standard block is usually sold as 8″ x by 8″ by 16″. This is not quite true. The specs refer to a block in a completed wall WITH mortar. The block itself is actually closer to 7.5″ x 7.5″ x 15.5″. I also chose blocks with squared/finished ends for the corners. I was happily surprised to find “cap” blocks for the top surfaces.
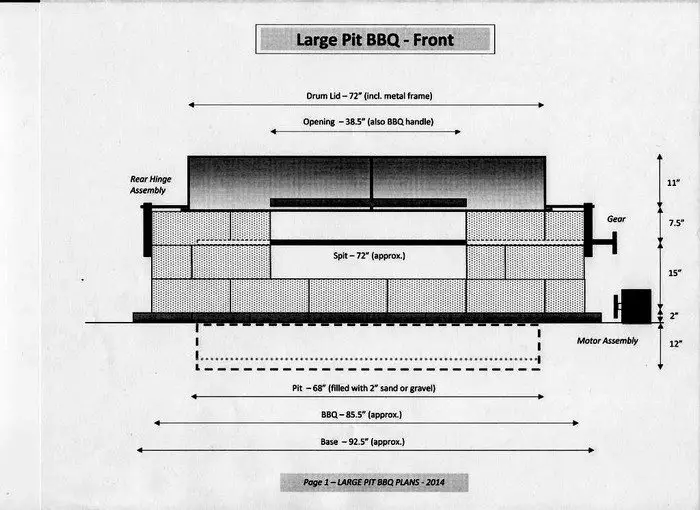
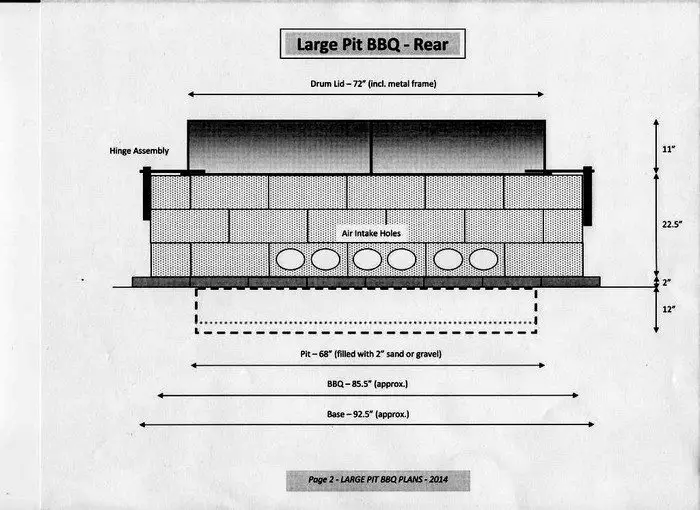
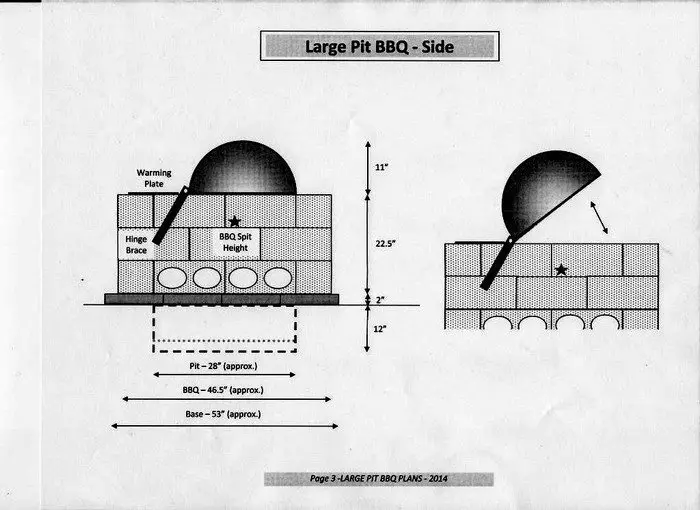
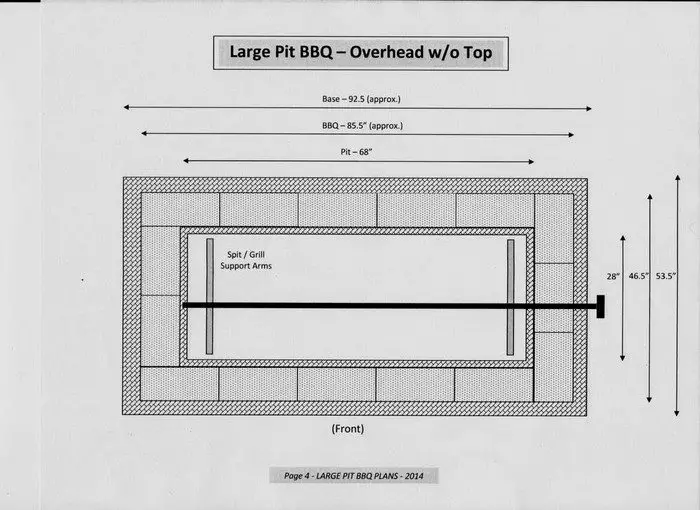
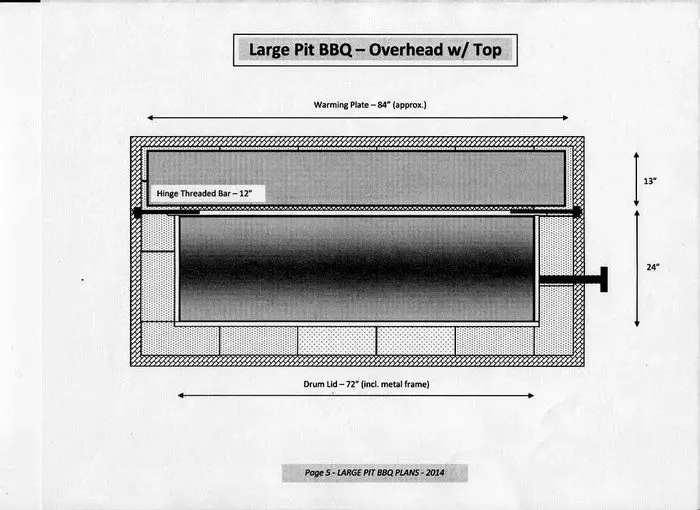
Here are my rudimentary rotisserie pit BBQ blueprints:
We gave location quite a bit of thought before assembling the rotisserie pit BBQ. Remember that it will be giving off a lot of smoke and heat once it’s fired up. We chose a convenient spot that was a safe distance from trees and play areas. If you use an electric motor you will also want to be located near an outlet.
As this is a rotisserie pit BBQ we had to consider tree roots. They are difficult to dig through (!) and also pose a fire hazard. The fire could get into the roots and smolder underground for an extended time, making its way back to the tree eventually. I suggest having buckets of water around when the BBQ is fired-up… just in case.
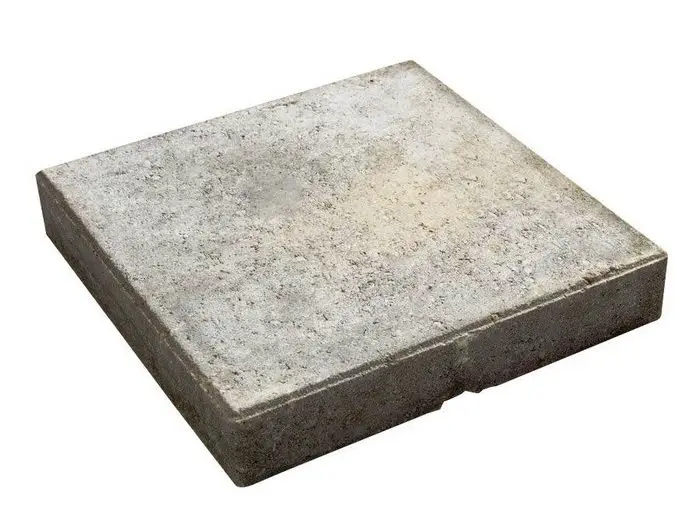
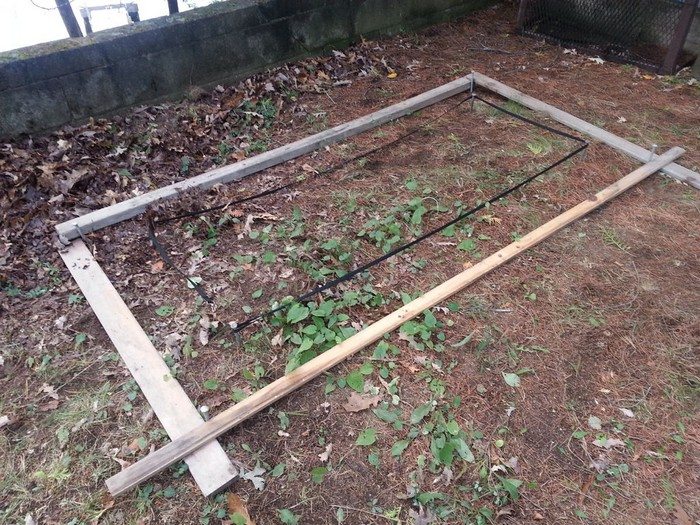
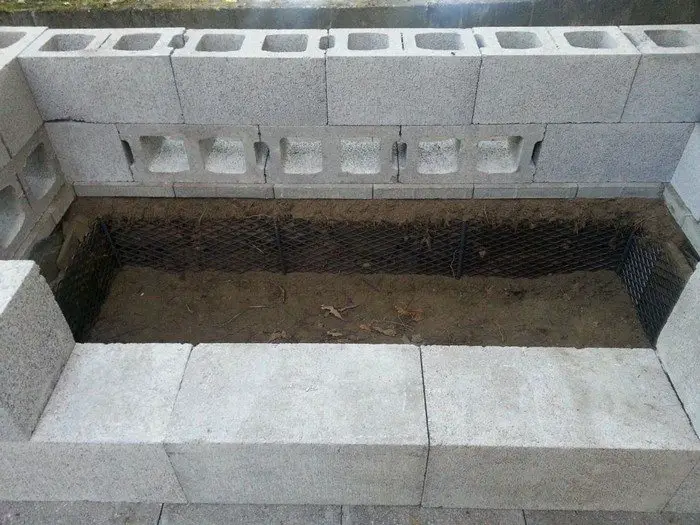
FYI – concrete blocks are HEAVY. Each block weighs 40-50 lbs, so forty of them will weigh a lot! A solid foundation of our rotisserie pit BBQ is absolutely critical. After leveling the ground we decided to first lay down 12″ x 12″ patio stones to help distribute the weight and keep the bricks from sliding into the hole.
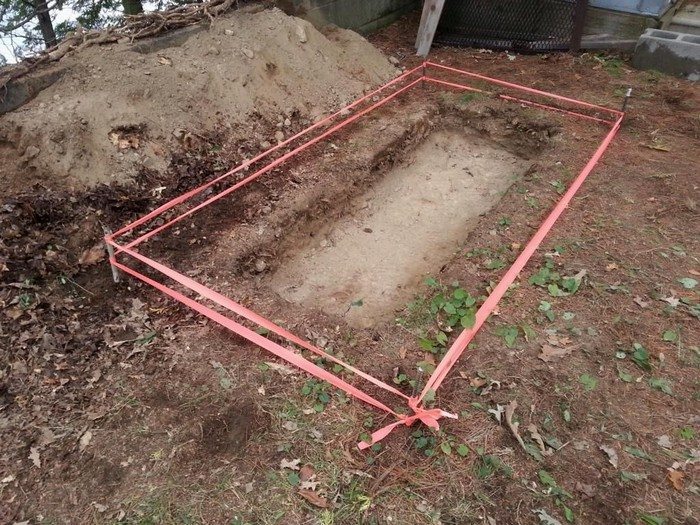
We measured the area and used stakes with flagging tape to mark the outside perimeter of the patio stones. NOTE: It would have been wiser to wait until AFTER laying the patio stones before digging the one-foot pit. We dug first and made the hole too large by mistake. Doh!

To keep the soil in place we used 12″ strips of expanded metal held in place with 2 ft rebar stakes. We also added thin, flat rocks behind the metal screen – cause it just seemed like the right thing to do.
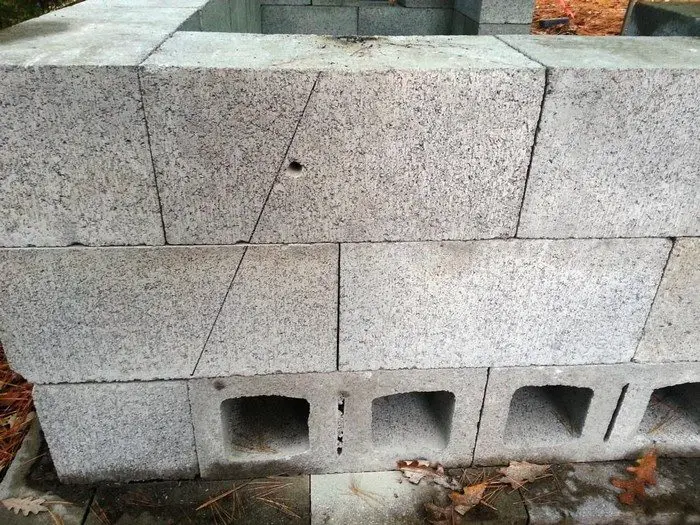
Now you can lay the blocks tightly against each other, checking for level (and square) often. Many of our blocks had little bumps and “extra bits” that had to be teased off with a hammer & an old ax. Lay some of the 1st-row blocks sideways to allow for air to feed the flames.
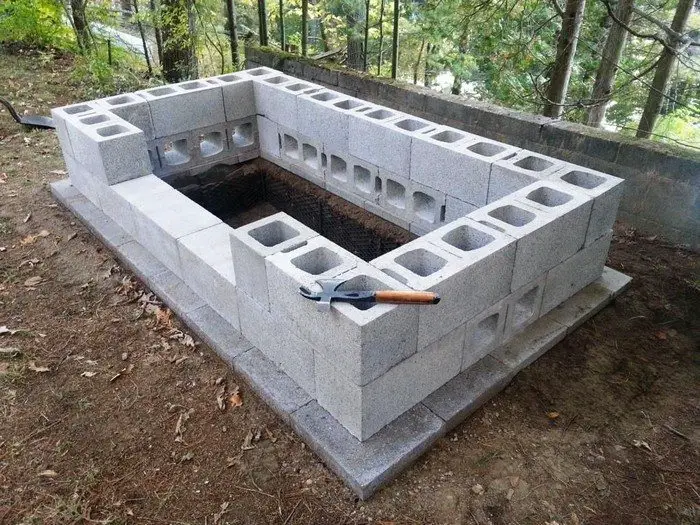
In some spots, we needed “half blocks” to complete a row. In other areas, we used “cap blocks” which have a finished surface over the holes (not solid top to bottom). They were almost the same cost and gave it a more polished look IMHO.
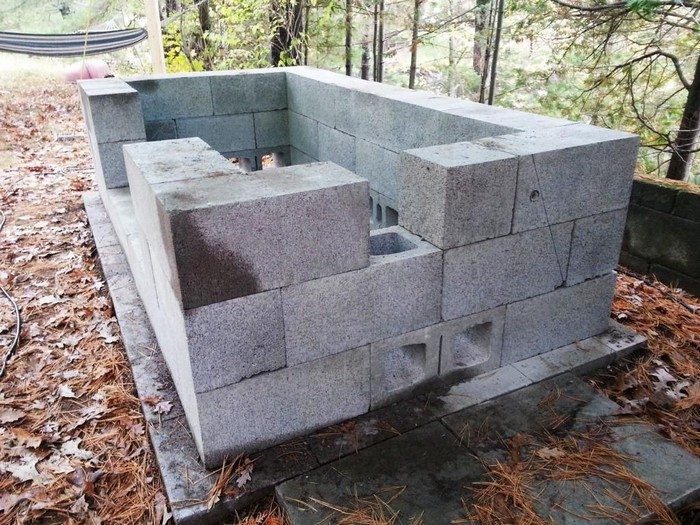
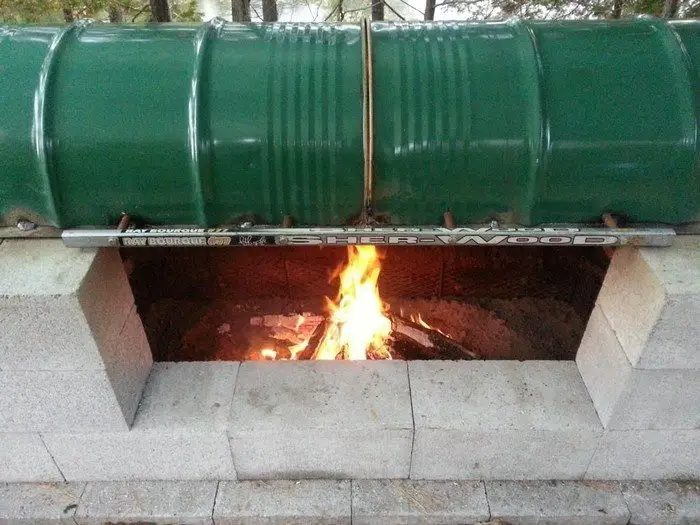
On top of the patio stones, we put down 3 rows of cinder blocks. On one end of the 3rd row, we judiciously placed a half block to leave a gap for the spit to come through. Using supports (next step) the spit should come out just above, but not touching, the 2nd row of blocks.
After putting 2″ of sand on the bottom of the pit we ended up with 25″ height from ground to spit. This seemed adequate and the amount of cooking heat can ultimately be controlled by the size of fire and opening of the lid.
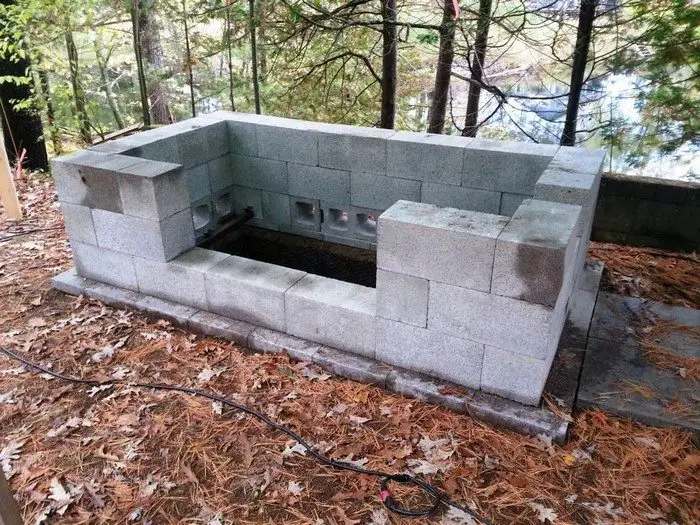
We also measured for a 1/2″ hole to be drilled in the top row of blocks on either end. This is used to mount the hinge brackets of our rotisserie pit BBQ on either side.
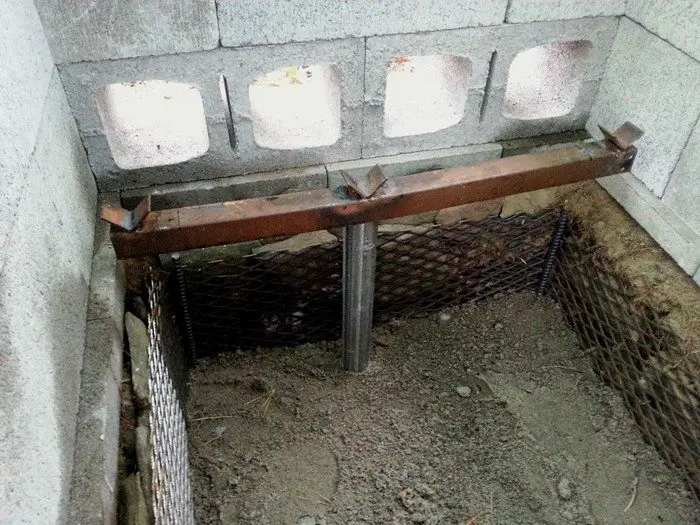
For the spit, we used an 8-foot black steel pipe with a few holes drilled along the length. A gear was welded to one end. To support it we used 1.5″ pipe and hammered it 24″ into the ground at both ends of the rotisserie pit BBQ. On the tops of these pipes, we welded horizontal arms at the desired height, and “v” brackets to hold the rotating pipe.
We could have simply supported a single rotisserie pipe but we wanted the option of adding other things later, such as a grill. For this, we welded horizontal steel arms to the support pipe, and more “v” brackets to support additional pipes.
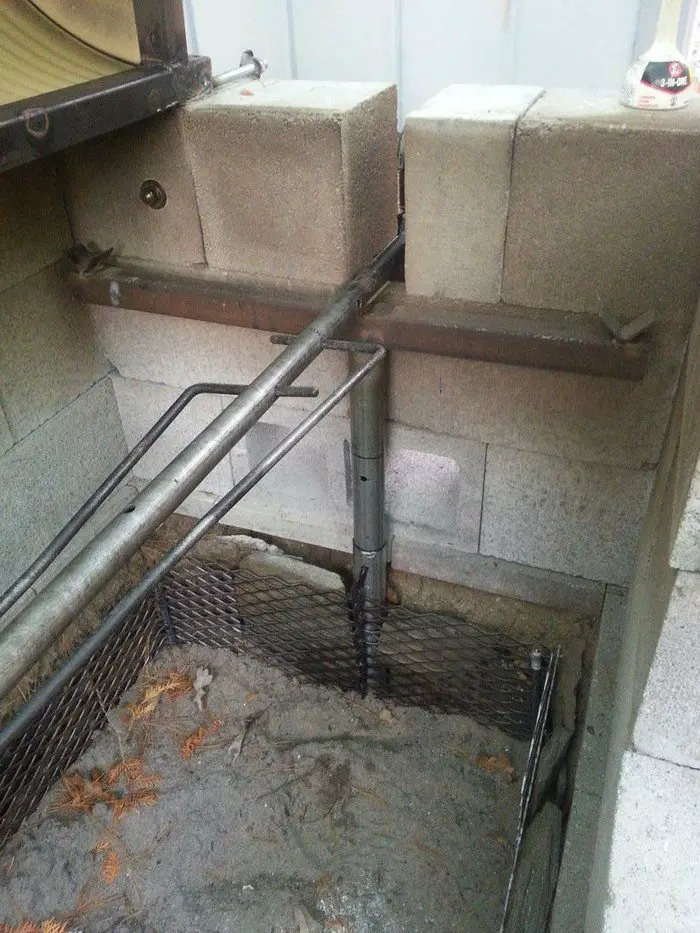
Note that we made the height-adjustable by sliding two sizes of pipe inside one another. This will allow the rotisserie pit BBQ grill to be lowered for traditional camp-fire cooking, or raised for warming pots and plates. We carefully drilled matching holes through the pipes so that a long pin or bolt can be inserted at various heights.
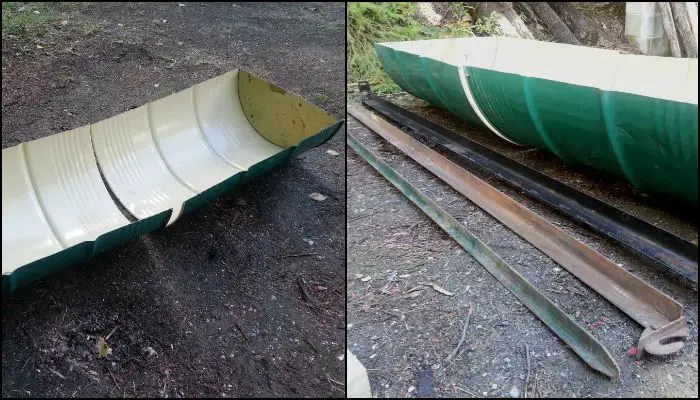
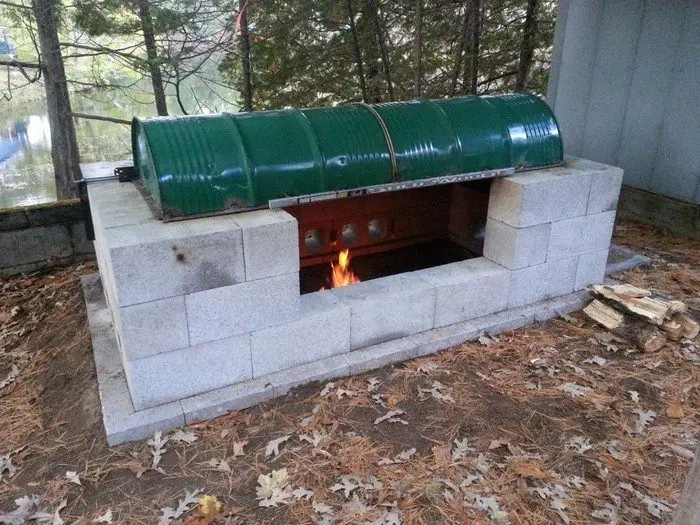
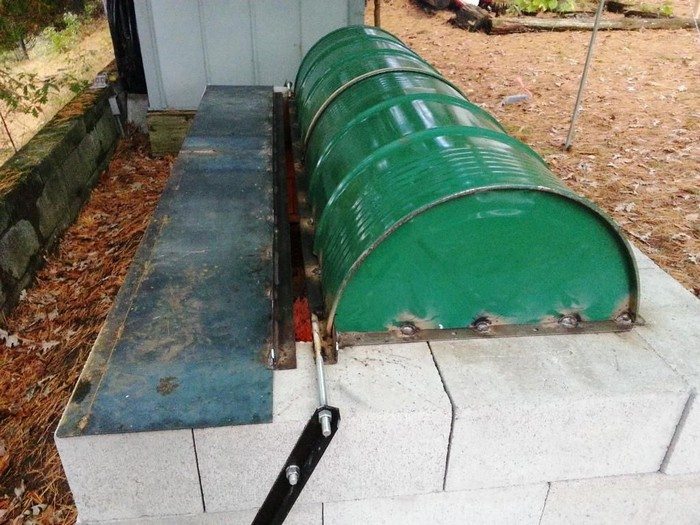
I don’t weld, but thank goodness for friends who do. (You’re the best Larry!) We used an old food-grade drum (cut in half length-wise) for our rotisserie pit BBQ, some scrounged bed-frame angle iron, and 1/2″ threaded rod to whip up this hinged lid.
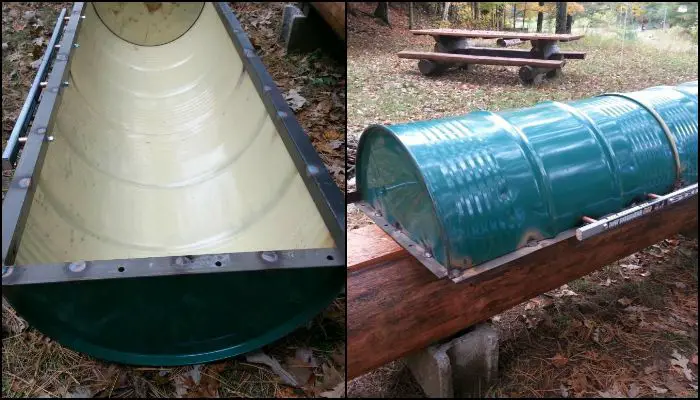
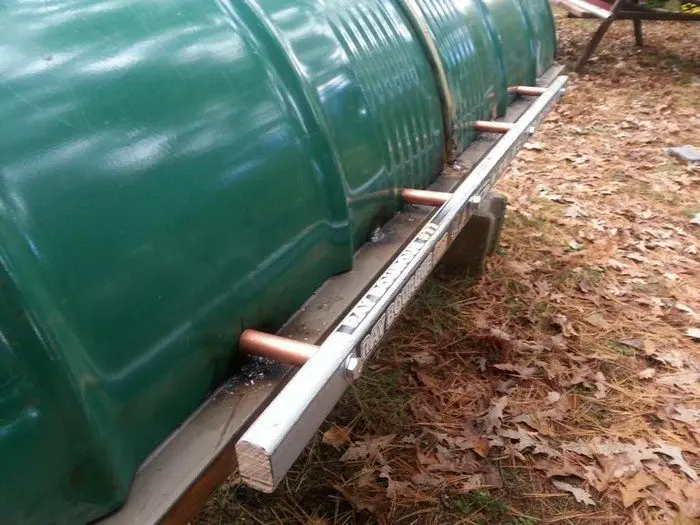
My advice would be to measure often here. We just barely managed to cover the length of the rotisserie pit BBQ opening, but it worked! With some patience, we made it square and then used a hockey-stick for a handle, spaced away from the rotisserie pit BBQ with 5″ bolts and copper pipe. A caution here because the handle can get a little toasty when there’s a roaring fire.
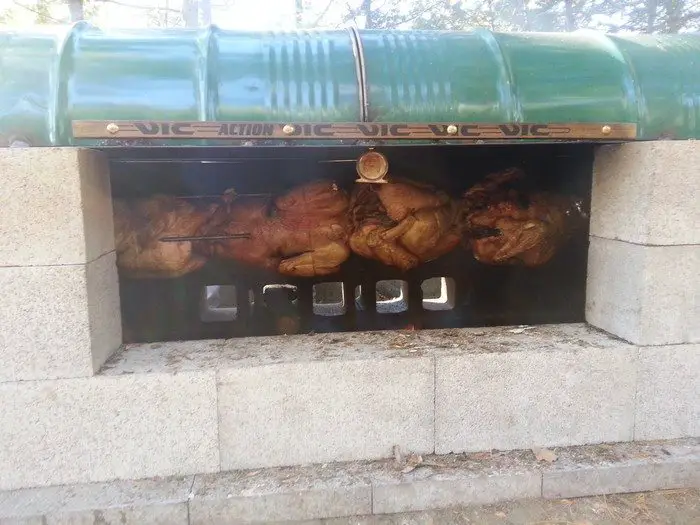
A ‘secret’ feature of this BBQ is the adjustable warming plate. The steel drum wasn’t wide enough front-to-back so we added a 12″ wide steel plate on the back.
This makes a great surface for keeping dishes & plates warm while dinner is cooking in our rotisserie pit BBQ. It can be moved to allow for more or less smoke to escape too.
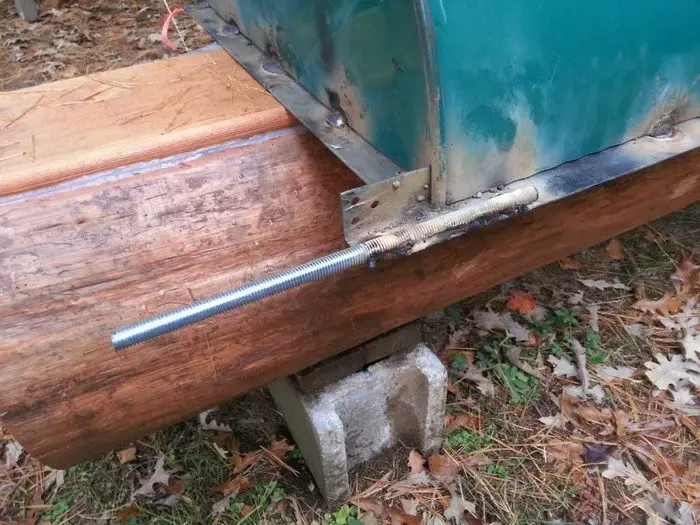
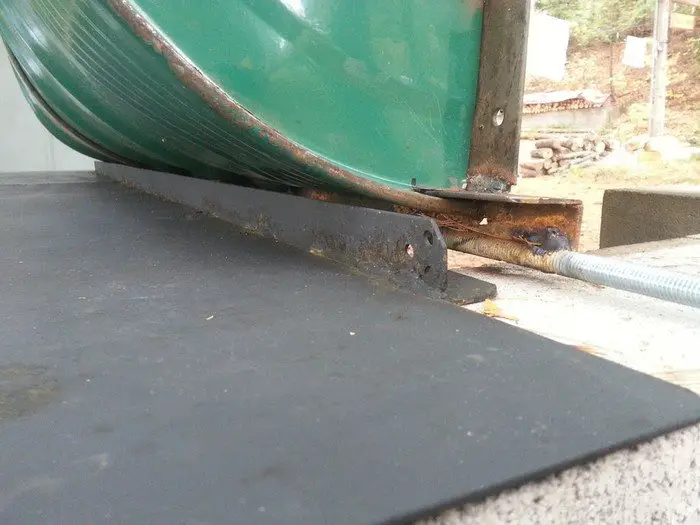
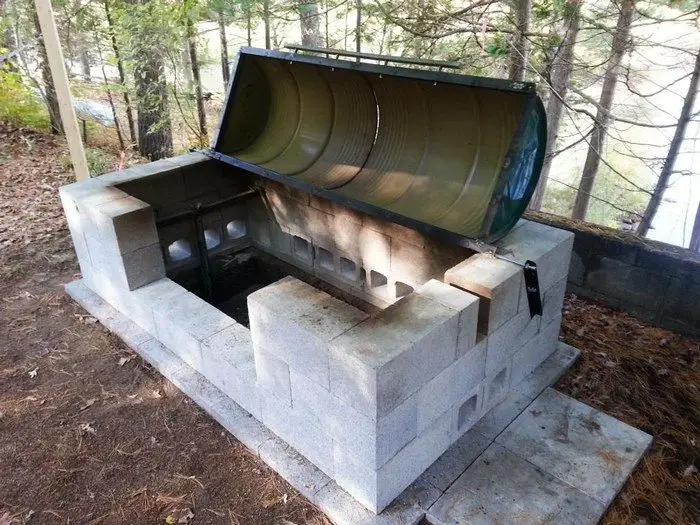
To make the lid of our rotisserie pit BBQ rotate we welded 12″ lengths of threaded rod to the back of the lid (on the angle iron bracing).
This is then fed into vertical hinge brackets on the side of the cinder blocks and secured with bolts, allowing for a fully open BBQ when needed.
It probably goes without saying that no one wants to BBQ with toxic vapors floating around. For that reason, we had a really good & hot fire in the rotisserie pit BBQ before using it for any kind of cooking. It burned off all the various finishes, though surprisingly, the exterior drum paint was hardly affected.
To protect the steel from rust I’ve been told to use “High-Heat” flat-black paint on the exterior surfaces. Other internal parts can be protected with repeated applications of Canola oil which has a higher smoke point than most other oils.
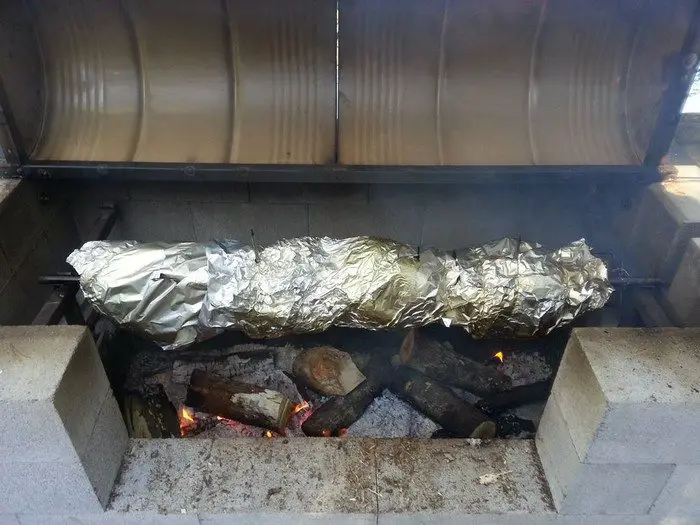
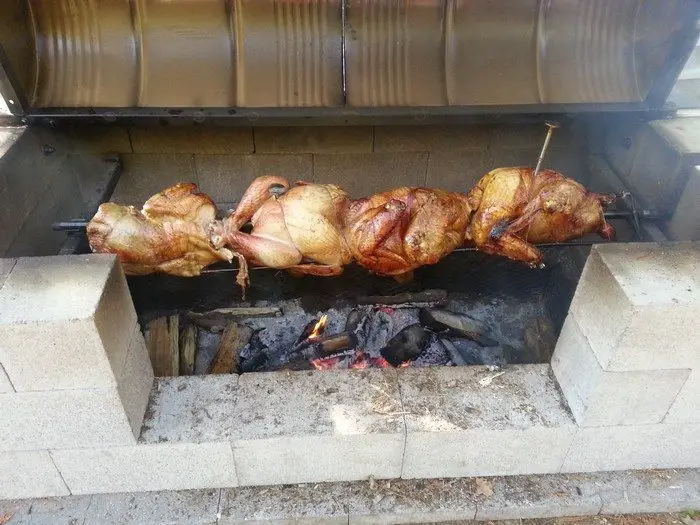
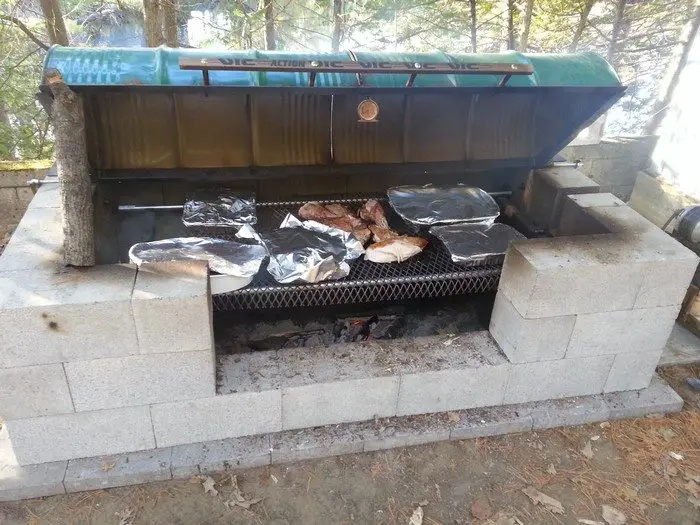
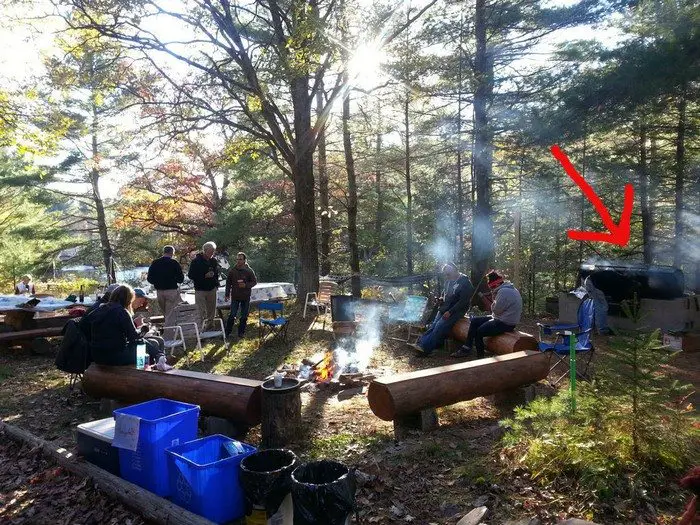
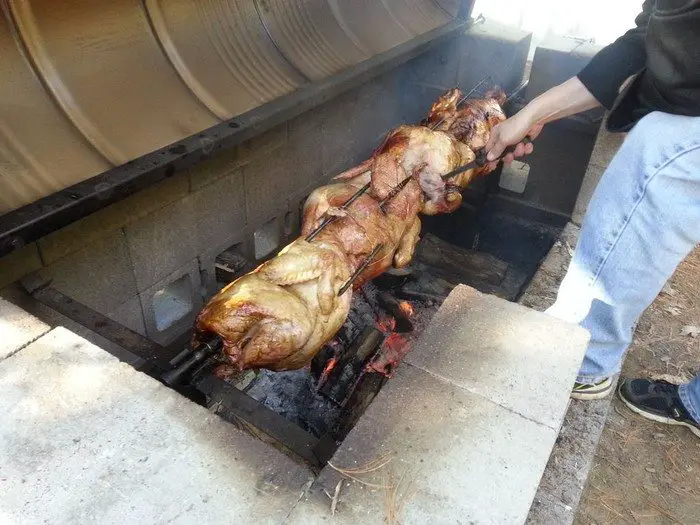
And here’s the finished product in use. We spear the turkeys length-wise and then use large steel ‘nails’ through holes in the spit to keep the meat from spinning freely. Wrap it all securely with stainless wire and foil, and even more, wire, to keep it a tight-knit bundle of goodness.
Our 20 lbs birds took about 6 hours of cooking, removing the foil near the end for an hour of browning. Note that we sometimes supplement the fire with charcoal briquettes for a quick and long-lasting heat source.

After the turkeys and rotisserie are removed two more pipes can be laid down on the support arms and a grill placed on top to keep food warm.
That’s how we did it… Now go try it yourself… Good luck!
Thanks to
Best Meats to Cook on a Pit BBQ (And How to Prep Them)
A pit BBQ brings out deep, smoky flavors you just can’t get from a stovetop or oven. The combination of wood-fired heat, open air, and slow-cooked tenderness makes it ideal for preparing flavorful cuts of meat. If you’re building or already enjoying your DIY rotisserie pit BBQ, choosing the right meats is the next step to creating unforgettable meals. Here’s a guide to some of the best meat choices for pit BBQ cooking and how to get them ready for the fire.
Whole Chicken
Whole chicken is a great starting point for beginners. It’s affordable, widely available, and forgiving when cooked low and slow. Spatchcocking the chicken, or removing the backbone, helps it cook evenly. Before placing it on the rotisserie or grill, brine the bird for at least 4 hours. Use a saltwater mixture with herbs and citrus to boost flavor and keep it juicy. Pat the skin dry, then coat with oil and your favorite rub to get that golden, crispy finish over the coals.
Turkey
A whole turkey is ideal for large gatherings and works beautifully on a rotisserie spit. Prep it much like a chicken but brine it longer—at least 12 hours, up to 24 if you have the time. A mixture of salt, sugar, garlic, and herbs in water will deeply season the meat. Make sure to truss the bird tightly with butcher’s twine or wrap in stainless steel wire if needed. Add foil during the first few hours to retain moisture, then remove it toward the end for a rich, brown skin.
Pork Shoulder
Pork shoulder, or Boston butt, is a classic BBQ cut that delivers tender, fall-apart meat after hours of slow roasting. It doesn’t need a rotisserie but works well on a grate above the coals or inside a foil pan placed inside the pit. For prep, dry rubs are the go-to. Coat the pork generously with a mix of salt, pepper, paprika, brown sugar, and garlic powder. Let it sit overnight in the fridge to deepen the flavor. Cook low and slow until the meat pulls apart easily.
Beef Brisket
Brisket takes patience, but the payoff is huge. It’s a tougher cut that benefits from slow cooking and smoke infusion. Before you cook it, trim the excess fat to about a quarter inch thick. Apply a coarse dry rub with salt, black pepper, and garlic. Some people like to add mustard or Worcestershire sauce first to help the rub stick. Let the brisket sit for several hours or overnight. During cooking, you can wrap it in butcher paper or foil once it hits the stall, usually around 160°F, to keep it moist.
Lamb Leg or Shoulder
Lamb adds a unique flavor to your BBQ spread. It pairs especially well with garlic, rosemary, lemon, and olive oil. A simple marinade with these ingredients works best. Let the lamb sit in the marinade for at least 4 hours. Whether bone-in or boneless, lamb cooks nicely on a spit or grill over indirect heat. Aim for medium-rare to medium for the best texture and flavor.
Sausages and Ribs
Sausages and pork ribs are perfect add-ons when you’re feeding a crowd. Sausages require little prep—just poke a few holes and brush lightly with oil. For ribs, remove the membrane from the back, season with dry rub, and let them rest for a few hours. Wrap them in foil during the first half of the cook to keep them tender, then finish unwrapped for a bit of char and texture.
Mastering pit BBQ is all about understanding how different meats respond to heat, smoke, and time. Start with quality cuts, prep them right, and let your pit do the magic.
DIY Fire Pit BBQ vs. Store-Bought Models: Pros and Cons
Building a fire pit BBQ can be one of the most rewarding backyard projects. It gives you full control over the size, features, and materials. But store-bought models offer convenience and modern design that some DIY builds can’t match. If you’re torn between rolling up your sleeves or heading to the hardware store, here’s a breakdown of the pros and cons of both options.
DIY Fire Pit BBQ: Pros
The biggest advantage of a DIY pit BBQ is customization. You can design it to suit your cooking style, yard size, and personal taste. Want a built-in rotisserie? Prefer a wider base for whole hog roasting? You decide. It’s also usually more cost-effective. Materials like cinder blocks, rebar, and patio stones are relatively affordable. You can even upcycle materials like old metal drums or bed frames to save more.
A well-built DIY pit BBQ often has better heat retention because of the mass and layout of the blocks. You can tailor the shape for wind control and airflow. Another benefit is portability. If you don’t use mortar, you can disassemble and move the setup if needed.
DIY Fire Pit BBQ: Cons
The downside is the labor. You’ll need to plan, level the ground, haul heavy materials, and possibly recruit a welder for metalwork. Mistakes in construction—like poor ventilation or uneven surfaces—can affect cooking performance. You also won’t have built-in features like side tables, adjustable grates, or ash drawers unless you design and add them yourself.
Maintenance can be more hands-on. While you can replace individual blocks, there’s no warranty if something goes wrong. And if you’re new to this kind of project, the learning curve can be steep.
Store-Bought BBQ Models: Pros
Store-bought BBQs offer convenience. They’re designed for easy setup and often include adjustable grates, ash collectors, lids with thermometers, and even side burners. Some come with rotisserie kits or are compatible with attachments sold separately. These units are usually made from stainless steel or cast iron, which helps with durability and ease of cleaning.
Portability is another plus. Many models have wheels and are light enough to move around your patio. There’s also customer support and warranties. If something breaks, you’re covered—or at least you can find a replacement part.
Store-Bought BBQ Models: Cons
You’re limited by what the manufacturer offers. If you want something outside the standard size or design, you may need to modify it yourself or look for a high-end model that can get expensive quickly. Store-bought grills can also wear out over time, especially cheaper ones that use thinner metals or lower-grade materials. Rust and warped parts are common after a few years of heavy use.
In terms of cooking space, even the larger store-bought models may not match the sheer surface area of a custom pit BBQ. If you’re cooking for a large group or planning to roast whole animals, most retail units won’t cut it.
DIY fire pit BBQs give you control, scale, and long-term durability if you’re willing to put in the work. Store-bought models are ready to go and feature-rich but can be limited in capacity and lifespan. It all comes down to how much you’re willing to invest—either in time and labor or in upfront cost for convenience.
Conclusion
Making your own pit BBQ is a rewarding project that transforms your backyard into a serious cooking space. It gives you control over size, features, and function. With the right materials and preparation, you’ll enjoy rich, smoky flavors and unforgettable meals for years to come.
We have more amazing cooking fixture projects. Check out our gas powered pizza dome project!