There’s no better time to get ready for summer living. You can maximize your outdoor lounge time by transforming your backyard space into a relaxing retreat.
But before you start, you need to find the perfect seating to match your style and your space. So, get ready to rock those lazy summer days with the ideal backyard escape!

There’s nothing like being able to inhale the crisp, fresh air of the outdoors. It’s relaxing and rejuvenating, really. For me, lazy days mean time spent on the porch with a good book in hand. Other times, it’s where we entertain family and friends.

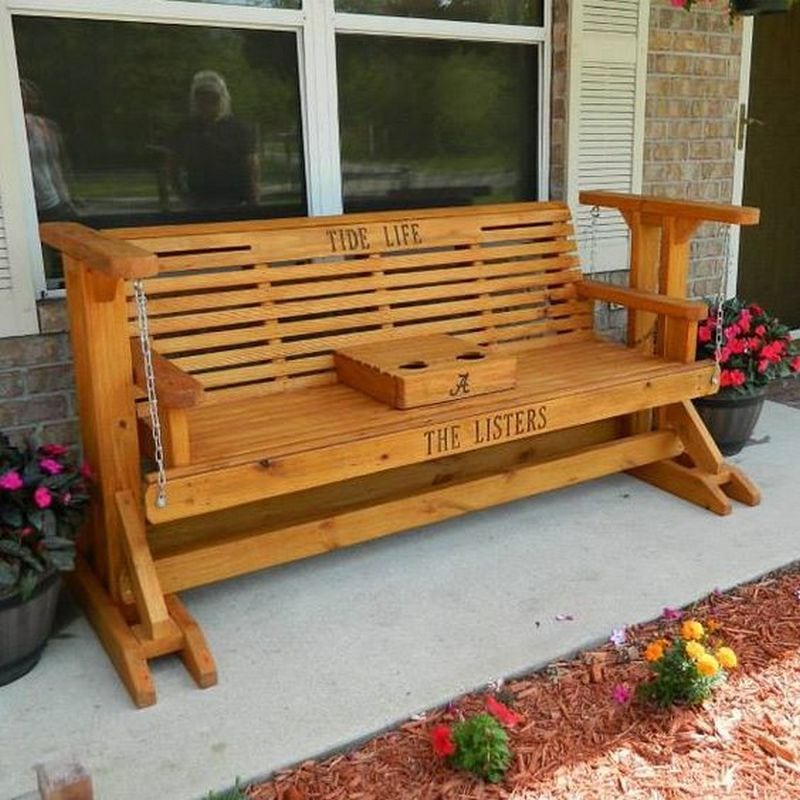
One of the most common seating options nowadays is a glider. Unlike a rocking chair that moves up and down, a glider moves you back and front. Its base is fixed on the ground and not suspended or hung like those in swings.
This unique design provides a stable and soothing experience, allowing you to enjoy a moment of relaxation or engage in pleasant conversation. Whether placed on a porch or in a garden, a glider adds an element of charm and tranquillity to any outdoor space.
If you have decent woodworking skills, you can build this DIY glider swing by yourself. It won’t take you long to finish, probably a day or two. Additionally, it’s not that expensive, too. Just make sure you choose high-quality materials to ensure longevity.
Contents
How to Make a DIY Glider Swing for Your Porch
Follow this easy-peasy guide and let your woodworking skills take flight. You’ll be swinging in no time and turning your porch into the ultimate chill-out zone.
Materials
- 4 pc – 2×4 lumber – 32 1/4″ long (legs)
- 2 pcs – 2×4 lumber – 22 1/4″ long, 2 pieces – 30 1/4″ long (frame)
- 4 pcs – 2×4 – 14 1/4″ long, 2 pieces – 5 3/4″ long (braces)
- 2 pcs – 2×4 lumber – 70″ long (supports)
- 6 pcs – 2×4 lumber – 8′
- 100 pcs – 2 ½” screws
Tools
- Hammer
- Tape measure
- Framing square
- Level
- Miter saw
- Drill
- Screwdriver
- Sander
- Post hole digger
- Concrete mixer
- Safety gloves
- Safety glasses
Click on any image to start lightbox display. Use your Esc key to close the lightbox.


Steps
Step 1: Prepare the Materials
- Measure and cut the 2×4 lumber pieces according to the dimensions given.
- Use the miter saw for precise cuts.
- Sand all cut pieces to smooth out rough edges.
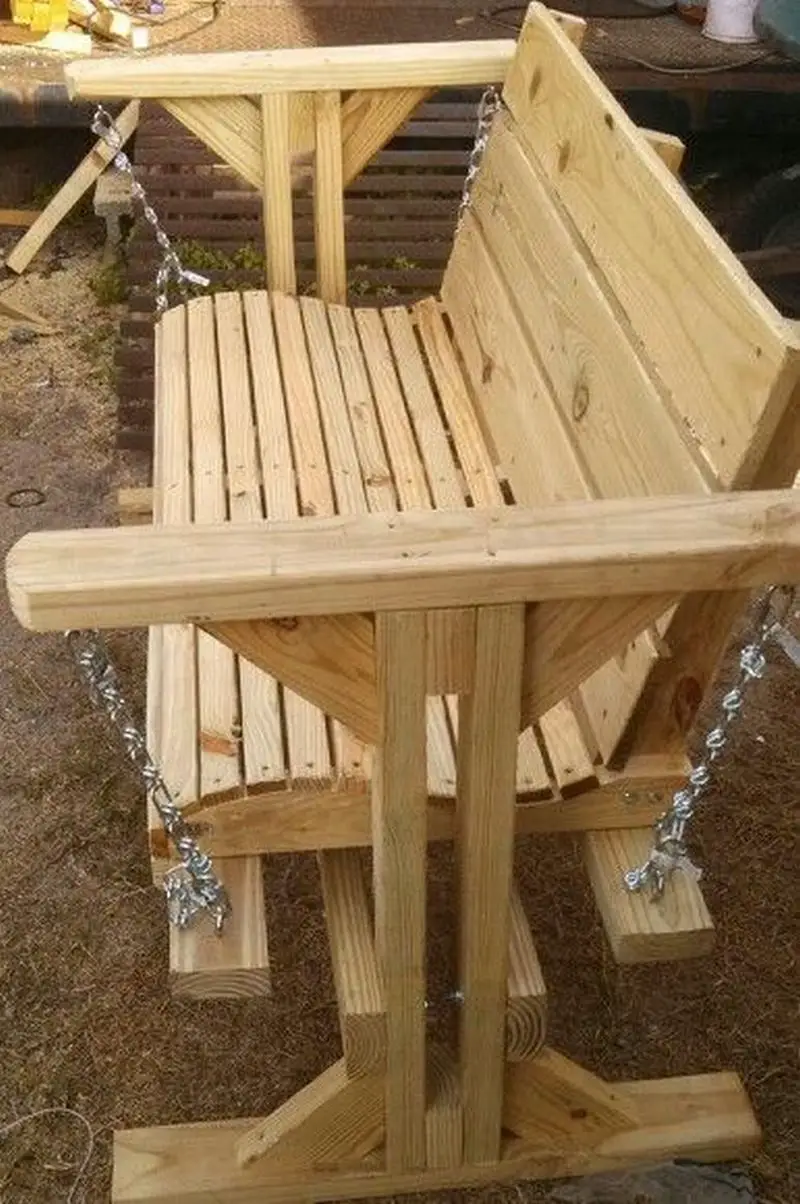
Step 2: Build the Frame
- Lay out the 22 1/4″ and 30 1/4″ pieces to form a rectangle (the base frame of the swing).
- Use the framing square to ensure the corners are right angles.
- Drill pilot holes and use screws to join the frame pieces together.
Step 3: Attach the Legs
- Stand the 32 1/4″ pieces (legs) upright and attach them to the corners of the frame.
- Ensure each leg is level and square to the frame.
- Secure the legs with screws.
Step 4: Add Supports and Braces
- Place the 70″ long supports horizontally between the legs for additional stability.
- Attach the 14 1/4″ and 5 3/4″ braces between the legs and supports for extra reinforcement.
- Check for level and adjust as necessary before securing with screws.
Step 5: Prepare for Installation
- Dig post holes for the swing using the post hole digger.
- Mix concrete in the concrete mixer and pour it into the holes.
- Ensure the posts are upright and level, then let the concrete set.
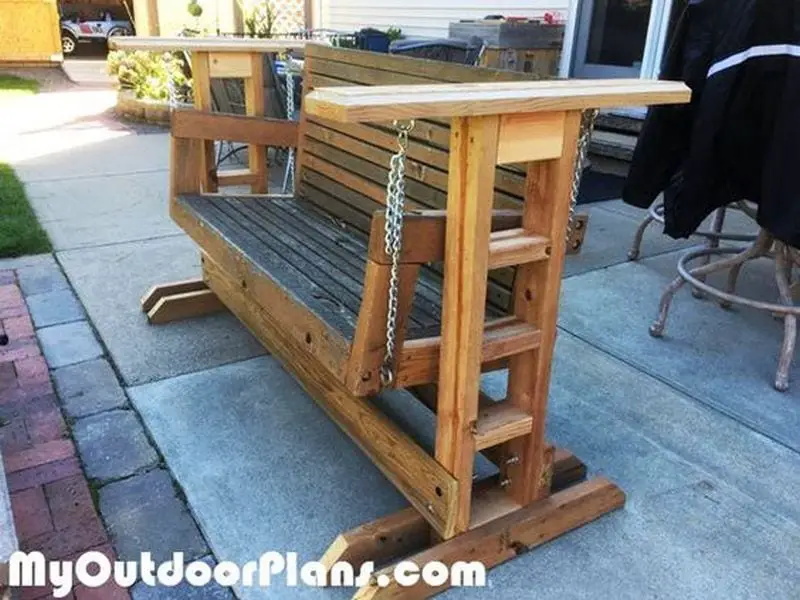
Step 6: Final Assembly
- Once the concrete is set, attach the frame to the posts securely.
- Double-check all screws and joints, tightening where necessary.
- Perform a final sanding to ensure all surfaces are smooth.
Step 7: Safety Check and Finishing Touches
- Inspect the swing thoroughly to ensure it’s stable and secure.
- Add any desired finish, like paint or sealant, to protect the wood.
- Install cushions or decorations as desired.
Step 8: Enjoy Your Glider Swing
- Test the swing gently to ensure it’s functioning properly.
- Sit back and enjoy your new outdoor feature.
Additional Tips
In addition to the steps outlined in the instructions, here are some additional tips to consider when building your DIY glider swing for your porch:
1. Choose the right materials
Make sure to choose only weather-resistant materials that can withstand outdoor conditions. Opt for sturdy wood or metal that can provide the necessary support and durability for your swing.
Get ready to soar high with your very own DIY glider swing that’s built to last! Don’t settle for anything less than top-notch quality that will keep you flying high for years to come.
2. Prioritize safety
Ensure that your glider swing is structurally sound and secure. Prevent any potential accidents or mishaps during use. Check all connections and fasteners to keep them snug and secure.
If you want to improve the stability of your swing, you might think about adding reinforcement or braces to provide extra support.
3. Apply a protective finish
Consider putting a protective coating on your glider swing to protect it from the elements and extend its lifespan. This could take the shape of a varnish, paint, or stain made expressly for outdoor use.
Applying a protective finish to your swing not only improves its appearance but also protects it from potential damage due to sunshine, dampness, and other environmental variables. The correct finish will offer an extra layer of protection, preventing fading, cracking, and warping of the wood.
4. Add cushions and pillows
To enhance comfort, consider adding cushions and pillows to your glider swing. Choose weather-resistant and easy-to-clean materials that provide both support and coziness.
You can choose from a variety of colours, patterns, and textures to match your personal style and complement the overall aesthetic of your porch. Whether you prefer vibrant hues that add a pop of colour or subtle tones that create a serene ambience, the right choice of cushions and pillows will contribute to the overall comfort and inviting atmosphere of your glider swing.
5. Regular maintenance
Maintain the condition of your glider swing by inspecting it on a regular basis for signs of damage. Clean them often to prevent dirt and debris buildup.
Avoid the collection of dirt, dust, and debris. Gently remove any filth or grime that has developed over time with a mild cleanser and a soft cloth. Cleaning your glider swing regularly will keep it looking good and help avoid future damage and extend its longevity.
By following these extra tips, you can make sure that your DIY glider swing looks nice and provides a secure and comfortable seating experience for you and your loved ones on your porch.
Design Variations for Glider Swings
A glider swing is a fantastic addition to any outdoor space. It combines comfort with a touch of elegance. Whether you’re looking to add a new feature to your porch or garden, understanding the various design options available can help you choose the perfect glider swing.
Traditional Design
Traditional glider swings often feature classic wood construction. They might have intricate woodwork, like carved details or a slatted backrest. These designs blend well with classic or rustic outdoor settings. When choosing a traditional glider swing, look for durable woods like teak or cedar.
Modern Style
Modern glider swings are all about sleek lines and minimalistic design. They often use metals or synthetic materials for durability and ease of maintenance. The color palette is usually neutral, with occasional bright accents. A modern glider swing is perfect for contemporary outdoor spaces.
Rustic Charm
Rustic glider swings bring a cozy, country feel to your space. Made typically from natural woods, they might have a rugged or distressed finish. These swings often feature natural colors and textures, making them ideal for garden settings or homes with a country aesthetic.
Customizable Designs
Customizable glider swings allow you to add personal touches. You can choose the material, color, and additional features like cup holders or built-in side tables. Custom designs offer the opportunity to match the swing with your existing outdoor décor seamlessly.
Kid-Friendly Options
For families, kid-friendly glider swings are a great choice. These swings are designed with safety and durability in mind. They feature rounded edges, secure seating, and often come in bright, playful colors.
Eco-Friendly Choices
Eco-friendly glider swings are made from sustainable materials. Recycled plastics, repurposed wood, or eco-friendly paints and finishes are common choices. These swings are ideal for those looking to reduce their environmental impact.
When choosing a glider swing, consider the overall style of your outdoor space. Whether you prefer a traditional, modern, rustic, or customized design, there’s a glider swing to suit your taste and enhance your outdoor living experience.
Weatherproofing Your Glider Swing
A glider swing is a delightful addition to any outdoor space, but it’s important to protect it from the elements. Proper weatherproofing ensures your glider swing remains beautiful and functional for years. Here are key strategies to weatherproof your glider swing.
Choose Weather-Resistant Materials
When selecting materials for your glider swing, it’s crucial to opt for those that can endure various weather conditions. This choice is key in ensuring the longevity and appearance of your swing.
- Hardwoods for Durability
Hardwoods like teak or cedar are excellent choices for glider swings. These woods are known for their natural resistance to rot and insects, making them ideal for outdoor use. Teak, in particular, contains oils that repel water, reducing the risk of moisture damage. Cedar, on the other hand, is lightweight yet strong and has a natural aroma that deters pests.
- Metal Options
For those preferring metal glider swings, stainless steel and aluminum are top choices. Stainless steel is highly durable and maintains its appearance over time, even in humid or coastal environments. Aluminum, being lightweight and corrosion-resistant, is perfect for easy movement and maintenance. Both metals offer a modern look and can be powder-coated for added color and protection.
- Synthetic Materials
Synthetic materials like polyethylene are becoming increasingly popular for glider swings. They offer excellent resistance to moisture, sun damage, and temperature fluctuations. These materials are also easy to clean and maintain, making them a practical choice for busy homeowners.
Apply Protective Finishes
Wooden glider swings greatly benefit from the application of protective finishes. These finishes act as a barrier against environmental factors, preserving the beauty and integrity of the wood.
- Exterior-Grade Varnish
Applying an exterior-grade varnish is one of the best ways to protect your wooden glider swing. Varnish not only enhances the wood’s natural beauty but also provides a durable layer against moisture and UV rays. It’s important to choose a varnish that’s specifically designed for outdoor use to ensure maximum protection.
- Sealants and Waterproof Paint
Sealants offer an additional layer of protection, penetrating the wood to provide a barrier against moisture. Waterproof paint is another option, especially if you’re looking to add a pop of color to your swing. These paints are formulated to withstand the outdoor elements while giving your glider swing a fresh, new look.
- Maintenance of Protective Coatings
To maintain the effectiveness of these protective finishes, they should be reapplied every few years. Regular inspection and touch-ups can help prevent long-term damage and keep your glider swing in top condition.
Use Water-Repellent Cushions
Comfort is key when it comes to enjoying your glider swing, and choosing the right cushions is a crucial part of this.
- Outdoor-Grade Fabrics
Ensure your cushions are made with water-repellent fabric designed for outdoor use. These fabrics are engineered to resist moisture, preventing the growth of mold and mildew. They also tend to be more durable, resisting fading and wear from sunlight and weather exposure.
- Quick-Dry Foam
The interior foam of your cushions is just as important. Opt for quick-dry foam, which allows water to drain quickly and prevents moisture accumulation inside the cushion. This type of foam helps the cushions dry faster after rain, making your glider swing ready to use sooner.
- Removable Covers
Consider cushions with removable covers. They make cleaning easier and allow for quick changes if you want to refresh the look of your glider swing. Removable covers can also be stored away during extreme weather conditions, like heavy rain or snow, to extend their lifespan.
Regular Cleaning and Inspection
Maintaining the condition of your glider swing is essential for its longevity and appearance.
- Cleaning Routine
Regular cleaning is crucial to prevent the buildup of dirt and grime. Use mild soap and water for cleaning and avoid harsh chemicals that can damage the finish. For wooden swings, a soft brush can help remove dirt from crevices. For metal swings, check for any signs of rust or corrosion, especially in joints and crevices.
- Inspection for Wear and Damage
Periodically inspect your swing, focusing on areas that are prone to wear or damage. Check the joints and hardware of your swing, tightening any loose screws or bolts. Look for signs of wear in the material, such as cracks in wood or rust on metal. Also, check the stability of the swing to ensure it remains safe to use.
- Addressing Damage Promptly
If you notice any damage, address it promptly to prevent further deterioration. Small repairs, like tightening loose parts or sanding and reapplying finish to a small area, can often be done quickly and can prevent the need for more significant repairs later.
Cover When Not in Use
Protecting your glider swing when it’s not in use is crucial for maintaining its condition and extending its lifespan.
- Weatherproof Covers
Invest in a high-quality weatherproof cover for your glider swing. The ideal cover should be waterproof to protect against rain and moisture. It should also be UV-resistant to prevent damage from the sun’s rays, which can fade and weaken materials over time.
- Snug Fit and Ventilation
Make sure the cover fits your glider swing snugly. A loose cover can lead to water pooling, which might seep into any exposed areas of the swing. At the same time, the cover should allow for adequate air circulation to prevent condensation and the growth of mold and mildew. Some covers come with vents or breathable fabric, which are excellent features to look for.
Store During Extreme Weather
In areas prone to severe weather conditions, additional steps are needed to protect your glider swing.
- Indoor Storage
If you live in a region with harsh winters, consider moving your glider swing indoors during the cold months. This protects it from the damaging effects of snow, ice, and extreme cold, which can cause materials to crack or become brittle. Indoor storage in a garage, shed, or basement is ideal.
- Alternative Protective Measures
When indoor storage isn’t an option, use a sturdy, high-quality cover and position your glider swing in a protected area. Placing it under a porch or in a sheltered part of your garden can provide additional protection from wind, heavy rain, or snow. Ensure the swing is anchored securely to prevent it from being moved or tipped over by strong winds.
With these weatherproofing tips, you can enjoy your glider swing throughout the seasons. Regular maintenance and the right protective measures will keep your swing looking great and functioning well for years to come.
Take a Seat and Unwind!
Enhance the vibe on your porch with a DIY glider swing! This artful addition combines beauty and functionality, allowing you to relax and enjoy the outdoors in style.
By following the comprehensive instructions provided by My Outdoor Plans and incorporating valuable tips, you can embark on this creative endeavor with confidence. With meticulous craftsmanship and the use of high-quality materials, your glider swing will not only serve as a captivating centerpiece but also offer a luxurious and comfortable seating experience.
The choice of cushioning and upholstery will further enhance the comfort, allowing you to relax and unwind in style. Whether you’re enjoying a quiet afternoon alone or hosting gatherings with friends and family, your glider swing will provide a cozy and inviting seating option.
Let your artistic skills shine, and create this beautiful addition to your porch. We also have other unique wooden porch swing projects you can sink your teeth into.


