My husband has a collection of projector slides from way, way back. He has boxes and boxes of them – mementos from his grandfather who used to dabble in photography. I mentioned this DIY project that I saw on the Internet using projector slides. When I asked if I could use some slides from his collection, he readily agreed. After all, I wasn’t going to damage them… I was going to put them on display!

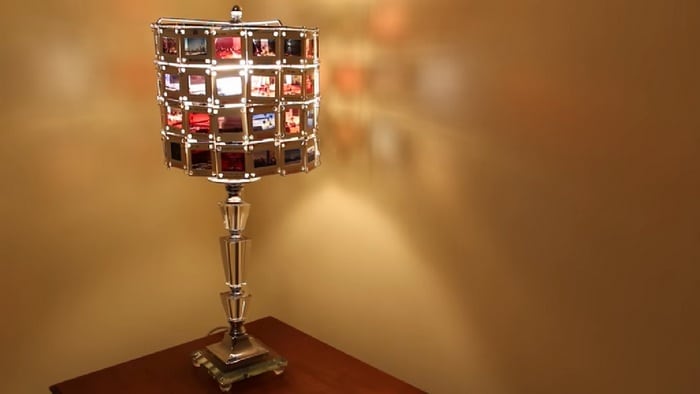
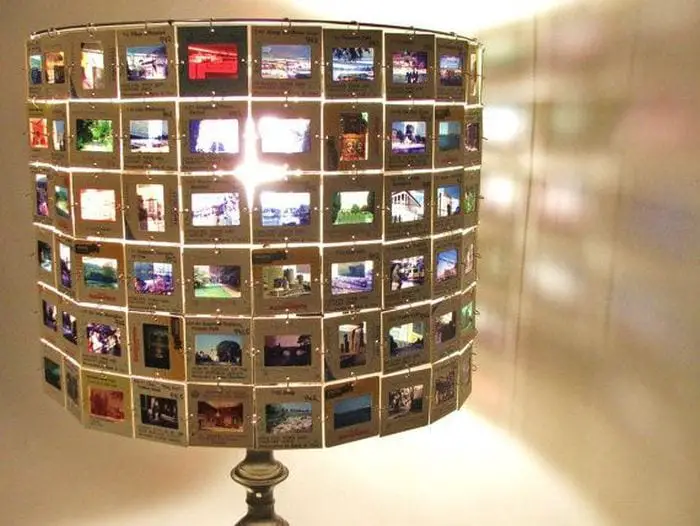
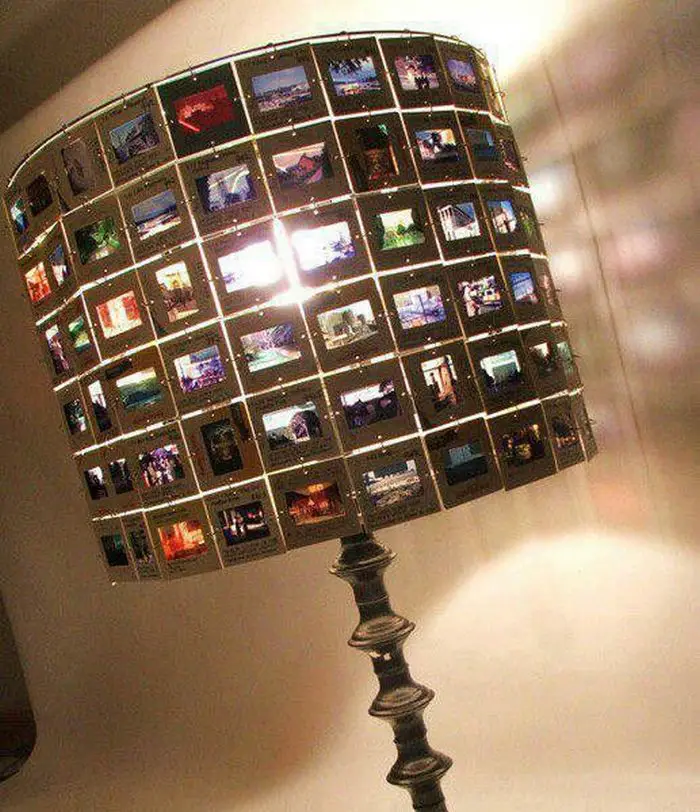
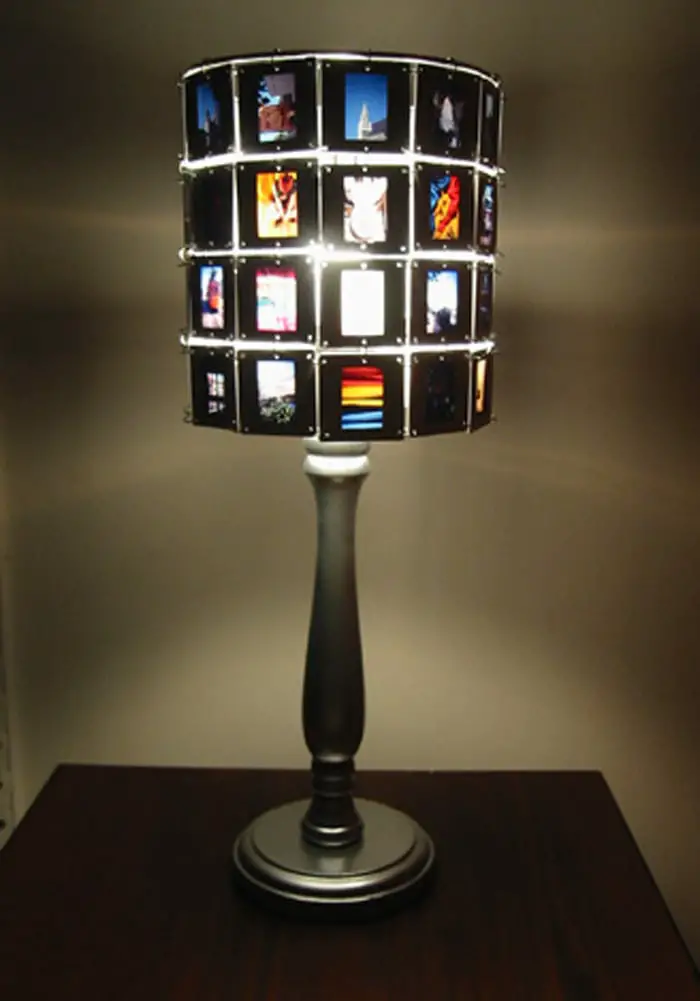
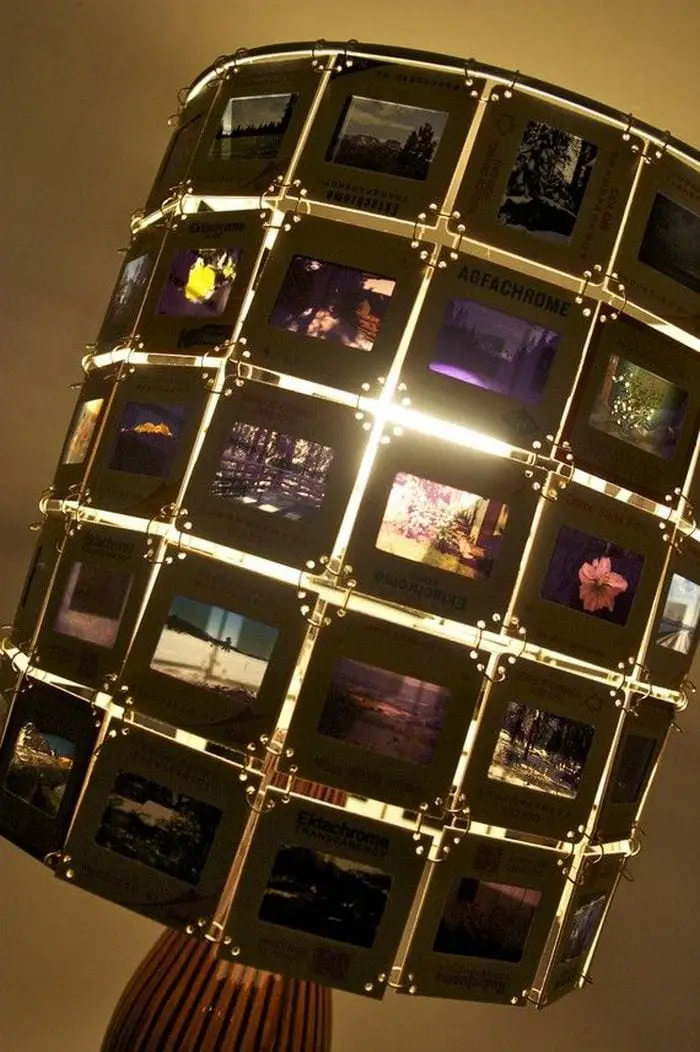
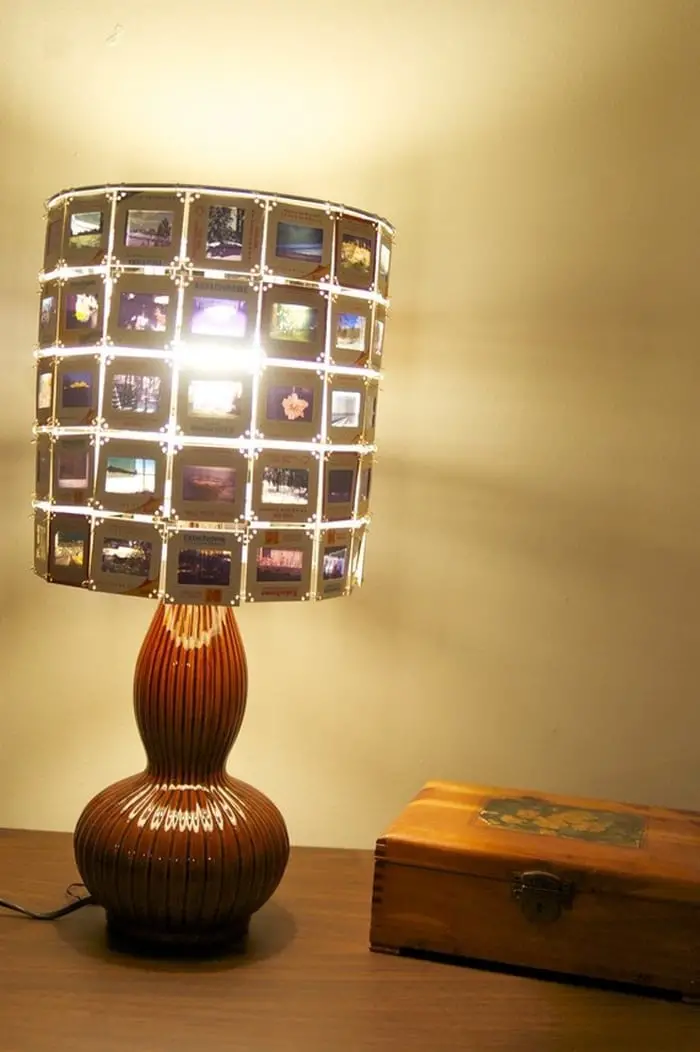
This is a DIY project that involves turning old projector slides into a photo lamp lampshade. I was really amazed by the finished product! With the light from the inside, you can actually see the images from the slides. They also cast off different silhouettes; various colors bouncing off the walls. The effect is mesmerizing.
This is a really great project to preserve old photos on projector slides. You can put it on display in your living room. Or better yet, make a pair for you and your partner’s bedside table. You can also give a lamp as a personalized gift. This is something the recipient will truly appreciate.
No need to get your hands dirty. This DIY photo slide lampshade is a fun and easy project!
Contents
How to Make a Photo Slide Lampshade
Materials:
- Projector slides (preferably with a paper border)
- Jewelry rings
- An old lampshade (or 4 wire hangers, dikes, tape)
- A lamp
Tools:
- Small leather punch (or a drill)
- Two-needle nose pliers
Click on any image to start the lightbox display. Use your Esc key to close the lightbox.


Watch this video for step-by-step instructions…
Creating a stunning DIY photo slide lampshade can be a rewarding and creative project that adds a personalized touch to your home decor. With just a few simple materials, you can transform ordinary photo slides into a unique and eye-catching lampshade.
Here are some pro tips to help you make the most of your photo slide lampshade project:
1. Selecting the Right Photos
Choose photos that hold special significance or evoke fond memories. Consider using a theme, such as family vacations, weddings, or favourite landscapes, to create a cohesive look. Black and white photos can add timeless elegance, while colour photos can bring vibrancy and energy to the photo slide lampshade.
2. Preparing the Photo Slides
Before starting your project, ensure that your photo slides are clean and free of dust or debris. Remove any dirt if needed, and gently wipe them with a soft cloth. Consider arranging the slides in a specific order or pattern to create visual interest and tell a story with your photo slide lampshade.
3. Creating a Template
To ensure that your photo slides are evenly spaced and aligned, create a template to guide your placement. You can use a piece of cardboard or paper as a base and mark out the positions for each slide. This will help you achieve a professional-looking finish and avoid any uneven gaps or overlaps.
4. Securing the Photo Slides
Use a strong adhesive, such as double-sided tape or glue dots, to attach the photo slides to the lampshade frame. Be sure to apply the adhesive evenly and press the slides firmly into place to prevent them from shifting or coming loose over time. Consider overlapping the edges slightly for a seamless look.
5. Experiment with Lighting
The type of lighting you use can dramatically affect the appearance of your photo slide lampshade. Consider using a warm, soft light bulb to create a cozy ambience, or opt for a bright, white bulb for a more modern and contemporary feel. You can also experiment with coloured bulbs to add a playful pop of colour to your lampshade.
6. Adding Personal Touches
Get creative and add personal touches to your photo slide lampshade to make it truly one-of-a-kind. You can incorporate decorative elements such as ribbons, beads, or fabric trim to embellish the edges of the lampshade. Consider adding a small tag or label with a special message or date to commemorate the photos.
7. Sealing and Protecting the Photos
Once you have arranged all of your photo slides on the lampshade frame, consider sealing them with a clear adhesive or sealant to protect them from dust, moisture, and fading over time. This will help preserve the integrity of your photos and ensure that your lampshade remains looking its best for years to come.
8. Displaying Your Lampshade
Once your photo slide lampshade is complete, find the perfect spot to display it in your home. Consider placing it in a living room, bedroom, or home office where it can be admired and enjoyed by family and guests. You can also experiment with different heights and angles to find the best lighting and visual impact.
By following these pro tips, you can create a stunning DIY photo slide lampshade that adds warmth, personality, and style to your home decor. Whether you’re a seasoned crafter or new to DIY projects, this creative endeavour will be a fun and rewarding experience. So gather your materials, unleash your creativity, and get ready to illuminate your home with memories captured in photos.
Essential Safety Precautions
Creating a DIY photo slide lampshade can be an enjoyable and rewarding project, but it’s important to prioritize safety throughout the process. Here are some essential safety precautions to keep in mind:
1. Selecting Suitable Materials
Choose materials that are safe to work with and suitable for the intended purpose. Opt for lampshade frames made of sturdy and non-toxic materials. Ensure that any adhesives or sealants used in the project are non-toxic and suitable for indoor use.
2. Read Instructions Carefully
Before starting the project, carefully read and understand all instructions provided with the materials and tools you’ll be using. Pay attention to any safety warnings or precautions mentioned by the manufacturer.
3. Work in a Well-Ventilated Area
Adequate ventilation is crucial when working with adhesives, sealants, or any materials that emit fumes. Work in a well-ventilated area, such as a workshop with windows or doors open, to minimize exposure to potentially harmful fumes.
4. Protective Gear
Wear appropriate protective gear, such as safety goggles and gloves, when handling sharp objects or working with adhesives and sealants. Safety goggles will protect your eyes from flying debris, while gloves will prevent skin irritation or contact with harmful chemicals.
5. Handle Sharp Objects with Care
Exercise caution when handling scissors, craft knives, or any other sharp objects. Always cut away from your body and keep your fingers away from the cutting edge to avoid accidental cuts or injuries.
6. Mindful of Electrical Components
If your project involves electrical components, such as light fixtures or wiring, ensure that you have a basic understanding of electrical safety. Avoid working on electrical components while they are plugged in, and always disconnect the power source before making any adjustments or repairs.
7. Proper Disposal of Waste Materials
Dispose of waste materials, such as excess adhesive or discarded photo slides, properly and responsibly. Avoid leaving sharp objects or hazardous materials lying around where they could pose a risk of injury to yourself or others.
8. Supervise Children and Pets
Keep children and pets away from your work area while you’re working on the project. Sharp objects, small parts, and potentially hazardous materials could pose a safety risk if mishandled or ingested.
9. Avoid Overloading Electrical Outlets
If you’re using multiple electrical devices or tools in your work area, be mindful of not overloading electrical outlets. Use power strips with built-in surge protection if necessary, and avoid running extension cords under rugs or carpets where they could become damaged.
10. Store Materials Safely
Store all materials, tools, and equipment in a safe and organized manner when not in use. Keep sharp objects out of reach of children and pets, and store hazardous materials in a secure location away from heat sources or open flames.
11. Take Breaks and Stay Hydrated
DIY projects can be physically demanding, so remember to take regular breaks and stay hydrated. Avoid overexerting yourself and listen to your body if you start to feel tired.
12. Inspect Your Work Area
Before starting work on your project, inspect your work area for any potential hazards, such as loose cords, clutter, or uneven surfaces. Remove any obstacles or hazards to create a safe and organized workspace.
13. Know When to Seek Help
If you’re unsure about how to safely complete a particular step or if you encounter any unexpected issues or hazards during the project, don’t hesitate to seek help or advice from a knowledgeable friend, family member, or professional.
By following these safety precautions, you can minimize the risk of accidents and injuries while working on your DIY photo slide lampshade project. Remember to prioritize safety at all times and take necessary precautions to protect yourself and others involved in the project.
The Wrap Up
Creating a stunning DIY photo slide lampshade from simple materials can be an exciting and fulfilling endeavour. As you conclude your project, it’s essential to reflect on the process, the outcome, and the significance of your creation. Here’s a comprehensive conclusion for your DIY photo slide lampshade project:
The journey of crafting a DIY photo slide lampshade has likely been filled with moments of creativity, experimentation, and problem-solving. From selecting the perfect photos to arranging them in a visually appealing pattern, each step of the process has allowed you to express your unique style and personality. Whether you worked independently or collaborated with others, the process itself has likely been a source of enjoyment and satisfaction.
As you admire the finished product of your DIY photo slide lampshade, take a moment to appreciate the beauty and uniqueness of your creation. The combination of cherished memories captured in photos and the soft glow of the lampshade creates a warm and inviting atmosphere in any room. Your lampshade serves not only as a functional piece of decor but also as a conversation starter and a testament to your creativity and craftsmanship.
Beyond its aesthetic appeal, your DIY photo slide lampshade holds personal significance. Each photo chosen for the project represents a special moment, a fond memory, or a beloved individual. Whether it’s a family vacation, a milestone celebration, or a snapshot of everyday life, the photos encapsulate moments that hold sentimental value. By incorporating them into your lampshade, you’ve created a tangible reminder of the people and experiences that bring joy to your life.
Your DIY photo slide lampshade is more than just a decorative accent—it’s a reflection of your creativity and ingenuity. By transforming ordinary materials into a unique and visually striking piece of decor, you’ve demonstrated your ability to think outside the box and reimagine everyday objects in new and exciting ways. Your lampshade is a testament to your creativity and resourcefulness, serving as inspiration for future DIY projects and creative endeavours.
As you bask in the glow of your DIY photo slide lampshade, let it serve as a source of inspiration for future creative endeavours. Whether it’s exploring new crafting techniques, experimenting with different materials, or embarking on entirely new projects, let your lampshade remind you of the joy and fulfillment that comes from expressing your creativity. With each new project, you’ll continue to push the boundaries of your imagination and create works of art that reflect your unique perspective and style.
Your DIY photo slide lampshade is a testament to your creativity, craftsmanship, and the meaningful memories that enrich your life. As you showcase your lampshade in your home, may it serve as a source of inspiration, connection, and pride for years to come.
Frequently Asked Questions
1. Where can you find the materials for your photo slide lampshade project?
You can purchase the necessary materials from hardware stores, home improvement centres, or online retailers. Ensure you acquire high-quality materials that are suitable for indoor use and safe for crafting.
If your project involves crafting or decorative elements, consider visiting specialty craft stores. These stores carry a wide range of materials such as fabrics, paints, beads, and other embellishments. Craft stores are ideal for finding unique and specialized items to add a creative touch to your project. Additionally, craft store staff can offer expert advice and guidance on product selection and usage.
2. How do you prepare the photo slides for the lampshade?
Start by selecting the photos you want to use and ensuring they fit the size of your lampshade frame. Clean the photo slides to remove any dust or debris, and organize them in a pattern or sequence that appeals to you.
3. What type of adhesive should you use to attach the photo slides to the lampshade frame?
It’s recommended to use a strong adhesive suitable for bonding materials like plastic and wood. Double-sided tape or glue dots can work well for securing the photo slides to the frame evenly and securely.
4. Can you customize the design of your photo slide lampshade?
Absolutely! One of the advantages of this photo slide lampshade project is the ability to customize the design to your preferences. You can choose photos that hold special significance, arrange them in a specific pattern, or add decorative elements like ribbons or beads for a personalized touch.
5. How do you ensure the photos are evenly spaced and aligned on the lampshade frame?
Creating a template can help guide the placement of the photo slides and ensure they are evenly spaced and aligned. Use a piece of cardboard or paper as a base and mark out the positions for each slide before attaching them to the frame.
6. Can you use coloured light bulbs with your photo slide lampshade?
Yes, experimenting with coloured light bulbs can add a unique ambience to your photo slide lampshade. Consider using warm, soft light bulbs for a cozy feel or bright, coloured bulbs for a more vibrant and playful atmosphere.
7. How do you clean and maintain your photo slide lampshade?
To clean your lampshade, gently wipe the photo slides with a soft cloth or duster to remove dust and debris. Avoid using harsh chemicals or abrasive cleaners, as they may damage the photos or the lampshade frame. If necessary, you can spot clean the photo slides with a mild detergent and water solution.
8. Can you use different types of photos for my lampshade?
Yes, you can use a variety of photos, including color or black and white prints, to create your lampshade. Consider using a theme or specific subject matter for a cohesive look, such as family vacations, special occasions, or favourite landscapes.
9. How do you safely dispose of any waste materials from the project?
Dispose of any waste materials, such as excess adhesive or discarded photo slides, properly and responsibly. Recycle materials where possible and dispose of hazardous waste according to local regulations.
Certain materials used in DIY projects, such as paint, solvents, batteries, and electronic components, may be classified as hazardous waste. It’s essential to handle and dispose of these materials according to local regulations to avoid environmental and health risks. Contact your local waste management authority or visit their website for guidance on how to dispose of hazardous waste safely. Many communities offer hazardous waste collection events or drop-off locations for proper disposal.


