
Are there more feeds wasted than eaten by the chooks in your yard? Your feeder may be the problem. Here’s a DIY project that might just solve your problem!
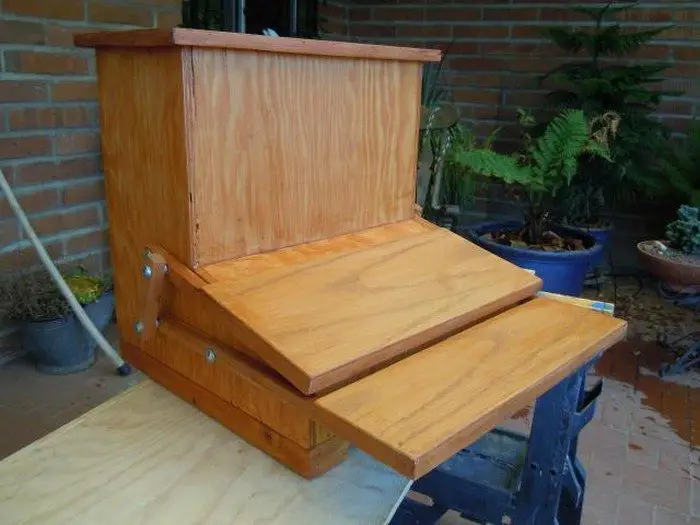
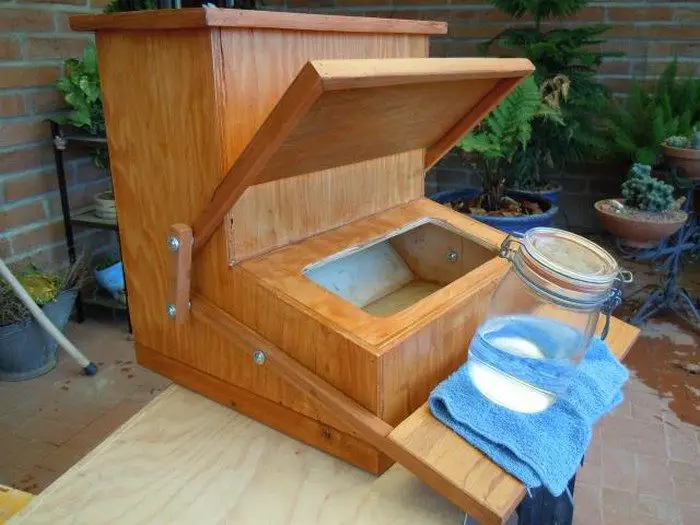
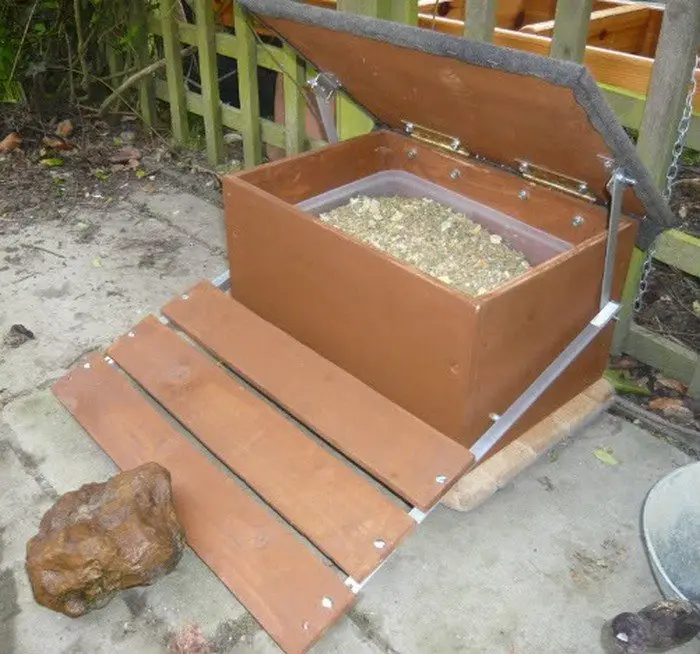
This treadle chicken feeder minimizes food waste by protecting the feeds from exposure to the elements and unwanted visitors. It always stays closed, and only opens for the chickens to eat when they step on the treadle.
Now every treadle chicken feeder is different. Its mechanism relies on the weight of the chooks. You will also have to consider the right size for them. This is why it’s best to DIY if you choose to go with this kind of feeder.
Your treadle chicken feeder should be calibrated so that your chooks can easily gain access to it, but not the ‘unwanted visitors’. You can do this by simply adding or reducing the weight of the lid connected to the treadle. If the lid opens too easily, use a heavier board. You can also attach any material that would add weight such as small wood scraps or magnets. You can figure it out and improve it by observing the way your chickens are using it. :)
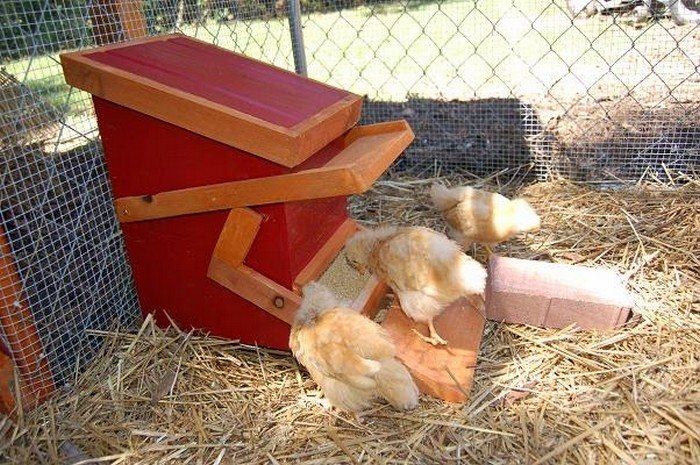
Yes – this chicken feeder will require training your chooks, which is a fun and easy task! You can start by placing a weight on the treadle so that it is always open first. This is to make them recognize their new feeder. Then bit by bit, lower the lid and your chickens will find a way to open their feeder. Eventually they will learn that stepping on the treadle will give them access to their food.
This is the best thing about a treadle chicken feeder. Only those who know how to use it can eat from it! So if you’ve got aggressive critters trespassing in your backyard, then this is the chicken feeder for you!
Do you know anyone who needs a treadle chicken feeder?
Contents
Building a Treadle Chicken Feeder
Materials
- 1 pc 1 x 12 x 10′ Cedar Board
- 1 pc 5/16″ x 6″ x 30″ Plywood
- 1/4 lb 1 1/2″ Wood Screws
- 1/8 lb 3/4″ Wood Screws
- 1/4 lb 1 1/4″ Kreg Screws (optional)
- 4 pcs 1/4″ x 20 Hex Bolts with Nuts (4) and Washers (12)
- 2 pcs 90 degree Hinges
- Sandpaper
Tools
- Table Saw
- Belt Sander or 120 grit sandpaper and a block (320 grit for finish sanding)
- Tape Measure
- Pencil
- Miter Saw
- Band Saw
- Power Drill with 9/64 Tapered Bit with Plug Cutter for Pilot Holes
- Router with Round-over Bit
- Kreg Jig (optional)
- Screw Gun
- Bar Clamps
- Gripping Clamps
Instructions
Step 1: Cutting the Cedar Board
- Measure and Mark: Using your tape measure and pencil, mark the following cuts on the cedar board:
- Two pieces for the sides (34″ each)
- One piece for the back (12″ x 20″)
- One piece for the front panel (12″ x 10″)
- One piece for the top lid (12″ x 18″)
- Cut the Pieces: Use the table saw or miter saw to make the cuts as per the marks.
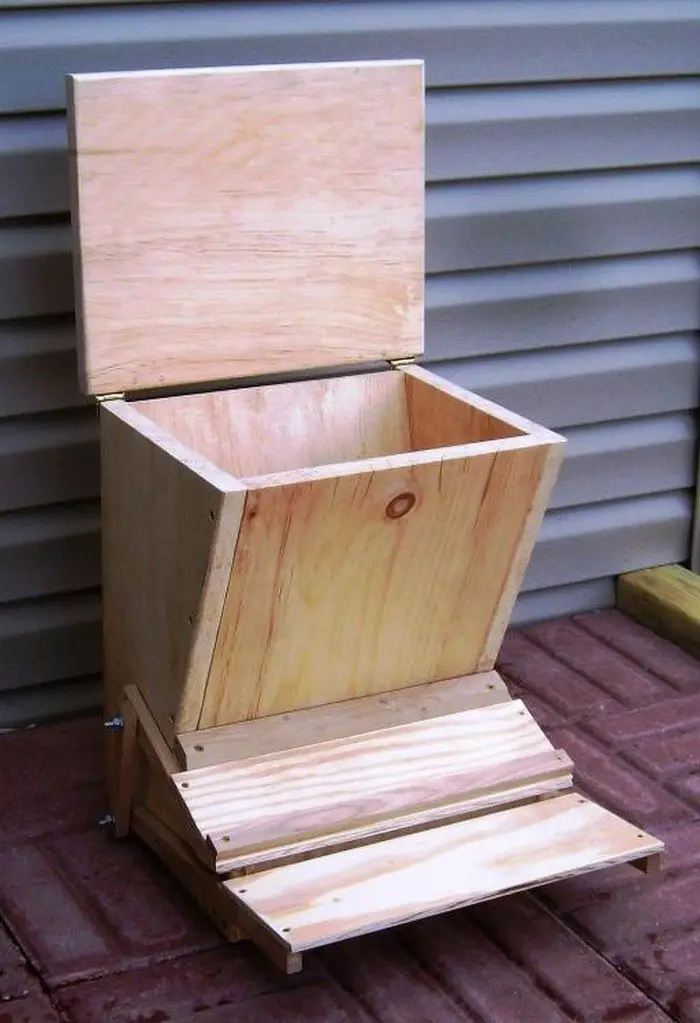
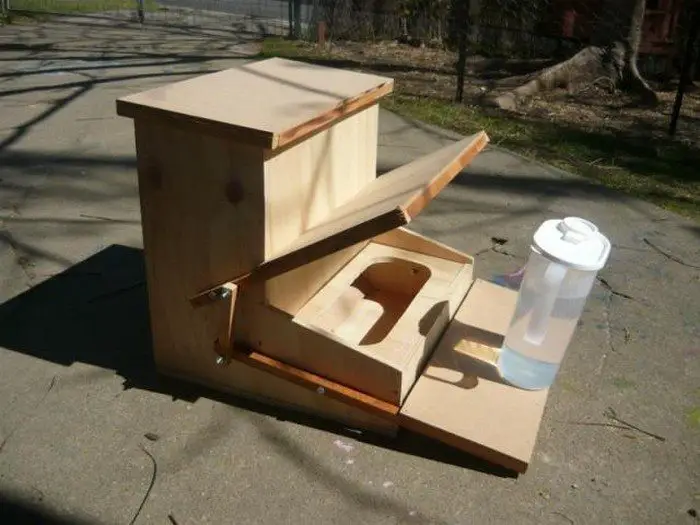
Step 2: Assembling the Frame
- Layout the Pieces: Arrange the sides, front, and back pieces to form the outer frame of the feeder.
- Secure with Screws: Use the 1 1/2″ wood screws to assemble the frame, ensuring corners are square.
Step 3: Adding the Hinges and Lid
- Attach Hinges: Install the 90-degree hinges to the top edge of the back piece.
- Attach the Lid: Secure the lid to the hinges, ensuring it opens and closes smoothly.
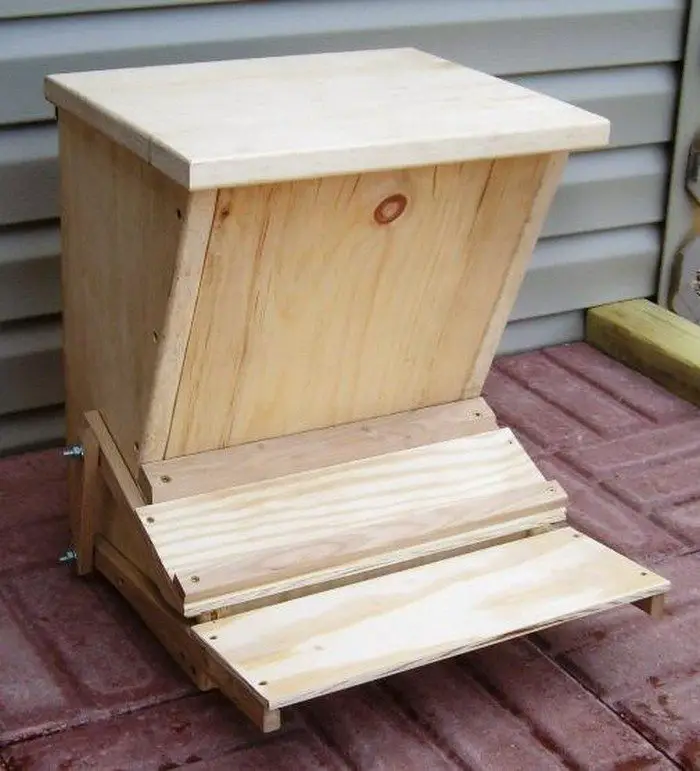
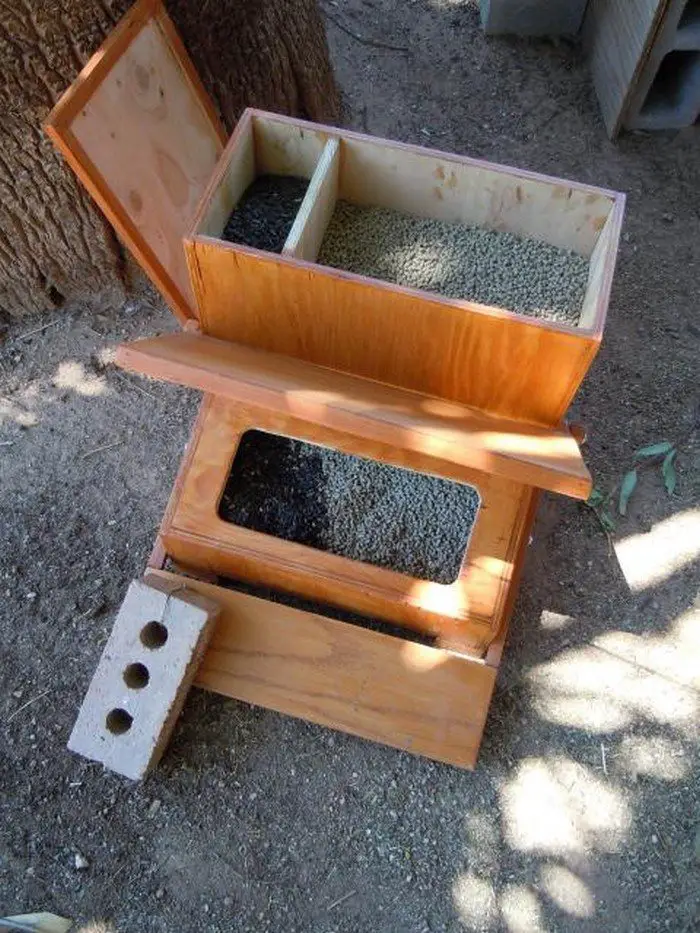
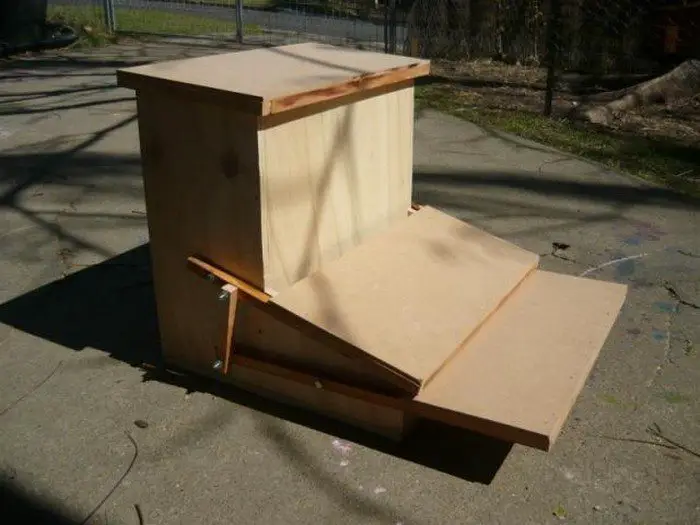
Step 4: Building the Treadle Mechanism
- Cut the Plywood: Use the band saw to cut the plywood into a treadle (base plate) measuring 12″ x 6″.
- Install the Treadle: Attach the treadle to the front bottom of the feeder using the hex bolts, nuts, and washers. Ensure it can pivot smoothly.
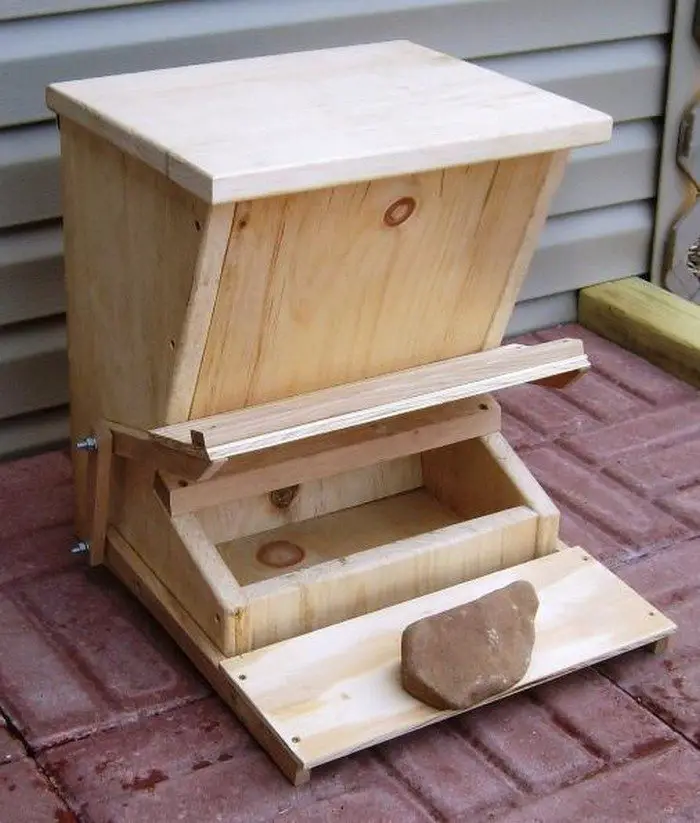
Step 5: Calibration and Adjustments
- Test the Treadle: Place a weight on the treadle to see if it opens the lid to the desired level.
- Adjust Weight: If necessary, adjust the weight on the lid or change the position of the treadle to ensure it operates as needed.
Step 6: Finishing Touches
- Sand the Feeder: Use the belt sander or sandpaper to smooth all surfaces, especially the edges and corners.
- Round-over Edges: Use the router with a round-over bit to give a finished look to the exposed edges.
Step 7: Installation
- Choose a Location: Place the feeder in a suitable location in your chicken coop.
- Secure the Feeder: Optionally, you can secure the feeder to the ground or walls of the coop to prevent tipping.
Step 8: Training Your Chickens
- Introduce the Feeder: Allow your chickens to get familiar with the new feeder by initially propping the lid open slightly.
- Encourage Usage: Gradually train your chickens to step on the treadle to access their food.
Click on any image to start lightbox display. Use your Esc key to close the lightbox.![]()

You can get more step-by-step instructions here…
Safety Measures and Enhancements
Ensuring the safety and effectiveness of a treadle chicken feeder is paramount for both the well-being of your chickens and the durability of the feeder itself. Implementing certain safety measures and enhancements can significantly improve the functionality and lifespan of your treadle chicken feeder.
Here are some key considerations and improvements you can make:
Regular Inspection and Maintenance
Regularly check your treadle chicken feeder for any signs of wear or damage. Look for loose screws, worn-out parts, or any sharp edges that could harm your chickens. It’s important to address these issues promptly to maintain the feeder’s safety and operational integrity.
Enhancing Stability
A stable treadle chicken feeder is crucial to prevent it from tipping over and potentially injuring your chickens. You can enhance stability by securing the feeder to the ground or a nearby wall. Consider adding extra weight to the base or using ground anchors for free-standing units.
Smooth Operation of the Treadle Mechanism
The treadle mechanism should operate smoothly without sticking or requiring too much force, which might discourage chickens from using the feeder. Lubricate the pivot points and check the tension regularly to ensure that the treadle moves freely. This adjustment ensures that the treadle chicken feeder remains accessible and easy to use for all chickens.
Weatherproofing
Protecting your treadle chicken feeder from the elements extends its lifespan and ensures the feed stays dry and fresh. Apply a weather-resistant finish to the wood, such as a sealant or paint that is non-toxic and safe for animals. Additionally, consider installing a cover or shelter over the feeder to shield it from direct sunlight and precipitation.
Safety Features
To further enhance the safety of your treadle chicken feeder, consider rounding off all sharp corners and edges with a router or sandpaper. Install a soft-close mechanism on the lid to prevent it from slamming shut, which could scare or harm the chickens. This feature not only improves safety but also contributes to a quieter and more peaceful environment for your flock.
By taking these steps, you ensure that your treadle chicken feeder is not only effective in reducing feed waste but also safe and comfortable for your chickens to use every day.
Guide to Training Chickens on New Feeders
Introducing a new feeding system to your flock can be a smooth and rewarding process if done correctly. A treadle chicken feeder, which helps to minimize waste and protect feed from pests, requires a bit of training to ensure your chickens can use it confidently and safely.
Here’s a comprehensive guide to help you train your chickens on a new treadle chicken feeder.
Familiarization
Start by placing the treadle chicken feeder in a location where your previous feeder was, if possible. This helps in the initial recognition as chickens are habitual creatures. Let the chickens observe the new feeder for a day or two without trying to use it. You might place some feed around and on the inactive treadle to pique their interest.
Gradual Introduction to the Treadle
Once your chickens start showing interest in the new feeder, encourage them to step on the treadle by placing treats or their favorite feed directly on it. Initially, you can prop the feeder open slightly so the chickens can see the food inside and begin to associate stepping on the treadle with accessing their feed.
Active Training
After your chickens are somewhat familiar with stepping on the treadle to see food, start training them actively. Allow the treadle to close completely, and guide your chickens to step on it to access their food. Be patient during this stage; some chickens might pick up the mechanism quickly, while others may take more time.
Positive Reinforcement
Use positive reinforcement throughout the training process. Every time a chicken successfully operates the treadle and accesses the food, provide additional treats as a reward. This reinforcement helps solidify the behavior and makes the training experience positive.
Monitoring and Adjustments
Keep a close watch on your chickens as they use the treadle chicken feeder. Make sure all your chickens are able to access the feed. Younger or lighter chickens might not initially trigger the treadle mechanism due to their weight. If this is the case, you might need to adjust the weight settings of the treadle to accommodate them.
Ongoing Support
Even after your chickens have learned how to use the feeder, continue to monitor their interactions with it. Ensure the feeder remains in good working condition and that it continues to provide a safe and efficient feeding solution for your flock.
Your chickens will quickly be confidently and successfully using their new treadle chicken feeder if you follow these instructions, which will result in a cleaner coop and less wasted feed.
Conclusion
Building a treadle chicken feeder is a fun project that will make feeding your chickens more efficient and clean. If the feeder is built and set up correctly, it will reduce waste and keep bugs from getting to the food. In the end, this do-it-yourself feeder is a long-lasting and inexpensive way to keep your flock healthy and happy.
Check out our chicken playground guide next to keep your flock physically fit!


