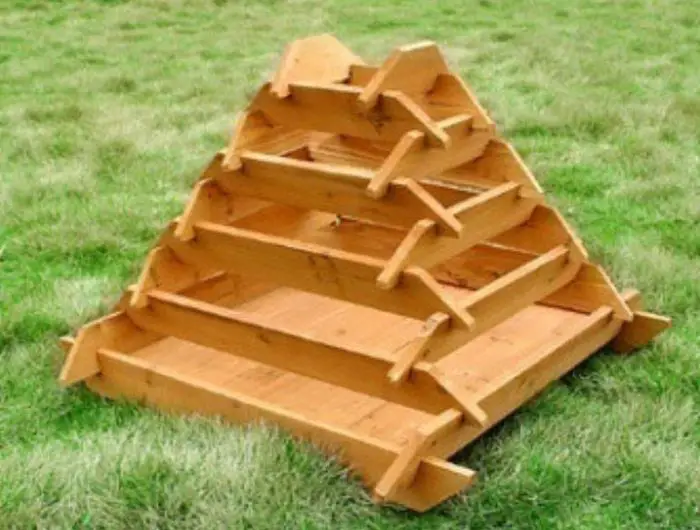
Pyramid planters are great for growing various plants especially if you don’t have a lot of space in your garden or yard.
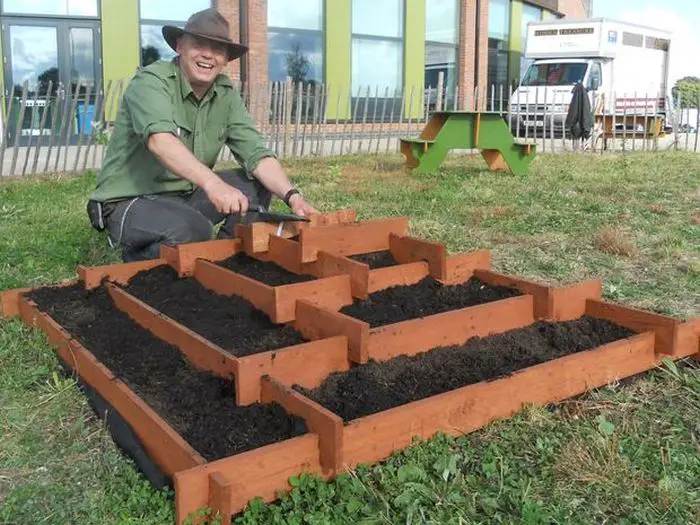
Pyramid planter plans are very easy and cheap to make as it’s made from recycled pallet timbers. All you need is an hour and a half and some basic woodworking skills.
This simple yet clever design makes it easy for you to dismantle the planter. That allows you to move it to different locations to suit the season or the crop. And when not in use, it won’t take a lot of storage space in your garden shed.
Contents
Completing Pyramid Planter Plans
Tools & Materials:
- 3/4 MDF Board/Wood Planks
- Square
- Pencil
- Drill
- Tenon Saw
- Chisel
- Sand Paper
Steps:
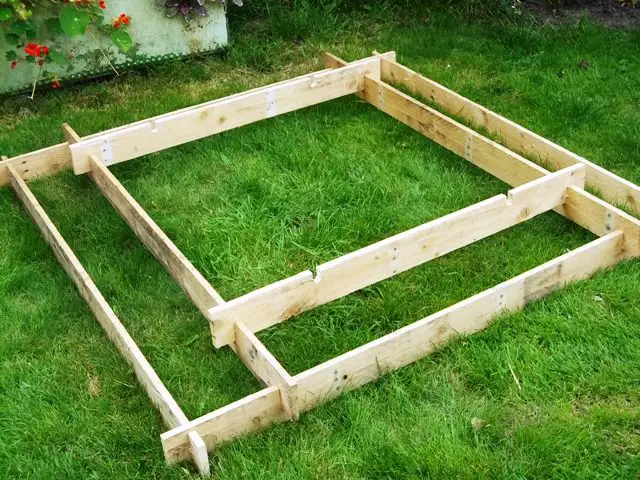
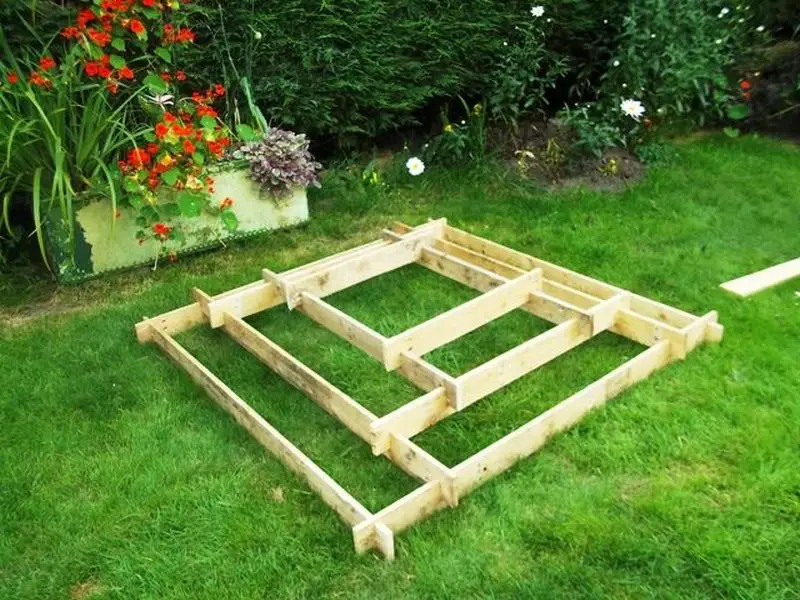
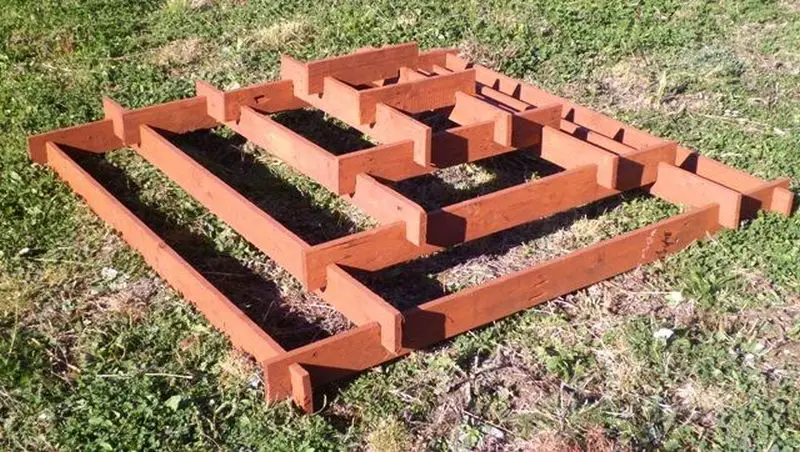
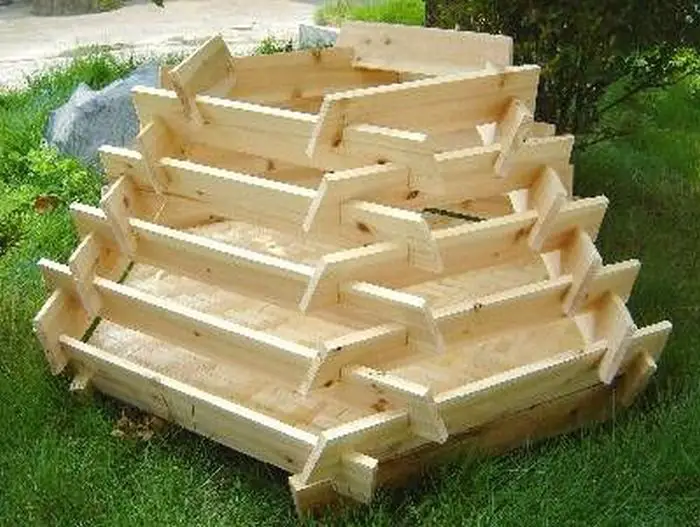
First, you need to cut 4 pieces of ¾ board that is 3 ½ x 43 inches as the base tier.
Then create corner slip joints. Take note that the slip joints should have a depth of 1 ¼ inches, but the slip joints for the BASE tier should be 1 ¾ inches deep. This is to ensure stability for the entire planter.
 Measure 2 inches from the edge of each plank. Of course, the thickness of these slots should be ¾ where your planks can fit.
For the slots for the above tier, measure 8 inches from the inside edge of the first slot. See picture.
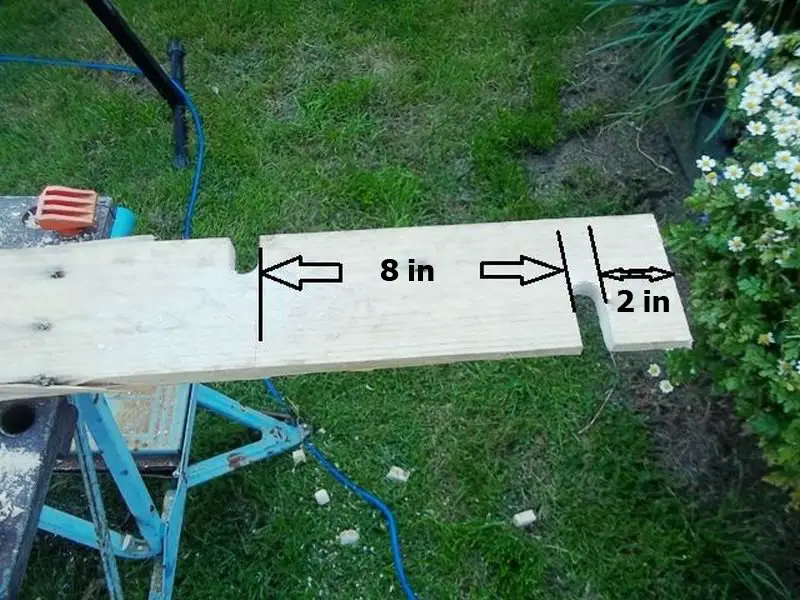
Remember that you should always measure inwards, so that your dimensions are even – two inches from the edge of the plank for the bottom slot, and 8 inches from the inside edge of that bottom slot for the slip joint of the above tier. This is the only measurement you have to remember throughout the construction.
Each tier has a distance of 8 inches from the inside edge of the previous tier, and the slots are cut 2″ from the end of each plank.
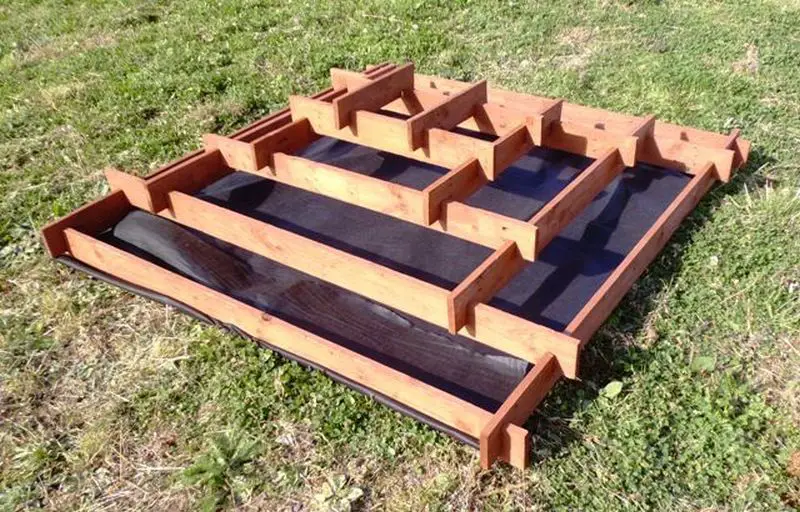
Use chisel to refine the slots. Sand the planks to avoid splinters. Apply at least two coats of wood preservative.
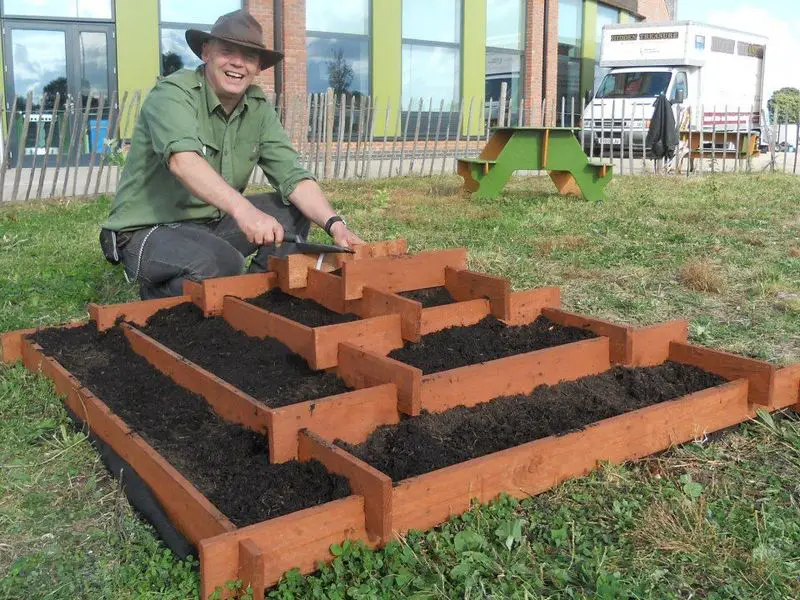
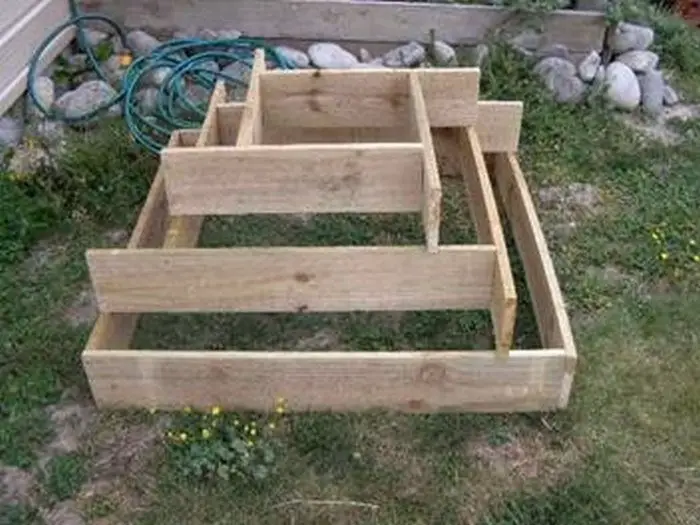
Assemble it in its final place…
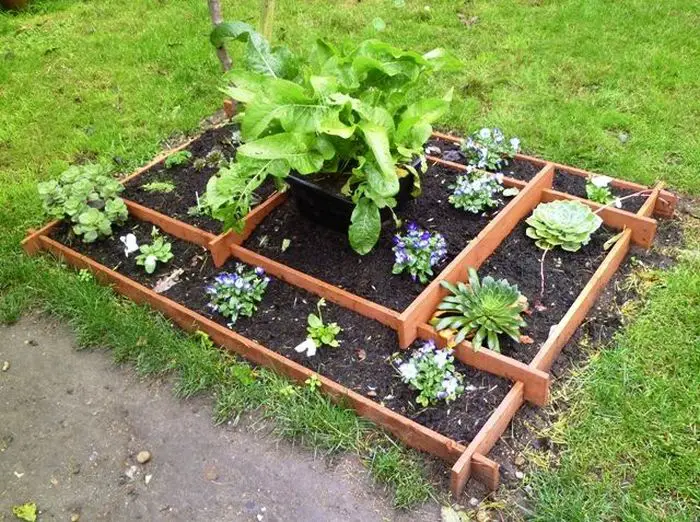
… and you are ready to fill it with compost and plants!
Thanks to Gareth for the original idea!
Choosing the Best Plants for Your Pyramid Planter
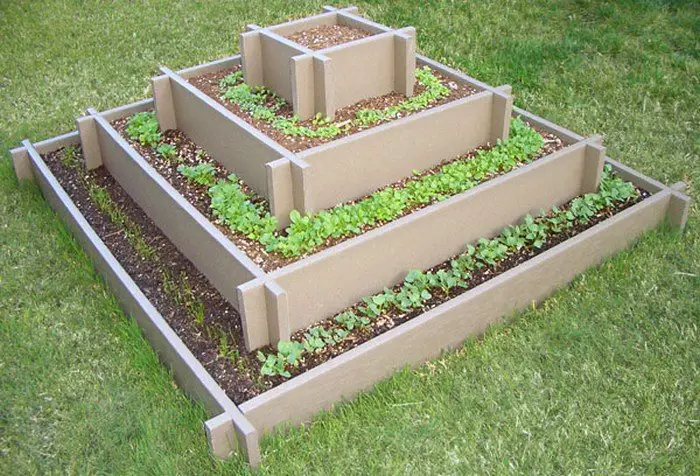
A pyramid planter is more than just a clever garden structure. It’s a space-saving solution that lets you grow a variety of plants in layers, making the most of limited garden space. If you’ve followed pyramid planter plans to build your own, the next step is knowing what to grow in it. Choosing the right plants can help you create a vibrant, productive display that stays healthy all season long.
Understanding the Pyramid Layout
Before you start planting, take a moment to think about the layout. Pyramid planters usually have several stacked tiers. Each tier offers a slightly different growing environment. The top tier gets the most sun and dries out faster. The lower tiers retain more moisture and offer more root space. When choosing plants, consider their sunlight and water needs so you can match each plant to the right level of your structure.
Top Tier Plants – Compact and Sun-Loving
The top level is best for small, shallow-rooted plants that thrive in full sun. Herbs like thyme, oregano, and chives do well here. You can also try lettuce, spinach, or baby bok choy if you plan to harvest frequently. These plants don’t need much soil depth and can handle quick-draining soil. If you’re growing flowers, go for compact annuals like marigolds, pansies, or petunias that add a burst of color without taking over the space.
Middle Tiers – Great for Veggies and Bushier Herbs
The middle sections of your pyramid planter offer a nice balance. These tiers still get plenty of light but hold more soil and moisture. This makes them perfect for plants that need a bit more root space and water. Strawberries are a favorite choice for these tiers. They cascade over the edges and make harvesting easy. You can also grow bushy herbs like basil, cilantro, and parsley. Vegetables like radishes, dwarf carrots, and green onions also thrive here.
Bottom Tier Plants – Bigger Roots and Moisture Lovers
The base tier holds the most soil and moisture. This is where you want to grow plants that need a bit more room to spread their roots. Leafy greens like kale, Swiss chard, and arugula do well in these lower levels. You can also try dwarf pepper varieties or even compact bush beans. Flowers like nasturtiums or trailing lobelia can add color while spilling over the sides to soften the structure’s appearance.
Companion Planting Tips
To make the most of your pyramid planter plans, consider companion planting. Group herbs and vegetables that benefit each other. For example, basil can help improve the growth of tomatoes, and marigolds can deter some pests. Mixing flowers and edibles adds diversity and keeps the planter visually appealing.
Stick to the Plan and Keep It Balanced
Whatever you plant, follow the spacing guidelines for each variety. Overcrowding can lead to disease and poor air circulation. A well-balanced pyramid planter not only looks better but performs better too.
With the right plant choices, your pyramid planter becomes more than just a weekend project. It turns into a mini vertical garden that brings fresh food, fragrant herbs, and bright blooms into even the smallest outdoor space. And if you’re still planning your project, go back to your pyramid planter plans to make sure each tier suits your plant choices perfectly.
Pyramid Planter Plans Gallery
Is this your next weekend project?


How to Weatherproof Your Pyramid Planter
Building a tiered garden structure with recycled wood is a great project. If you’ve already followed pyramid planter plans to create one, you’re probably excited to get it into the garden. But before you start planting, protecting your planter from the elements is important. Rain, sun, and temperature swings can quickly break down untreated wood. Weatherproofing your pyramid planter helps it last longer and keeps your plants healthier.
Choose the Right Wood
Start with the best foundation. Consider using naturally rot-resistant wood if you’re still in the early stages of your pyramid planter plans. Cedar and redwood are excellent choices. These woods resist decay better than common softwoods like pine. If you’re repurposing pallet wood, make sure it’s heat-treated, not chemically treated. Look for “HT” stamps and avoid boards marked with “MB,” which indicates methyl bromide, a toxic chemical.
Sand and Clean the Surface
Before applying any protective coatings, take time to prep the surface. Sand all sides of the boards to smooth out rough patches and open up the wood grain. This allows treatments and sealants to soak in better. Wipe the boards clean to remove dust, dirt, or grease. A clean surface helps the preservative adhere evenly and reduces the chances of peeling later on.
Apply a Wood Preservative
A good-quality wood preservative is your first layer of defense. Choose one that protects against moisture, fungi, and insects. Water-based preservatives are easy to apply and environmentally friendly. Use a brush or sprayer to coat all surfaces, especially the ends of the boards and the insides of any slots. Apply at least two coats, allowing each to dry fully. This treatment helps prevent rot and mold, especially in areas that stay damp.
Seal With an Outdoor Finish
Once the preservative dries, seal the wood with an exterior wood sealer or oil-based finish. Look for products labeled for deck or fence use. These coatings help block UV rays, which can fade and crack wood over time. If you want a natural look, use a clear or lightly tinted sealer. For more color, consider using exterior paint or wood stain. Just make sure the product you choose allows the wood to breathe and won’t trap moisture.
Line the Interior (Optional)
If you want to go a step further, line the inside of each tier with landscaping fabric or a plastic liner with drainage holes. This keeps wet soil from staying in direct contact with the wood. It adds a moisture barrier and slows down the decay process. This step is optional, but it can extend the lifespan of your structure—especially the lower tiers, which stay wetter.
Regular Maintenance Matters
Weatherproofing isn’t a one-time job. Even the best coatings will wear down after a few seasons. Inspect your planter at the start and end of each growing season. Look for signs of cracking, peeling, or water damage. Lightly sand and reapply sealer as needed. Keeping up with small maintenance tasks now can save you from bigger repairs later.
If you’ve already followed pyramid planter plans to build your structure, taking the time to weatherproof it is the smart next step. Not only does it keep your pyramid planter looking good, but it also protects the effort and time you put into building it. With the right protection, your planter will last season after season, giving you more time to enjoy your garden. Make weatherproofing part of your pyramid planter plans from the start, and you’ll get the most out of your DIY project.
Conclusion
Choosing the right plants makes your pyramid planter both practical and beautiful. Match each tier to a plant’s light and root needs for the best results. With thoughtful planning, you can grow herbs, vegetables, and flowers in one compact space. Follow your pyramid planter plans and enjoy a productive, eye-catching garden feature all year round.
We have more amazing planter ideas. Check out our picture frame planter project next!


