
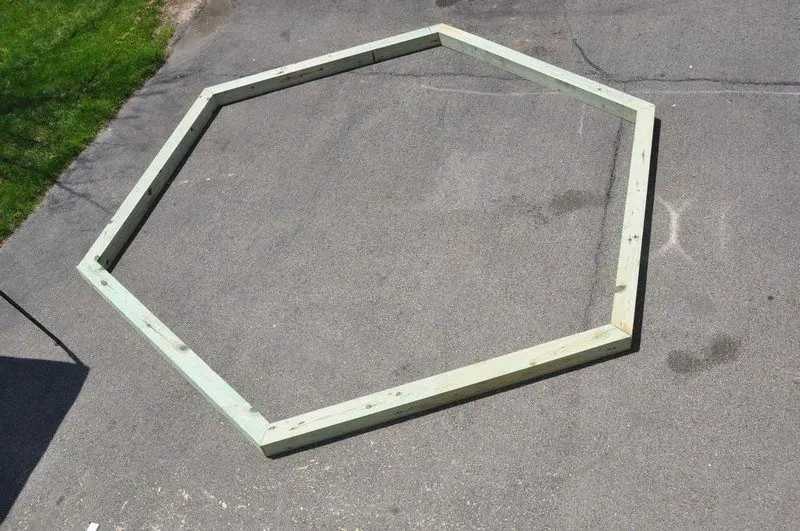
With hexagons, the distance from the center point to the outside edge of each post will be a little less than the length of each beam. My beams were 8 feet long, and the distance from the center point to the outside edge of each post was 7′ 11″. So the beams opposite each other were 15′ 10″ apart. Don’t dwell on this too much as the easiest way to measure your hexagon, regardless of the beam length you choose, is below.
The other thing you need is the angle of the cuts for your beams. 360 degrees divided by 6 is 60 degrees, split between the two ends of each beam is 30 degrees. So your cuts will be 30 degrees at the end of each beam.
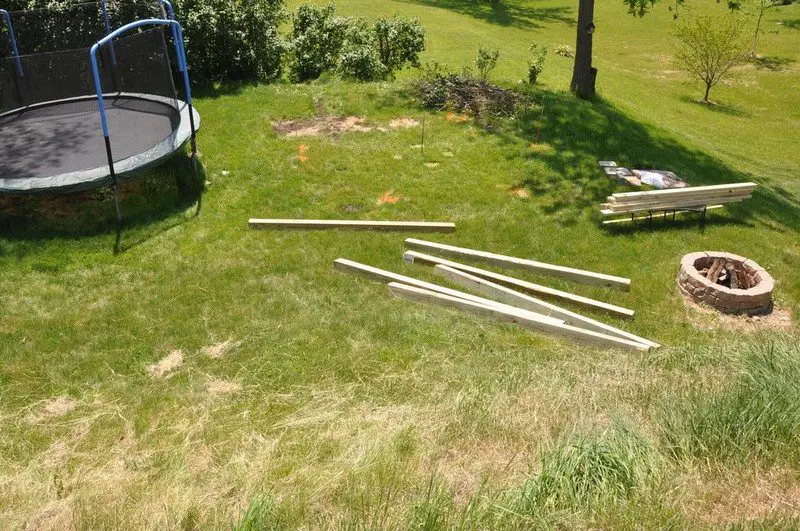
To make the dimensions as easy as possible, I went ahead and cut the beams and laid them out on a flat surface so I could take all the measurements directly from the beams. You have to be a little more exact when digging holes and sinking the posts, but cutting the beams first ensures that your structure is symmetrical. Just make sure that your beams are perfectly parallel on the ground before you start taking measurements. All corner to corner measurements should be the same and all beam-to-beam measurements should be the same. While you have the beams on the ground, mark the center point of each beam so you will have a reference for the cross-braces. Number both sides of each joint 1 through 6. And save some of the 6×6 scrap pieces for later.
Now, making your hexagon square and level is going to be a challenge and you do NOT want to have to lug these 6×6 beams around any more than necessary. So, I cheated. Once I was satisfied with the beams, I cut the 2×6 boards that I would eventually use for cross braces to be exactly the same dimensions as the 6×6 beams. Now you have much lighter boards to work with as surrogate beams. When you are done with them, you will cut about a foot off of them and use them as cross braces. Nothing wasted.
While you have the saw out, cut one of the 2×2 boards into 1-foot stakes with a 45-degree angle at one end. These will be used as anchors later.
To create a grid for my layout, I put a steel rod in the center of the space, measured out the length of my beams (8 feet in my case), and painted a circle. That was a good starting point. The posts will end up just inside the circle.
Start with the “front” of the hexagon and either lay down one of your 2×6 mock-up beams or measure out the dimensions and paint the ground where the posts will go. If you saved any 6×6 scraps, place one where each post will go just for the visual and to help with measurements.
When you are done marking out for the six posts, the marking for each post should be exactly the same distance from the center rod and exactly the same distance apart. I used a field tape-measure with a large hook on it so I could walk to each post location without having it unhook from the center rod. Don’t forget to make sure the corners are all the same distance apart (measure the post markings across from each other and make sure the beams will be parallel). This may sound complicated, but once you start laying things out, it isn’t. If you painted a circle at the beginning of this process, all of your postmarks should be the same distance from the circle as well.
OK – time to go get that power auger.
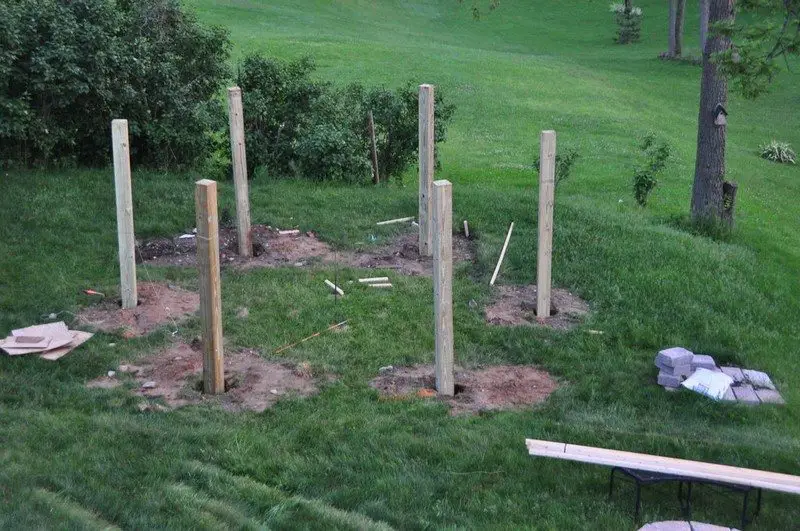
You will want to auger the holes exactly above your marked locations for each post. Make sure the hole is straight. Start without the extension and drill all 6 holes. Then attach the extension and go back around and dig down to just over 3 feet. 3 feet is building code frost-line depth where I live. It is also deep enough to ensure that the structure is rock solid.
Here is a hint. If you have really nice grass that you don’t want to destroy AND your yard is perfectly level, use a couple of sacrificial tarps over the auger hole. Cut a hole in it and let all the dirt from the auger fall onto the tarp. This keeps the dirt out of the grass and allows you to haul any that you don’t use away.
Note: If your location is not perfectly level, you will want to dig to 3 feet on the HIGH side. Use the string and line level to determine how many inches shallower each hole on the low side will need to be. You will end up with all posts at three feet deep into the ground once you level the area with additional dirt.
Take one of your 2×2 braces and mark it at 2 and 3 feet. This will be your depth gauge as you auger.
Mark each 6×6 post at the three-foot mark. I also marked each post at the 6-foot mark to make leveling a little easier.
Now, there are a couple of ways to set and level posts. You could set them and then cut off the tops to make each level, but I wanted to use all 10 feet of my posts, so I actually leveled each post before setting it in concrete. It isn’t as hard as it sounds.
Start with the depth gauge and dig each hole so it is maybe 3 feet two inches deep. Don’t be lazy here. When we get to the leveling step, it will be a lot easier to fill a hole in a little than it will be taking things apart, pull a post out, and dig more. Pour some paver base into the hole and flatten out the bottom so the hole is at or just over 3 feet deep.
Drop a post into each hole and check to see where that 3-foot pencil mark you made is. It should be at or slightly below grade or where you expect it to be if the area is not perfectly level. Be careful when placing or removing the post so you don’t collapse the sides of the hole. These posts are heavy, really heavy, so either has a friend help you or pretend you are a Scottish pole thrower and be prepared for back pain later.
Get the posts as close as you can to level. One good way to do this is to tie a string to one of the posts at the 6-foot mark that you made earlier (This will be 3 feet from the ground now…). Attach the string level to the string and walk to the 6-foot mark on each of the other posts. We will get them perfectly true and level in the next step.
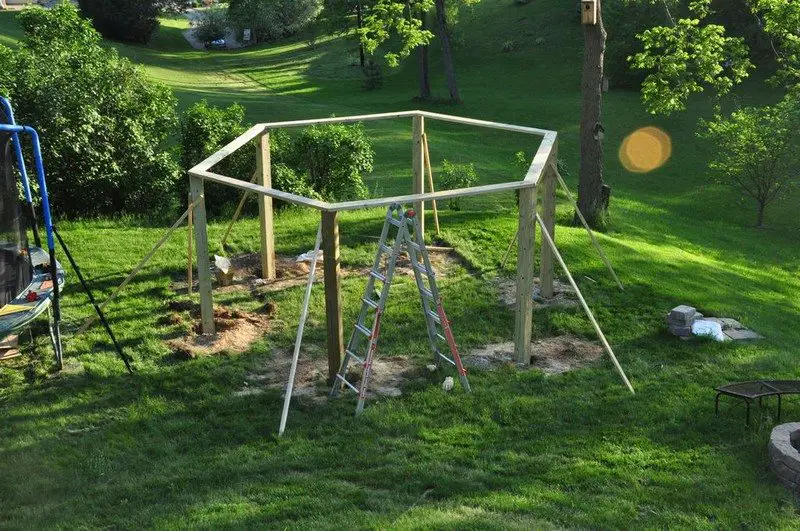
Leveling and trueing the structure will take a little time and patience. There will probably also be head-scratching.
Continued on page 3…


