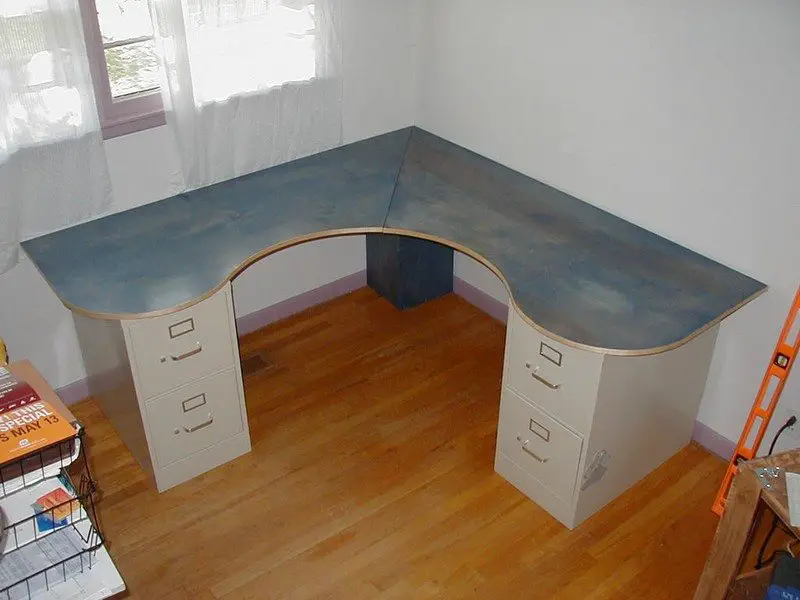
If you’re looking for a home office project, this one could be for you. This wrap-around desk will give you some great work space and an individual look.
Contents
Building a Wrap-Around Desk
Materials
- 2 – short filing cabinets of equal height
- 1 piece – 4’x8′ of 3/4″ double-faced plywood.
- 1 or 2 table/trunk latches.
- 4 pieces – 1/2″ radius quarter round trim, 18″ long.
- Metal Strapping or Corner Brace
- Paint or Stain
- Polyurethane
- 12 feet of real wood edging with heat-sensitive glue on back (optional)
[adinserter block=”11″]
Tools
- Jigsaw
- Screwdriver
- Circular Saw and Long Straightedge (optional)
- Clothes Iron (optional)
- Sandpaper of varied grits
- Paintbrush/Drop Cloth
Steps
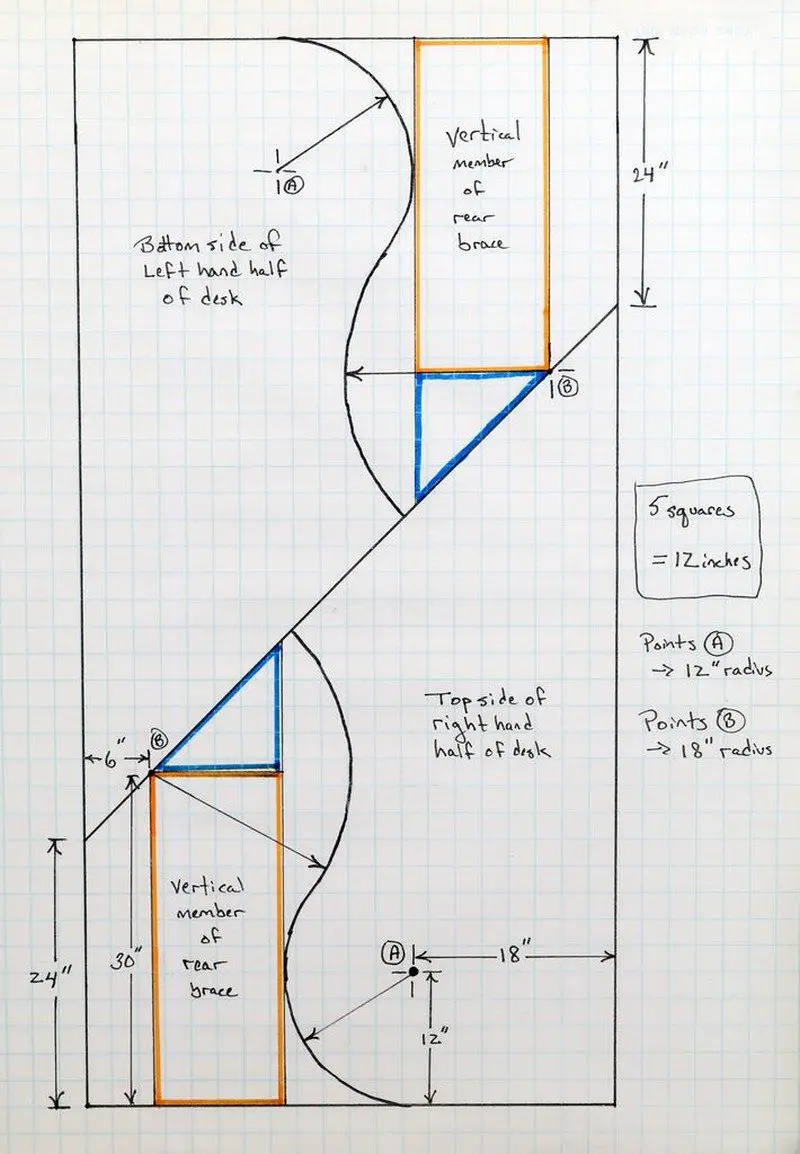
Make the long diagonal cut all the way through the sheet from a point 2 feet from the corner along one long side to a point 2 feet from the opposite corner along the other long side. (it’s the long straight cut diagonally side-to-side in the drawing) Use a circular saw with a long straightedge clamped into place, if you have such. The straighter, the better for your wrap-around desk.
2) If you have a long enough cutting blade for your jigsaw, clamp the two pieces together, lining up all the sides (rotate the top cut piece 180 degrees to line up with bottom piece)
3) Using a pencil on a non-stretchy 12″ string and anchoring the string at point “A” in the diagram, draw an arc from the short edge of the sheet around through about 120 degrees. Point “A” is 18″ from the (previously) long side of the sheet, 12″ from the end. (see drawing)
4) Lengthening the string to 18″, draw an arc centered at point “B” in the diagram from the edge you just cut around until it meets the other arc centered on point “A”. Point B is 6″ from the shortest edge of the quadrilateral you’re left with after the diagonal cut, and on the cut diagonal edge (actually 30″ from the end of the sheet). (see drawing)
5) Cut along the long curved line you just drew.
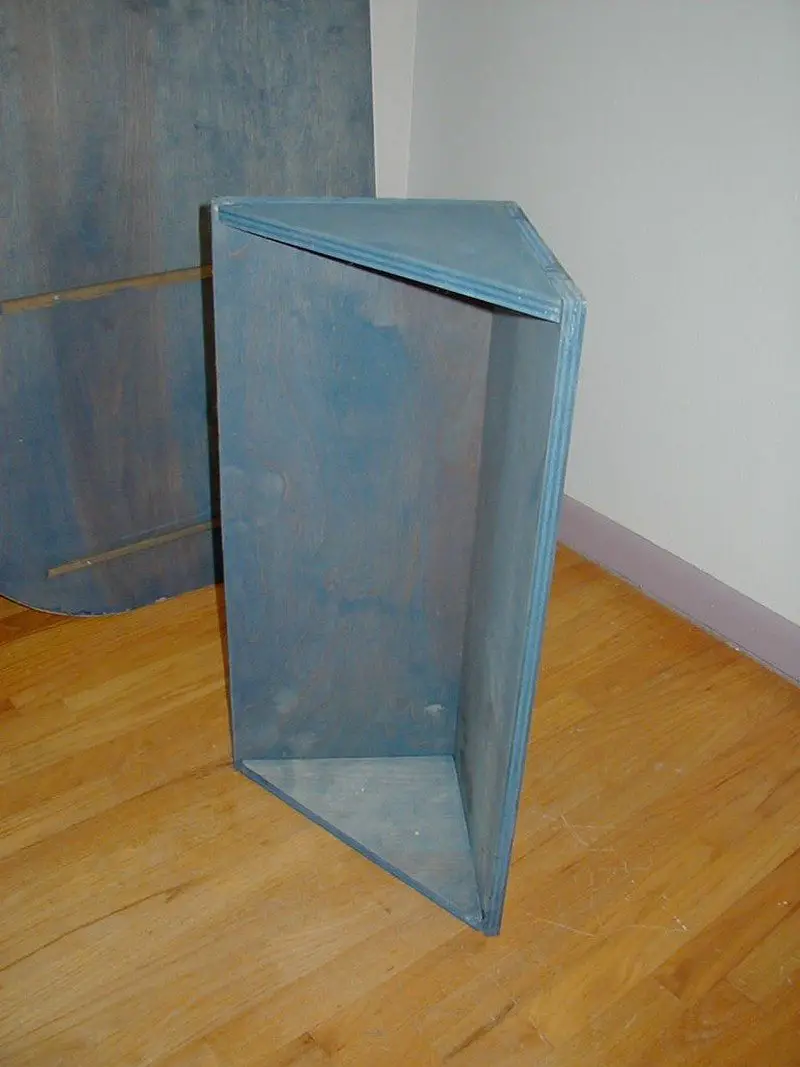
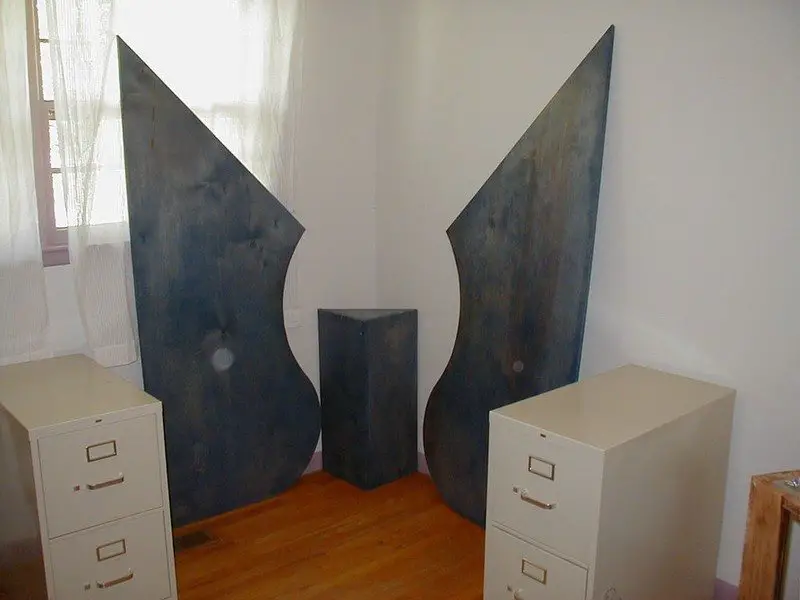
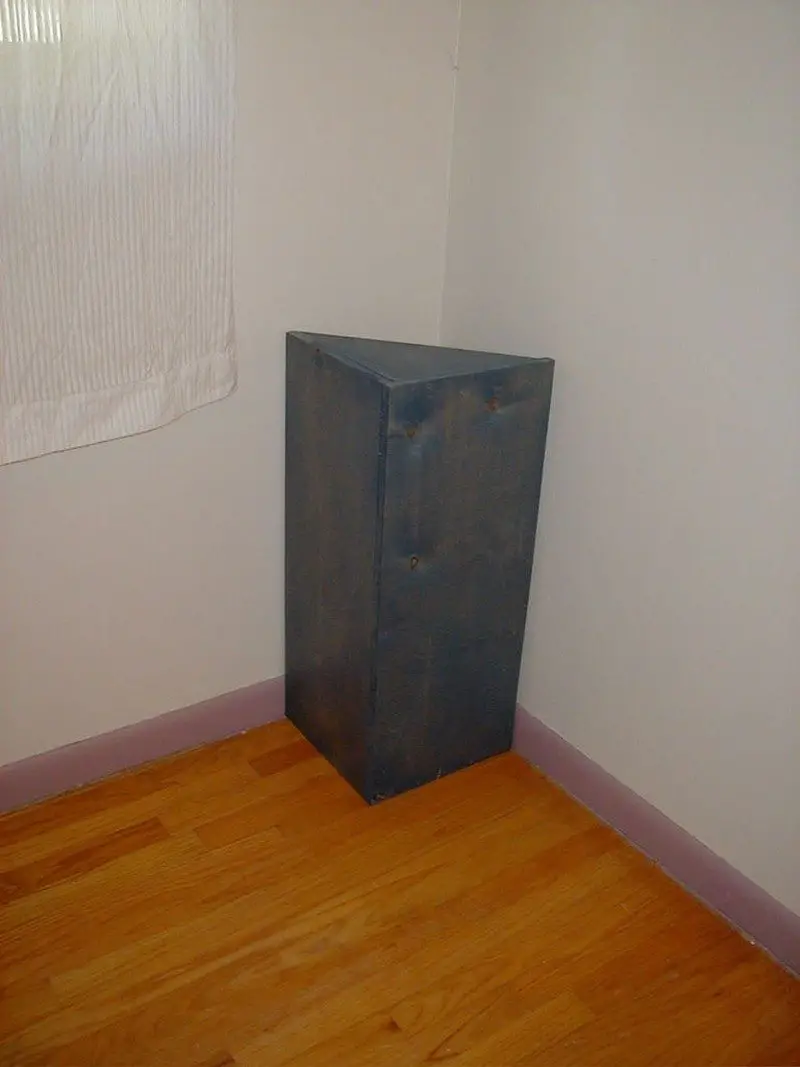
6) Take the pieces left over and cut a 12″x30″ shape and a 12″x12″ right triangle shape from them, in the manner shown on the diagram, outlined in orange and blue respectively . These will form the corner support stand.
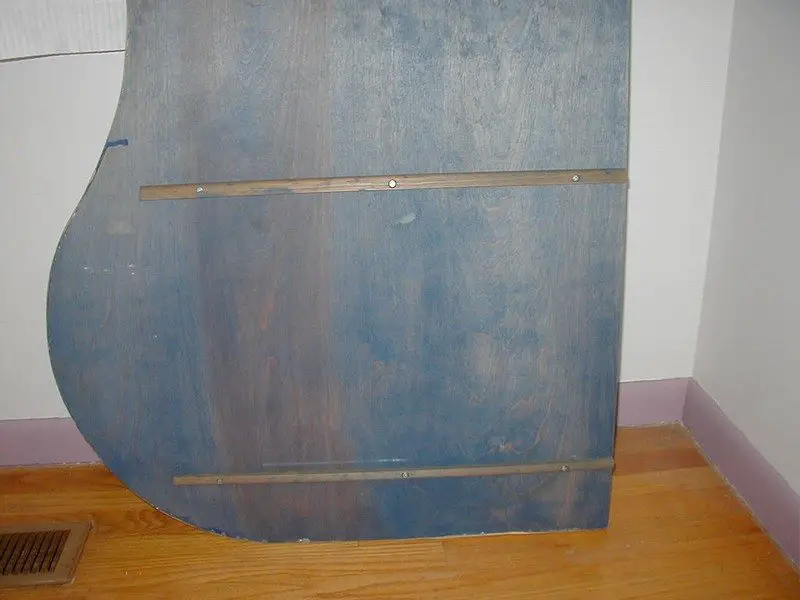
Trim the long leftover rectangular pieces to the height of your filing cabinets for your wrap-around desk, in my case, 29″ tall. You want the final height of the stand to be the same as your filing cabinets.
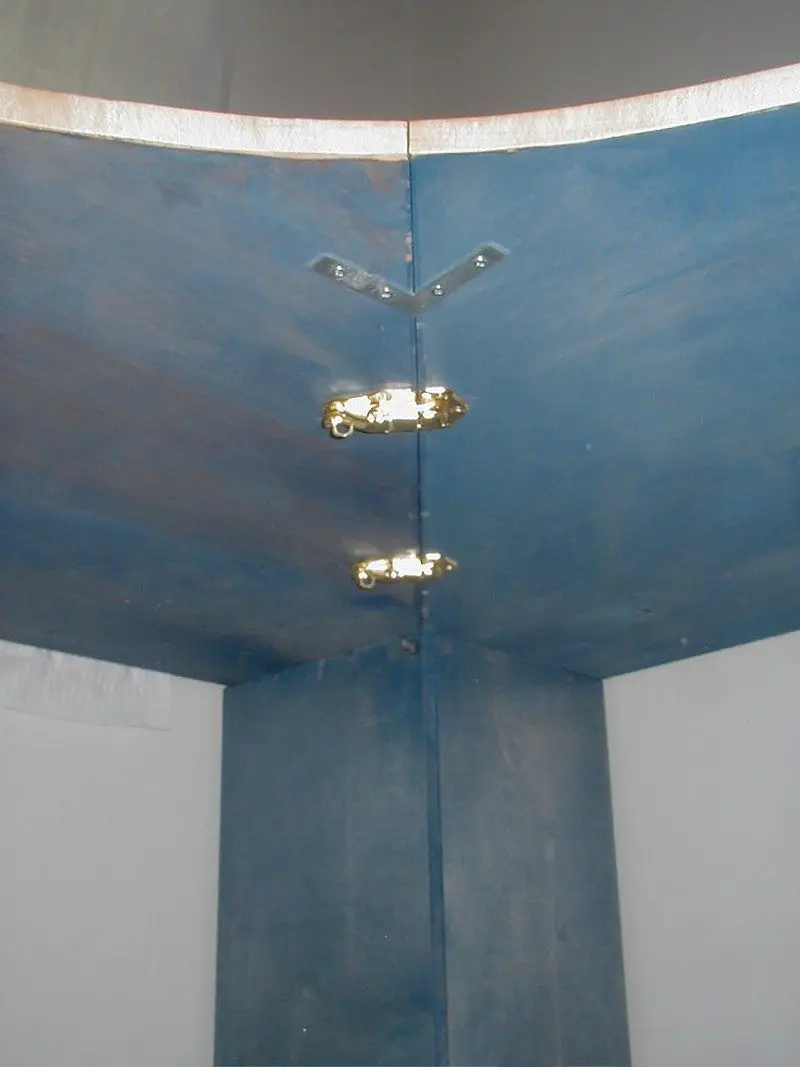
Use glue and screws to assemble the corner support like the picture shown. I used 1.25″ drywall screws, just because I had them around. Since you’re screwing into the edge of plywood, pilot holes are a good idea. These are all just lap joints, nothing fancy. It’s not very visible anyway.
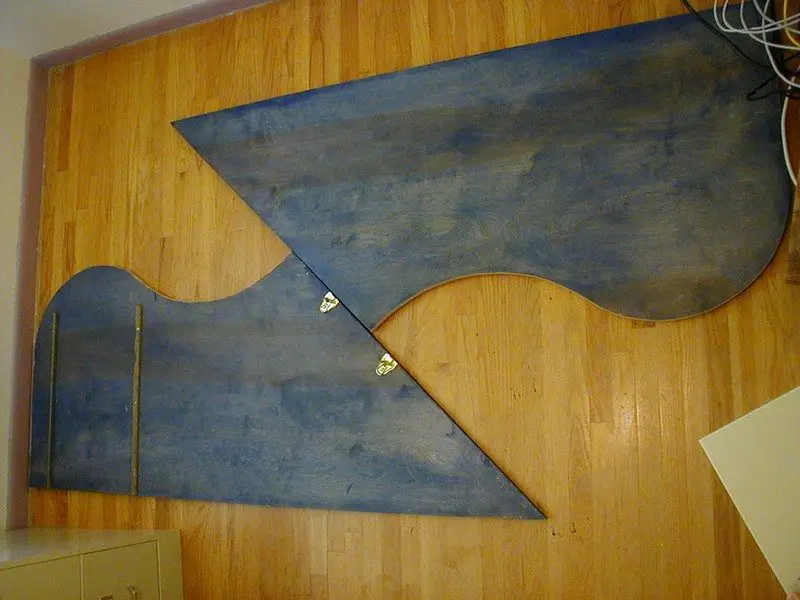
Clamp the two halves of the top together again and sand the edges to try to make them as symmetrical as you can. I used a mini-drum sander bit for my electric drill, but sandpaper on a curved surface should work well for your wrap-around desk, if slower.
Orient the top pieces of your wrap-around desk in the way they will be assembled (one top piece has to flip over and join with the other at the diagonal cut). Mark or somehow assign which is the top side and sand with progressively finer grits of sandpaper until it’s as smooth as you like it. You may wish to sand the bottom to a medium fineness—the stain applies easier to a smoother surface.
If you want the edgesof your wrap-around desk to match the top, apply the wood edging to the exposed edges with a heat source, either a clothes iron or (possibly—I didn’t try this) a curling iron. The curved surface of the curling iron may work better on the concave curves.

I really liked the look of colored stain on my wrap-around desk for this, so I chose a blue-tinted Minwax stain. I stained the bottom sides first, the the tops, and repeated for a total of 2 coats each side.
I then applied 3-4 coats of water-based polyurethane on my wrap-around desk, sanding between each step. I poly’d each of the surfaces which would be seen, including the “front” of the corner support stand.
Note: I did not then nor have I yet attached the desk tops to the corner support. I had planned to do it, but when I place my monitor on the desk in the corner, with the file cabinets in place, nothing seemed to move, so I didn’t bother. Feel free to attach them if you wish – I’d use 1.25″ screws from the bottom.
Turn the wrap-around desk face down on the floor, diagonal cuts together. Place the two-piece latches, closed, on the joint and mark and drill pilot holes for their screws. Be careful not to drill through the top side. Attach the latches. Unhook them and separate the pieces.
Place the corner support in the corner and the file cabinets to either side of the corner in their approximate positions pm ,u wrap-around desk. Place each desktop half, top side up, where it’s supposed to go supported by the file cabinets and corner support. Latch the two halves together with the latches you just installed above. Hopefully both halves will move as one now.
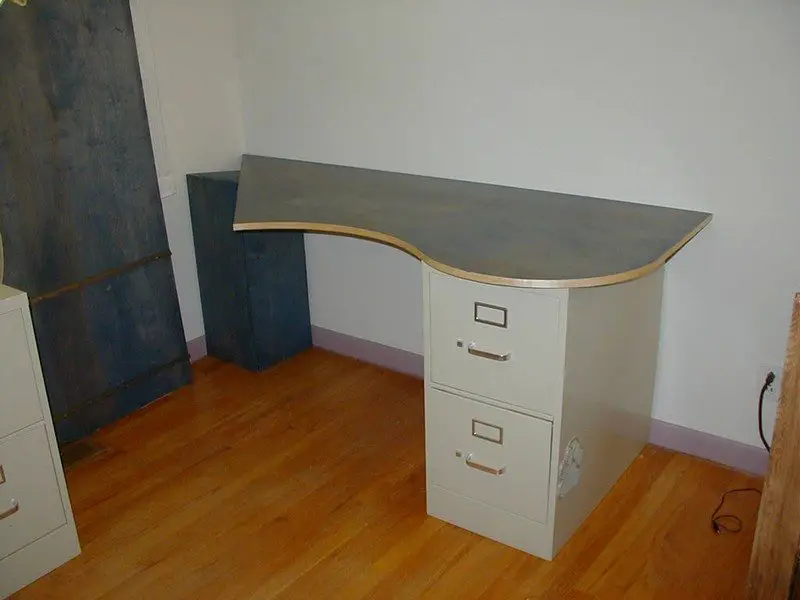
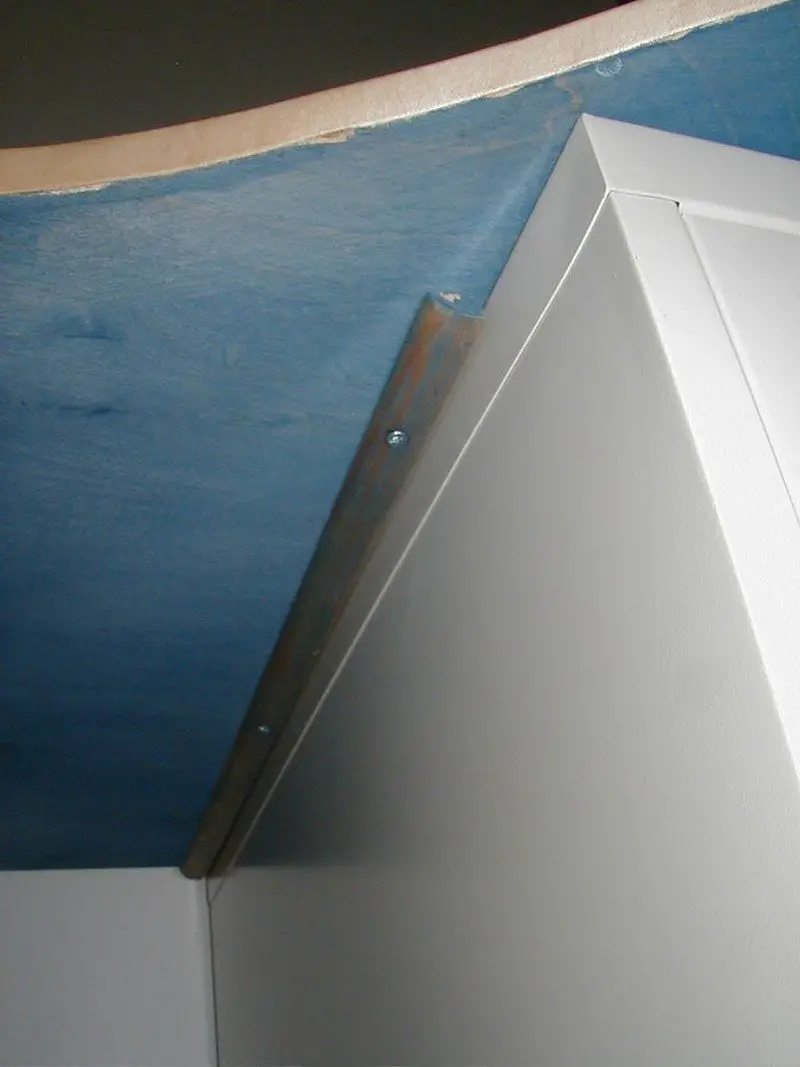
Line up the file cabinets along each wall, maybe moving them 1-2 inches out from the wall to allow cords and such to go behind them. Put them under the fattest part of the outer curves and mark the undersides along the sides of the cabinets. Unlatch the desktop halves and turn them over. Align the pieces of quarter round along those marks, flat sides toward the underside of the desktops and toward the filing cabinets. Make sure they’re short enough to not be seen when the wrap-around desk is right-side-up. Pilot drill and screw them down with 1″ screws.
Place the desktops back up on the cabinets where they belong and latch them together. You most likely need a little more support in the middle right under your arms since the latches are the only things holding the top together and they occasionally become uneven. I used a corner bracket screwed into each side. In elegant perhaps, but each half is level with the other and there is plenty of support for my hands, keyboard, forearms, yada yada yada.
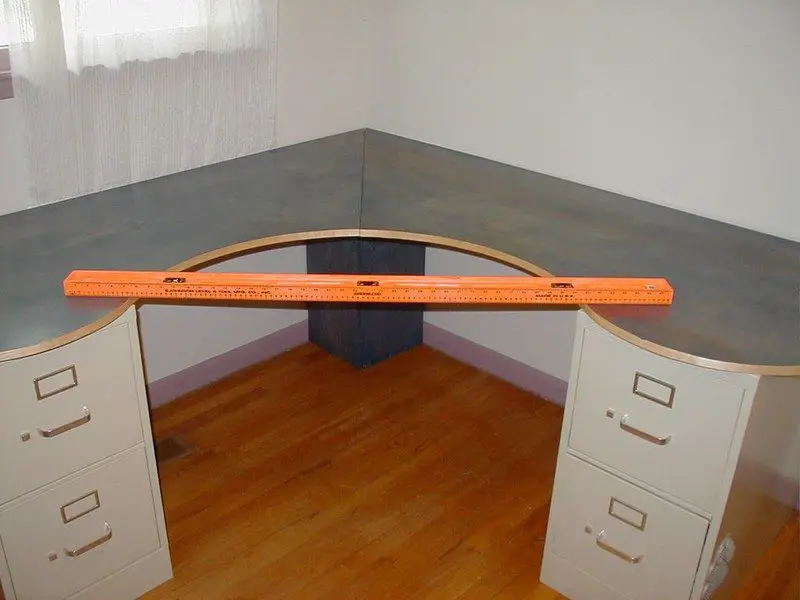
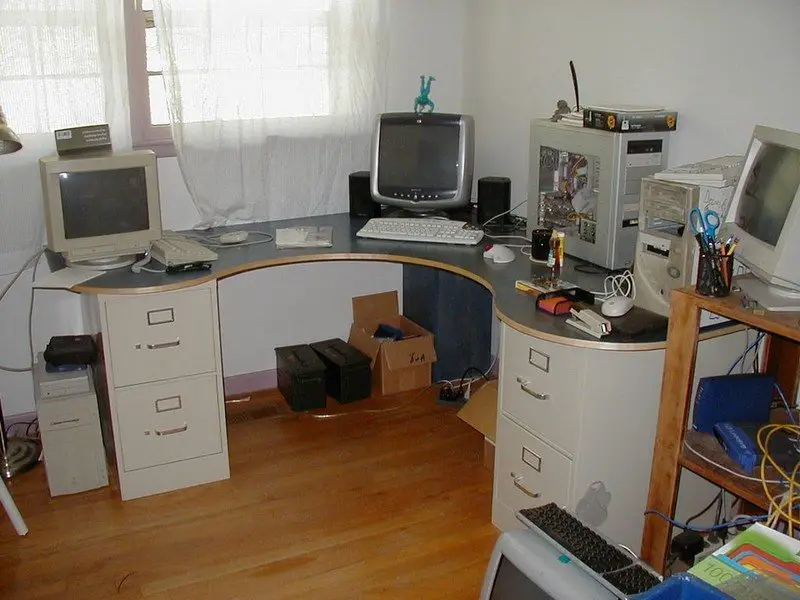
It’s ready to use – enjoy. I have. Mine has been great, even with my honkin big desk chair (see picture). The center sitting area is about 32″ wide – plenty of room in general, and there is a metric buttload of deskspace to fill up
Here’s a great tip: If you want an easy cord pass-through the desktop, you can cut the tip of the corner off each desktop half prior to staining. Enjoy!
Thanks to themostbob for this great project.
Finishing Touches and Decoration
When you’re putting together a DIY wrap-around desk, it’s not just about functionality—there’s a whole world of creative possibilities to make it uniquely yours. Below are some ideas to infuse your desk with personality and style, turning it into more than just a piece of furniture but a centerpiece of your workspace.
Get Creative with Stencils
Adding a stencil design to your wrap-around desk can instantly boost its charm. Pick a pattern that speaks to you—maybe something geometric or floral—and gently dab on some paint to bring it to life. Focus on areas like the desk corners or where it’s most visible. Once you’re happy with the design, seal it with a clear coat to make sure it lasts as long as your desk does.
Try Out Decoupage
If you love a collage of colors and patterns, decoupage is your go-to. It lets you cover your desk with paper or fabric cutouts. Think about using pages from vintage books, chic wallpaper scraps, or anything else that catches your eye. Glue them down smoothly, coat them well, and you’ll end up with a desk surface that’s entirely original.
Upgrade with Unique Hardware
Small details can make a big difference. Swapping out plain drawer pulls or cabinet handles with something more eye-catching is an easy upgrade. Whether you prefer sleek, modern metals or rustic, antique-style handles, this simple change can significantly enhance your desk’s look.
Choose Your Color Wisely
The color of your wrap-around desk sets the tone for your workspace. Want your desk to pop? Go bold with colors like deep blue or bright yellow. Prefer something subtler? Earth tones or pastels can blend beautifully with any room. After painting, pick a finish—glossy for a shiny look, or matte for a more understated style.
Detail the Edges
Edge detailing might sound minor, but it adds a professional touch to your desk. You could route the edges for a smooth, rounded feel, or add decorative molding for a more classic look. These details might be small, but they’re sure to be noticed.
These personalized touches not only make your wrap-around desk functional but also transform it into a true reflection of your style. With each addition, you turn an ordinary workspace into an inspiring and welcoming spot that’s all yours.
Conclusion
Building your own wrap-around desk is a rewarding project that combines functionality with personal expression. As you design and assemble the desk, you have the opportunity to tailor every aspect to fit your specific needs and aesthetic preferences. Once complete, this custom piece not only enhances your workspace but also serves as a testament to your creativity and craftsmanship.


