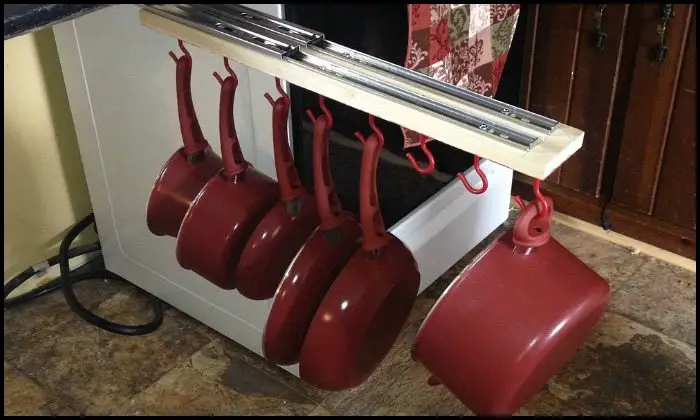
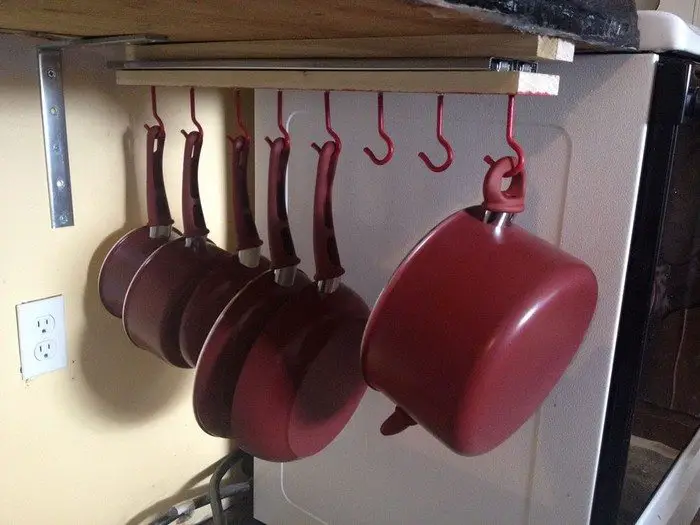
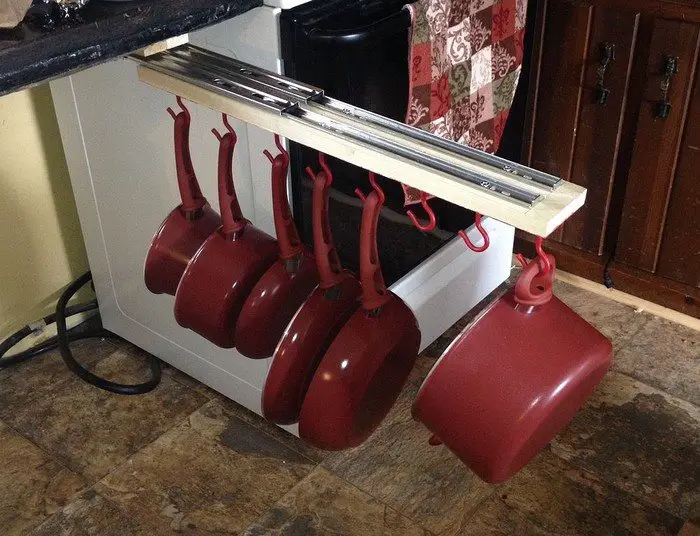
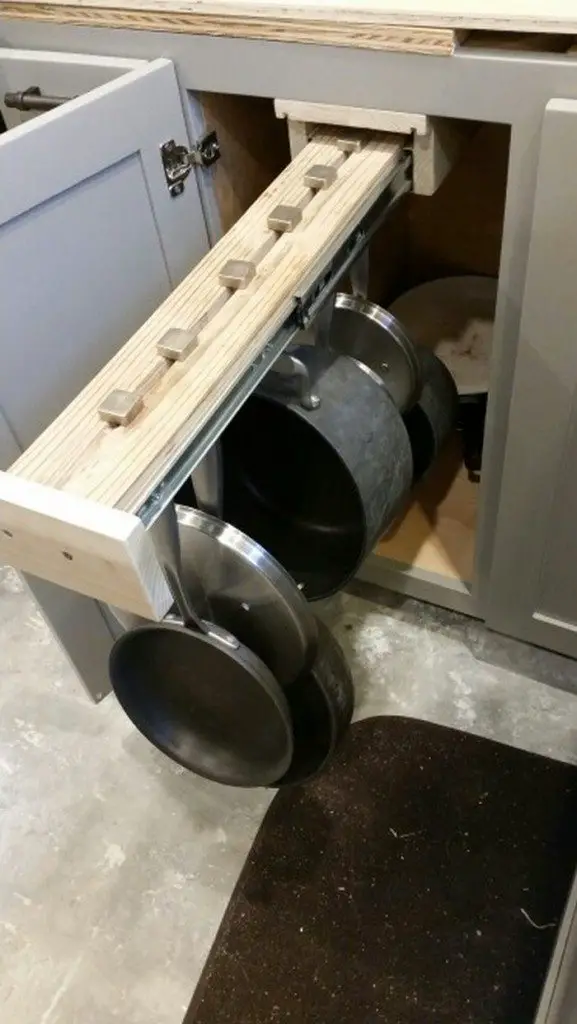
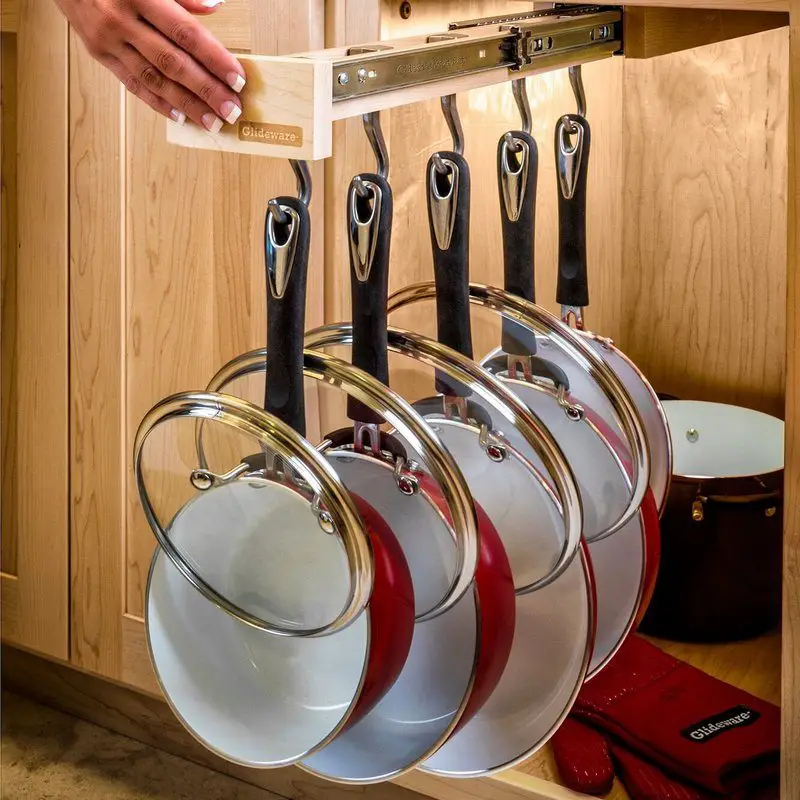
Many of you have liked this style of storage system but not its store-bought price:(
If this is the kind of pots and pans storage idea you’re looking for, you can definitely DIY!
Making this storage system yourself can save you a huge amount of money compared to buying from the store. And what’s great is that it is not a difficult DIY project to do!
The pull-out cabinet organizer is a simple mechanism, requiring only basic skills and tools. Just be sure to invest in heavy-duty hardware and good timber boards to have a storage system as strong and long-lasting as its store-bought version.
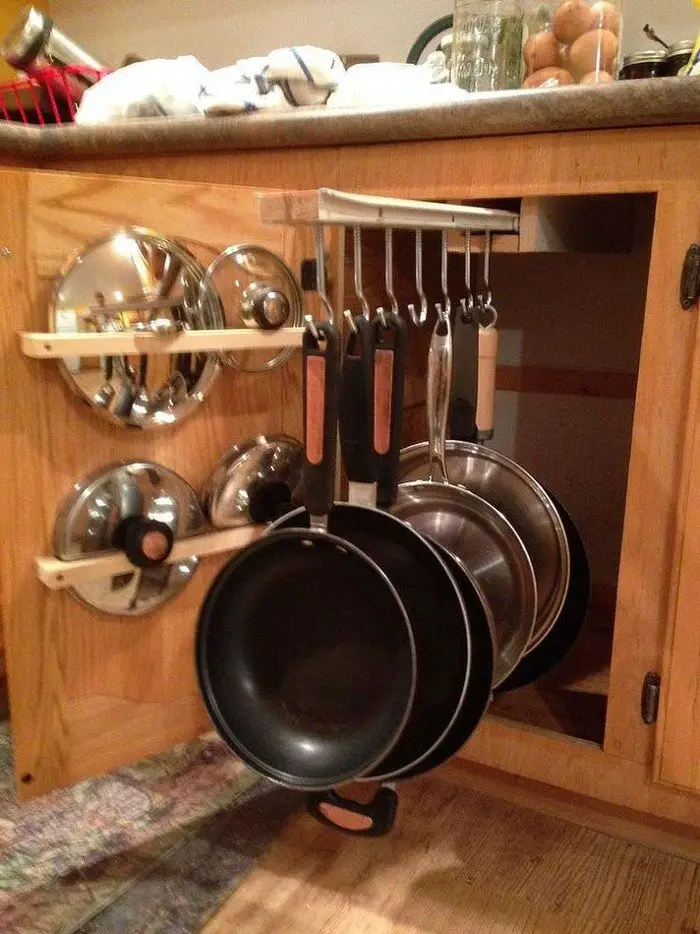
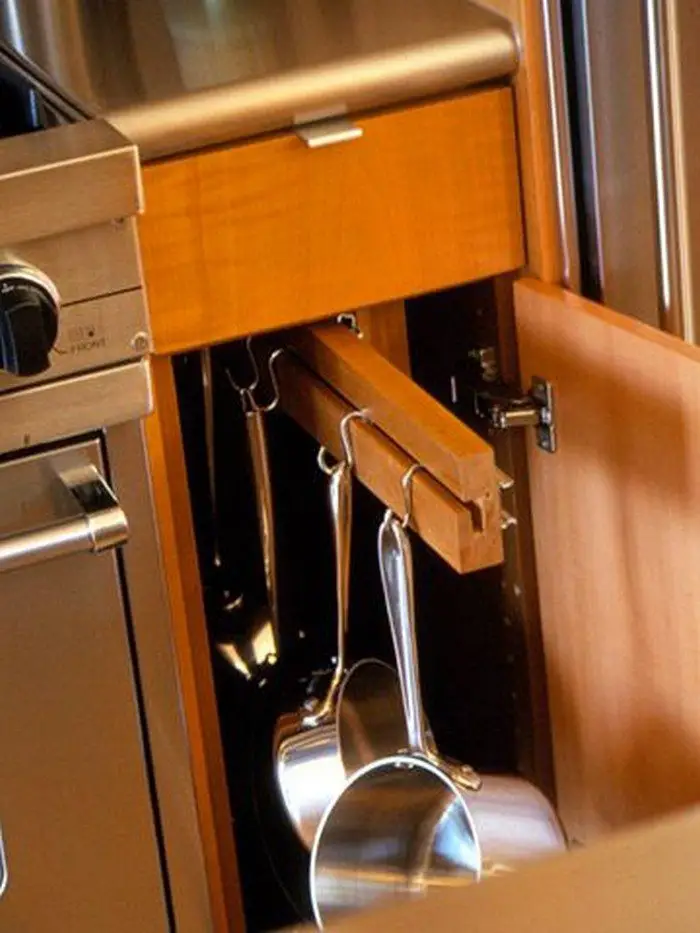
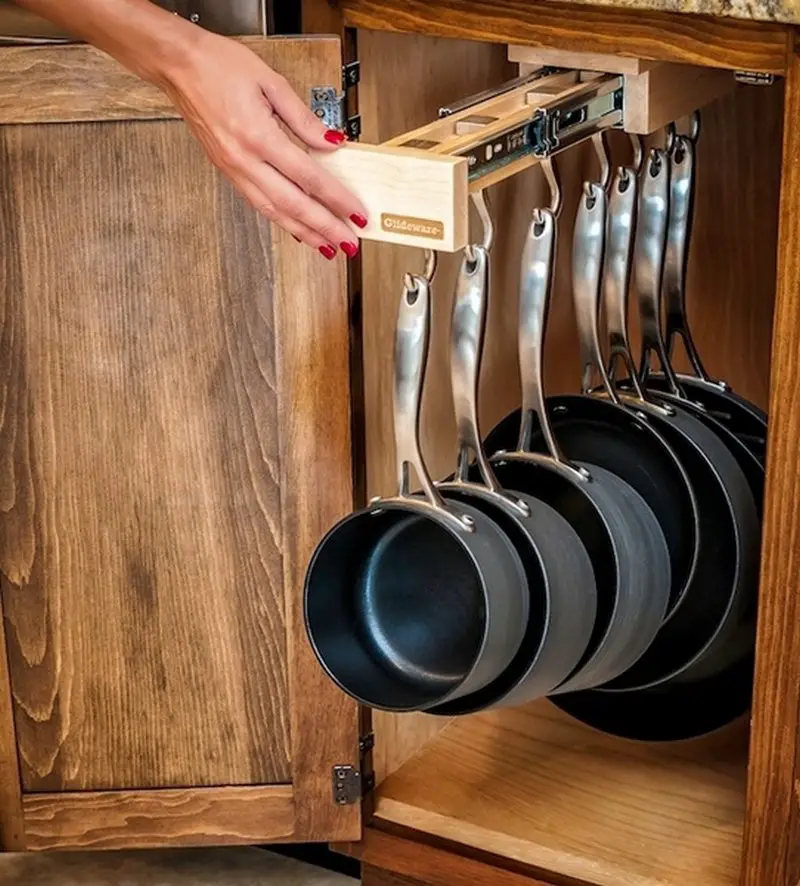
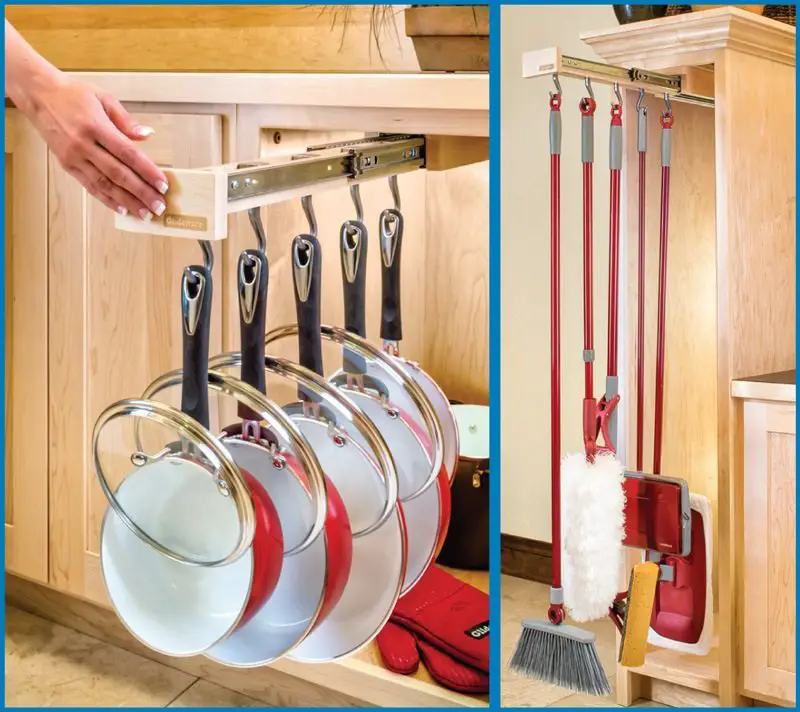
See more DIY sliding pots and pans rack examples from our album below, plus other DIY under-the-counter/cabinet storage ideas that might better suit your needs. You can also find the link to a tutorial for the sliding pots and pans rack below. :)
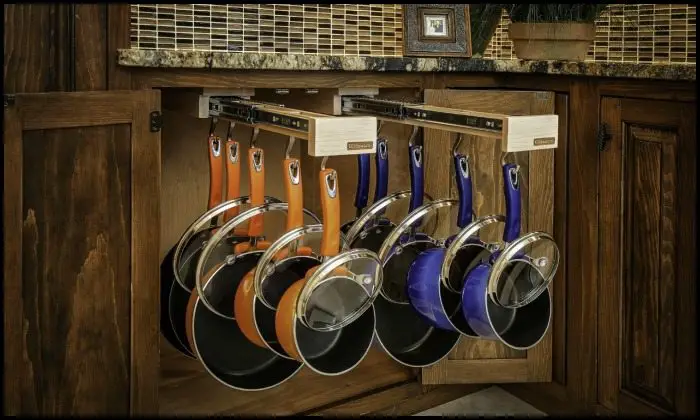
Have you finally found the perfect storage solution for your pots and pans?
Contents
How to Make Sliding Pots and Pans Racks
Ready to cook up some kitchen organization magic? With DIY sliding pots and pans racks, you can wave goodbye to tangled messes and hello to streamlined storage solutions! These sliding wonders not only save space but also bring an air of culinary elegance to your kitchen. Let us dive into the recipe for kitchen success!
You’ll need these materials:
- Set of 24″ Heavy-duty Drawer Slides
- 2 pcs of 1″x3″x24″ Finished Pine Boards
- Plasti-Dip Spray Paint
- 8 pcs of #4 3-7/8″ Screw in Hooks-Ceiling Hook
- Knob
And these tools:
- Measuring Tape
- Marker
- Drill
Click on any image to start lightbox display. Use your Esc key to close the lightbox.![]()

You can get step-by-step instructions from Tanya Marie Davis over at Hometalk…
Here’s a quick video…
5 Pro Strategies for Sliding Pots and Pans Rack
Welcome to the DIY sliding pots and pans rack extravaganza! Are you tired of digging through cluttered cabinets just to find your favourite skillet? Well, get ready to bid farewell to kitchen chaos because we have five pro strategies that will turn your space into an organized haven faster than you can say “stir-fry.” Let’s jump right in!
1. Measure Twice, Cut Once
Precision is your new best friend! Grab that trusty measuring tape and embark on a quest to conquer every nook and cranny of your kitchen space. We’re talking height, width, depth – leave no corner unmeasured! Your mission? To craft a rack that fits your kitchen like a glove, utilizing every inch of available real estate. Remember, in the world of DIY, precision is not just important – it’s essential!
2. Choose the Right Materials
Get ready to meet your material match! Whether you are swooning over the rustic vibes of hardwood or lusting after the modern allure of metal, it is time to ensure your materials are up to the task. Your pots and pans deserve nothing but the best – sturdy, reliable materials that can handle the weight of your culinary arsenal. And compatibility with those oh-so-important sliding mechanisms! We’re aiming for smooth sailing here, not a stuck-in-place nightmare!
3. Maximize Your Space
It is time to think outside the box – or in this case, outside the cabinet! Get those creative juices flowing and let us maximize every precious inch of space in your kitchen. Double up on levels, toss in some hooks, shelves, or dividers – the sky’s the limit!
This is your moment to shine, to craft a storage setup that is as unique as you are. Say farewell to kitchen clutter and hello to a space that is as organized as it is stylish!
4. Smooth Sliding Mechanism
Say goodbye to sticky situations and hello to effortless elegance! It is time to invest in the Rolls Royce of drawer slides or rails – the kind that can handle the weight of your entire cookware collection. But before you commit, it is essential to put them to the test.
Give them a whirl, a spin, a twirl – whatever it takes to ensure they’re up to the task. Because let us face it, a rack that glides smoothly is an absolute game-changer when you’re in the throes of a culinary whirlwind!
5. Secure Installation
Strap on your superhero cape, because it’s time to become the guardian of kitchen safety! When the moment arrives to install your rack, leave no screw unturned and no anchor unfastened. It is heavy-duty screws and anchors to the rescue, ensuring a fortress-like installation that can withstand even the most vigorous kitchen activity.
Follow those instructions like your kitchen depends on it – because let’s be real, a wobbly rack is just waiting to rain on your kitchen parade!
With these five pro strategies up your sleeve, you will be well on your way to kitchen organization nirvana. So roll up those sleeves, grab your tools, and let’s get started on building the sliding pots and pans rack of your dreams!
Advantages of Sliding Pans and Pots Racks
Looking to level up your kitchen game? Dive into the DIY world with a sliding pots and pans rack! Here are the top advantages that will have you sliding into organization heaven:
1. Maximized Space: Say goodbye to cluttered cabinets! DIY sliding pots and pans utilize vertical space, giving you more room to store your kitchen gadgets. But, there’s no precious counter space is wasted.
2. Customizable Design: Get creative! With a DIY project, you have the freedom to design your rack to fit your kitchen’s unique layout and style. Add hooks, shelves, or dividers to tailor the storage to your needs.
3. Cost-Effective: Save those hard-earned dollars! Building your sliding rack can be much more affordable than purchasing a pre-made one from the store. Plus, you’ll have the satisfaction of knowing you did it yourself!
4. Easy Access: No more digging through stacks of pots and pans! A sliding rack allows you to easily access all of your cookware with a simple pull, making meal prep a breeze.
5. Organization Bliss: Say hello to Kitchen Zen! By keeping your pots and pans neatly organized and easily accessible, you’ll streamline your cooking process and reduce stress in the kitchen.
6. Space Efficiency: Make the most of every inch! By utilizing vertical storage, a sliding rack helps you make efficient use of limited kitchen space, leaving more room for other essentials.
7. Enhanced Visibility: See everything at a glance! With your pots and pans neatly arranged on a sliding rack, you’ll have a clear view of your cookware collection, making it easier to find what you need when you need it.
8. DIY Pride: Show off your skills! Building your sliding rack is not only practical but also a rewarding DIY project that will impress friends and family. Plus, you’ll gain valuable woodworking or crafting experience along the way.
With these advantages in mind, it’s time to roll up your sleeves and embark on your DIY sliding pots and pans rack adventure. Get ready to transform your kitchen into an organized oasis that’s as functional as it is stylish!
Safety Precautions for Sliding Pots and Pans Rack
Get ready to slide and glide with safety on your side! Dive into DIY with these 5 safety precautions for crafting your sliding pots and pans rack. Let’s cook up a storm while keeping safety centre stage!
1. Foundation First: Secure Mounting
Before you even think about sliding those pots and pans, ensure your rack has a rock-solid foundation. This means securely mounting it to a sturdy surface. Opt for wall studs or use heavy-duty anchors to keep your rack firmly in place. Remember, a wobbly rack is a recipe for disaster!
2. Weight Wisdom: Know Your Limits
Sure, that sliding rack might look sleek, but don’t let its appearance fool you. Every DIY project has its limits, and weight capacity is a crucial one when it comes to pots and pans. Before loading up your rack, double-check its weight limit and stick to it like your favourite recipe. Overloading can lead to sagging shelves or worse, a catastrophic collapse!
3. Slide Smoothly: Quality Sliders Only
Nobody likes a sticky situation, especially when it comes to sliding pots and pans racks. Invest in high-quality sliders to ensure smooth gliding action every time. Cheap sliders can lead to frustrating jams or wobbles, putting your precious cookware at risk. Don’t skimp on quality here – your pots and pans will thank you!
4. Clearance Considerations: Space Matters
When it comes to sliding racks, clearance is key. Make sure there’s enough space between your rack and nearby cabinets or walls to prevent any unwanted collisions. The last thing you want is for your sliding masterpiece to scrape against your freshly painted cabinets or chip your beloved kitchen tiles. Measure twice, slide once!
5. Lock It Down: Safety First
Last but certainly not least, let’s talk safety locks. If you’ve got little ones running around, a sliding pots and pans rack can be an accident waiting to happen. Keep curious hands at bay by installing a child lock to prevent unauthorized access. It’s a simple step that can make a world of difference in keeping your kitchen a safe and happy place for everyone.
There you have it, 5 safety precautions to keep safety at the forefront of your DIY sliding pots and pans rack project. So roll up your sleeves, grab your tools, and get ready to slide into kitchen perfection – safely, of course!
The Wrap Up
Introducing the ultimate solution to your kitchen clutter: the sliding pots and pans rack! Say goodbye to rummaging through messy cabinets and hello to effortless organization. With its sleek design and practical functionality, this rack will revolutionize your cooking space.
Picture this: you’re in the middle of preparing a delicious meal, but you can’t find the right pan buried beneath a mountain of cookware. Frustrating, isn’t it? Well, fret no more! This sliding pots and pans rack puts an end to kitchen chaos by providing a designated spot for every pot, pan, and lid.
First things first, let’s talk space-saving magic. This sliding pots and pans rack is designed to make the most out of your kitchen real estate. No more wasted cabinet space or awkward stacking. The sliding mechanism allows you to effortlessly access your cookware, even in the deepest corners of your cabinets. It’s like having a mini-pantry makeover without the hefty price tag!
But this sliding pots and pans rack is not just about convenience—it’s also about durability. Crafted from high-quality materials, it’s built to withstand the demands of daily use. Whether you are a culinary enthusiast whipping up gourmet meals or a busy parent juggling weeknight dinners, this rack can handle it all. Say goodbye to flimsy organizers that buckle under pressure. With the sliding pots and pans rack, you can trust that your cookware is in good hands.
Let’s talk about versatility, shall we? This rack isn’t just for pots and pans. It’s a multi-functional powerhouse that can also accommodate baking sheets, cutting boards, and even serving trays. The adjustable dividers allow you to customize the layout to suit your needs, so you can say goodbye to one-size-fits-all solutions. Whether you’re a master chef or a novice cook, this rack will adapt to your kitchen lifestyle with ease.
Let us address the elephant in the room: installation. We know what you’re thinking—assembly can be a hassle. But fear not! This sliding pots and pans rack comes with easy-to-follow instructions and all the necessary hardware for a pain-free setup. No drills, and no headaches—just a simple, straightforward installation that you can tackle in minutes.
So, what’s the bottom line? The sliding pots and pans rack isn’t just a storage solution—it’s a game-changer for your kitchen. Say goodbye to cluttered cabinets and hello to culinary bliss. With its space-saving design, durable construction, and unmatched versatility, this rack will transform the way you cook and organize.
Don’t let kitchen chaos hold you back. Upgrade to the sliding pots and pans rack today and take control of your culinary kingdom!
Frequently Asked Questions
1. What materials do you need and where can you find them?
For the frame of your sliding pots and pans rack, consider sturdy hardwood like oak or maple, which you can purchase from your local lumberyard or hardware store. For the sliding mechanism, heavy-duty metal slides are recommended, available in the hardware section of most home improvement stores. Additionally, gather screws, brackets, and any other necessary hardware for assembly.
With sturdy hardwood, heavy-duty metal slides, and all the necessary hardware in your toolkit, you’re well-equipped to tackle any project with confidence.
2. How do you determine the right dimensions for your sliding pots and pans rack?
Measure the dimensions of your cabinet space accurately, considering both width and height. Take inventory of your pots and pans to determine the necessary spacing between shelves and dividers. Plan for additional clearance to ensure smooth sliding motion and accessibility.
Once you have determined the layout of your pots and pans, organize them based on frequency of use and size. Place frequently used items within easy reach, while larger or less frequently used items can be stored towards the back or higher shelves. Consider grouping similar items to maximize space and efficiency.
3. What tools do you need and how do you use them effectively?
Essential tools include a tape measure, a combination square for precise angles, a saw (such as a mitre saw or table saw) for cutting wood, a drill with appropriate bits for creating pilot holes and screwing components together, and a level to ensure the rack is installed evenly.
With these tools in your arsenal, you’ll be well-prepared to tackle woodworking projects with confidence and precision.
4. How do you ensure the sliding pots and pans rack is securely anchored in place?
Prioritize stability and security by using heavy-duty screws and brackets to attach the sliding pots and pans rack firmly to the inside of your cabinet. Ensure that the slides are installed correctly and securely, allowing for smooth movement.
Follow the manufacturer’s instructions precisely, ensuring the slides are aligned accurately and securely attached to both the rack and the cabinet. Test the movement of the rack along the slides to ensure it glides smoothly without any resistance or wobbling. Make any necessary adjustments to achieve optimal performance.
5. What are some strategies for troubleshooting common issues during assembly?
When undertaking the assembly of any project, it is not uncommon to encounter challenges along the way. These challenges can often manifest as misaligned components or difficulties in sliding the rack into place. In such situations, it is crucial to approach the task methodically and with precision.
One of the first steps to take is to reassess your measurements and ensure that all pieces have been cut accurately. Even the slightest miscalculation can lead to significant issues during assembly. By confirming the accuracy of your measurements, you can eliminate any potential errors and make the assembly process smoother.
By following these pro strategies, you’ll be well-equipped to tackle your DIY sliding pots and pans pack project with confidence and precision!


