If you’re one of the many people who have rabbits as pets, I don’t blame you. The fact that they’re cute should be reason enough but there are other advantages, too. For example, they’re quiet, easy to train, and they bond closely with their owners.
Here are some fun facts about rabbits: their pregnancy period lasts just 28 to 31 days. A female rabbit can give birth to as many as 18 kits (baby rabbits) at one time. And – wait for it – it can get pregnant again just moments after giving birth. So yes, they multiply pretty fast and you have to provide a home for them.
When it comes to housing rabbits, most owners prefer hutches to cages. Hutches provide better outdoor protection from the elements, predators, and whatnot. You can build a rabbit hutch all by yourself.
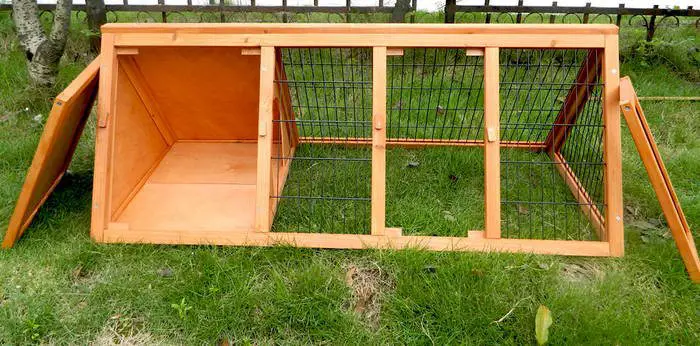
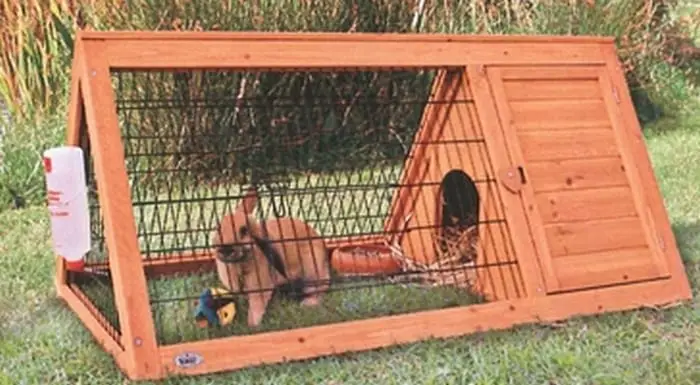
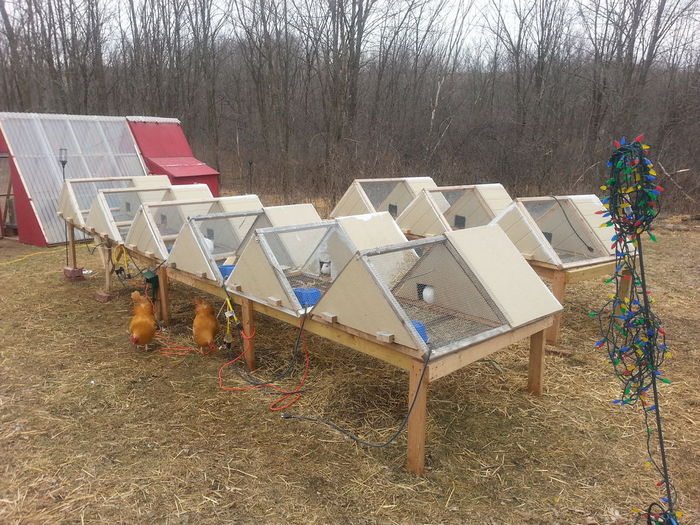
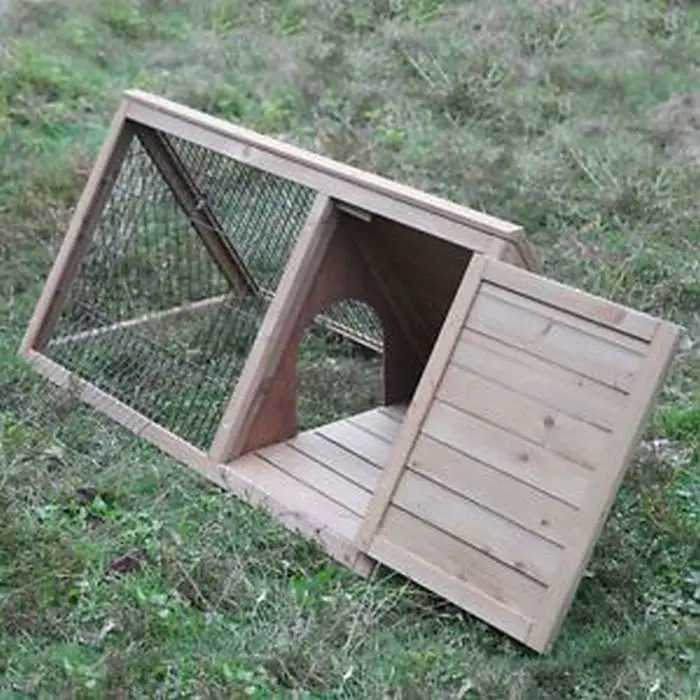
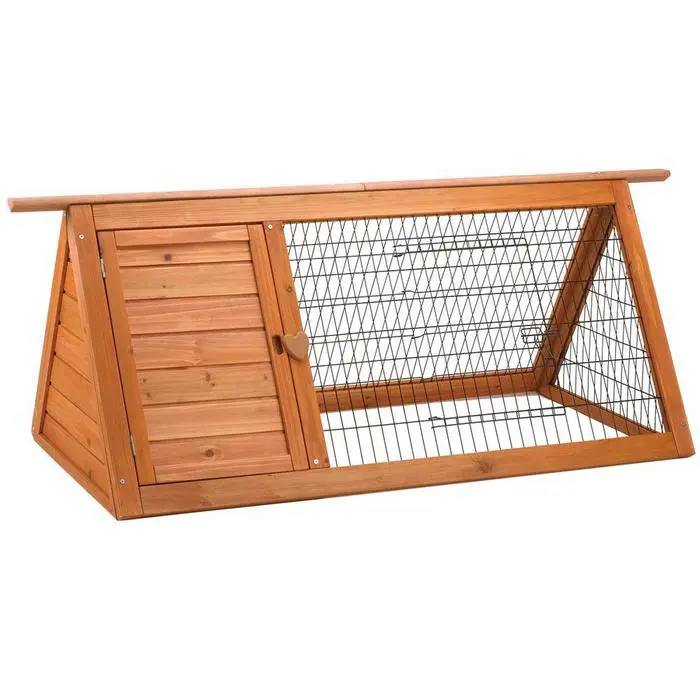
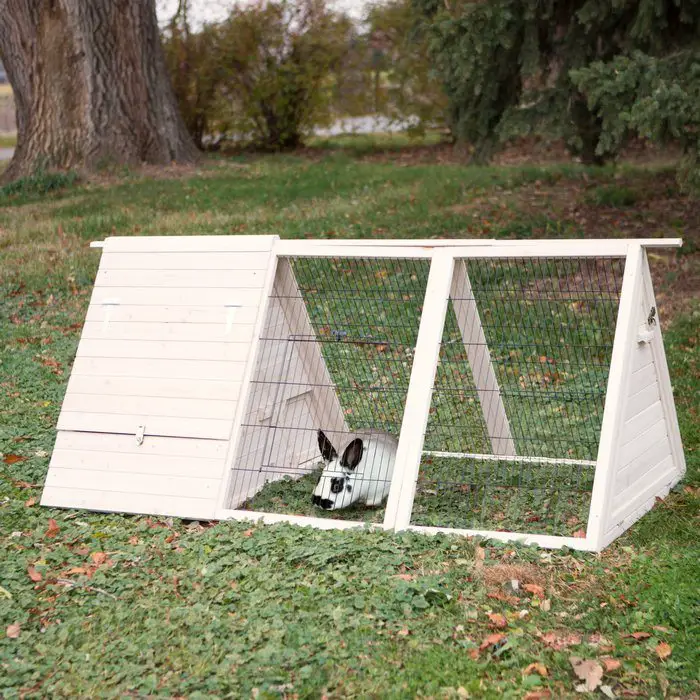
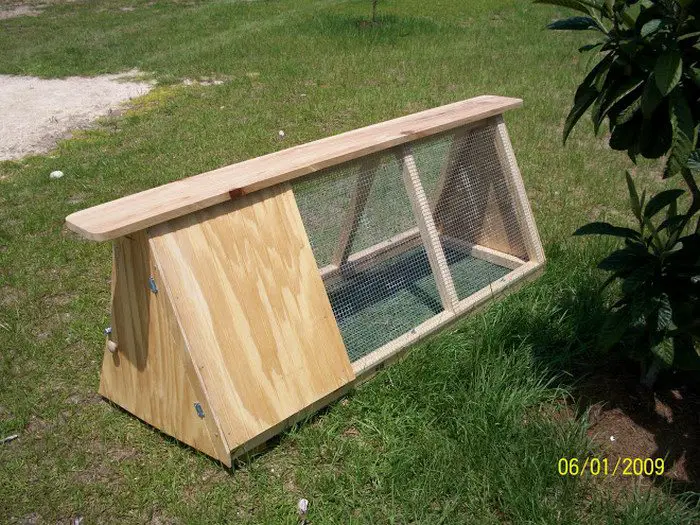
Here’s a unique idea for your pets: an A-frame rabbit hutch that is sturdy and safe. And it’s lightweight, too so you can easily move the hutch from one place to another.
Contents
How to Make an A-frame Rabbit Hutch
What you’ll need to build an A-frame rabbit hutch…
Materials:
- 3 pcs 4ft long 2×2’s
- 3 pcs 3ft long 2×2’s
- 2 pcs 8ft long 2×2’s
- 1 4×8 sheet plywood
- 1 roll hardware cloth
- 4 small hinges
- 2 small latches
- 1 box 1.5in 4d nails
- 1 bottle of wood glue
- Spray paint or a small bucket of paint (optional)
Tools:
- Hammer
- Staple gun/strong stapler
- Screwdriver
- Saw
- Wirecutter
Making an A-frame rabbit hutch is a rewarding project that provides a safe and comfortable home for your furry friends. With basic materials like 2x2s, plywood, hardware cloth, hinges, latches, nails, wood glue, and paint, you can construct a sturdy and functional hutch.
In this guide, we’ll walk you through the step-by-step process of building an A-frame rabbit hutch from start to finish.
Step 1: Cut Wood Pieces to Size
Using a circular saw or handsaw, cut the 2x2s to the following lengths:
- 6 pieces at 4ft long
- 6 pieces at 3ft long
- 4 pieces at 2ft long (for roof supports)
Cut the plywood sheet into two pieces:
- One piece measuring 4ft x 3ft (for the back panel)
- One piece measuring 2ft x 3ft (for the roof)
Step 2: Assemble the Frame
Using wood glue and nails, assemble the frame of the hutch. Start by constructing two identical rectangular frames using the 4ft and 3ft long 2x2s. These will serve as the front and back panels of the A-frame rabbit hutch.
Attach the 3ft long 2x2s to the ends of the 4ft long 2x2s using wood glue and nails. Ensure the corners are square by using a carpenter’s square.
Step 3: Attach the Roof Supports
Attach the 2ft long 2x2s across the top of each rectangular frame to serve as roof supports. Space them evenly apart and attach them securely with wood glue and nails.
Step 4: Add Hardware Cloth
Cut the hardware cloth to fit the openings of the front and back panels of the A-frame rabbit hutch. Use a staple gun to attach the hardware cloth to the inside of the frames, ensuring there are no gaps or loose edges where rabbits could get caught.
Step 5: Attach the Roof
Place the 4ft x 3ft plywood sheet on top of the hutch frame to serve as the back panel. Attach the plywood to the frame using hinges along the top edge, allowing it to open and close like a door for easy access.
Step 6: Finishing Touches
Attach the 2ft x 3ft plywood sheet to the top of the roof supports to serve as the roof. Secure it in place with nails or screws.
Install latches on the front panel to secure the door closed when needed. Optionally, you can paint the hutch with spray paint or a bucket of paint to protect it from the elements and add a decorative touch.
Building an A-frame rabbit hutch is a fun and rewarding project that provides a safe and comfortable home for your furry friends. With basic materials and tools, you can construct a sturdy and functional hutch that will keep your rabbits happy and healthy for years to come. So gather your materials, follow these step-by-step instructions, and create a cozy retreat for your beloved pets.
Click on any image to start the lightbox display. Use your Esc key to close the lightbox.


Thanks to HeatherP2 for sharing tips and strategies on how to make a DIY a-frame rabbit hutch.
Safety Precautions for Building a Sturdy DIY A-Frame Rabbit Hutch
Building a sturdy DIY A-frame rabbit hutch is an exciting and rewarding project, but it’s essential to prioritize safety throughout the construction process. By following proper safety precautions, you can create a secure and comfortable home for your furry friends while minimizing the risk of accidents or injuries.
In this comprehensive guide, we’ll explore safety measures to consider at each step of building a DIY A-frame rabbit hutch to help you ensure the safety and well-being of your rabbits.
1. Planning and Preparation
- Choose a Safe Location: Select a level and well-drained area in your yard or garden to place the hutch. Ensure there are no hazards such as sharp objects or uneven terrain that could harm your rabbits.
- Wear Protective Gear: Put on appropriate safety gear, including gloves, safety glasses, and closed-toe shoes, to protect yourself from splinters, sharp edges, and flying debris.
- Review Plans: Carefully review the hutch plans or instructions to familiarize yourself with the construction process and identify any potential safety hazards or challenges.
2. Gathering Materials
- Select Non-Toxic Materials: Choose untreated wood and non-toxic paints or stains to prevent harm to your rabbits. Ensure all materials are sturdy and free from defects that could compromise the hutch’s structural integrity.
- Inspect Materials Thoroughly: Examine all materials for defects, splinters, or damage before using them in construction. Discard any items that may pose a safety risk to your rabbits or yourself.
3. Construction
- Use Proper Tools and Equipment: Use the appropriate tools and equipment for each task, and ensure they are in good working condition. Follow manufacturer instructions for safe use of power tools.
- Secure Work Area: Keep your work area clean, organized, and free from clutter to minimize tripping hazards and accidents. Ensure adequate lighting for visibility.
- Handle Materials Carefully: Lift and maneuver materials with caution to avoid strain or injury. Use proper lifting techniques, and be mindful of sharp edges and corners.
4. Assembly
- Enlist Assistance if Needed: If the hutch assembly requires lifting heavy components or working with large pieces of wood, enlist the help of a friend or family member to prevent strain or injury.
- Secure Components Properly: Ensure all components are securely fastened and aligned correctly during assembly. Use clamps or braces to hold pieces in place temporarily while attaching them permanently.
5. Finishing Touches
- Ventilate Work Area: Ensure proper ventilation when applying paints or stains to minimize exposure to fumes. Work in a well-ventilated area or outdoors if possible.
- Use Non-Toxic Finishes: Choose pet-safe paints or stains that are non-toxic and low in volatile organic compounds (VOCs) to ensure the safety of your rabbits.
- Allow for Drying Time: Allow the finish to dry completely before allowing your rabbits to inhabit the hutch. Keep them away from freshly painted or stained surfaces until they are fully cured.
Maintenance Tips for DIY A-Frame Rabbit Hutch
Maintaining your DIY A-frame rabbit hutch is crucial for ensuring the health, safety, and comfort of your furry companions. Regular upkeep helps prevent the buildup of waste, debris, and harmful bacteria, ensuring a clean and hygienic living environment. In this guide, we’ll explore essential maintenance tips to keep your rabbit hutch in optimal condition and provide a comfortable home for your rabbits.
1. Cleaning Routine
Regular cleaning is essential to prevent the buildup of waste and odours in the hutch. Follow these steps for effective cleaning:
- Remove Waste Daily: Remove soiled bedding, droppings, and uneaten food from the hutch daily to maintain cleanliness.
- Scrub Surfaces: Use a mild soap and water solution to scrub the interior surfaces of the hutch, including the floor, walls, and any removable trays or shelves.
- Disinfect Weekly: Disinfect the hutch weekly using a pet-safe disinfectant to get rid of bacteria and prevent the spread of disease.
- Replace Bedding: Replace bedding regularly to keep the hutch clean, dry, and odor-free. Choose bedding materials that are safe for rabbits, such as hay or straw.
2. Inspection and Repairs
Regular inspection allows you to identify any signs of wear, damage, or deterioration in the hutch. Follow these steps to ensure the structural integrity of the hutch:
- Inspect Components: Check for loose fasteners, cracked wood, or rusty hardware. Tighten screws and bolts as needed, and replace any damaged or worn-out parts.
- Repair Damage: Repair any structural damage or weaknesses in the hutch promptly to prevent further deterioration. Replace damaged wood or hardware as necessary to maintain stability and security.
- Check for Predators: Regularly inspect the hutch for signs of predators, such as chew marks or attempts to dig under the hutch. Reinforce vulnerable areas to prevent access by predators and ensure the safety of your rabbits.
3. Ventilation and Air Quality
Proper ventilation is essential for maintaining good air quality and preventing the buildup of moisture and odours in the hutch. Follow these tips to ensure adequate ventilation:
- Provide Airflow: Ensure the hutch has adequate ventilation openings or vents to allow fresh air to circulate. Avoid blocking ventilation openings with bedding or other materials.
- Prevent Moisture Buildup: Monitor humidity levels in the hutch and take steps to prevent moisture buildup, such as providing proper drainage and using moisture-resistant materials.
- Clean Air Filters: If your hutch is equipped with air filters, clean or replace them regularly to ensure optimal airflow and air quality.
4. Temperature Control
Maintaining a comfortable temperature is essential for the health and well-being of your rabbits. Follow these tips to ensure proper temperature control in the hutch:
- Provide Shade: Place the hutch in a shaded area to protect your rabbits from direct sunlight and excessive heat. Use tarps or awnings to provide additional shade if necessary.
- Insulate the Hutch: Insulate the hutch to regulate temperature and provide protection from extreme cold or heat. Use insulating materials such as foam board or blankets to provide added warmth in cold weather.
- Monitor Temperature: Monitor temperature fluctuations in the hutch and take appropriate measures to ensure your rabbits are comfortable. Provide additional bedding or shelter during cold weather, and use fans or misters to cool the hutch during hot weather.
Maintaining your DIY A-frame rabbit hutch is essential for ensuring the health, safety, and comfort of your rabbits. By following these maintenance tips, you can create a clean, hygienic, and comfortable living environment for your furry companions.
Regular cleaning, inspection, and repairs help prevent the buildup of waste and bacteria, while proper ventilation, temperature control, and air quality management ensure your rabbits remain healthy and happy in their hutch. With proper care and attention, your DIY A-frame rabbit hutch will provide a safe and secure home for your rabbits for years to come.
The Wrap Up
Constructing an A-frame rabbit hutch is a rewarding and beneficial project that provides a safe and comfortable home for your furry companions. Through careful planning, dedication, and craftsmanship, you’ve created a shelter that meets the unique needs of your rabbits while showcasing your creativity and skills.
As you admire the completed hutch and watch your rabbits settle into their new environment, you can take pride in knowing that you’ve provided them with a secure and nurturing space where they can thrive. The sturdy construction, thoughtful design, and attention to detail ensure that the A-frame rabbit hutch will serve as a reliable and inviting habitat for your rabbits for years to come.
Moving forward, regular maintenance and care will be essential to preserve the integrity of the A-frame rabbit hutch and ensure the well-being of your rabbits. By staying attentive to their needs and addressing any issues promptly, you can continue to provide a comfortable and supportive living environment for your beloved pets.
Constructing an A-frame rabbit hutch is more than just a building project; it’s an expression of love and care for your rabbits. The time and effort invested in creating their home will be rewarded with their happiness and contentment, making it a worthwhile endeavour for both you and your furry friends.
Every nail hammered, every board cut, and every screw fastened is imbued with the intention of creating a space where your rabbits can thrive. It’s a labour of love, driven by the desire to ensure their happiness and well-being.
As you pour your time and effort into crafting their home, you’re not just building a structure; you’re creating a sanctuary—a place where your rabbits can feel secure, comfortable, and cherished. Each detail carefully considered, from the size and layout of the A-frame rabbit hutch to the materials used in its construction, reflects your dedication to providing the best possible living space for your pets.
Frequently Asked Questions
1. How big should your A-frame rabbit hutch be?
The size of your A-frame rabbit hutch will depend on the number and size of your rabbits, as well as the available space in your yard or garden. A good rule of thumb is to provide at least 12 square feet of space per rabbit, with additional space for exercise and enrichment.
2. Can you customize your A-frame rabbit hutch?
Absolutely! Customizing your A-frame rabbit hutch allows you to tailor it to your rabbits’ specific needs and preferences. You can add features such as removable trays for easy cleaning, nesting boxes for privacy, or ramps and platforms for enrichment. Get creative and make your A-frame rabbit hutch uniquely suited to your rabbits’ comfort and well-being.
3. How can you protect my rabbits from predators?
Predators pose a significant threat to rabbits, especially if they are housed outdoors. To protect your rabbits from predators, reinforce the hutch with sturdy wire mesh or hardware cloth to prevent access by predators such as raccoons, foxes, or birds of prey. Ensure the hutch is securely anchored to the ground to prevent digging or tipping by larger predators.
4. How often should you clean your rabbit hutch?
Regular cleaning is essential to maintain a healthy and hygienic living environment for your rabbits. Clean the hutch at least once a week, removing soiled bedding, droppings, and food debris. Disinfect the hutch periodically to prevent the buildup of bacteria and parasites. Replace bedding regularly to keep the hutch clean and odour-free.
5. What should I do if I notice signs of illness or injury in my rabbits?
If you notice any signs of illness or injury in your rabbits, such as lethargy, loss of appetite, or unusual behaviour, consult a veterinarian as soon as possible. Prompt medical attention is crucial to ensure the health and well-being of your rabbits.
6. Can you house different rabbit breeds together in the same hutch?
It’s generally not recommended to house different rabbit breeds together, as they may have different temperaments and social needs. It’s best to provide separate living spaces for each rabbit to prevent potential conflicts or aggression.


