If you want your friends and family to frequent your precious garden, you must fill it not only with healthy, colorful plants and blooms but also with adorable decorations!
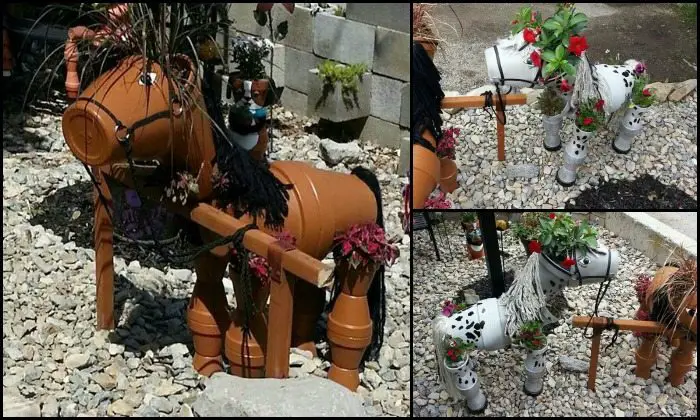
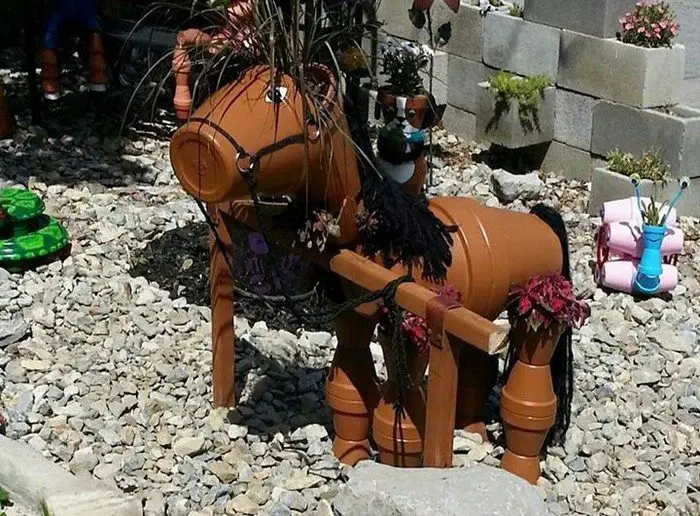
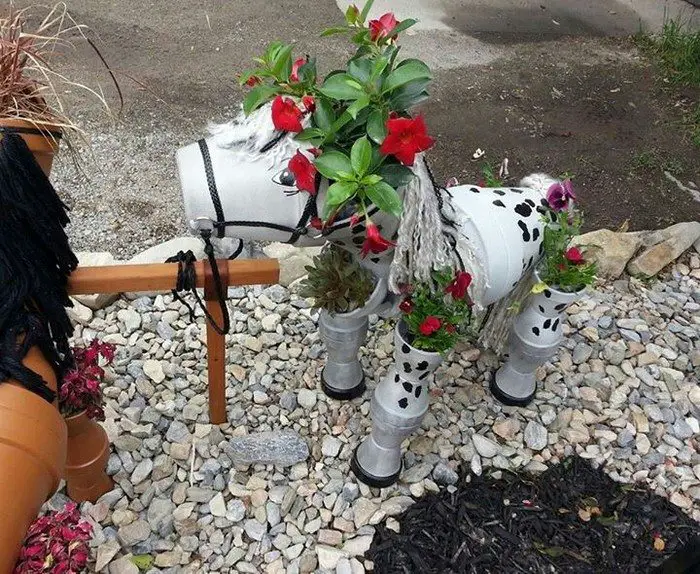
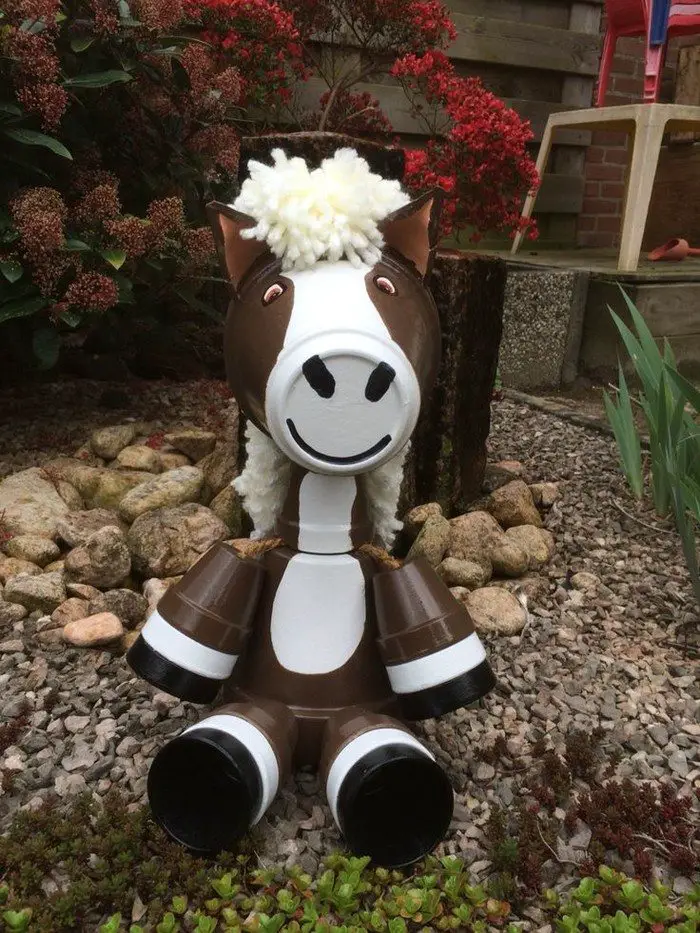
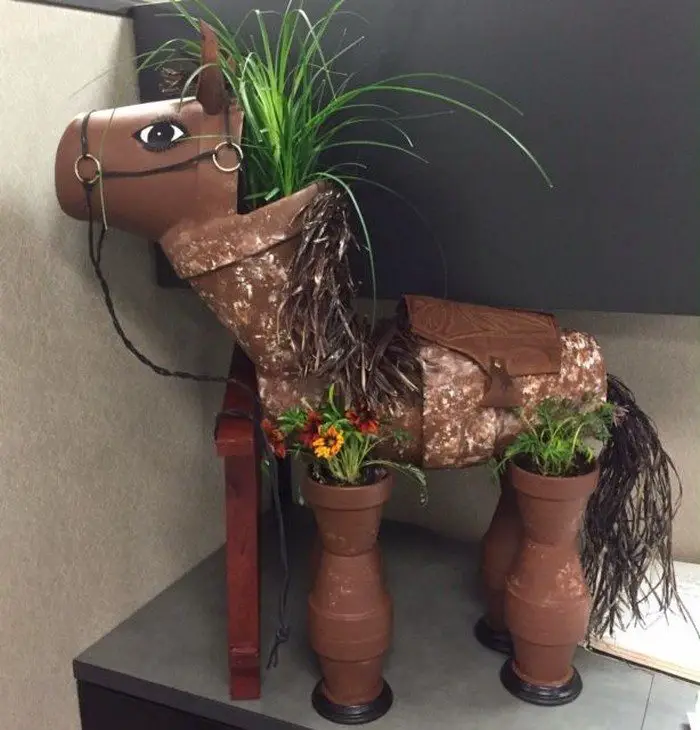
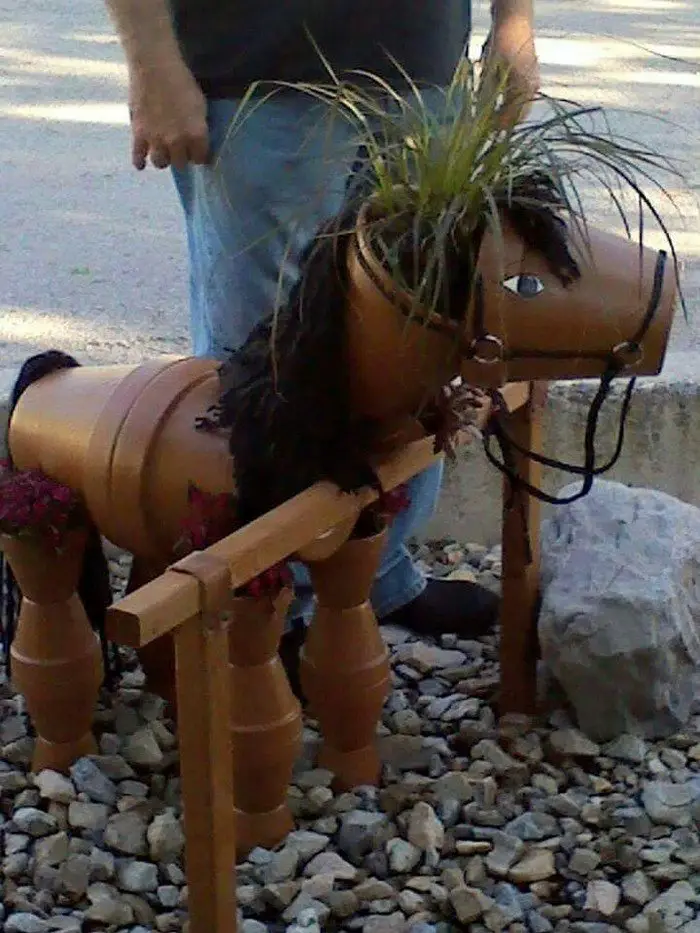
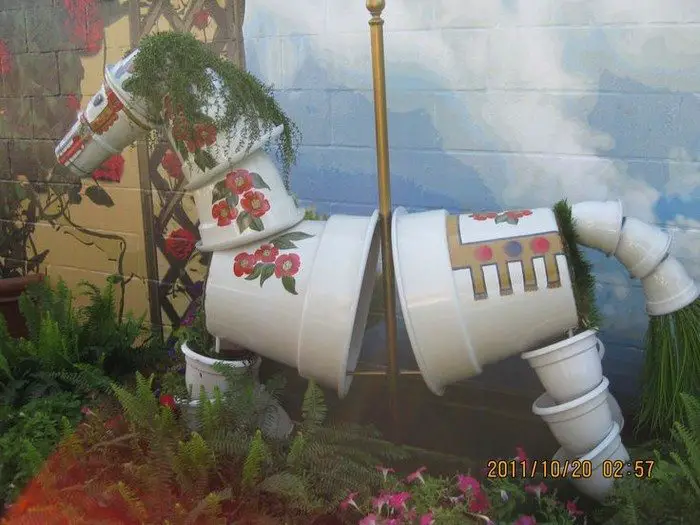
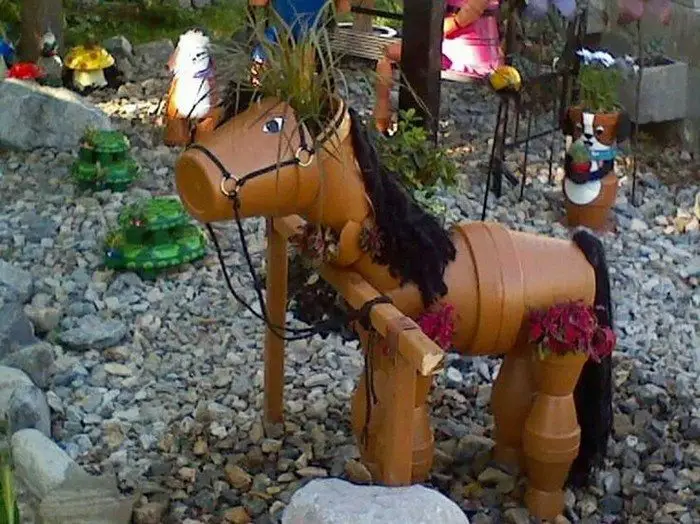
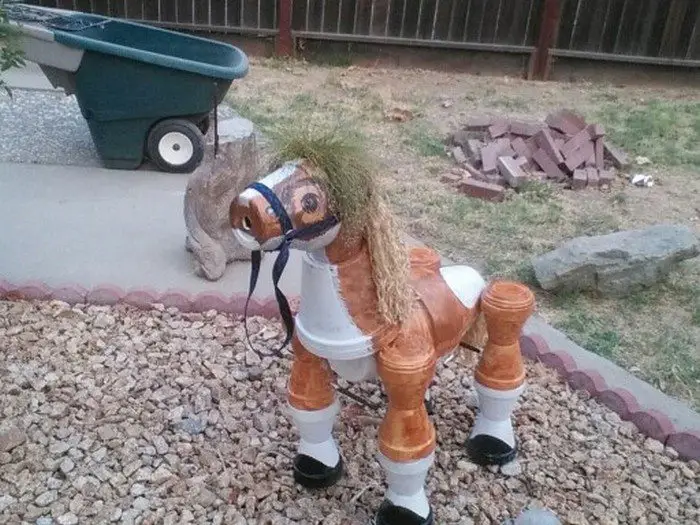
A clay flower pot horse is one idea everybody will surely love!
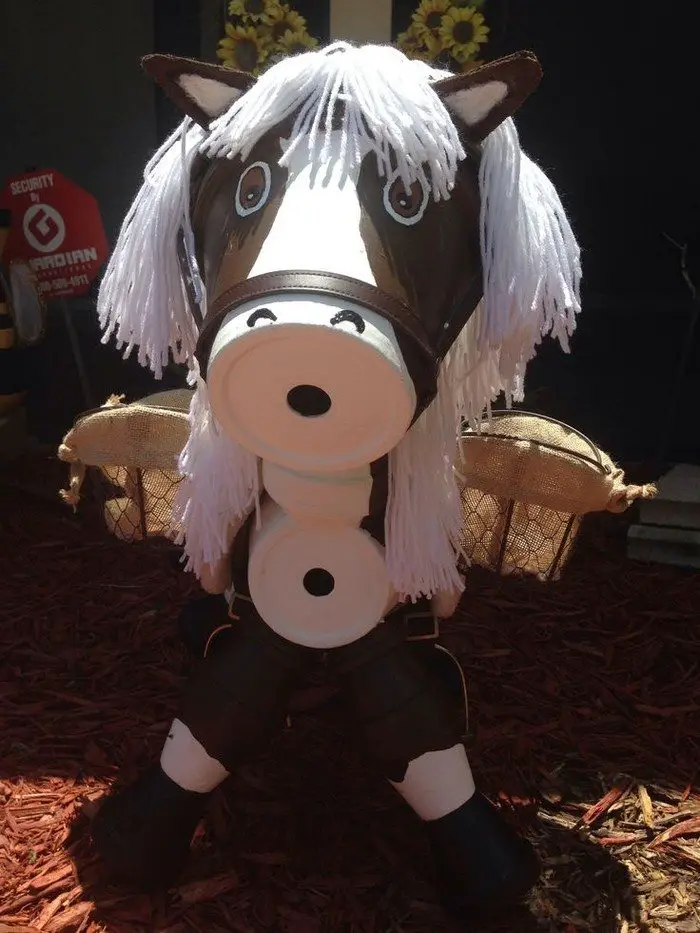
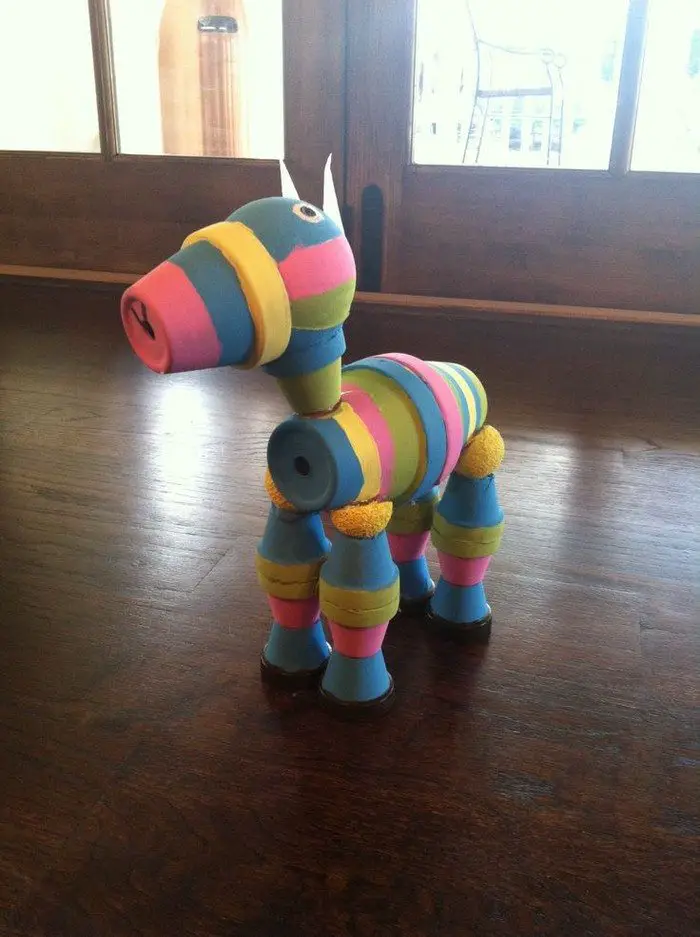
Aren’t these garden decorations cute??
Though some of you might find that it’s not a quick and easy process, we guarantee it’s a fun and happy project to do, especially with kids!
There are several ways to design a clay flower pot horse. You can choose what color you want your horse decor to be. You can use yarn for the mane and tail but real plants look great, too! Some people enjoyed that they even added accessories.
Take a look at various versions from our album below and be inspired to create your clay pot horse!
We’re feeling very happy just looking at them. How about you? :)
Contents
- 1 How to Create Your Own Adorable Clay Flower Pot Horse
- 2 Extra Tips
- 3 Creative Painting Techniques for Your Clay Pot Horse
- 4 Incorporating Lighting Elements
- 5 FAQ for Making Your Own Clay Flower Pot Horse
- 5.1 What materials do I need to make a clay flower pot horse?
- 5.2 Can I use any type of clay pots?
- 5.3 How do I ensure the clay flower pot horse is stable?
- 5.4 Can I customize the color of my clay flower pot horse?
- 5.5 How can I add more character to my clay flower pot horse?
- 5.6 Can I add lighting to my clay flower pot horse?
- 6 Garden Delights!
How to Create Your Own Adorable Clay Flower Pot Horse
In this step-by-step guide, discover the delightful process of crafting your adorable clay flower pot horse. Unleash your creativity as we take you on a journey of sculpting and molding, transforming humble clay into a captivating equine masterpiece that will add a touch of whimsy to any garden setting.
Whether you’re an experienced artist or a curious beginner, this enchanting project is designed to be both enjoyable and achievable. Ready to set out on this creative journey? Gather all the essential materials and tools to kickstart your artistic adventure.
Materials
- 2 pieces, 8″ Pots (for head)
- 6″ Pot (for neck)
- 2 pieces, 10″ Pots (for body)
- 16 pieces, 4 1/4″ Pots (for legs)
- All Thread Pole / Rod
- Gorilla Glue (E6000)
- Yarn
- Rubber Bands
- Nuts and Washers
- Spray Paint
- Paper Towel
- Small Belts, Ropes (any decor materials to dress up your horse)
Tools
- Scissors
- Hacksaw
- Drill
Click on any image to start the lightbox display. Use your Esc key to close the lightbox.8-)

Steps
Step 1: Prepare Your Pots
Start by cleaning your clay pots with a damp paper towel to remove any dust or dirt. This ensures the glue and paint adhere properly.
Step 2: Drill Holes
Using your drill, carefully make a hole in the center of each pot. These holes are for the all-thread rod that will hold your horse together.
Step 3: Cut the All Thread Rod
Measure and cut the all-thread rod with a hacksaw to the desired length. This rod will need to be long enough to stack your pots for the head, neck, body, and legs, plus a bit extra for securing with nuts and washers.
Step 4: Assemble the Legs
Take four 4 1/4″ pots for each leg and thread them onto the rod. Secure each set of legs with washers and nuts to keep them in place. Repeat this step for all four legs.
Step 5: Create the Body
Thread the two 10″ pots onto the rod for the horse’s body, positioning them to sit wide apart, creating the horse’s belly. Secure with nuts and washers.
Step 6: Attach the Neck and Head
Thread the 6″ pot (neck) and then the two 8″ pots (head) onto the rod. Adjust the positioning until you’re happy with the shape. Secure with nuts and washers.
Step 7: Apply Adhesive
To ensure stability, apply Gorilla Glue (E6000) at the points where the pots touch each other. This will help keep your clay flower pot horse together securely.
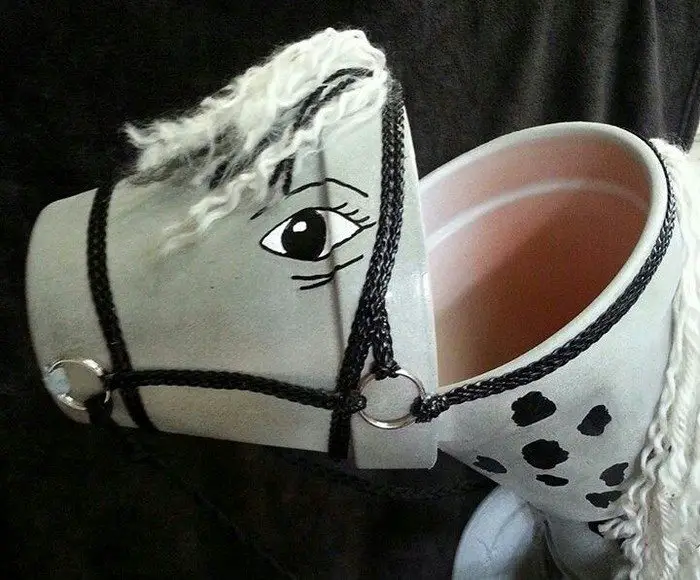
Step 8: Decorate Your Horse
Once the glue has dried, you can paint your horse with spray paint. Choose colors that match your garden’s theme or go for a realistic horse color. Let the paint dry completely.
Step 9: Add Yarn for Mane and Tail
Cut lengths of yarn for the horse’s mane and tail. Tie them with rubber bands and glue them to the horse’s head and rear, respectively.
Step 10: Add Final Touches
Use small belts, ropes, or any other decor materials to dress up your horse. You can create a bridle, reins, or even a saddle to add character.
Extra Tips
As you embark on your journey of garden artistry to create a charming clay flower pot horse, here are some extra tips to make the process even more enjoyable and successful:
- Choosing the Right Pots: Opt for flower pots that have a shape suitable for the horse’s body and head. A larger pot for the body and a smaller one for the head works well. Make sure the pots have a smooth surface for easy painting and decorating.
- Stability is Key: To ensure your clay horse is stable and doesn’t topple over, consider using pots with a wider base for the body and legs. This will give your creation a solid foundation.
- Quality of Clay Pots: Invest in high-quality clay pots to ensure they are durable and won’t break easily during assembly. Terra cotta or ceramic pots are great options as they provide a sturdy structure.
- Clean and Sand: Before assembling the pots, clean them thoroughly to remove any dust or dirt. Sand the surface slightly to enhance paint adhesion and provide a smoother finish.
- Use Strong Adhesive: To securely attach the pots, use a strong adhesive for outdoor use. Epoxy or weather-resistant glue is recommended to ensure the horse remains intact in various weather conditions.
- Reinforce With Wire: For added stability, consider inserting a metal wire or rod through the center of the pots, extending from the body to the head. This reinforcement will make the structure more robust.
- Paint With Outdoor-Grade Paint: Choose outdoor-grade acrylic paint that can withstand exposure to sunlight and rain. Paint the pots in your desired colors, and let each coat dry before applying the next.
- Add Decorative Details: Get creative with decorative elements to bring your clay horse to life. Use smaller pots or other materials to craft ears, a mane, and a tail. Certainly, you can attach faux flowers or small plants to the horse’s back for an added touch.
- Sealant for Protection: After painting and decorating, apply a clear outdoor sealant over the entire clay horse to protect the paint and enhance its longevity. This will safeguard your creation from the elements and preserve its vibrant colors.
- Mindful Placement: Once your clay flower pot horse is complete, consider where you’ll display it in your garden. Your chosen spot should complement the overall garden design and allow the horse to stand out as a charming focal point.
- Maintenance and Care: Regularly inspect your clay horse for any signs of damage. Ensure there is no chipped paint or loose elements to maintain its appeal over time.
Remember to have fun and let your creativity flow while making your clay flower pot horse. It’s a wonderful way to add a touch of whimsy and artistry to your garden!
You can also turn clay flower pots into a brilliant bird bath. With a little creativity and a few simple steps, you can create a welcoming oasis that not only enhances your garden but also provides a refreshing spot for birds to bathe and drink.
Creative Painting Techniques for Your Clay Pot Horse
Adding a clay flower pot horse to your garden is a delightful way to bring charm and whimsy to your outdoor space. Beyond the basic assembly, painting your clay pot horse offers an opportunity to unleash your creativity and personalize your piece. Here are some creative painting techniques that will transform your garden decor into a unique art piece.
Sponging for Texture
Sponging is a wonderfully simple technique to enhance your clay flower pot horse with appealing depth and texture. Begin this creative process by choosing a vibrant or subtle base color that matches the theme of your garden or personal taste.
After applying a smooth, even base coat to your clay flower pot horse and allowing it to dry completely, it’s time to add the magic touch. Dip a sponge into a paint shade that is either slightly lighter or darker than the base coat.
Gently dab the sponge across the surface of your clay flower pot horse, focusing on creating a varied, mottled effect. This technique doesn’t just add texture; it brings your clay flower pot horse to life, making it a more dynamic and visually interesting feature in your garden.
Stenciling Designs
Stenciling is a fantastic method for incorporating intricate patterns or motifs onto your clay flower pot horse, adding a layer of sophistication and detail. First, select stencils that resonate with the overall vibe of your garden—be it the natural beauty of flowers and leaves or the whimsical charm of abstract designs.
Carefully wrap the stencil around the desired section of your clay flower pot horse, ensuring it’s secure. Then, gently apply paint over the stencil openings using a small brush or a piece of sponge. By carefully choosing where to place these designs and repeating the patterns on different segments of your clay flower pot horse, you can achieve a harmonious and striking look that enhances the aesthetic appeal of your outdoor space.
Decoupage for Detail
Decoupage is a unique and creative way to add exquisite detail to your clay flower pot horse. This technique transforms simple paper designs into elegant decorations, creating a stunning visual impact. Start by selecting napkins, tissue paper, or lightweight fabrics that feature captivating patterns or designs that resonate with your personal style or garden theme.
Carefully cut out these designs, keeping in mind the areas of your clay flower pot horse you wish to embellish. Using a decoupage medium or a mixture of white glue and water, apply the cutouts onto the surface of your clay pot horse.
Smooth out any bubbles or wrinkles for a flawless finish. After the application dries completely, seal your artwork with a layer of clear varnish. This not only protects the surface but also enhances the vibrancy of the designs. Decoupage allows you to add detailed scenes, intricate floral designs, or any imagery that complements your garden’s aesthetics, making your clay flower pot horse a captivating focal point.
Layering and Blending
Layering and blending different colors on your clay flower pot horse can produce stunning, lifelike, or artistically abstract effects. Begin with a solid base coat, choosing a color that sets the tone for your horse. Once the base is dry, gradually add layers of paint, using a wet-on-wet technique to blend these colors smoothly.
This method is particularly effective for simulating natural textures and details, such as the softness of the mane or the sleekness of the tail, giving your clay flower pot horse a more realistic or artistically nuanced appearance.
The key is to work patiently, allowing each layer to partially dry before adding the next, thereby creating depth and dimension. This technique not only elevates the visual appeal of your clay flower pot horse but also invites viewers to appreciate the subtleties of your garden decor.
Adding Metallic Accents
Incorporating metallic paints into your clay flower pot horse project can introduce an element of glamour and sophistication. Metallic hues like gold, silver, and bronze can dramatically highlight your horse’s edges, features, and decorative patterns.
Strategically apply these metallic accents to areas such as the bridle, hooves, or patterns over the base coat to create a stunning contrast. The reflective quality of metallic paints catches the sunlight beautifully, making your clay flower pot horse shimmer and stand out in your garden.
This technique works wonderfully for adding a luxurious touch or for emphasizing certain aspects of your horse’s design, ensuring that your garden decor captures attention and reflects a sense of elegance.
By experimenting with these painting techniques, you can transform a simple clay flower pot horse into a stunning piece of garden art. Each method offers a different way to express your style, ensuring your clay pot horse is as unique as your garden.
Incorporating Lighting Elements
Incorporating lighting elements into your clay flower pot horse can transform it from a charming daytime decoration to a magical nighttime feature in your garden. Adding lights highlights the beauty of your creation after sunset and adds a whimsical ambiance to your outdoor space. Here’s how to bring your clay flower pot horse to life with light.
Choosing the Right Lights
Selecting the appropriate lighting is crucial. Solar lights are an excellent option for garden decorations since they’re eco-friendly and easy to install without worrying about electrical cords. LED string lights or small outdoor fairy lights can also be wrapped around or placed inside the pots, creating a glowing effect.
Installing Solar Lights
For a simple, yet effective lighting solution, consider using a solar garden stake light. Drill a hole at the top of your clay flower pot horse’s head or back, big enough to securely hold the solar light. Insert the light into the hole, ensuring it’s stable and upright. As night falls, your horse will have a beautiful glow, casting enchanting shadows around it.
Wrapping with LED String Lights
LED string lights are flexible and perfect for wrapping around your clay flower pot horse. Start at the base and carefully wrap the lights around the body, moving up towards the head and neck. Use small, clear clips or adhesive strips to secure the lights in place. The LED lights will illuminate your horse, accentuating its shape and features.
Highlighting Features with Spotlights
To highlight your clay flower pot horse’s features, place small spotlights around it. Position the lights to shine on the horse from different angles, focusing on the head, body, or the overall structure. This method lights up the horse and creates a dramatic effect in your garden, making the horse a focal point at night.
Creating Ambiance with Ambient Lighting
Consider placing LED candles or lanterns around your clay flower pot horse for a softer, ambient light. This creates a cozy, inviting atmosphere, perfect for evenings spent outdoors. The gentle flicker of candlelight or the soft glow from lanterns will complement the natural beauty of your garden while highlighting your clay flower pot horse.
FAQ for Making Your Own Clay Flower Pot Horse
What materials do I need to make a clay flower pot horse?
You will need various sizes of clay pots (for the head, neck, body, and legs), all thread pole/rod, Gorilla Glue (E6000), yarn, rubber bands, nuts and washers, spray paint, paper towel, and small belts or ropes for decoration. Tools required include scissors, a hacksaw, and a drill.
Can I use any type of clay pots?
Yes, any type of clay pots can be used as long as they fit the size requirements for the head, neck, body, and legs of the horse. Ensure they have a hole at the bottom for the all-thread rod to pass through.
How do I ensure the clay flower pot horse is stable?
Use nuts and washers on the all-thread rod to securely fasten each pot in place. Applying Gorilla Glue (E6000) at the points where pots touch each other can also add stability. Consider placing your horse on a flat, stable surface in your garden.
Can I customize the color of my clay flower pot horse?
Absolutely! Spray paint allows you to customize your horse in any color or combination of colors. Let the paint dry completely before handling.
How can I add more character to my clay flower pot horse?
You can add yarn for the mane and tail, use small belts or ropes for decorative elements like bridles or saddles, and even incorporate painting techniques such as sponging, stenciling, or decoupage for detailed designs.
Can I add lighting to my clay flower pot horse?
Incorporating lighting elements like solar lights, LED string lights, or small spotlights can transform your horse into a magical nighttime feature. Choose a lighting option that suits your garden and safely install it on or around your horse.
Garden Delights!
This comprehensive guide demonstrates an easy and enjoyable fashion for an adorable clay flower pot horse. Emphasizing ease, it utilizes readily available pots and offers insights on selecting suitable shapes and sizes. It also highlights the importance of prioritizing stability and durability by opting for high-quality pots and using suitable adhesives.
The creative process involves painting the pots with outdoor-grade paint and adding decorative touches to bring the horse to life. The guide also highlights the significance of applying a protective sealant and offers suggestions for placement and maintenance.
With these straightforward approaches, anyone can effortlessly produce a captivating clay flower pot horse to enhance their garden with charm and artistry.
Ready to craft your very own, one-of-a-kind clay flower pot horse?


