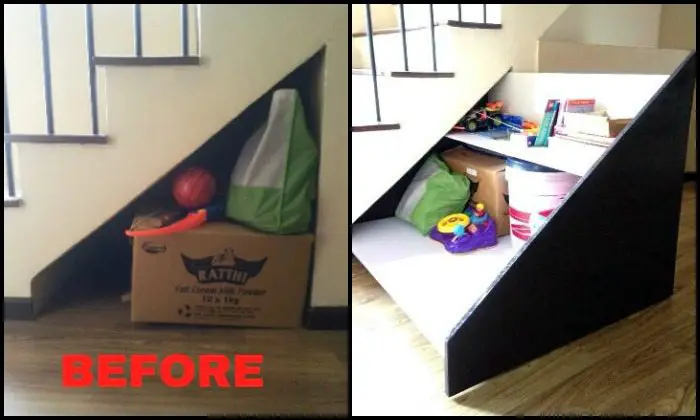
Under stairs pull-out storage! There are plenty of designs for this storage idea, but most of them seem to require a great amount of work. This one, however, is simple and practical both in the building process and in actual use!
If you’ve got unused space under your stairs and you want to make good-looking storage with it, this project is for you no matter what your building experience is. :)
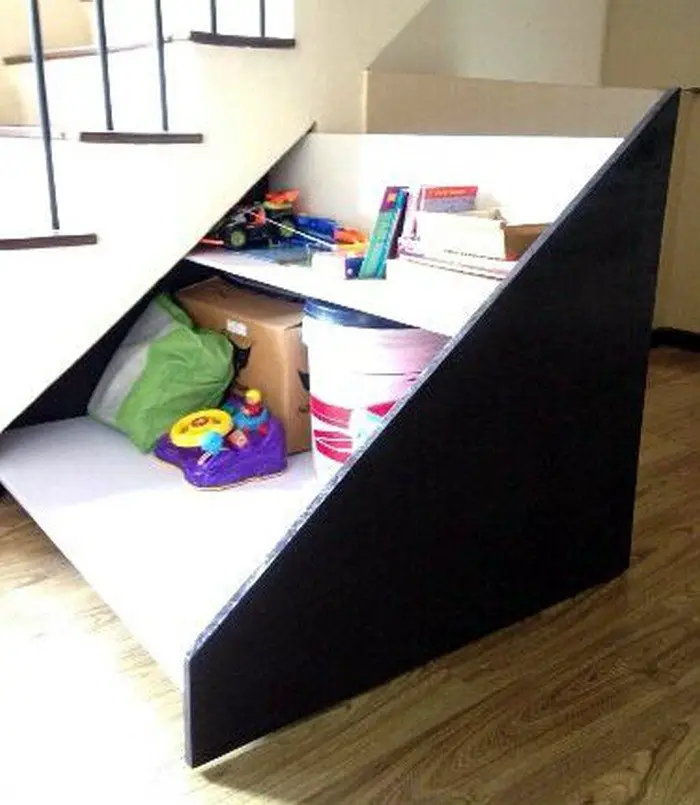
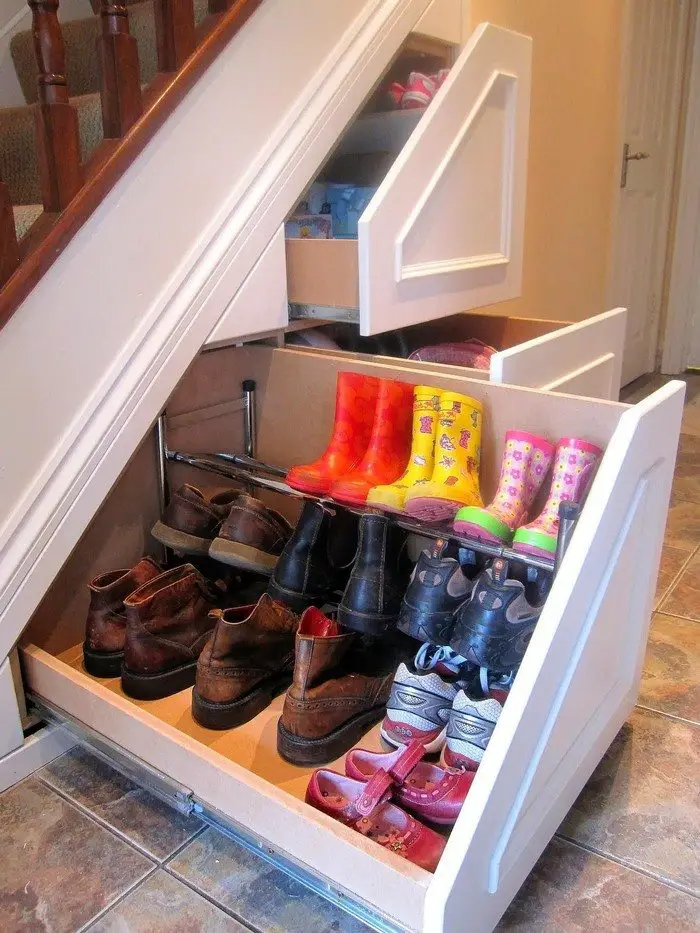
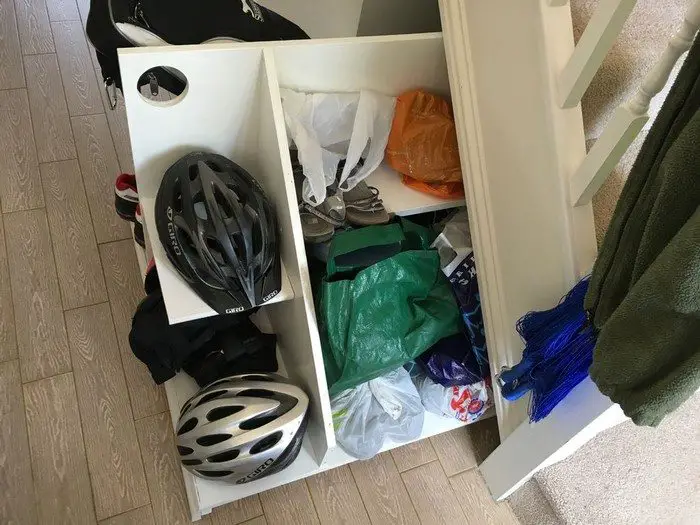
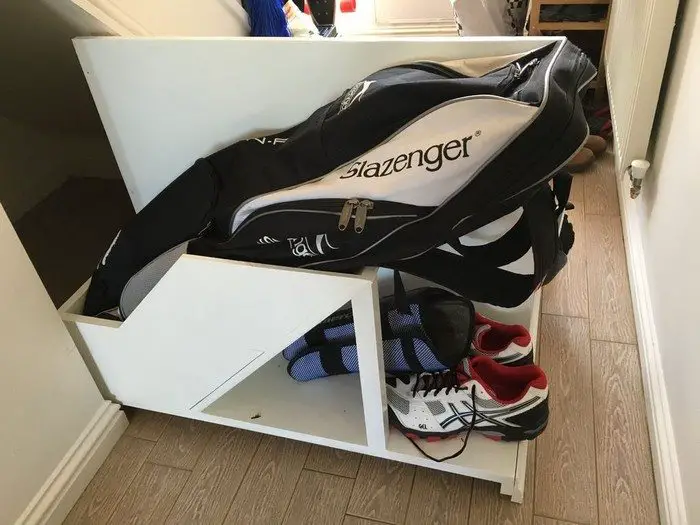
This under stairs pull-out storage makes it easier for you to find stuff that you need. You don’t have to crawl all the way inside to find what you’re looking for. You pull the entire storage unit out, and voila, you’ll see every item you have in that storage.
Now, as we’ve said, everything about this DIY project is simple, including the mechanism used. No complicated drawer slide installation involved, just caster wheels and a timber slat for a rail system!
There’s also no need for drawings for this project. (Though, of course you can also do this step if it would make you feel more comfortable.) You can also “build as you go” and this tutorial will show you just how to do it.
So, without further ado, gather all the tools and materials you will need and start building your under stairs pull-out storage!
BTW, the materials indicated below were chosen to make the under stairs pull-out storage project as inexpensive as possible. If you want an even finer finish, you can use any material of your choice.
Check our under stairs pull-out storage gallery for a closer look so you can plan what to use for your under-stairs pull-out storage!
Click on any image to start the lightbox display. Use your Esc key to close the lightbox.![]()

Contents
Building Under Stairs Pull-Out Storage
Materials
- Chipboard (for floor panel, front panel, back panel, and 1 side panel
- 1×2 Pallets (for support)
- Nails and Screws
- 4 Caster Wheels
Tools
- Measuring Tape
- Marker
- Saw
- Combination Ruler
- Drill
Steps
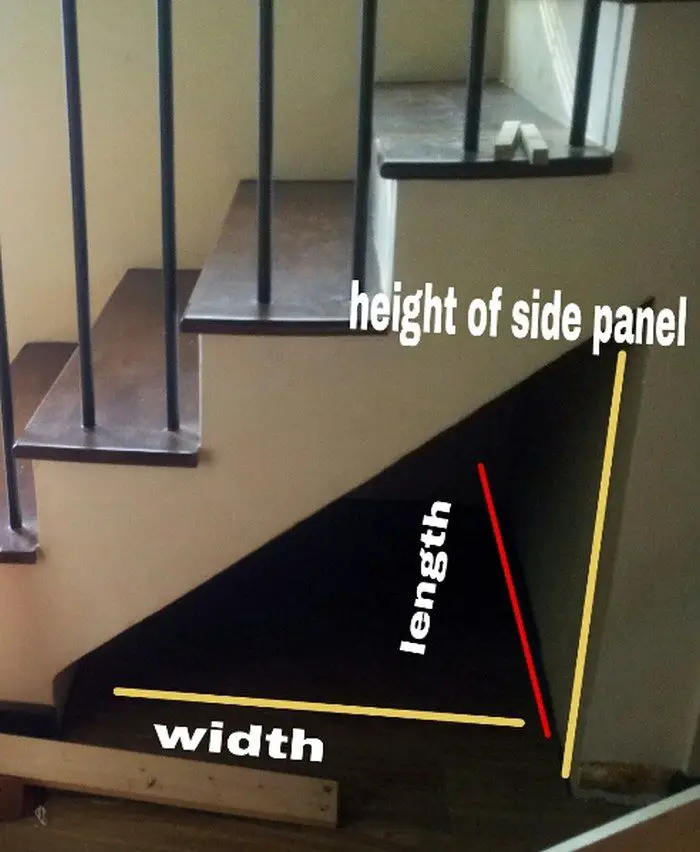
Measure and cut: First you need to measure the inside floor area, the height, and width. It wouldn’t always be proper and square. If your width differs, go with the width that is smaller as only then can you push the floor panel in. Luckily for me my front width was just 2″ smaller than the back – so not much of a difference. The length was the same throughout.
Basically, you need the floor area and side panel measurements.
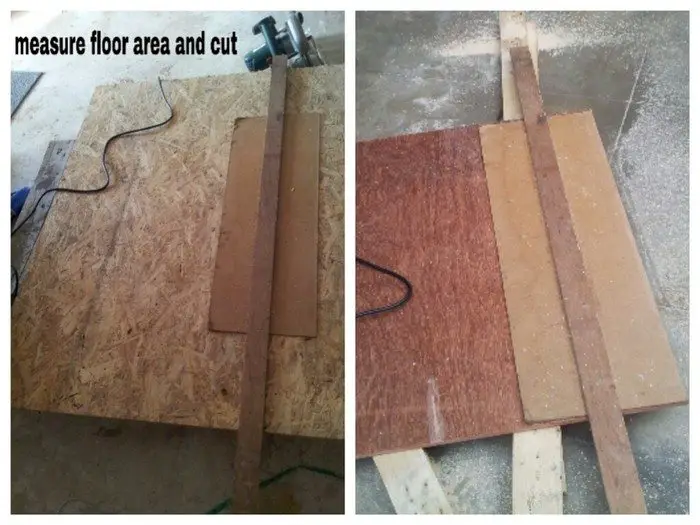
Side panel height- 2″ (it’s easier to cut this at once as you need to keep space at bottom and top to avoid friction).
Take into account the thickness of the wood for the drawer slider and also the side panel thickness. My whole width was 33″, so my drawer width was about 32″. This was determined by trial and error as shown in the next step.
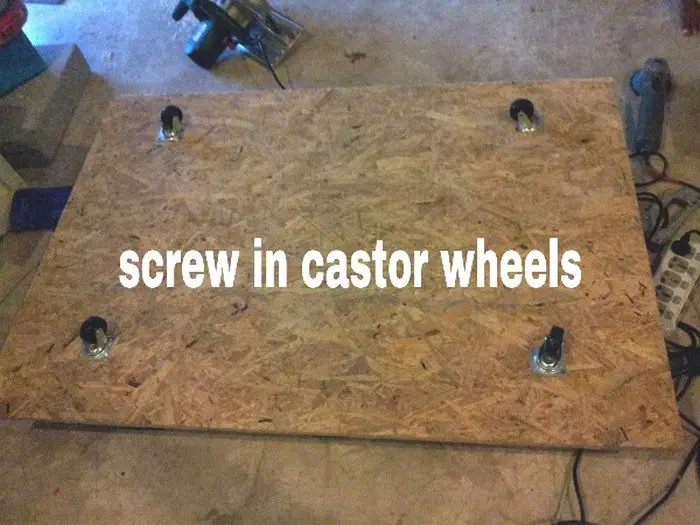
Main frame: Measure and screw in castor wheels.
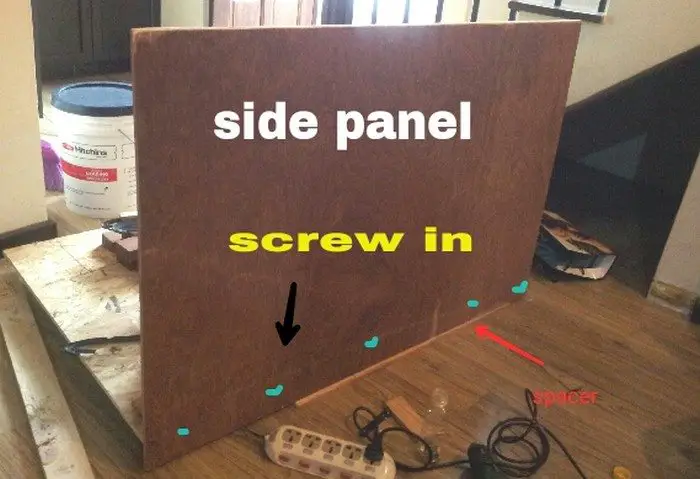
Place a spacer under the side panel and screw it in at a right angle in a T- joint to the floor panel.
You would need help here to hold the panel while you screw it in.
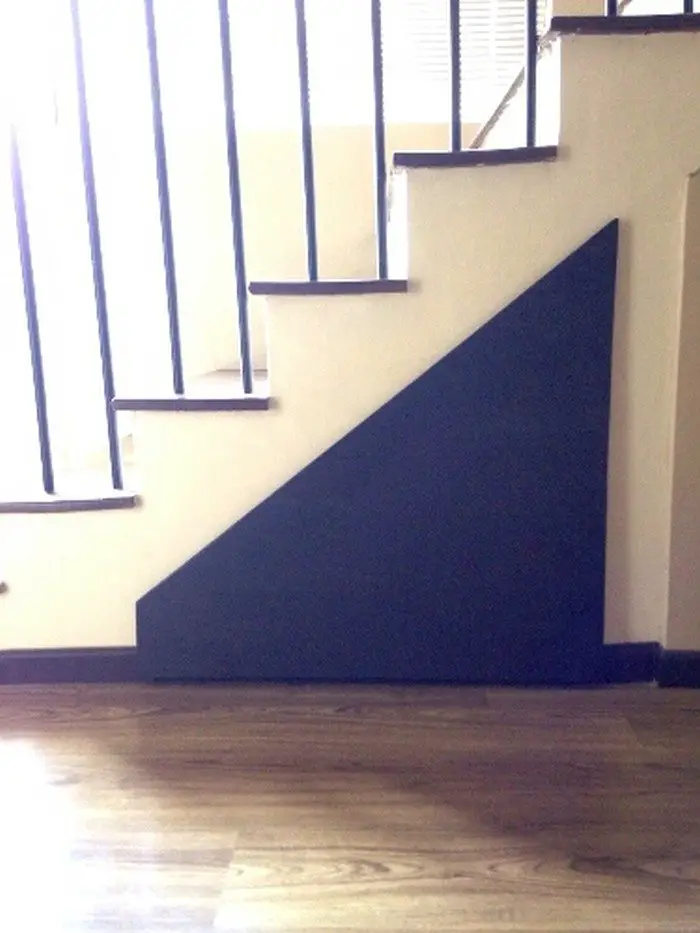
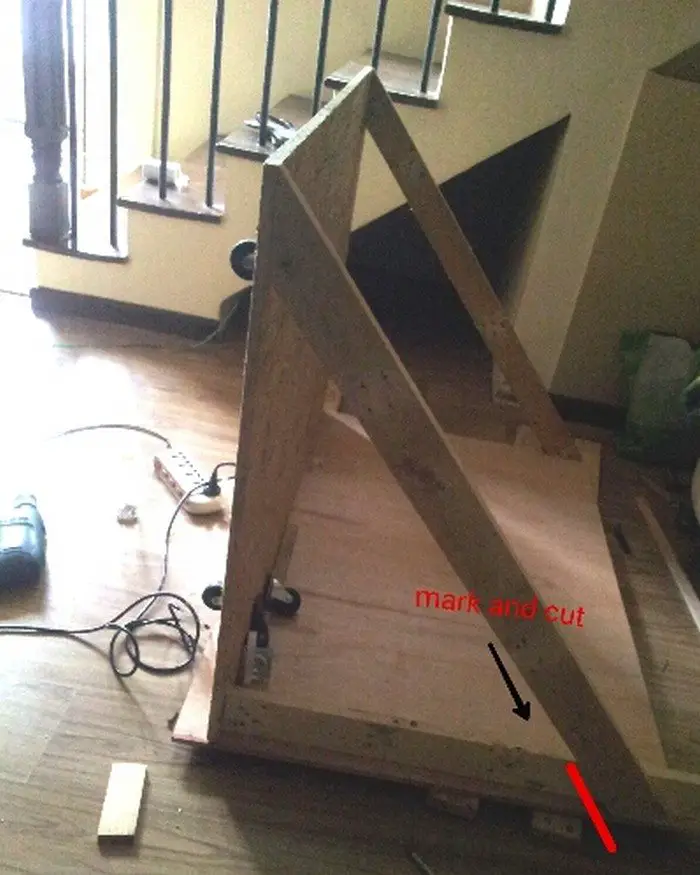
Now push this under the stairs. It is fine if the panels are flush to the wall or less in front. Sides – it’s best if its less or else it would have lots of friction, thereby damaging the panel. Make sure there is at least 1″ gap.
The panels should never jut out. If it juts out, measure and cut the excess.
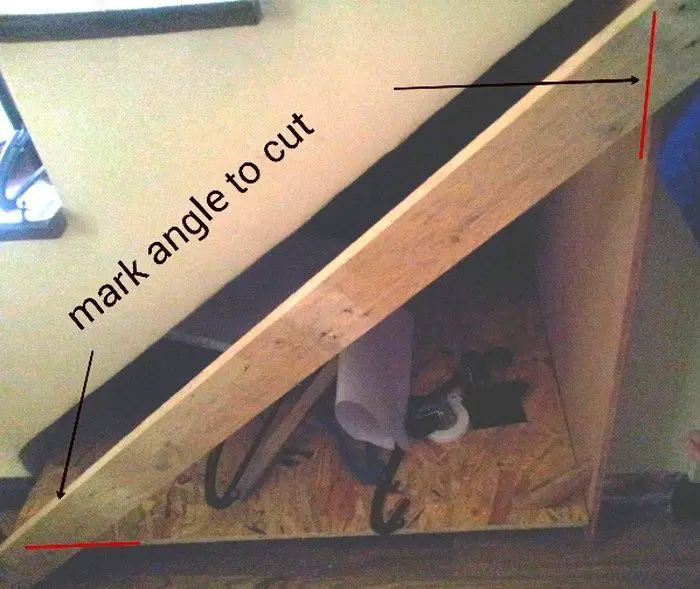
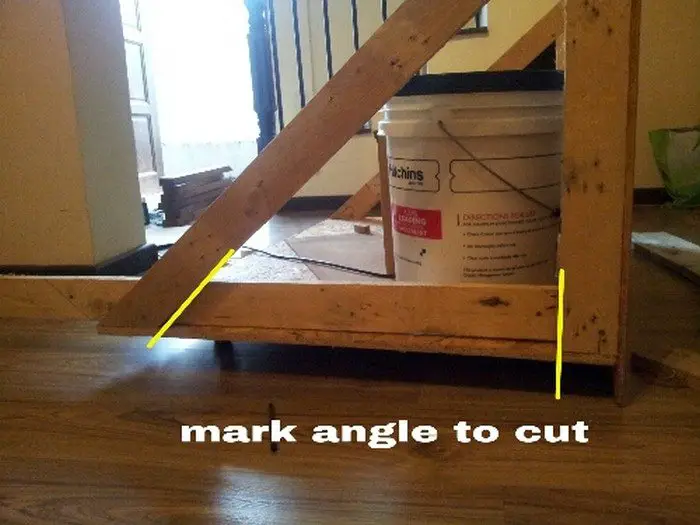
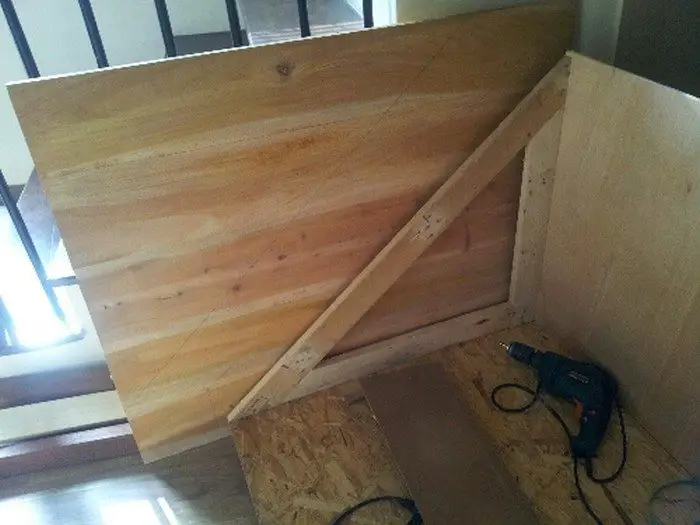
Support for panels: Place your 1×2 across the panels. Make sure it’s below the stairs and not touching it. Mark angles to cut.
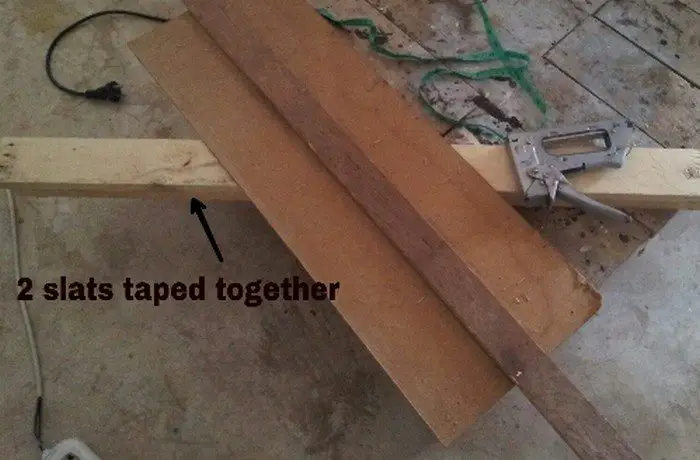
Tape another identical pallet to it and cut. This is for the back support.
Screw cross support to both front and back.
Now place another slat from the floor panel to the bottom of cross bar. Again mark angle cuts, tape another slat and cut. Screw this in too, from the sides and bottom.
Repeat this same process for the bottom slat too. Screw it in place from under the floor panel.
Note: those with kreg jig can build a right angle support and fix it to the side and bottom panel.
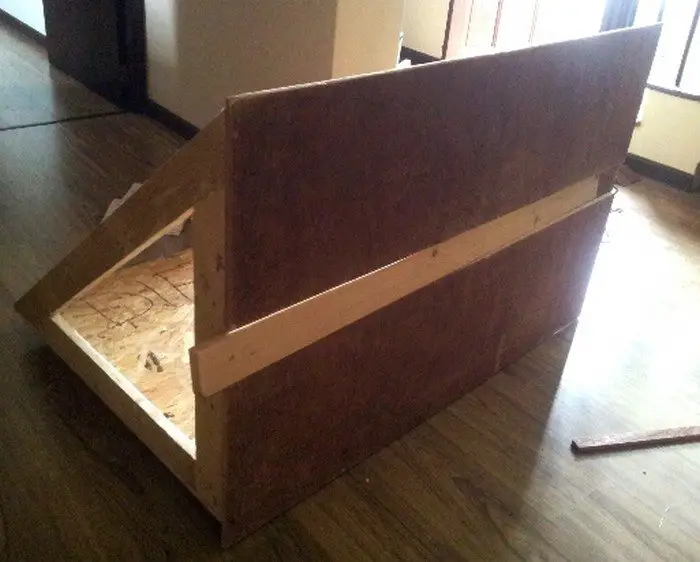
The door and back panel: It is not necessary to cover the back panel. Covering it is of course optional. As the wood panel I had for the door was large. It was more than enough to cut the back panel too. Therefore I traced the shape into the plank and cut it. Then I replaced the back right angle slat support with the plank right angle.
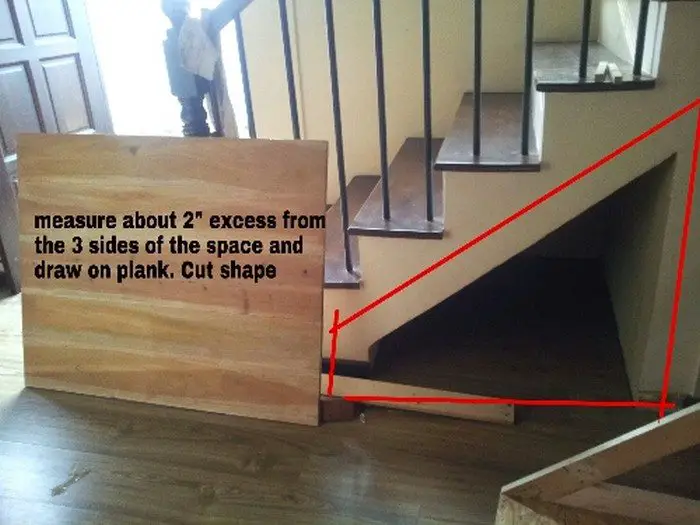
For the door, measure about 2″ excess from the opening space on the 3 sides. Transfer the measurement to board and cut. Sand and keep aside till later.
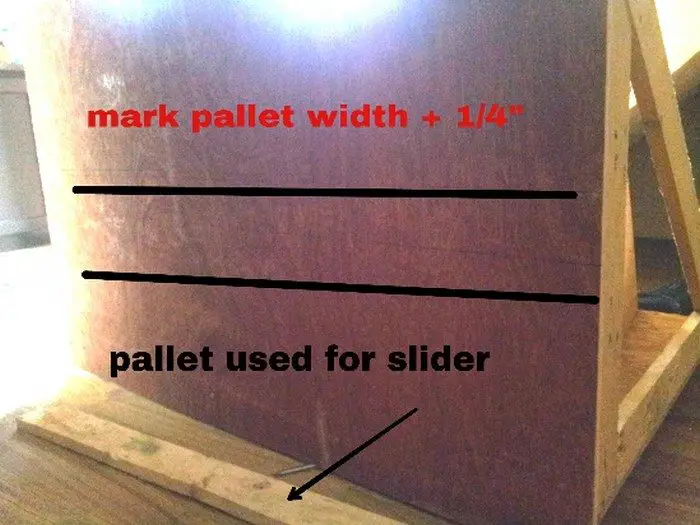
The slider: Now that basically everything is almost done we need to add the pull out guide else the storage might move around quite a bit when pulling out the storage.
Cut a 1×2 slat about the length of storage. Mark the width plus about 1/4″ across the side panel. Remove side panel and cut the mark off. Now reassemble the side panel to the angle supports and floor panel.
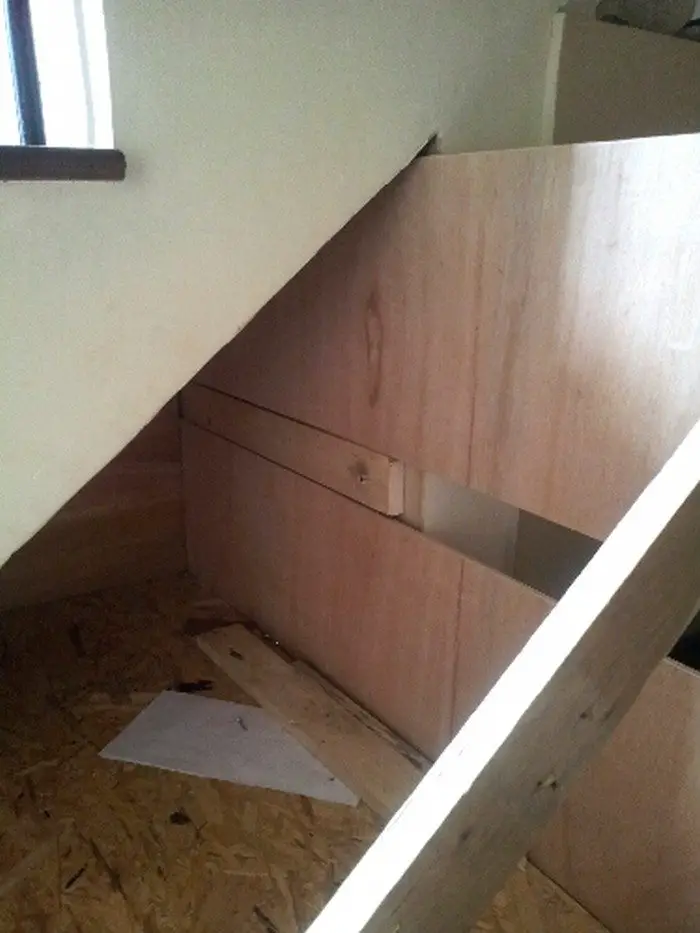
Position the guide slat in proper place under the stairs and hammer it in. How to do this? Well I slid onto the storage. Got someone to push me in. Placed the slat in between the opening on the wall and hammered it in. BTW, the door wasn’t fixed yet just in case you were wondering ;-).
Someone commented about using a long telescopic drawer slide. This would be great idea if you have a level floor.
When I pulled out my storage I found out the floor area under the stairs was not level too. The storage guide slat was rubbing and getting stuck on certain areas in the upper side panel. So I removed the upper side panel and sanded it down so it didn’t get stuck while pulling.
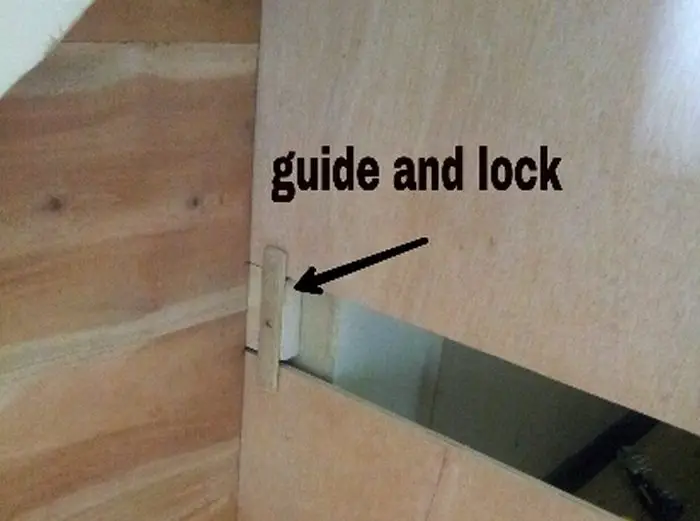
Now as a guide and lock for the slider I fixed a small 1/4″ thick slat on to the slide. I screwed it in the center so that when you turn it, it would be within the guide slat width.
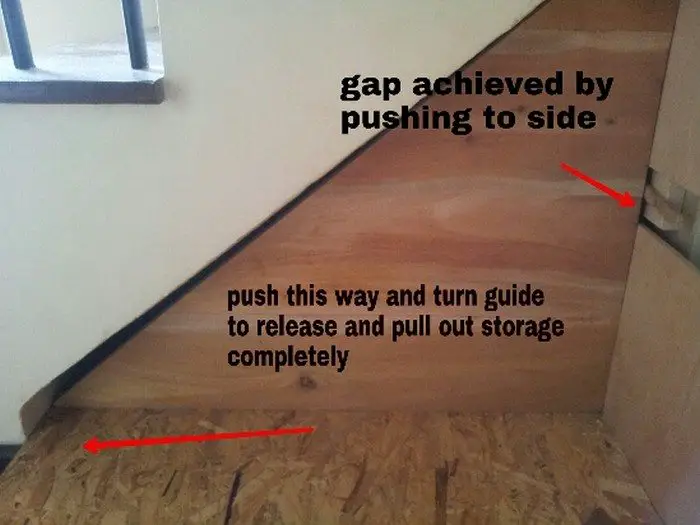
To remove the storage totally out; you need to turn the guide lock parallel and push the storage to the side. Thereby providing the space to pull the storage over the lock. I hope you can understand what I mean! It sounds confusing, but the picture should help clarify it.
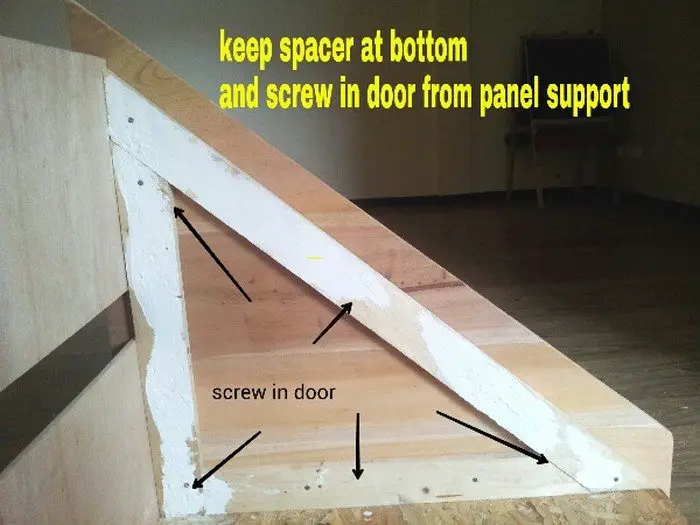
Fix door and shelf support: Now take the front door panel, place the spacer at the bottom, and fix the door to the front right angle support. Make sure to fix all 3 slats of the angle support to the door. Now the angle support and the door would become one piece. When dismantling to paint, just unscrew from side panels and bottom panels.

As there was enough space I wanted to add a shelf. So, I fixed 2 slats as shelf support on the front and back panels at equal heights. Measure length and width and cut shelf to size.
I did not add a handle for the door as I felt the gap at the bottom was more than enough for me to slide my hand under and pull. Adding the handle is of course up to you :-)
Dismantle and beautify: Now that all is done it’s time to dismantle and beautify :-)
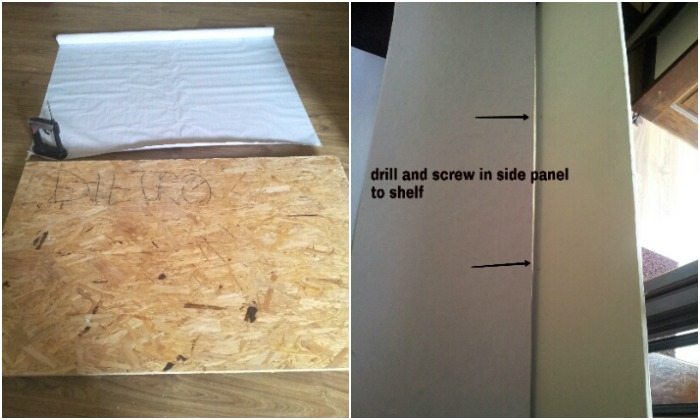
Paint all the sections. In my case, my floor panel and shelf were chipboard. So, as painting wouldn’t achieve a smooth finish I used a vinyl sticker sheet. Very easy maintenance!
Once all parts are painted, dried, and fixed, place the shelf on supports and secure it by drilling and screwing to the side panel.
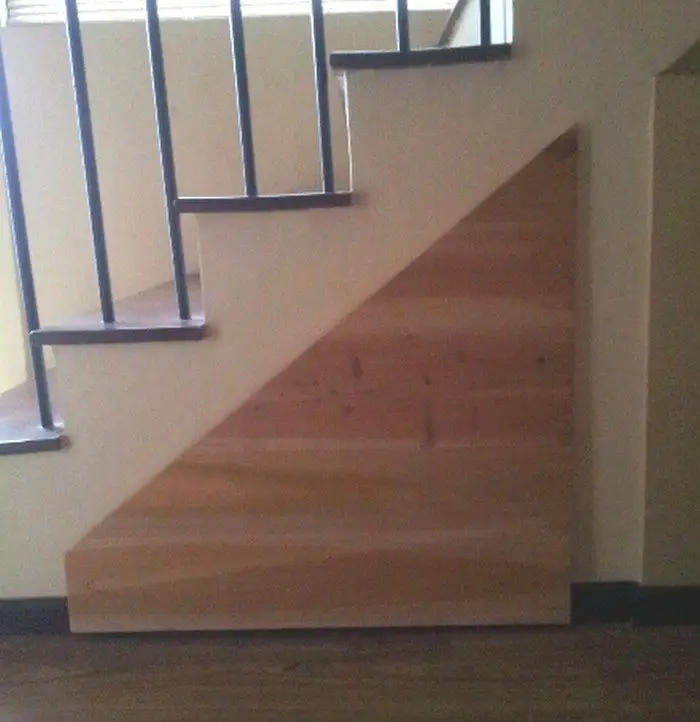
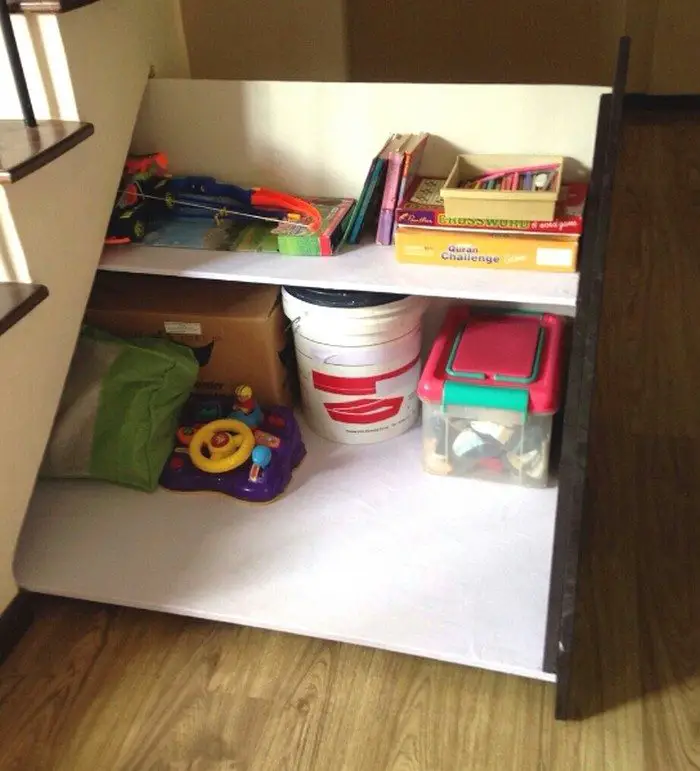
I was really surprised at the amount of space. My kids were using it as a play area while I was doing up the shelf!
I really liked how it turned out! I hope you find it useful to improve your house space too :-)
Thanks to shazni for this great project!
Here’s a quick video…
Customization Options for Under Stairs Pull-Out Storage
Creating under stairs pull-out storage offers a unique opportunity to make the most of often underutilized space in your home. While the fundamental aim is to provide extra storage, the beauty of these units lies in their versatility and the myriad ways they can be customized to meet specific needs and preferences.
Below are several customization options that can transform your under stairs pull-out storage into a tailored, highly functional feature of your home.
Adjustable Shelves
One of the most practical customization options for under stairs pull-out storage is the inclusion of adjustable shelves. This flexibility allows you to easily modify the storage space to accommodate items of varying sizes, from bulky winter coats to small decorative items. Adjustable shelves ensure that your under stairs pull-out storage can evolve with your changing needs, making it a long-term storage solution.
Built-in Hooks and Rails
For those needing to store outdoor wear, tools, or sports equipment, adding built-in hooks and rails inside your under stairs pull-out storage can be a game-changer. This option maximizes the usability of the storage space, ensuring that items are not only out of sight but also organized and easy to access. Whether it’s hanging coats, storing bicycles, or keeping gardening tools in order, hooks and rails enhance the functionality of your under stairs storage.
Specialized Storage Solutions
Tailoring your under stairs pull-out storage with specialized storage solutions can significantly increase its utility. Consider incorporating wine racks for a stylish and accessible way to store your collection or shoe organizers to keep your footwear neatly arranged and out of the way.
For families, creating compartments for toys, games, and school supplies can help keep clutter at bay. Specialized storage solutions make your under stairs pull-out storage not just a place to hide things away but a functional part of your living space.
Integrating Seating
If space allows, integrating seating into your under stairs pull-out storage design can add an unexpected but welcome feature. A pull-out bench not only provides a place to sit and remove shoes but also hides additional storage compartments underneath. This is particularly useful in entryways, where under stairs pull-out storage can double as a welcoming nook with practical benefits.
Custom Finishes and Handles
Finally, the aesthetic appeal of your under stairs pull-out storage can be significantly enhanced by selecting custom finishes and handles. Choose materials and colors that complement your home’s decor for a cohesive look. Sleek, modern handles or vintage knobs can add character and style to your storage unit, turning it into a statement piece rather than just a practical solution.
By exploring these customization options, you can ensure your under stairs pull-out storage not only maximizes space but also reflects your personal style and meets your specific storage needs. Whether you’re looking for practicality, aesthetics, or a blend of both, there’s no shortage of ways to make your under stairs storage uniquely yours.
Conclusion
Building an under stairs pull-out storage offers an ingenious solution to maximizing unused spaces in homes, transforming them into functional and accessible storage areas. The process allows for creativity and personalization, ensuring that the storage not only serves its practical purpose but also enhances the aesthetic appeal of the space. Ultimately, the decision to construct under stairs pull-out storage is a wise investment in organizing and decluttering, bringing both functionality and style to underutilized areas of the home.
Want more storage ideas? Read our floating shelf with hidden storage project next!


