Do you often organize or host a grilling party at home? Why not add a DIY Yakitori grill to your outdoor cooking arsenal! Sure, you can buy one from the store, but you can also easily DIY one!
This DIY project is doesn’t involve any welding. You can easily put it together since the materials are not hard to find.
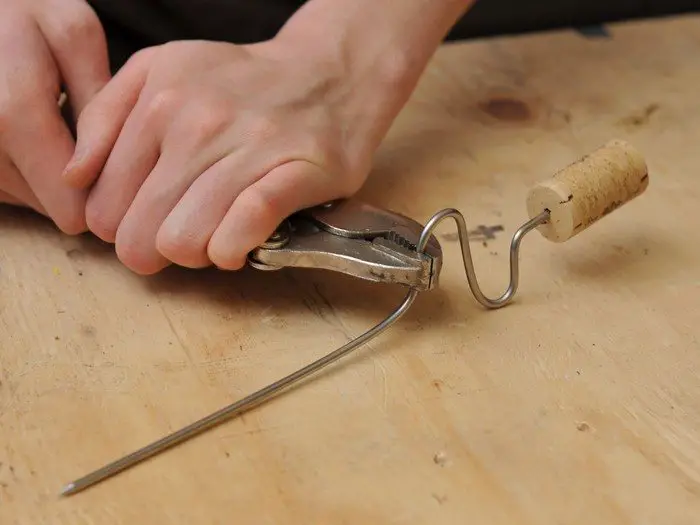
You will need a number of natural wine corks for holding the skewers and the grill while it’s in use. If you don’t have enough corks in your storage, you can purchase heaps from Amazon!
Learn how to make your own Yakitori grill now by heading over to the tutorial linked below!
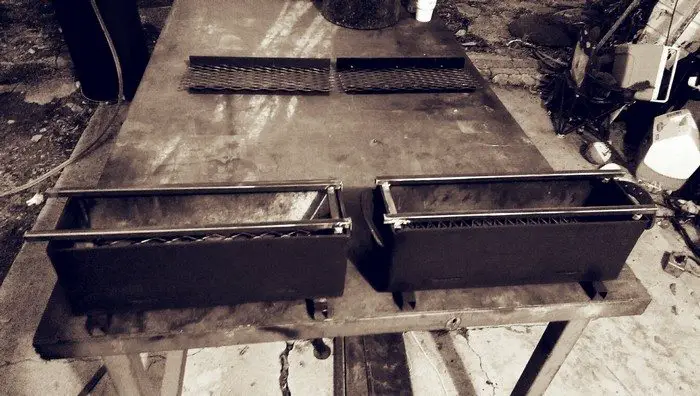
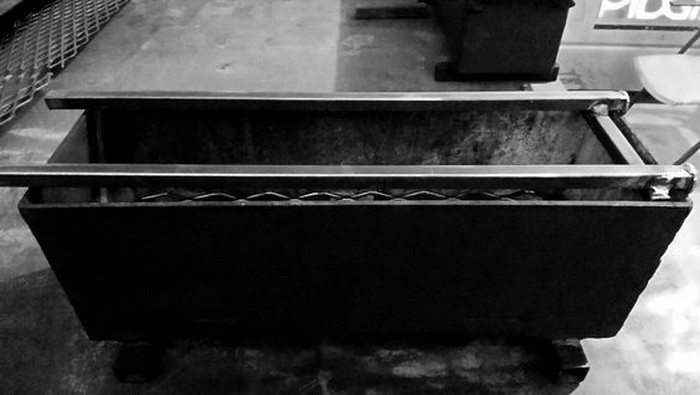
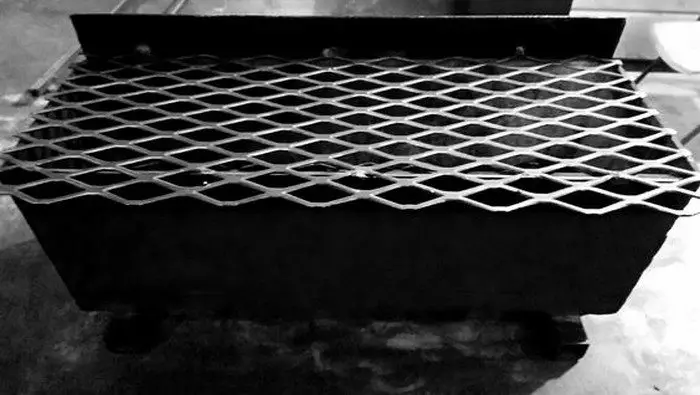
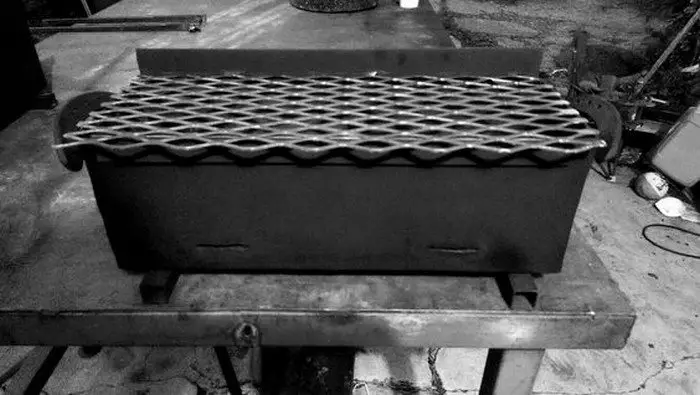
But before that, have a look at our gallery of DIY Yakitori grills for inspiration. It also includes a welded version if you are into that type of build. :)
Now, how about some Japanese yakitori at your next backyard party?
Contents
- 1 Building a DIY Yakitori Grill
- 2 Cooking Tips and Recipes for Your DIY Yakitori Grill
- 3 Customization Ideas for Your DIY Yakitori Grill
- 4 Maintenance and Care for Your DIY Yakitori Grill
- 5 FAQ for DIY Yakitori Grill
- 5.1 What is the best material for the grill surface?
- 5.2 Can I customize the size of my DIY yakitori grill?
- 5.3 How often should I clean my DIY yakitori grill?
- 5.4 Is it safe to paint my grill?
- 5.5 Can I leave my DIY yakitori grill outdoors?
- 5.6 What should I do if my grill starts to rust?
- 5.7 How do I ensure even cooking on the grill?
- 6 Conclusion
Building a DIY Yakitori Grill
Materials:
- 1 pc Aluminum Sheet
- 2 pcs 6×2 Steel L-Straps
- High Temp Spray Paint
- 1/8″ diameter Stainless Steel Rod (for skewers)
- Charcoal
- #4-40 x 2′ Flat Head Machine Screws (with matching nuts and washers)
- Stainless Steel Rivet Washers
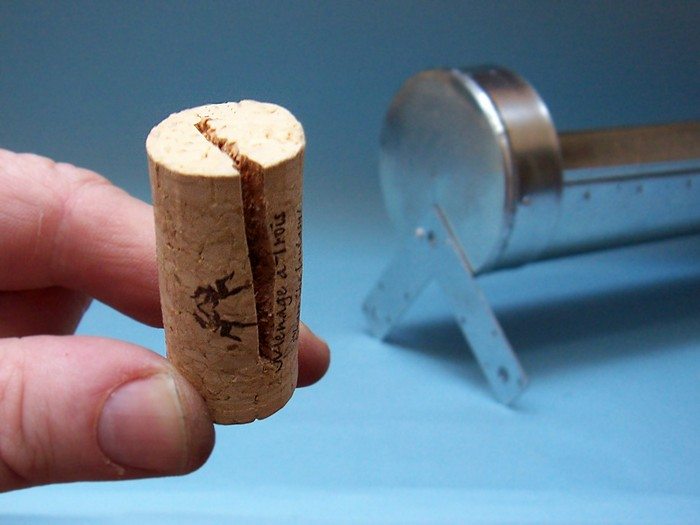
- Natural Wine Corks
- 2 Aluminum 6″ Cake Pans
Tools:
- Ruler
- Marker
- Hammer
- Drill
- Pop Rivets
- Rivet Gun
- Pliers
- Hobby Knife
Instructions:
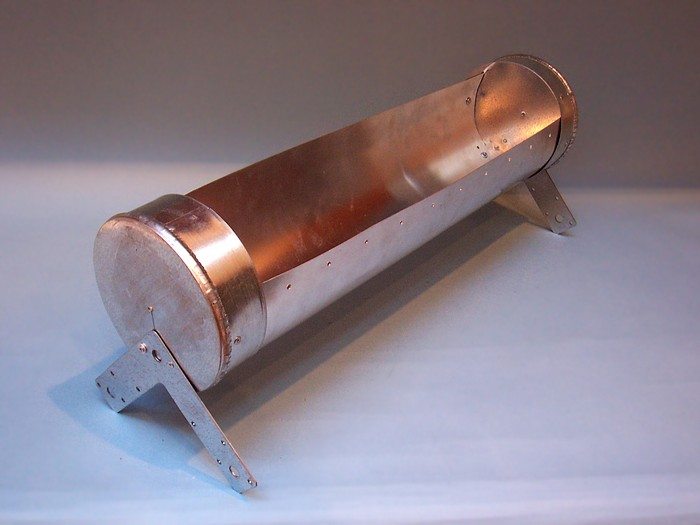
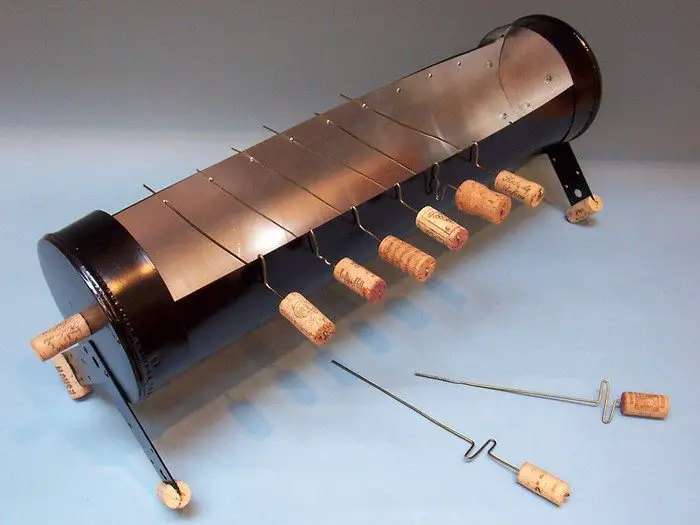
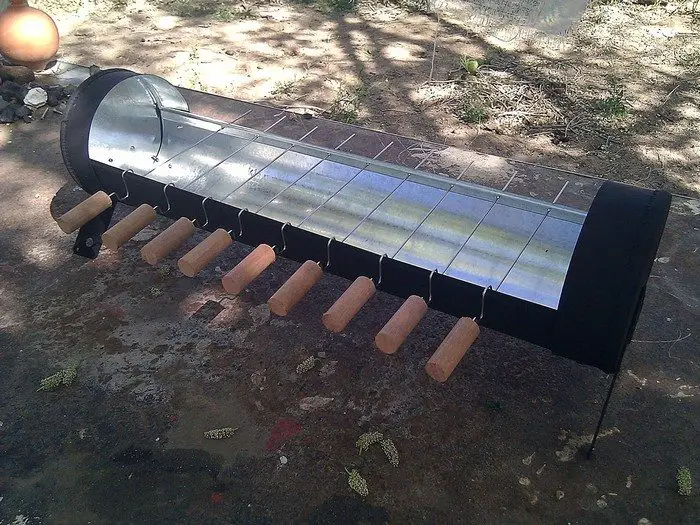
- Prepare the Aluminum Sheet: Measure and mark the aluminum sheet to create a rectangular grill base. The size can vary, but a standard size is about 24″ x 12″. Use the hobby knife and ruler for precise cuts.
- Fold Edges for Safety: Fold about 1 inch of the sheet’s edges upward to create a rim. This helps in containing the charcoal and prevents injury from sharp edges. Use pliers to make the folds neat and uniform.
- Attach the Steel L-Straps: These will act as the grill’s legs. Place them on each short side of the aluminum sheet. Mark the drilling points on the sheet and L-straps. Drill holes and use the pop rivets and rivet gun to secure the straps in place.
- Prepare the Skewer Rods: Cut the stainless steel rod into skewer-length pieces, typically around 12 inches. Smooth the ends with a file to remove sharp edges.
- Drill Skewer Holes: Along the longer sides of the grill base, drill evenly spaced holes to hold the skewers. The holes should be slightly larger than the diameter of your skewers.
- Paint the Grill: Use high temp spray paint to coat the grill. This will improve its look and resistance to heat and rust. Let it dry completely.
- Attach the Handles: Use the wine corks as handles for your grill. Drill a small hole in each cork and attach them to the sides of the grill using the machine screws, nuts, and washers.
- Prepare the Charcoal Pans: Place the aluminum cake pans inside the grill base. These will hold the charcoal and make cleaning easier.
- Final Assembly: Check all parts are securely attached. Your DIY yakitori grill is now ready for use.
- Testing: Before the first use, light some charcoal in the pans to test. Ensure the grill is stable and the skewers fit well in the holes.
Click on any image to start the lightbox display. Use your Esc key to close the lightbox.![]()

Cooking Tips and Recipes for Your DIY Yakitori Grill
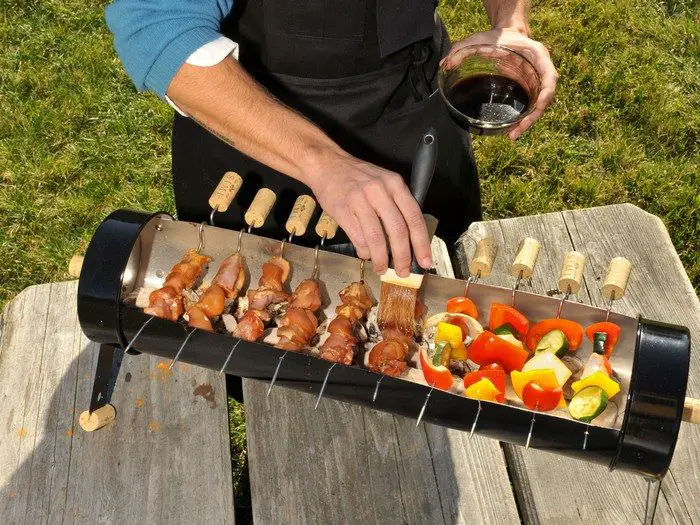
Once you’ve built your DIY yakitori grill, it’s time to explore the delicious world of grilling. Yakitori is not just about skewered chicken; it’s a versatile cooking style that brings out the best in a variety of ingredients. Here are some tips and recipes to get you started.
Grilling Techniques
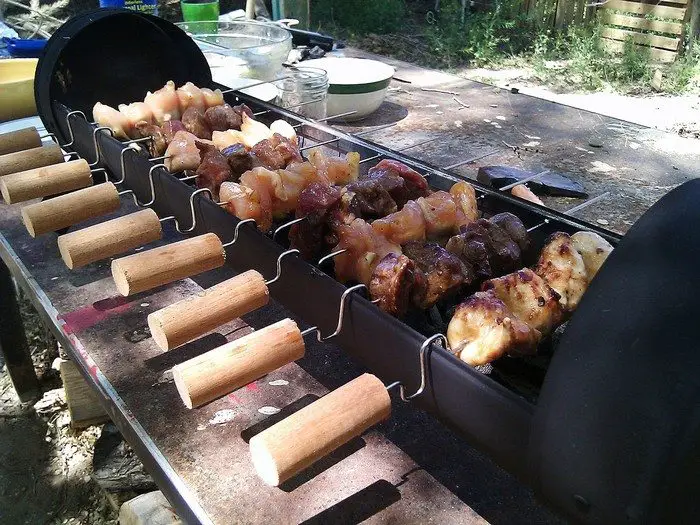
- Preheat the Grill: Ensure your grill is hot before you start. This helps in cooking the skewers evenly.
- Skewering: When skewering, leave a little space between pieces. This ensures even cooking.
- Turning Skewers: Regularly turn your skewers. This prevents burning and cooks food evenly.
- Sauce Application: If you’re using a sauce, apply it towards the end of cooking. This keeps the flavor fresh and prevents burning.
Classic Chicken Yakitori
Ingredients:
- Chicken thighs, cut into bite-sized pieces
- Salt and pepper, to taste
- Yakitori sauce (store-bought or homemade)
Instructions:
- Season the chicken with salt and pepper. Skewer the chicken pieces.
- Place skewers on the preheated DIY yakitori grill. Grill each side for about 2-3 minutes.
- Brush yakitori sauce over the chicken during the last minute of grilling.
- Serve hot off the grill.
Vegetable Medley Skewers
Ingredients:
- Bell peppers, cut into squares
- Zucchini, sliced
- Cherry tomatoes
- Onion chunks
- Olive oil
- Salt and pepper, to taste
Instructions:
- Thread the vegetables onto skewers. Brush with olive oil and season with salt and pepper.
- Grill on your DIY yakitori grill for about 2-3 minutes on each side, or until desired tenderness is reached.
- Serve as a side dish or a vegetarian option.
Shrimp Yakitori
Ingredients:
- Large shrimp, peeled and deveined
- Lemon juice
- Garlic powder
- Salt and pepper, to taste
Instructions:
- Marinate shrimp in lemon juice, garlic powder, salt, and pepper for 15 minutes.
- Skewer the shrimp and grill on your DIY yakitori grill for 2 minutes on each side, or until cooked through.
- Serve with a side of lemon wedges.
Customization Ideas for Your DIY Yakitori Grill
Creating a DIY yakitori grill is not just about functionality; it’s also an opportunity to inject your personal style and preferences into the design. Here’s how you can customize your grill to make it uniquely yours.
Paint and Color
The color of your DIY yakitori grill plays a significant role in its overall appearance and how it fits into your outdoor setting. Instead of sticking with conventional black, you have a world of colors to choose from. Pick a shade that not only complements the surroundings of your patio or garden but also resonates with your personality. Perhaps a vibrant red for a bold statement, or a subtle green to blend in with nature.
To take creativity a step further, incorporate designs and patterns on your grill using stencils. High-temperature paint is essential here, as it ensures that your artistic work withstands the heat of grilling. You could add anything from simple geometric patterns to more intricate designs, depending on your skill level and taste. This approach doesn’t just make your grill stand out; it infuses it with your personal style, transforming a simple cooking tool into a piece of art.
Material Upgrades
The materials you choose for your DIY yakitori grill can greatly affect both its functionality and aesthetic. For a more elegant and polished look, consider using stainless steel sheets. Stainless steel not only has a sleek and modern appearance but also offers enhanced durability and resistance to rust and corrosion compared to aluminum. This means your grill will not only look better but also last longer.
Another aspect of material upgrade is the customization of skewer handles. The standard skewers can be transformed by adding handles made from various materials. Consider using colored beads, which can withstand high temperatures, to add a splash of color and a fun, personalized touch to each skewer.
Alternatively, you could use other heat-resistant materials that complement the overall design of your grill. These custom handles not only make the skewers easier and safer to handle but also add an element of personalization to your grilling experience. Every time you grill, these unique skewers will remind you and your guests of the care and creativity you put into building your own yakitori grill.
Add-On Features
The addition of adjustable height to your DIY yakitori grill is a game-changer in terms of its functionality. This feature allows you to control the proximity of the food to the heat source, which is crucial for cooking different types of food perfectly.
For instance, delicate vegetables may require less heat, while thicker cuts of meat might need more intense heat for a good sear. With an adjustable height mechanism, you can easily cater to these needs, enhancing your overall grilling experience.
Incorporating foldable side tables is another practical enhancement for your DIY yakitori grill. These tables offer valuable space for keeping everything you need within arm’s reach. Imagine having a convenient place to set your marinades, sauces, plates, utensils, or even a refreshing drink as you grill.
These tables can fold down when not in use, making them a space-saving addition that’s perfect for smaller patios or balconies. The convenience and efficiency these tables bring to your grilling sessions make them an invaluable addition to your DIY project.
Lighting and Accessories
Grilling doesn’t have to be a day-only activity, especially with the addition of LED lights to your DIY yakitori grill. These lights can be a stylish and practical upgrade, illuminating your cooking area and enabling you to grill at any time of the day or night.
You can attach these lights strategically to provide the best visibility, ensuring that every skewer is grilled to perfection, even under the stars. LED lights are energy-efficient and can withstand heat, making them an ideal choice for outdoor cooking.
Adding hooks to the side of your grill is a simple yet effective way to keep your grilling area organized. These hooks are perfect for hanging your grilling tools, keeping them handy and off the ground.
This not only helps in keeping your workspace tidy but also ensures that your tools are within easy reach whenever you need them. The convenience of having your tongs, spatula, or brush hanging right beside you cannot be overstated, especially when you’re in the midst of grilling.
Personalized Branding
Personalizing your DIY yakitori grill with a metal nameplate or etching your logo onto it transforms the grill from a mere cooking tool to a reflection of your identity and creativity. This form of branding is an excellent avenue to showcase your craftsmanship and the pride you take in your creation.
Whether it’s your name, a special date, or a unique logo that represents you or your family, this personal touch adds a level of sophistication and ownership to the grill. Etching can be done through various methods, depending on the tools available and your skill level, giving your grill a professional finish. This personalized branding does more than just make your grill look good; it tells a story, your story, making the grill not just a part of your backyard but a part of your personal history.
Eco-Friendly Touches
Incorporating eco-friendly elements into your DIY yakitori grill is not only good for the environment but also adds a unique aspect to your grill. One innovative way to do this is by installing small solar panels.
These panels can power LED lights or other small electronic components of your grill, reducing energy consumption and making your grilling sessions more sustainable. This addition is particularly beneficial for those who enjoy evening grilling, as it provides a renewable energy source for lighting.
Using recycled or upcycled materials in the construction of your grill is another step towards eco-friendly living. This could involve repurposing old metal sheets or using reclaimed wood for side tables. Not only does this approach minimize waste, but it also adds character and history to your grill.
Each recycled material brings its own story, and using these materials can create a conversation piece as much as a functional cooking tool. Embracing these eco-friendly practices not only contributes to a healthier planet but also gives a sense of fulfillment, knowing that your DIY project is environmentally responsible.
Maintenance and Care for Your DIY Yakitori Grill
Proper maintenance and care are crucial for ensuring the longevity and safety of your DIY yakitori grill. Regular upkeep not only keeps your grill in good working condition but also enhances your grilling experience. Here’s how you can maintain and care for your grill.
Regular Cleaning
Regular cleaning is essential for any grill, and your DIY yakitori grill is no exception. After each use, allow the grill to cool down and then clean the grates and interior surfaces. Remove any food particles or grease to prevent buildup and potential flare-ups. For the grates, use a grill brush or a scraper to remove residue. If your grill has removable parts like pans or trays, wash them with warm soapy water.
Protecting the Surface
Since your grill is likely to be exposed to various weather conditions, protecting its surface is important. If you’ve painted your grill with high-temp paint, check periodically for any chips or scratches. A touch-up may be needed to prevent rust. If your grill is made of stainless steel, wipe it down with a stainless steel cleaner to maintain its shine and prevent corrosion.
Checking for Wear and Tear
Regularly inspect your DIY yakitori grill for signs of wear and tear. Pay special attention to areas like hinges, screws, and the grill base. Tighten any loose parts and replace any that are worn out or damaged. This not only ensures your grill’s stability but also its safety during use.
Storage Solutions
When not in use, especially during off-season months, store your DIY yakitori grill in a dry, covered area. If you don’t have a storage space, consider using a grill cover to protect it from the elements. This will help prevent rust and keep your grill clean and ready for its next use.
Seasonal Maintenance
Before the grilling season begins, give your grill a thorough inspection and cleaning. This includes checking all components and giving it a good clean inside and out. This preparation ensures your grill is safe and ready for another season of delicious grilling.
FAQ for DIY Yakitori Grill
What is the best material for the grill surface?
The best material for the grill surface is typically a stainless steel sheet. It’s durable, resistant to high temperatures, and easy to clean.
Can I customize the size of my DIY yakitori grill?
Yes, you can customize the size. Adjust the measurements of the materials according to the space available and your grilling needs.
How often should I clean my DIY yakitori grill?
Clean your grill after each use. This prevents the buildup of grease and food particles, which can affect taste and grill performance.
Is it safe to paint my grill?
Yes, it is safe to paint your grill, but ensure you use high-temperature resistant paint designed for grills and outdoor use.
Can I leave my DIY yakitori grill outdoors?
While the grill can be left outdoors, it’s best to cover it or store it in a dry place to protect it from weather and extend its life.
What should I do if my grill starts to rust?
If you notice rust, sand the affected area lightly and apply a coat of high-temp paint. Regular maintenance can prevent rust.
How do I ensure even cooking on the grill?
Ensure even cooking by preheating the grill, using adjustable height features if available, and turning skewers regularly during cooking.
Conclusion
Building and using a DIY yakitori grill is a rewarding experience that combines the joys of crafting with the pleasures of cooking. By following these guidelines and tips, you can create a durable, functional, and personalized grill that reflects your style and meets your grilling needs.
Looking to make your porch the ultimate cooking station? Check out our building guide for your own smokehouse pizza oven!


