
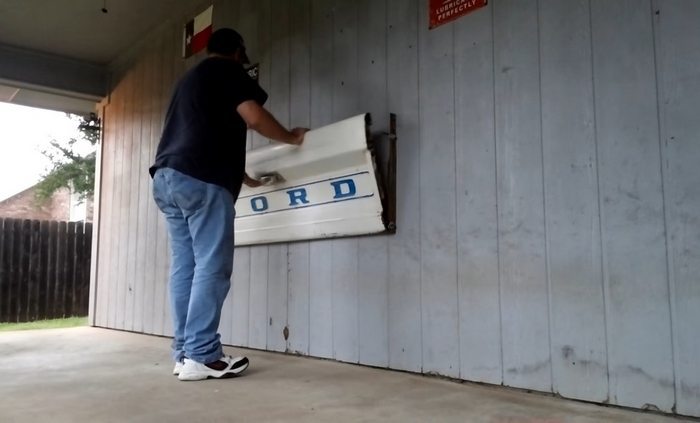
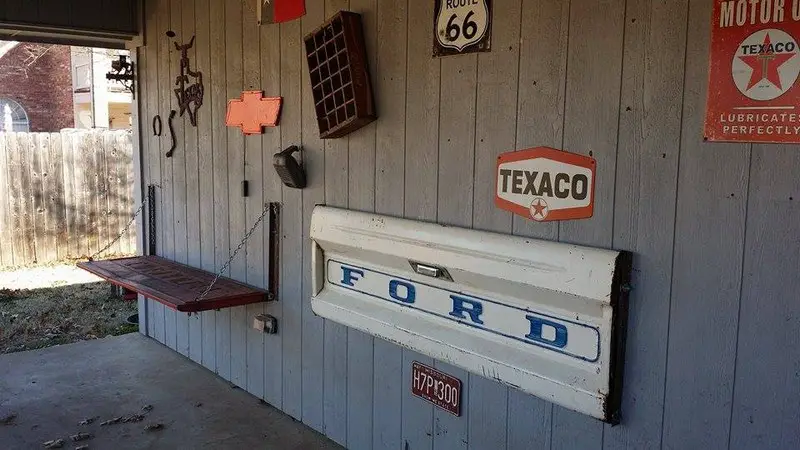
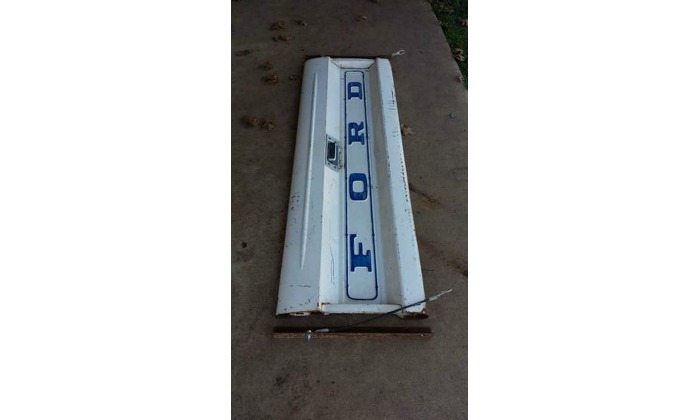
A friend gave me this old Ford tailgate after I told him I was decorating my back porch in vintage Gas station/ feed store style. I decided to make a working tailgate wall bench out of this part for my home.
Having just purchased a home. My wife and I decided the entire house belonged to her except for the garage back porch, and yard. She may have made a mistake!
Click on any image to start the lightbox display. Use your Esc key to close the lightbox.![]()

This is how I did it!
Contents
Building a Tailgate Wall Bench
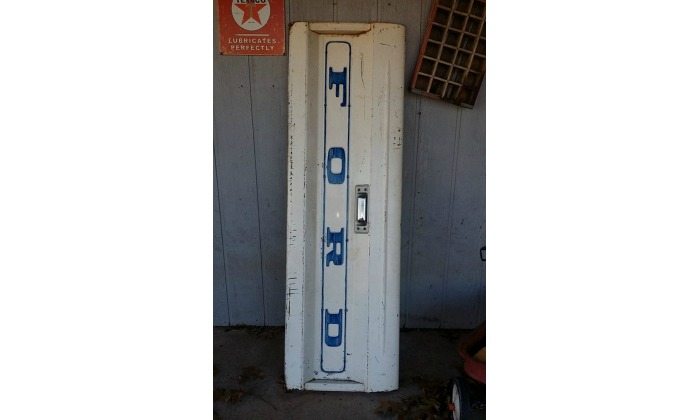
Start with one old rusty tailgate…
Materials
- 2- 2 1/2″ X 8″ stove bolts
- 2- 20″ X 1 1/2″ angle iron
- 1- 6′ X 1 1/2″ angle iron
- 1- 6′ X 1/8″ pipe or 1/2″ rebar
- 2- medium snap rings
- 4- 1/2″ flat washers
- 1- 1 1/2″ X 1/4-20 allen head bolt
Steps:
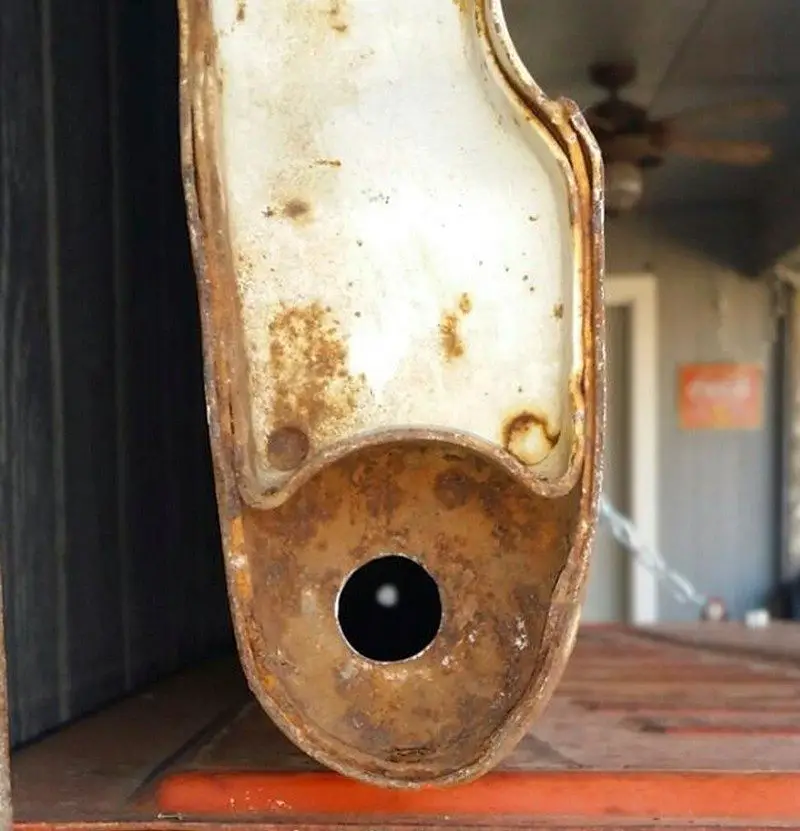
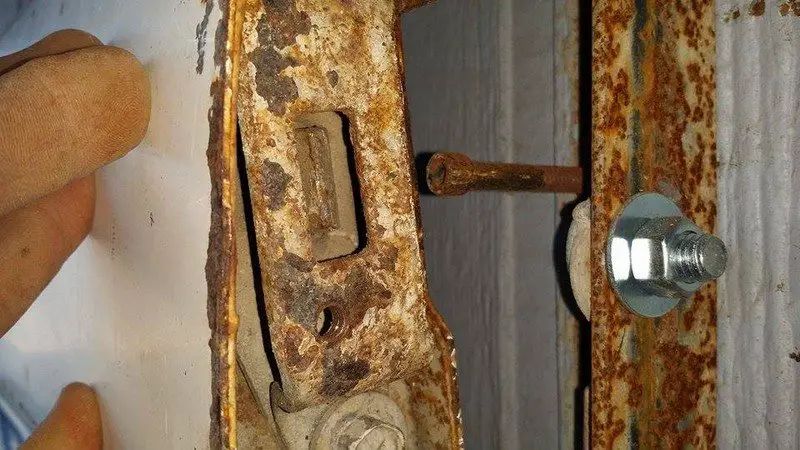
Use a 5/8″ drill bit to drill a hole in the center of the pivot on each end of tailgate.
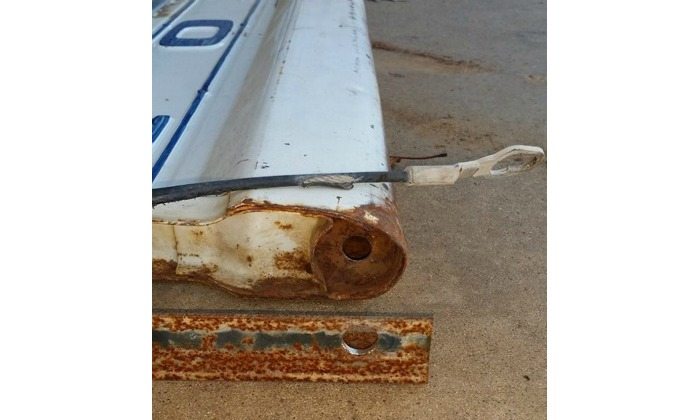
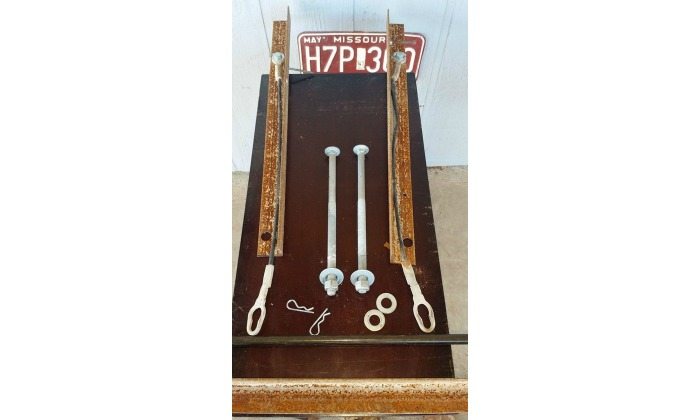
Lay angle iron flush with side of tailgate and mark and drill 5/8″ holes in the angle like so.
Once both ends are drilled, lay tailgate and angles out flat on table or floor like so to make assembly easy.
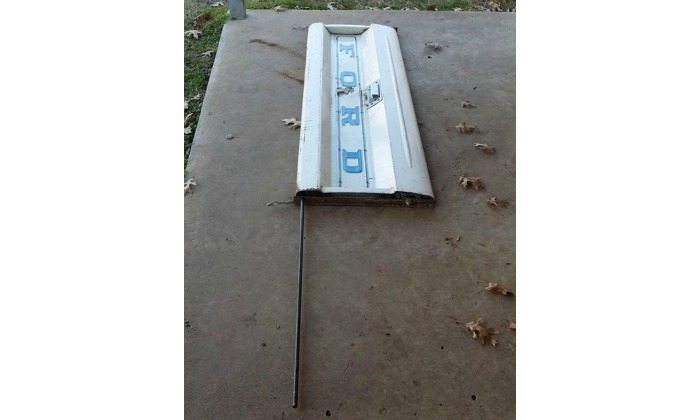
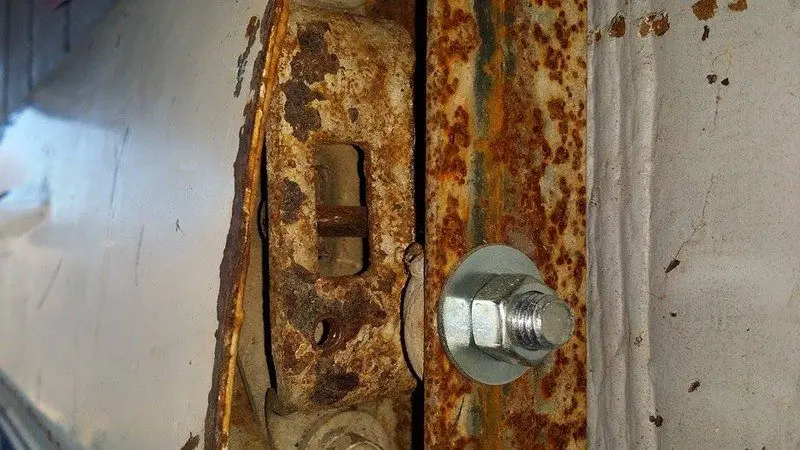
Slide the 1/8″ pipe through all three pieces like so.
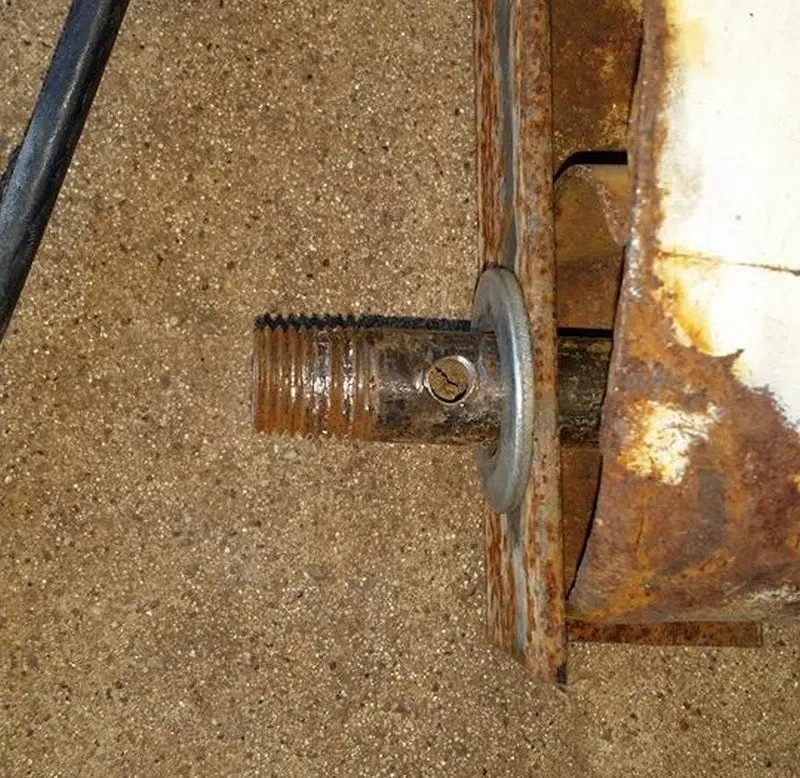
Place flat washer on one end of pipe and drill a hole through your pipe with a 1/8″ drill bit.

Install a cotter pin to lock the pipe in place. Do the exact same thing on the other side with angle tight against tailgate. Drill as close as possible to the washer for a tight fit.

I found a small table to be perfect height and used it to help with install. I leveled tailgate at the right height and positioned angle pieces on wall. I actually used a couple of wood screws to hold them in place while I assembled it.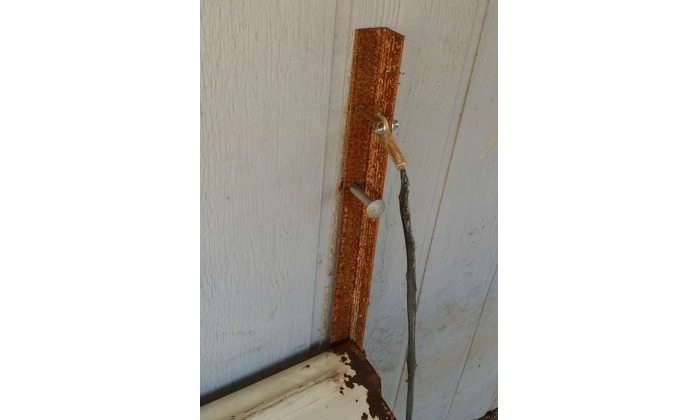
I then measured down 6 inches and drilled through the angle and all the way through the wall (after checking the wall for electrical of course!) Then i installed the 8″ stove bolts.
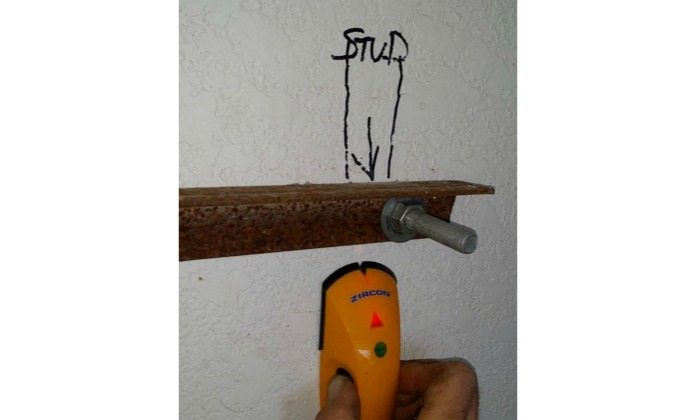
I then went to the other side of the wall and marked the long piece of angle iron according to the bolts I had just pushed through the wall. then I drilled it out and mounted it on the 2 bolts and tightened to the wall. here is where the studs were placed on each end of the brace which was ideal.
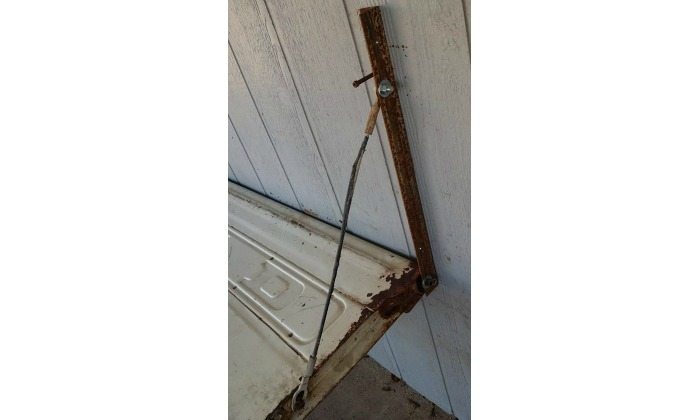
Back outside, I attached the cables from the angle iron to the tailgate on both ends.
I then removed the table. The tailgate hanging is complete.
I then closed the tailgate with the allen bolt in between the angle iron and the truck latch pin. I marked the spot on the angle then tapped 1/4-20 threads into the angle iron and installed the allen bolt there.
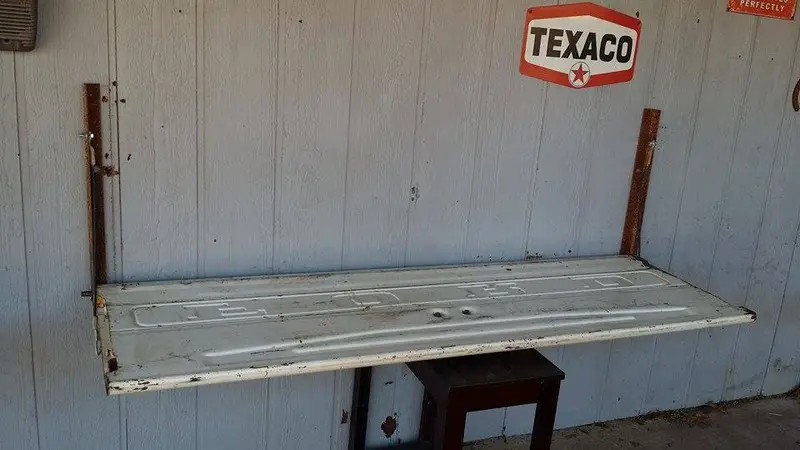
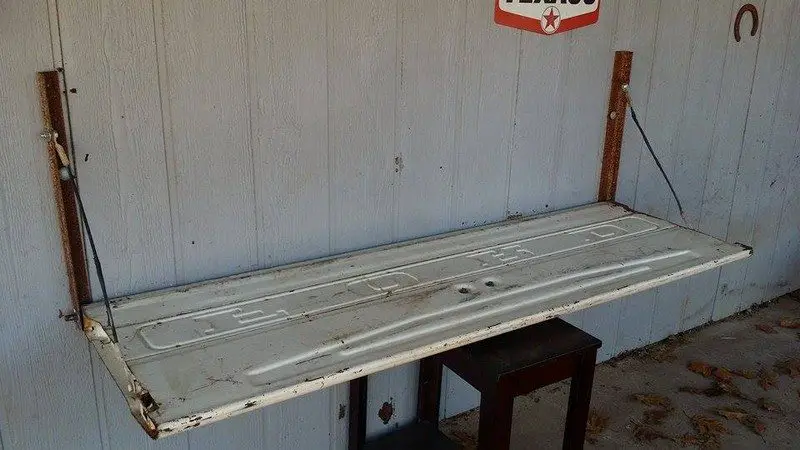
Finished Bench.

The tailgate now latches against the wall using the original tailgate handle.

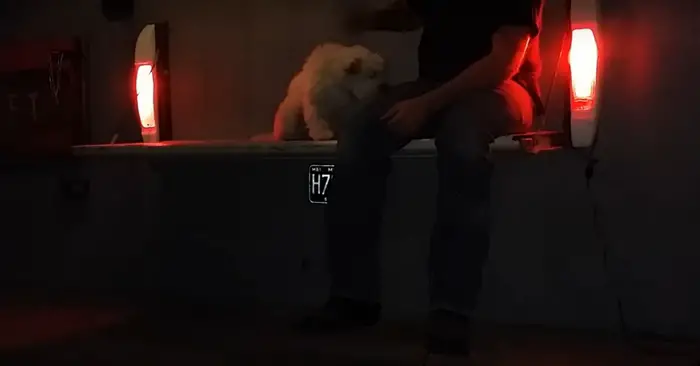
My family and I enjoy sitting out here now and firing up the old bbq grill (that old 51 Chevy truck clip is another project. It is a bbq grill) I hope you enjoy your tailgate bench just as much as we do ours. Now go find a tailgate before they’re all gone!
Here’s a quick video showing all the steps.
I’ve got lots of other projects over on my Youtube Channel DRMD421. Stop in and have a look sometime!
Choosing the Right Tailgate for Your Wall Bench
Choosing the right tailgate for your wall bench is crucial in creating a unique and stylish piece of furniture. This guide will help you find the perfect tailgate that matches your decor style and ensures durability and appeal.
Define Your Design Aesthetic
The first step in selecting the right tailgate for your wall bench is to clearly define your design aesthetic. Are you leaning towards a classic, vintage look that evokes nostalgia? Or is your space more contemporary, requiring a sleek and minimalist tailgate?
Perhaps a rustic theme is more your style, calling for a tailgate with a bit more character and patina. Identifying your decor style early on will streamline the selection process, making it easier to choose a tailgate that seamlessly blends with your surroundings.
Finding the Perfect Tailgate
Once you have a clear vision of your style, the next step is to source the tailgate. This process can be as straightforward or as adventurous as you make it. Start by exploring local salvage yards and auto parts stores; these are often treasure troves for vintage and modern tailgates alike.
Online marketplaces and social media groups dedicated to automotive restoration and DIY projects can also be invaluable resources. When searching, use the focus keyword “tailgate wall bench” to find posts and listings that may directly relate to your project, offering tailored advice or selling exactly what you need.
Consider Size and Compatibility
The dimensions of your tailgate are crucial to the success of your tailgate wall bench project. It’s important to consider not just the width and height of the tailgate but also how it will fit into the designated space. Measure the area where you plan to install the bench to ensure the tailgate you choose doesn’t overpower the space or look too diminutive. Compatibility with the existing decor and the physical space it will occupy can make or break the aesthetic appeal of your tailgate wall bench.
Assess Condition and Character
The condition of the tailgate you select for your wall bench plays a significant role in the project’s overall look and feel. A well-worn tailgate with a rich patina can add warmth and history to a space, making it perfect for rustic or vintage themes.
Conversely, a tailgate in better condition with minimal wear might be more suitable for a modern or sleek design scheme. Consider how the character of the tailgate will influence the vibe of your tailgate wall bench and choose accordingly.
Incorporate Into Your Space
Integrating the tailgate wall bench thoughtfully into your space will maximize its impact. Consider the surrounding elements, such as wall color, flooring, and furniture. The tailgate wall bench should be a focal point without clashing with the rest of your decor. Accessorizing the bench with cushions throws, or even ambient lighting can help tie it into the overall design theme of your space.
DIY Tools and Safety for Beginners
Creating a tailgate wall bench is a rewarding DIY project combining creativity and craftsmanship. Knowing the right tools to use and understanding safety precautions is crucial for beginners. This guide will walk you through the essentials for making your tailgate wall bench, ensuring you work efficiently and safely.
Essential Tools for Your Tailgate Wall Bench
Embarking on your tailgate wall bench project is an exciting journey into the DIY world, transforming an ordinary space into something extraordinary. Having the right tools at your disposal to ensure success is non-negotiable. This expanded guide outlines the essential tools needed for constructing your tailgate wall bench, emphasizing their importance at every process step.
Drill and Bits: The Foundation of Your Project
The drill is perhaps the most critical tool for your tailgate wall bench project. You’ll need a reliable drill with a variety of bits to create precise holes in both the tailgate and the wall. These holes are essential for mounting the tailgate securely and attaching any additional fixtures or supports. Ensure you have a range of bit sizes to match the various bolts and screws you’ll be working with.
Wrenches, Screwdrivers, and Socket Set: Securing the Details
Assembling and securing the components of your tailgate wall bench requires a comprehensive set of wrenches, screwdrivers, and a socket set. These tools allow you to tighten bolts and screws effectively, ensuring your bench is sturdy and safe to use. Each tool is pivotal in piecing together the tailgate wall bench, ensuring every part is tightly fastened and aligned properly.
Measuring Tape: Precision and Perfection
A measuring tape is indispensable for your tailgate wall bench project. Accurate measurements ensure the bench fits perfectly in your designated space and aligns with your vision. It’s crucial for determining the length and height of your bench and accurately spacing out mounts and supports. Remember, “Measure twice, cut once” is a golden rule in DIY projects to avoid any costly mistakes.
Saw: Shaping Your Project
Depending on your tailgate wall bench design, you may need to cut additional support materials or make modifications. A saw, whether a hand saw for smaller tasks or a power saw for larger cuts, becomes essential. It allows you to shape and size your materials precisely, ensuring they fit together seamlessly in the construction of your bench.
Level: Ensuring Balance and Stability
Lastly, a level is crucial to mount your tailgate wall bench horizontally. This tool guarantees that the bench looks good and is practical and comfortable to sit on. A perfectly level bench enhances your space’s overall aesthetic and functionality, providing a stable and reliable seating area.
Equipped with these essential tools, your journey to creating a tailor-made tailgate wall bench can begin. Each tool plays a specific role in bringing your vision to life, ensuring that the result is not just visually appealing but also durable and functional. Investing in quality tools pays off in the long run, making your tailgate wall bench project a satisfying and rewarding endeavor.
Safety Gear and Practices
When diving into the construction of your tailgate wall bench, prioritizing safety cannot be overstated. The right safety gear and practices protect you from immediate injuries and ensure your long-term health and safety throughout the project. Expanding on the essentials of safety gear and practices provides a comprehensive guide to keep you secure.
Comprehensive Protective Gear
- Safety Glasses: These are non-negotiable for shielding your eyes from hazardous materials like flying debris and dust. Opt for glasses that provide wrap-around protection to cover all angles.
- Gloves: Durable work gloves are crucial for protecting your hands from cuts, abrasions, and splinters. Look for gloves that offer a good grip and flexibility, so they don’t hinder your ability to handle tools and materials.
- Hearing Protection: Power tools can generate harmful noise levels. Using earplugs or earmuffs will help prevent potential hearing loss or damage. Choose protection that is comfortable for long periods of wear and provides adequate noise reduction.
- Respiratory Protection: When sanding or painting your tailgate wall bench, wearing a dust mask or respirator is vital to avoid inhaling harmful particles. Ensure it fits properly to provide effective protection.
- Protective Footwear: Sturdy shoes or boots can protect your feet from falling objects, sharp materials, and other hazards. Steel-toe boots offer the highest level of protection.
Adopting Safe Practices
- Workspace Ventilation: Always work in a well-ventilated area, especially when using products that emit fumes, such as paints or solvents. Good airflow helps dissipate harmful vapors and reduces the risk of respiratory issues.
- Clutter-Free Environment: Maintain a clean and organized workspace to minimize the risk of trips, falls, and accidental tool activations. Regularly clearing away debris and ensuring all tools have a designated storage space can significantly reduce accidents.
- Tool Maintenance: Keep all your tools in good working condition. Regularly inspect them for wear and tear, and repair or replace damaged tools. A well-maintained tool is less likely to malfunction and cause injury.
- Electrical Safety: Be cautious when working with electrical tools. Inspect cords for damage, use grounded outlets, and keep water away from electrical sources to prevent shocks.
- Manual Handling: Learn and practice safe lifting techniques. Bend at the knees and keep the load close to your body to avoid back strain. For heavier items, use a dolly or ask for assistance.
Educate Yourself
Before starting your tailgate wall bench project, take the time to educate yourself on the proper use of each tool and the specific safety gear required. Reading manuals, watching safety tutorials, and even attending a workshop can be incredibly beneficial. Knowledge is your best defense against accidents.
Implementing these safety gear and practices ensures that you can enjoy the process of creating your tailgate wall bench without putting yourself at risk. Remember, taking a few extra minutes to put on protective gear and organize your workspace can make a significant difference in your DIY experience, making it safer and more enjoyable.
Preparation and Workspace Organization
Preparing and organizing your workspace is a fundamental step in ensuring the success of your tailgate wall bench project. A well-organized space not only streamlines your workflow but also significantly minimizes the likelihood of accidents and injuries. Here’s how to effectively set up your workspace for optimum safety and efficiency.
Clearing the Workspace
Begin by removing any clutter or unnecessary items from your work area. This includes tools unrelated to your project, loose wires or cords, and any other objects that could cause tripping or obstruct your movement. Clear space allows you to move freely and safely, especially when handling large pieces or operating power tools.
Tool and Material Placement
Strategically place all tools and materials to be easily accessible but not in your immediate work area where they could pose a hazard. Use shelving units, toolboxes, or workbenches to organize your tools and keep them within reach. For materials, designate a specific area close enough for convenience but far enough to keep your workspace unobstructed. This careful placement prevents unnecessary stretching or bending, which could lead to strain or injury.
Safety Equipment Station
Create a station for your safety equipment, including gloves, goggles, ear protection, and masks. This station should be easily accessible from your main work area, encouraging you to use your safety gear consistently. A dedicated spot ensures you always know where your protective gear is, eliminating the excuse not to use it.
Lighting and Ventilation
Good lighting is crucial for safety and precision in any DIY project. Ensure your workspace is well-lit, with additional task lighting to illuminate specific work areas. Proper ventilation is also key, especially when working with paints, stains, or materials emitting fumes. Open windows, use fans, or work outdoors to maintain fresh airflow.
First Aid and Emergency Preparedness
Equip your workspace with a first aid kit tailored to common workshop injuries, such as cuts, scrapes, and splinters. Familiarize yourself with the contents and know how to use them. Additionally, ensure a fire extinguisher is within reach and that you know how to operate it, preparing for any potential emergencies.
Workspace Layout for Efficiency
Consider the flow of your project and arrange your workspace to follow a logical sequence. This might mean having a designated area for cutting, another for assembly, and a separate space for finishing touches like painting or staining. This logical layout reduces the time and effort spent moving between tasks and minimizes the risk of mishandling materials or tools.
You create a safer, more efficient environment by dedicating time to prepare and organize your workspace before beginning your tailgate wall bench project. This preparation enhances your overall enjoyment of the project and contributes to a higher-quality finished product.
Understanding Your Tools
Gaining a thorough understanding of your tools is a cornerstone for successfully completing your tailgate wall bench project while ensuring your safety. Here’s an expanded look at why and how you should familiarize yourself with the tools required for building a tailgate wall bench, emphasizing the importance of this step in the DIY process.
Read the Manuals Thoroughly
Each tool you plan to use for your tailgate wall bench, especially power tools, comes with a user manual. These manuals are not just guides to operating the tool but also contain crucial safety information and maintenance tips to keep your tools in optimal condition.
Before starting your tailgate wall bench project, dedicate time to read through these manuals. Understanding each tool’s specific functions and safety warnings will help prevent accidents and ensure that your project proceeds smoothly.
Seek Instructional Videos for Clarity
Sometimes, reading the manual may not be enough, especially for visual learners or if the manual is not clear. Look for instructional videos online that demonstrate how to use your tools effectively and safely for tailgate wall bench projects. These videos often provide practical insights and tips that manuals might not cover, offering a more comprehensive understanding of the tool’s capabilities and limitations.
Ask for Demonstrations from Experienced Individuals
If you have friends, family members, or acquaintances experienced in DIY projects, especially those involving tailgate wall benches, ask them for a demonstration on using certain tools. Hands-on learning from someone experienced can provide valuable tips unavailable in manuals or videos. This is also an excellent opportunity to ask questions and receive advice tailored to your tailgate wall bench project.
Practice with the Tools
Before diving into your tailgate wall bench project, practice using your tools on scrap materials. This hands-on experience will help you get comfortable with the tools’ feel, understand their power and response, and refine your technique without the pressure of working on the project. Practicing will also allow you to identify any issues with the tools you can correct before they impact your tailgate wall bench project.
Understand the Safety Features
Familiarizing yourself with the safety features of your tools is just as important as understanding how they operate. Know how to engage and disengage safety locks, what to do if a tool jams or malfunctions, and how to use protective guards correctly. This knowledge is crucial to prevent injuries and damage to your tools or tailgate wall bench project.
Maintain Your Tools
Part of understanding your tools is knowing how to maintain them. Proper maintenance ensures your tools are always in good working condition, which is essential for the accuracy and quality of your tailgate wall bench. Regular maintenance tasks include cleaning, sharpening, lubricating, and checking for wear and tear. Well-maintained tools are safer to use and can significantly contribute to the success of your tailgate wall bench project.
By thoroughly understanding your tools, you’re laying a foundation for the success of your tailgate wall bench project and ensuring a safer DIY experience. This preparation allows you to confidently approach your project, knowing you have the knowledge and skills to use your tools effectively and safely.
Conclusion
Building a tailgate wall bench is more than just a weekend DIY project. It’s an opportunity to transform a piece of automotive history into a functional and stylish piece of furniture. Through careful planning, understanding your tools, and adhering to safety protocols, you’re ensuring the successful completion of your project and enjoying the process along the way.
If you have any questions, just use the comment box and I’ll happily respond!
Do you want more ways of reusing old vehicle parts? Check out our recycled tire rim stove project!


